
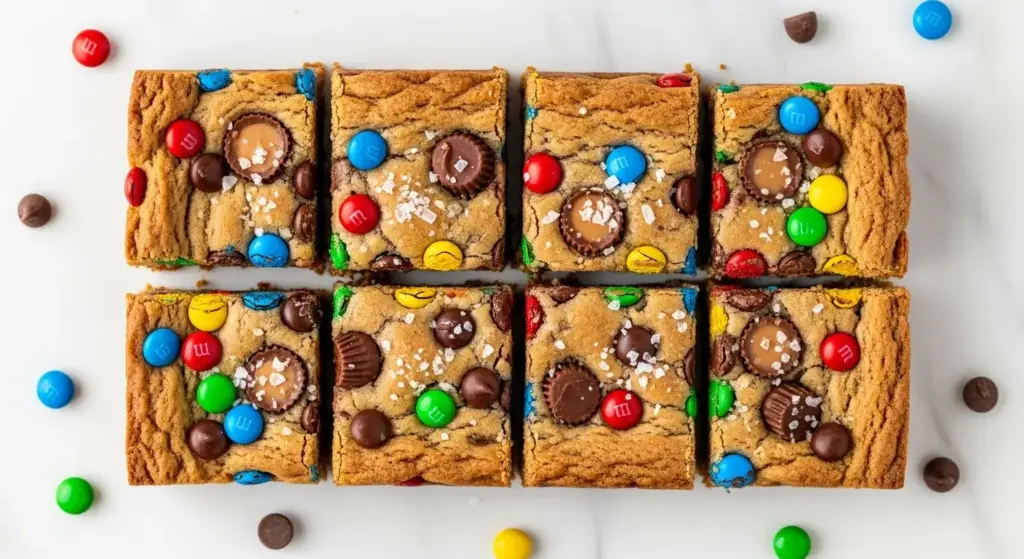
If you have ever craved a cookie that has it all, this monster cookie bars recipe is exactly what you have been looking for. These bars pack in creamy peanut butter, hearty rolled oats, melty chocolate chips, and colorful M&Ms all into one glorious pan, making them one of the most crowd-pleasing treats you can bake.
What makes them so special is the texture. The oats create an incredibly chewy, satisfying bite, while the peanut butter gives every bar that rich, nutty depth that is hard to resist.
They are also ridiculously easy to make. No rolling individual cookie balls, no chilling the dough, no fussing over perfectly shaped cookies. You mix everything in one bowl, press it into a pan, and bake.
Whether you are baking for a holiday gathering, a potluck, a school event, or simply a cozy weekend at home, monster cookie bars always disappear fast.
You might also love the classic Monster Cookie for when you want individual cookies!
Why You’ll Love This Monster Cookie Bars Recipe
This recipe has become a go-to for so many bakers, and it is easy to see why. These bars deliver everything you love about a classic monster cookie, but in a simpler, more shareable format.
They are thick, chewy, and generously loaded with mix-ins. Every single bite offers a little bit of peanut butter, a little bit of chocolate, and a pop of color from the M&Ms.
The ingredient list is short and made entirely of pantry staples. You likely already have most of what you need on hand right now.
These bars also bake in a single 9×13-inch pan, which means less cleanup and more time to enjoy your treat.
They hold up wonderfully for several days, making them ideal for making ahead and storing for the week.
- No individual cookie scooping required: Simply press the dough into a pan and bake, which saves significant time and effort.
- Incredibly versatile: You can swap the M&Ms for holiday-colored varieties, add butterscotch chips, or toss in chopped peanut butter cups.
- Naturally adaptable to dietary needs: Swap the all-purpose flour for a gluten-free blend and use certified gluten-free oats for an easy gluten-free version.
- Perfect for feeding a crowd: One pan yields 24 bars, plenty for a party or a bake sale table.
- Loved by kids and adults alike: The colorful M&Ms and familiar flavors make these a universal favorite.
Read Also: Monster Cookie Dough Dip Recipe
Ingredients
These monster cookie bars rely on a handful of everyday baking staples that work together to create the perfect chewy, rich, and colorful bar cookie. The key is using creamy processed peanut butter (like Jif or Skippy) rather than natural peanut butter, which tends to make the bars crumbly and dry. Rolled oats are essential here because they provide the signature chewy texture that quick oats just cannot replicate.
- 1 cup (226g) unsalted butter, softened to room temperature
- 1 cup (213g) packed light brown sugar
- ½ cup (100g) granulated sugar
- 2 large eggs, at room temperature
- 1 cup (250g) creamy peanut butter (such as Jif or Skippy, not natural)
- 1 tablespoon pure vanilla extract
- 1½ cups (180g) all-purpose flour
- 2 cups (198g) old-fashioned rolled oats
- 1 teaspoon baking soda
- ½ teaspoon fine sea salt
- 1 cup (170g) semi-sweet chocolate chips
- 1 cup (180g) M&M chocolate candies (plus extra for topping)
- Flaky sea salt for topping (optional but highly recommended)
Another fun variation for this same dough is Monster Cookie Ice Cream, which uses crushed monster cookie bars as a mix-in!
Kitchen Equipment Needed
Having the right tools makes this recipe even easier to put together. A hand or stand mixer is the most helpful piece of equipment since creaming the butter and sugars together by hand takes significantly more effort. Lining your pan with parchment paper (with a little overhang on the sides) makes lifting the bars out cleanly much easier, especially when you want neat, even cuts.
- 9×13-inch metal baking pan
- Parchment paper
- Stand mixer or hand mixer
- Large mixing bowl
- Medium mixing bowl
- Rubber spatula or wooden spoon
- Measuring cups and spoons
- Kitchen scale (optional but recommended for precision)
- Wire cooling rack
- Sharp knife or bench scraper for cutting bars
Read Also: No Bake Cookie Recipe
Recommended Products for This Recipe
These are products chosen based on quality and performance that can genuinely make a difference when baking monster cookie bars.
1. USA Pan 9×13 Inch Baking Pan
A high-quality metal baking pan ensures even heat distribution from edge to edge, which means your bars bake uniformly without overdone corners and a raw center. USA Pan’s corrugated design promotes airflow and prevents sticking. It is a reliable, long-lasting baking staple you will reach for constantly.
2. KitchenAid Hand Mixer
Creaming softened butter with sugars properly is the key to getting the right texture in these bars, and a good hand mixer does it in under two minutes. KitchenAid’s handheld models offer multiple speed settings that give you full control over mixing without over-working the batter. Easy to clean and store, it is perfect for any home baker.
3. Maldon Sea Salt Flakes
Sprinkling a pinch of flaky sea salt over the top of your monster cookie bars before baking takes the flavor to a completely different level. Maldon’s light, pyramid-shaped flakes dissolve just enough during baking to enhance the chocolate and peanut butter without tasting salty. This one small step elevates the entire batch.
4. OXO Good Grips Bench Scraper
Getting clean, straight cuts through a 9×13 pan of bars can be tricky with a regular knife. A bench scraper lets you press straight down through the bars in one smooth motion, giving you neat edges and perfectly even squares. It is also great for portioning dough and cleaning your work surface.
5. Reynolds Parchment Paper Sheets
Pre-cut parchment sheets fit perfectly into a 9×13 pan and make lifting your cooled bars out for slicing effortless. Using parchment means no stuck-on edges and no scraping the pan. Reynolds’ non-stick sheets are reliable and consistent, making them a staple in any baking kitchen.
For something similar with a satisfying crunch, check out this Peanut Butter Cookie Recipe!
Step-by-Step Instructions
Step 1: Preheat the Oven and Prepare the Pan
- Preheat your oven to 350°F (175°C) and allow it to fully preheat before placing the bars inside. An oven that has not reached the right temperature will affect how evenly your bars bake.
- Cut a sheet of parchment paper large enough to line the bottom of your 9×13-inch baking pan with at least a 2-inch overhang on both short sides.
- Press the parchment paper firmly into the pan, creasing it into the corners so it lays flat.
- Lightly spray the parchment and the exposed sides of the pan with non-stick cooking spray to prevent any sticking.
- Set the prepared pan aside while you make the dough.
Step 2: Cream the Butter and Sugars
- Place your softened butter in the bowl of your stand mixer fitted with the paddle attachment, or in a large mixing bowl if using a hand mixer.
- Add the packed light brown sugar and granulated sugar to the butter.
- Beat on medium speed for 2 to 3 minutes until the mixture is light, pale, and fluffy. Do not rush this step. Proper creaming incorporates air into the dough and gives the bars a better texture.
- Scrape down the sides of the bowl with a rubber spatula partway through to ensure all the butter and sugar is incorporated evenly.
Step 3: Add the Wet Ingredients
- Add both eggs to the creamed butter mixture, one at a time, beating well after each addition. Adding them one at a time helps the eggs emulsify into the batter rather than making it greasy.
- Add the creamy peanut butter to the bowl.
- Pour in the vanilla extract.
- Beat on medium speed for another 1 to 2 minutes until everything is smooth, creamy, and fully combined.
- Scrape down the sides of the bowl again to make sure everything is evenly mixed.
Step 4: Mix the Dry Ingredients
- In a separate medium mixing bowl, whisk together the all-purpose flour, baking soda, and fine sea salt until combined.
- Whisking the dry ingredients together first ensures the baking soda is evenly distributed throughout the flour, which helps the bars rise and bake evenly.
- With the mixer on low speed, gradually add the dry ingredient mixture to the wet ingredients, mixing just until no dry streaks of flour remain.
- Avoid overmixing at this stage, as overworking the flour can make the bars tough rather than tender.
Step 5: Add the Oats and Mix-Ins
- Add the rolled oats to the dough and mix on low speed or fold in with a rubber spatula until the oats are fully incorporated.
- Add the semi-sweet chocolate chips and most of the M&Ms, reserving a small handful of M&Ms to press onto the top of the bars.
- Fold the chocolate chips and M&Ms into the dough gently using your spatula. You want them evenly distributed throughout the dough without smashing the M&Ms.
Step 6: Press the Dough into the Pan
- Transfer the dough to your prepared 9×13-inch baking pan.
- Using your hands, a rubber spatula, or the back of a large spoon, press the dough out evenly across the entire pan. Make sure the dough reaches all four corners and the layer is as uniform in thickness as possible.
- If the dough sticks to your hands or spatula, lightly dampen your hands with water or spray the spatula with a little cooking spray.
- Once the dough is evenly spread, scatter the reserved M&Ms over the top and gently press them into the surface of the dough so they stick and stay visible after baking.
- Sprinkle the top lightly with flaky sea salt, if using.
Step 7: Bake the Bars
- Place the pan on the center rack of your preheated oven.
- Bake for 22 to 25 minutes, or until the edges are set and lightly golden brown.
- The center of the bars may look slightly underdone and soft when you pull them from the oven. This is completely normal and intentional. The bars will continue to set and firm up as they cool.
- Do not overbake. Overbaked monster cookie bars lose their chewiness and become dry and crumbly.
- If you are unsure, err on the side of underbaking rather than overbaking. The bars will be perfectly chewy once cooled.
Step 8: Cool and Slice
- Remove the pan from the oven and place it on a wire cooling rack.
- Allow the bars to cool in the pan for at least 30 minutes before attempting to lift them out or slice them.
- For the cleanest cuts, allow the bars to cool completely to room temperature, which takes about 1 hour.
- Once cooled, use the parchment paper overhang to lift the entire slab out of the pan and onto a flat cutting surface.
- Use a sharp knife or bench scraper to cut the bars into 24 even squares by making 4 cuts down the length and 6 cuts across the width of the slab.
- Serve immediately or store as directed below.
If you love bar-style desserts, the Pumpkin Bar Recipe is another fantastic option worth trying!
Tips for Success
Getting monster cookie bars right every time comes down to a few key technique details that make a real difference in the final result. Paying attention to ingredient temperature and how you measure your flour will have the biggest impact.
- Use room temperature butter: Cold butter does not cream properly and results in a dense, greasy dough. Take your butter out of the fridge 30 to 60 minutes before baking.
- Spoon and level your flour: Scooping flour directly from the bag packs in too much and leads to dry, crumbly bars. Spoon flour into your measuring cup and level it off with a straight edge for accuracy.
- Stick to processed peanut butter: Natural peanut butter (just peanuts and salt) lacks the stabilizers and oils that processed peanut butter contains, which are what give the bars their soft, cohesive texture.
- Do not overmix after adding flour: Once the flour goes in, mix only until just combined. Overworking gluten in the flour makes baked goods tough.
- Do not overbake: Pull the bars from the oven when the edges look golden but the center still looks slightly soft. They will firm up perfectly as they cool.
- Let them cool completely before cutting: Cutting too early leads to crumbled edges and bars that fall apart. Patience pays off here.
- Press extra M&Ms on top before baking: This makes the bars look more colorful and bakery-worthy, so do not skip it.
The same care and patience that makes these bars great also applies to a classic Oatmeal Cookie Recipe!
Serving Suggestions
Monster cookie bars are delicious completely on their own, but pairing them with a few simple accompaniments can turn them into a real dessert moment. Serve them slightly warm (15 to 20 seconds in the microwave) so the chocolate chips get melty and gooey.
They make a fantastic addition to a cookie platter, a holiday dessert spread, or a bake sale table. Their size and easy portioning make them a natural fit for any gathering.
- With a scoop of vanilla ice cream: Press a bar into the bottom of a bowl, add a generous scoop of vanilla ice cream on top, and finish with a drizzle of hot fudge or caramel sauce.
- Alongside a cold glass of milk: The classic pairing that never gets old.
- On a dessert platter: Stack them alongside brownies, blondies, and other bar cookies for a mixed bar cookie board that is visually stunning and crowd-pleasing.
- As a lunchbox treat: Cut them into smaller squares for a kid-friendly snack that packs easily.
- With coffee or hot chocolate: The richness of the peanut butter and chocolate is perfectly balanced by a cup of something warm to drink.
- Crumbled over a Banana Pudding: Monster cookie bar crumbles add a chewy, peanut buttery crunch to a creamy banana pudding for an extra-special dessert mashup.
Variations to Try
The base recipe is wonderful as written, but monster cookie bars are also an incredibly flexible canvas for creativity. The dough holds up well to various mix-ins and substitutions, so you can customize the bars for holidays, dietary needs, or personal taste preferences.
- Holiday M&M variations: Swap the classic M&Ms for holiday-colored versions, like red and green for Christmas, pastels for Easter, or orange and black for Halloween. The colors make the bars feel festive and special.
- Extra chip mix-ins: Add ½ cup of butterscotch chips, peanut butter chips, or white chocolate chips alongside or instead of some of the chocolate chips for a different flavor dimension.
- Chopped Reese’s Peanut Butter Cups: Fold in roughly chopped mini Reese’s cups along with or in place of the M&Ms for an even more intense peanut butter-chocolate flavor.
- Gluten-free version: Replace the all-purpose flour with a 1:1 gluten-free baking blend and use certified gluten-free rolled oats for a version that is completely gluten-free.
- Dairy-free version: Use a plant-based butter stick (not a spread) and dairy-free chocolate chips and M&M alternatives for a dairy-free batch.
- Brown butter variation: Brown the butter before creaming it with the sugars for a deeper, more complex nutty flavor in every bite.
- Crunchy peanut butter: Swap creamy peanut butter for crunchy peanut butter to add extra texture and crunch throughout the bars.
You might also enjoy Monster Cookie Protein Balls for a snackable, no-bake version of the same beloved flavors!
Storage and Reheating
These bars store really well, which makes them perfect for making ahead. The key is keeping them in an airtight container so they do not dry out or absorb any odors from the surrounding environment.
- Room temperature: Store in an airtight container at room temperature for up to 4 days. Place a sheet of parchment or wax paper between layers if you are stacking them to prevent sticking.
- Refrigerator: Store in an airtight container in the refrigerator for up to 7 days. The bars may firm up a bit when cold, so allow them to come to room temperature for 15 to 20 minutes before serving.
- Freezer: Place cooled bars in a single layer on a baking sheet and freeze until solid (about 1 hour), then transfer to a zip-top freezer bag or airtight container with parchment between layers. Freeze for up to 3 months.
- Thawing: Thaw frozen bars at room temperature for 30 to 60 minutes. They will taste just as fresh as the day you made them.
- Reheating: Microwave a single bar for 10 to 15 seconds for a warm, gooey treat with melty chocolate chips.
Read Also: Chewy Oatmeal Chocolate Chip Cookie Recipe
Nutritional Facts
Per serving (1 bar, based on 24 bars per pan). Values are approximate and will vary based on specific brands and ingredient substitutions used.
| Nutrient | Amount Per Serving |
|---|---|
| Calories | 285 kcal |
| Total Fat | 14g |
| Saturated Fat | 6g |
| Cholesterol | 35mg |
| Sodium | 160mg |
| Total Carbohydrates | 37g |
| Dietary Fiber | 2g |
| Total Sugars | 24g |
| Protein | 5g |
| Calcium | 30mg |
| Iron | 1.5mg |
For a lighter treat with a similar flavor profile, the Oatmeal Raisin Cookie Recipe is a great option to have in your repertoire!
Health Benefits of Key Ingredients
While monster cookie bars are certainly a treat, a few of the key ingredients do bring some genuine nutritional value to the table. It is a nice reminder that indulging mindfully can still be part of a balanced approach to eating.
Rolled oats, peanut butter, and eggs each contribute meaningful nutrients that make these bars more than just empty calories.
- Rolled oats: Oats are a rich source of beta-glucan, a type of soluble fiber that supports heart health and helps keep you feeling full longer. They also provide manganese, phosphorus, and B vitamins.
- Peanut butter: Peanut butter is packed with heart-healthy monounsaturated fats, protein, magnesium, and vitamin E. The protein and healthy fats in peanut butter help make these bars more satisfying compared to typical sugary snacks.
- Eggs: Eggs provide high-quality complete protein, choline (important for brain health), and vitamins D and B12. They also contribute to the structure and richness of the bars.
- Dark or semi-sweet chocolate chips: Semi-sweet chocolate contains flavonoids, which are antioxidants associated with cardiovascular benefits. Opting for a higher-quality chocolate chip with a higher cocoa percentage amplifies these benefits.
- Sea salt: A small amount of salt enhances all the other flavors in the recipe, particularly the sweetness and the nuttiness of the peanut butter, without contributing a significant amount of sodium per bar.
Read Also: Peanut Butter Blossom Cookies Recipe
Frequently Asked Questions
1. Can I make monster cookie bars without flour?
Yes, absolutely! Several popular versions of monster cookie bars are made without any flour at all. In flourless versions, the structure comes entirely from the eggs, peanut butter, and oats. The texture will be slightly denser and chewier. If you want a naturally gluten-free bar, a flourless version using certified gluten-free oats is a great option.
2. Why are my monster cookie bars crumbly?
The most common reason for crumbly bars is using natural peanut butter instead of processed peanut butter. Natural peanut butter lacks the stabilizers and emulsified oils that processed brands like Jif or Skippy contain, which are key to binding the dough together. Measuring too much flour by packing the cup instead of spooning and leveling can also cause dryness and crumbling.
3. Can I make monster cookie bars ahead of time?
Yes, these bars are excellent for making ahead. They stay fresh at room temperature for up to 4 days in an airtight container, or up to 7 days in the refrigerator. You can also freeze the baked bars for up to 3 months and thaw them at room temperature whenever you need them. They taste just as good after freezing as they do fresh.
4. Can I double the recipe to make a larger batch?
Doubling the recipe works well. Spread the doubled dough into a large rimmed half-sheet pan (approximately 12×17 inches or 18×13 inches) lined with parchment paper. Start checking the bars around 20 minutes since the thinner dough layer may bake faster than the standard recipe. Look for golden edges and a center that looks just set.
5. What can I use instead of M&Ms?
Reese’s Pieces are the most popular M&M substitute and add a more intense peanut butter candy flavor. You can also use chopped mini Reese’s Peanut Butter Cups, candy-coated sunflower seeds for a nut-free option, or chocolate-covered raisins for a different texture. During the holidays, any seasonal candy-coated chocolate works perfectly and gives the bars a festive look.
This Cookie Skillet Recipe is another fun, shareable cookie dessert that the whole family will love!
Final Thoughts
Monster cookie bars are one of those recipes that never gets old. Every time you pull a warm pan out of the oven and the whole house smells like peanut butter and chocolate, you will be reminded of why this recipe earns a permanent spot in your baking rotation.
They are simple, satisfying, and completely customizable. Once you have made them once, you will find yourself coming back to this recipe again and again.
Go ahead and give this monster cookie bars recipe a try. You really cannot go wrong with a pan full of chewy, peanut buttery, chocolate-loaded goodness.
If you make them, drop a comment below and let me know how they turned out! Did you add any fun mix-ins or try a seasonal M&M variation? Share your creation with the community!
Recommended:
- Monster Cookie Recipe
- Peanut Butter Cookie Recipe
- Oatmeal Cookie Recipe
- No Bake Cookie Recipe
- Oatmeal Raisin Cookie Recipe
- Best Chocolate Chip Cookies Recipe
- German Chocolate Cake Bars Recipe
- Snickerdoodle Cookie Recipe
- Gingerbread Cookie Recipe
- Muddy Buddy Recipe


