Making from scratch ravioli recipe at home transforms a simple meal into something truly special. Fresh pasta dough wrapped around a creamy ricotta filling delivers tender, pillowy pockets that melt in your mouth.
The process might seem intimidating at first, but once you understand the basic steps, it becomes surprisingly manageable. You’ll need just a handful of simple ingredients for both the dough and filling.
The key to success lies in rolling the pasta thin enough to be delicate yet sturdy enough to hold the filling. A pasta machine makes this easier, though a rolling pin works too with a bit of patience.
Fresh ravioli tastes infinitely better than anything you can buy at the store. The texture is silkier, the flavors are brighter, and the satisfaction of creating them yourself is unmatched.
This recipe breaks down every step so even beginners can achieve beautiful results. From mixing the dough to sealing each ravioli, you’ll have clear guidance throughout the entire process.
Why You’ll Love This From Scratch Ravioli Recipe
This from scratch ravioli recipe gives you complete control over both texture and flavor. You can adjust the filling to your preferences and ensure every ingredient is exactly what you want.
The pasta dough comes together quickly with just flour and eggs. It requires minimal kneading compared to bread dough and rests while you prepare the filling.
Here are the top reasons this recipe stands out:
- Authentic texture: Fresh pasta has a silky, tender quality that dried pasta can never match
- Customizable filling: The ricotta base accepts endless variations from herbs to vegetables
- Impressive presentation: Homemade ravioli looks restaurant-quality on any plate
- Make-ahead friendly: You can freeze uncooked ravioli for quick meals later
- Family activity: Rolling and filling ravioli makes a fun cooking project for all ages
- Cost-effective: Homemade ravioli costs less than buying fresh pasta at specialty stores
This pairs beautifully with homemade alfredo sauce for a complete Italian feast.
Ingredients
This recipe uses simple, high-quality ingredients that come together to create exceptional fresh pasta. The 00 flour gives the dough its characteristic silky texture.
For the Pasta Dough:
- 2 cups (250g) 00 flour, plus extra for dusting
- 3 large eggs
- 1 teaspoon olive oil
- Pinch of salt
For the Ricotta Filling:
- 15 oz (425g) whole milk ricotta cheese, drained
- 1/2 cup (50g) freshly grated Parmesan cheese
- 1 large egg yolk
- 1/4 teaspoon nutmeg
- 1/2 teaspoon salt
- 1/4 teaspoon black pepper
- 2 tablespoons fresh basil, finely chopped (optional)
For Assembly:
- 1 egg, beaten (for egg wash)
- Semolina flour for dusting
Kitchen Equipment Needed
Having the right tools makes the ravioli-making process much smoother and more enjoyable. While you can manage with basic equipment, certain items significantly improve your results.
Essential Tools:
- Pasta machine or rolling pin
- Ravioli cutter or sharp knife
- Large mixing bowls
- Fork for sealing edges
- Clean work surface or large cutting board
- Pastry brush for egg wash
- Baking sheets for holding finished ravioli
- Fine-mesh strainer for draining ricotta
- Large pot for boiling
Recommended Products for This Recipe
These carefully selected products will help you achieve professional-quality ravioli at home.
1. Caputo 00 Flour
This finely milled Italian flour creates the silkiest pasta dough with perfect elasticity. The 00 designation indicates an extra-fine grind that absorbs liquid evenly and rolls out smoothly without tearing. Professional pasta makers across Italy rely on this flour for authentic results.
2. Marcato Atlas Pasta Machine
This hand-crank machine rolls pasta sheets to consistent thickness every time. The adjustable settings let you control exactly how thin you want your dough, and the sturdy construction means it will last for years. It’s significantly easier than rolling by hand and produces more uniform results.
3. Ravioli Stamp and Cutter Set
This tool cuts and seals ravioli in one motion, saving time and ensuring tight edges. The crimped pattern creates a professional appearance while pressing out air pockets that could cause ravioli to burst during cooking. It’s much faster than cutting and crimping individually.
4. Whole Milk Ricotta
High-quality ricotta makes all the difference in the filling’s creaminess and flavor. Look for brands with minimal ingredients and a thick, creamy texture rather than watery consistency. Fresh ricotta from specialty stores works even better if available.
Read Also: Lasagna Recipe With Ricotta
Step-by-Step Instructions
1. Make the Pasta Dough
Creating silky pasta dough requires gentle handling and patience during the kneading process.
- Mound the 00 flour on a clean work surface and create a wide well in the center
- Crack the eggs into the well and add the olive oil and salt
- Use a fork to beat the eggs gently, gradually incorporating flour from the inner walls
- Continue mixing until the dough becomes too thick to work with a fork
- Begin kneading with your hands, incorporating the remaining flour
- Knead for 8-10 minutes until the dough feels smooth and elastic
- The dough should be slightly tacky but not sticky; add flour sparingly if needed
- Form the dough into a ball and wrap tightly in plastic wrap
- Let rest at room temperature for 30 minutes to allow gluten to relax
2. Prepare the Ricotta Filling
Draining the ricotta properly prevents watery filling that can make ravioli soggy.
- Line a fine-mesh strainer with cheesecloth or paper towels
- Place the ricotta in the strainer over a bowl
- Refrigerate for at least 2 hours or overnight to drain excess liquid
- Transfer drained ricotta to a mixing bowl
- Add the Parmesan cheese, egg yolk, nutmeg, salt, and pepper
- Mix thoroughly until all ingredients are evenly combined
- Fold in fresh basil if using
- Taste and adjust seasonings as needed
- Cover and refrigerate until ready to use
3. Roll Out the Pasta Dough
Thin, even sheets are crucial for tender ravioli that cook properly.
- Cut the rested dough into 4 equal pieces
- Keep unused portions wrapped to prevent drying
- Flatten one piece slightly with your hand
- If using a pasta machine, start at the widest setting
- Pass the dough through the machine, folding it in thirds after the first pass
- Continue rolling, gradually decreasing the thickness setting
- Roll until you reach setting 6 or 7 (you should see your hand through the dough)
- If rolling by hand, dust the surface and rolling pin with flour
- Roll from the center outward, rotating the dough frequently
- Aim for 1/16 inch (1.5mm) thickness
- Lay finished sheets on a floured surface and cover with a damp towel
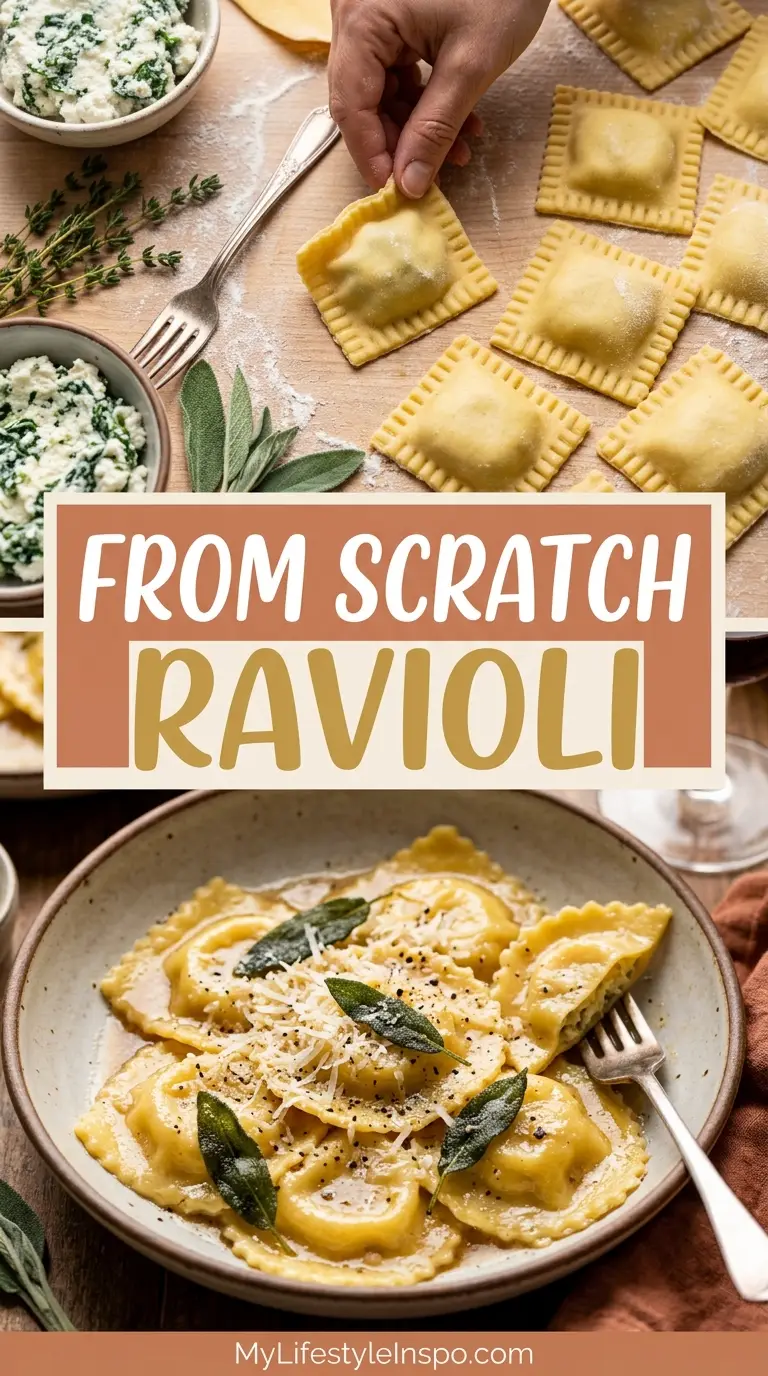
4. Cut and Fill the Ravioli
Proper spacing and sealing prevent filling from leaking during cooking.
- Lay one pasta sheet on a lightly floured surface
- Place small mounds (about 1 teaspoon) of filling 2 inches apart
- Leave a 1-inch border around the edges
- Brush beaten egg wash between the mounds and around the edges
- Carefully drape a second pasta sheet over the filled sheet
- Press gently around each mound to remove air pockets
- Start from the filling and push air toward the edges
- Use your fingers to seal the pasta sheets together firmly
- Ensure there are no air bubbles trapped inside
5. Seal and Cut the Ravioli
Clean cuts and tight seals ensure ravioli hold together during boiling.
- Use a ravioli cutter or sharp knife to cut between the mounds
- Create square or circular shapes depending on your preference
- Press the tines of a fork around all edges to reinforce the seal
- Make sure the edges are completely sealed with no gaps
- Place finished ravioli on a semolina-dusted baking sheet
- Keep them separated so they don’t stick together
- Cover with a clean kitchen towel to prevent drying
- Repeat with remaining dough and filling
6. Cook the Ravioli
Gentle boiling prevents delicate pasta from breaking apart.
- Bring a large pot of salted water to a rolling boil
- Use about 4 quarts of water with 2 tablespoons of salt
- Gently lower ravioli into the water a few at a time
- Don’t overcrowd the pot; cook in batches if necessary
- The ravioli will sink initially, then float when nearly done
- Cook for 3-4 minutes after they float to the surface
- Test one ravioli to ensure the pasta is tender
- Use a slotted spoon or spider strainer to remove them carefully
- Place directly into your prepared sauce or onto plates
- Drizzle with olive oil if not serving immediately
You might also enjoy: Baked Ziti
Tips for Success
These proven techniques will help you avoid common pitfalls and achieve perfect ravioli every time.
Key Success Factors:
- Drain ricotta thoroughly: Excess moisture makes filling leak and pasta soggy
- Roll pasta thin: Thick dough becomes chewy and overwhelms the filling
- Remove all air: Trapped air causes ravioli to burst while cooking
- Seal edges completely: Press firmly and check for gaps before cutting
- Use egg wash generously: This acts as glue to bind the pasta layers
- Don’t overfill: Too much filling makes sealing difficult and causes bursting
- Work quickly: Pasta dries out rapidly; keep unused portions covered
- Flour generously: Prevents sticking but brush off excess before cooking
- Boil gently: Vigorous boiling can break delicate ravioli apart
- Taste test filling: Adjust seasonings before assembling all the ravioli
Another favorite: Classic Lasagna
Serving Suggestions

Fresh ravioli pairs wonderfully with both simple and elaborate sauces that complement the delicate pasta.
Serving Ideas:
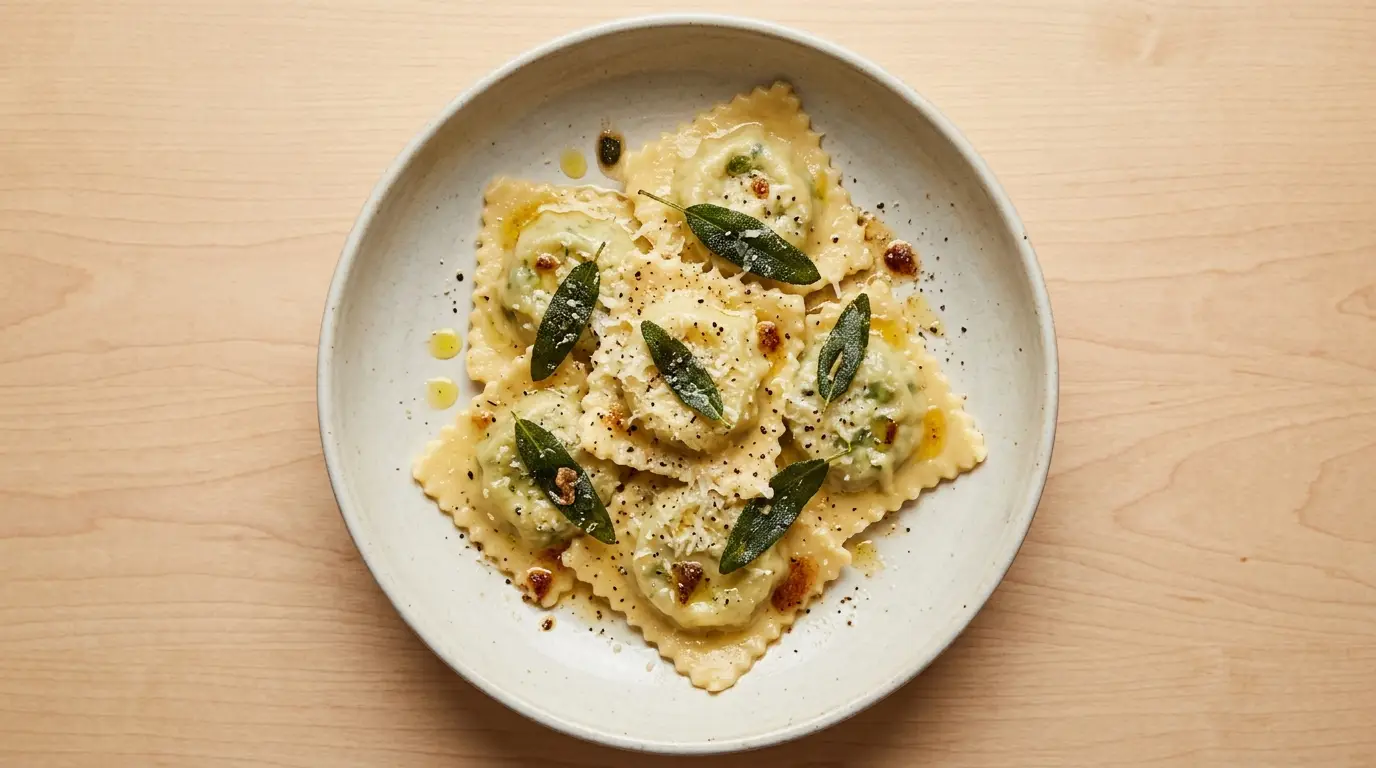
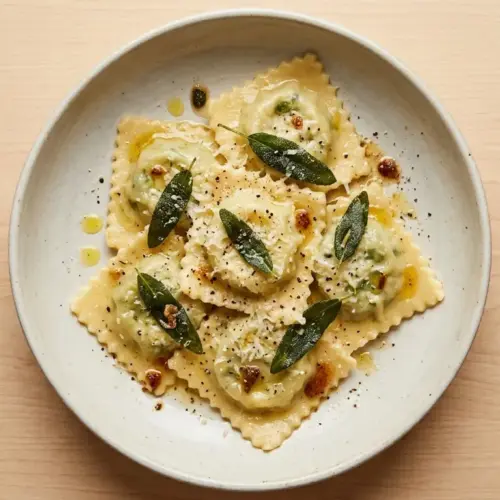
- Toss with brown butter, crispy sage leaves, and Parmesan
- Serve in a light tomato sauce with fresh basil
- Drizzle with olive garden alfredo sauce and cracked black pepper
- Float in homemade chicken broth with vegetables
- Top with pesto and toasted pine nuts
- Garnish with lemon zest and ricotta salata
- Serve alongside classic bruschetta as an appetizer
- Pair with a simple arugula salad dressed in lemon vinaigrette
For a lighter option, try: Healthy Chicken Salad
Variations to Try
Experimenting with different fillings and flavors keeps this recipe exciting and adaptable.
Delicious Variations:
- Spinach and ricotta: Add 1 cup cooked, squeezed-dry spinach to the filling
- Butternut squash: Replace ricotta with roasted, mashed squash and amaretti crumbs
- Mushroom: Sauté finely chopped mushrooms with garlic and mix with ricotta
- Meat filling: Combine ground beef, pork, Parmesan, and breadcrumbs
- Lobster: Mix chopped lobster meat with ricotta and fresh herbs
- Four cheese: Blend ricotta, mozzarella, fontina, and Gorgonzola
- Pumpkin sage: Use pumpkin puree with brown butter and sage
- Pea and mint: Mash fresh peas with ricotta and chopped mint
Read Also: San Giorgio Lasagna
Storage and Reheating
Proper storage techniques preserve the quality and texture of your homemade ravioli.
Storage Guidelines:
- Refrigerator: Place uncooked ravioli on a floured baking sheet, cover with plastic wrap, and refrigerate for up to 2 days
- Freezer: Freeze ravioli on a baking sheet until solid (about 2 hours), then transfer to freezer bags for up to 3 months
- Cooked ravioli: Store in an airtight container with a drizzle of olive oil for up to 3 days
- Reheating: Drop frozen ravioli directly into boiling water (add 1-2 minutes to cooking time)
- Avoid microwave: This makes pasta rubbery and unevenly heated
- Sauce separately: Store cooked ravioli and sauce separately to prevent sogginess
This technique works wonderfully in lasagna soup as well.
Nutritional Facts
Per serving (approximately 8 ravioli):
- Calories: 385
- Total Fat: 14g
- Saturated Fat: 7g
- Cholesterol: 165mg
- Sodium: 520mg
- Total Carbohydrates: 45g
- Dietary Fiber: 2g
- Sugars: 2g
- Protein: 18g
- Calcium: 280mg
- Iron: 3mg
Note: Nutritional values vary based on filling ingredients and serving size.
For a lighter option, try: Air Fryer Chicken Parmesan
Health Benefits of Key Ingredients
The ingredients in homemade ravioli provide several nutritional advantages beyond just great taste.
Nutritional Highlights:
- Eggs: Provide high-quality protein and essential amino acids for muscle maintenance
- Ricotta cheese: Delivers calcium for bone health and contains beneficial probiotics
- Parmesan: Offers concentrated protein and calcium in small amounts
- 00 flour: Easier to digest than some whole wheat flours due to fine milling
- Olive oil: Contains heart-healthy monounsaturated fats and antioxidants
- Fresh herbs: Add vitamins, minerals, and anti-inflammatory compounds without calories
- Nutmeg: May aid digestion and contains antibacterial properties
Read Also: Creamy Mac and Cheese
Frequently Asked Questions
1. Can I make ravioli without a pasta machine?
Yes, you can absolutely make ravioli using just a rolling pin. Roll the dough as thin as possible on a well-floured surface, turning and flipping frequently to maintain even thickness. It takes more effort and time than using a machine, but the results can be just as delicious.
2. Why do my ravioli burst when cooking?
Ravioli typically burst due to trapped air pockets or improperly sealed edges. Press firmly around each filling mound to remove all air, and make sure edges are tightly sealed with egg wash. Boiling too vigorously can also cause delicate pasta to break apart.
3. Can I use all-purpose flour instead of 00 flour?
All-purpose flour works as a substitute, though the texture will be slightly different. 00 flour creates silkier, more tender pasta due to its fine grind. If using all-purpose flour, you might need slightly less liquid since it absorbs differently.
4. How do I know when fresh ravioli is done cooking?
Fresh ravioli floats to the surface when it’s nearly done, then needs 2-3 additional minutes of cooking. The pasta should be tender but still have a slight bite. Test one ravioli by cutting it open to check that the filling is hot throughout.
5. Can I make the dough and filling ahead of time?
Yes, you can prepare both components in advance. The dough keeps refrigerated for up to 2 days when tightly wrapped. The filling stays fresh for 3 days in an airtight container. Bring dough to room temperature before rolling for easier handling.
You might also enjoy: Baked Mac and Cheese
From Scratch Ravioli
Equipment
- Pasta machine or rolling pin - A pasta machine makes rolling easier, but a rolling pin works with patience
- Ravioli cutter or sharp knife - For cutting individual ravioli
- Large mixing bowls
- Fork - For sealing edges
- Clean work surface or large cutting board
- Pastry brush - For applying egg wash
- Baking sheets - For holding finished ravioli
- Fine-mesh strainer - For draining ricotta
- Large pot - For boiling ravioli
- Ravioli stamp and cutter set - Optional but saves time and ensures tight edges
- Cheesecloth or paper towels - For draining ricotta
- Plastic wrap - For resting dough
- Slotted spoon or spider strainer - For removing cooked ravioli
Ingredients
- 2 cups 00 flour - 250g, plus extra for dusting
- 3 large eggs
- 1 teaspoon olive oil
- 1 pinch salt
For the Ricotta Filling
- 15 oz whole milk ricotta cheese - 425g, drained
- 0.5 cup freshly grated Parmesan cheese - 50g
- 1 large egg yolk
- 0.25 teaspoon nutmeg
- 0.5 teaspoon salt
- 0.25 teaspoon black pepper
- 2 tablespoons fresh basil - finely chopped, optional
For Assembly
- 1 egg - beaten (for egg wash)
- semolina flour - for dusting
Instructions
- Mound the flour on a clean surface and create a wide well in the center. Crack eggs into the well and add olive oil and salt. Beat eggs gently with a fork, gradually incorporating flour from the inner walls.
- Knead the dough for 8-10 minutes until smooth and elastic. Form into a ball, wrap in plastic, and let rest at room temperature for 30 minutes.
- Line a fine-mesh strainer with cheesecloth. Place ricotta in the strainer over a bowl and refrigerate for at least 2 hours to drain excess liquid.
- Transfer drained ricotta to a bowl. Add Parmesan, egg yolk, nutmeg, salt, pepper, and optional basil. Mix thoroughly, then cover and refrigerate until ready to use.
- Cut rested dough into 4 equal pieces. Roll each piece through a pasta machine, starting at the widest setting and gradually decreasing until you reach setting 6 or 7, until you can see your hand through the dough.
- Lay one pasta sheet on a floured surface. Place small mounds (about 1 teaspoon) of filling 2 inches apart, leaving a 1-inch border. Brush beaten egg wash between mounds and around edges.
- Carefully drape a second pasta sheet over the filling. Press gently around each mound to remove air pockets. Use your fingers to seal the sheets together firmly.
- Use a ravioli cutter or sharp knife to cut between the mounds. Press the tines of a fork around all edges to reinforce the seal. Place finished ravioli on a semolina-dusted baking sheet.
- Bring a large pot of salted water to a rolling boil. Gently lower ravioli into the water a few at a time, avoiding overcrowding. Cook for 3-4 minutes after they float to the surface.
Notes
- Drain ricotta thoroughly: Excess moisture makes filling leak and pasta soggy. Refrigerate in a strainer for at least 2 hours or overnight.
- Roll pasta thin: Thick dough becomes chewy and overwhelms the filling. You should be able to see your hand through the rolled sheet.
- Remove all air: Trapped air causes ravioli to burst while cooking. Press firmly from the filling outward toward the edges.
- Seal edges completely: Press with a fork and check for gaps before cutting. Use egg wash generously as glue.
- Don’t overfill: About 1 teaspoon per ravioli is plenty. Too much filling makes sealing difficult and causes bursting.
- Work quickly: Pasta dries out rapidly; keep unused portions covered with a damp towel or plastic wrap.
- Make-ahead friendly: Freeze uncooked ravioli on a baking sheet until solid, then transfer to freezer bags for up to 3 months.
- Variations: Try spinach-ricotta (add 1 cup cooked, squeezed-dry spinach), butternut squash, mushroom, or four-cheese fillings.
- Serving suggestions: Toss with brown butter and sage, serve in light tomato sauce, or drizzle with Alfredo sauce.
- Storage: Refrigerate uncooked ravioli for up to 2 days. Cooked ravioli keeps in an airtight container for up to 3 days.
Final Thoughts
Making from scratch ravioli recipe at home truly elevates your cooking skills and brings authentic Italian flavor to your table. The tender pasta combined with creamy filling creates a memorable meal that’s worth every minute of effort.
This recipe might seem time-consuming at first, but the process becomes faster and easier with practice. Soon you’ll find yourself making ravioli as confidently as any experienced pasta maker.
Give this from scratch ravioli recipe a try and experience the difference fresh pasta makes. Share your results in the comments below and let us know which filling variation became your favorite!
Recommended:
- Vodka Sauce
- Classic Chicken Parmesan
- Chicken Alfredo With Jar Sauce
- Udon Noodle Soup
- Mulligatawny Soup
- Easy Pesto
- Chicken Fried Rice
- Classic Tiramisu
- Sauteed Cabbage
- Vinegar Coleslaw


