
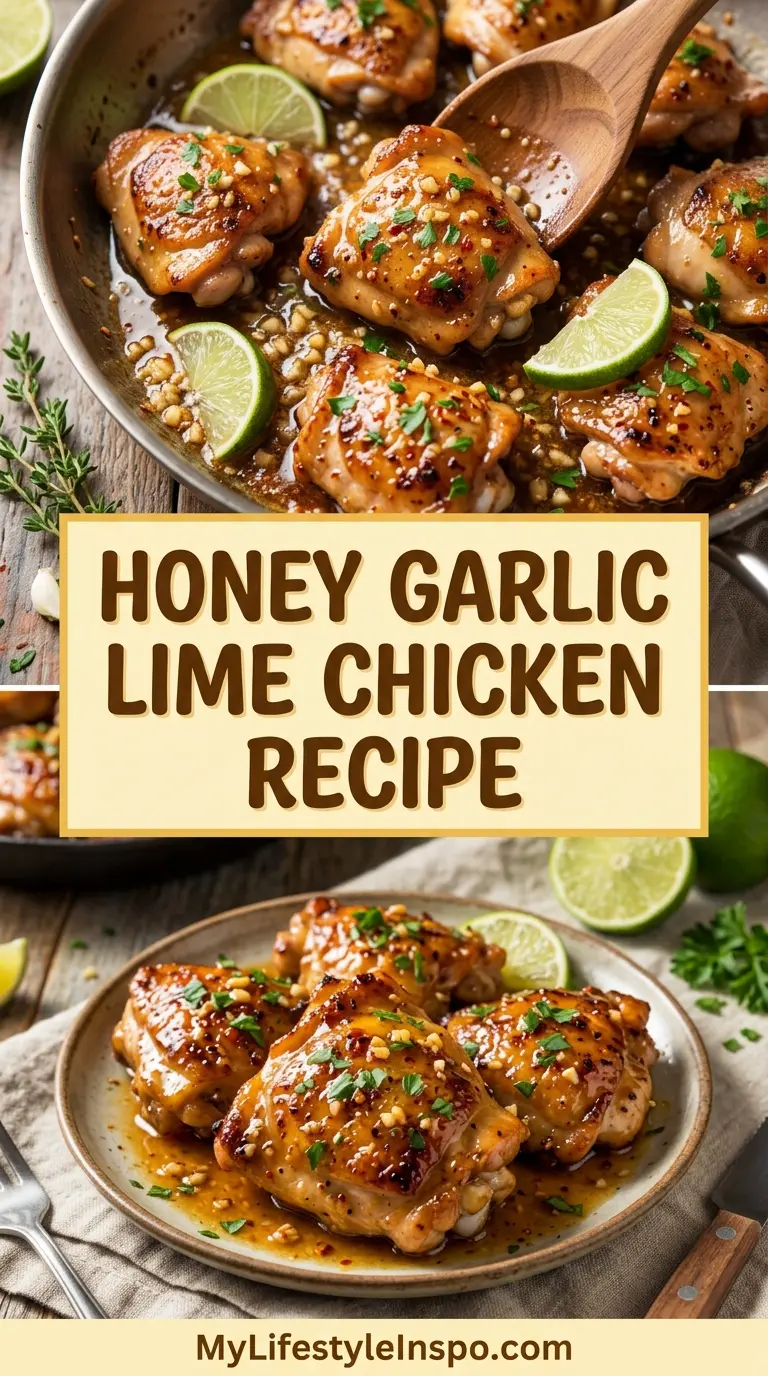
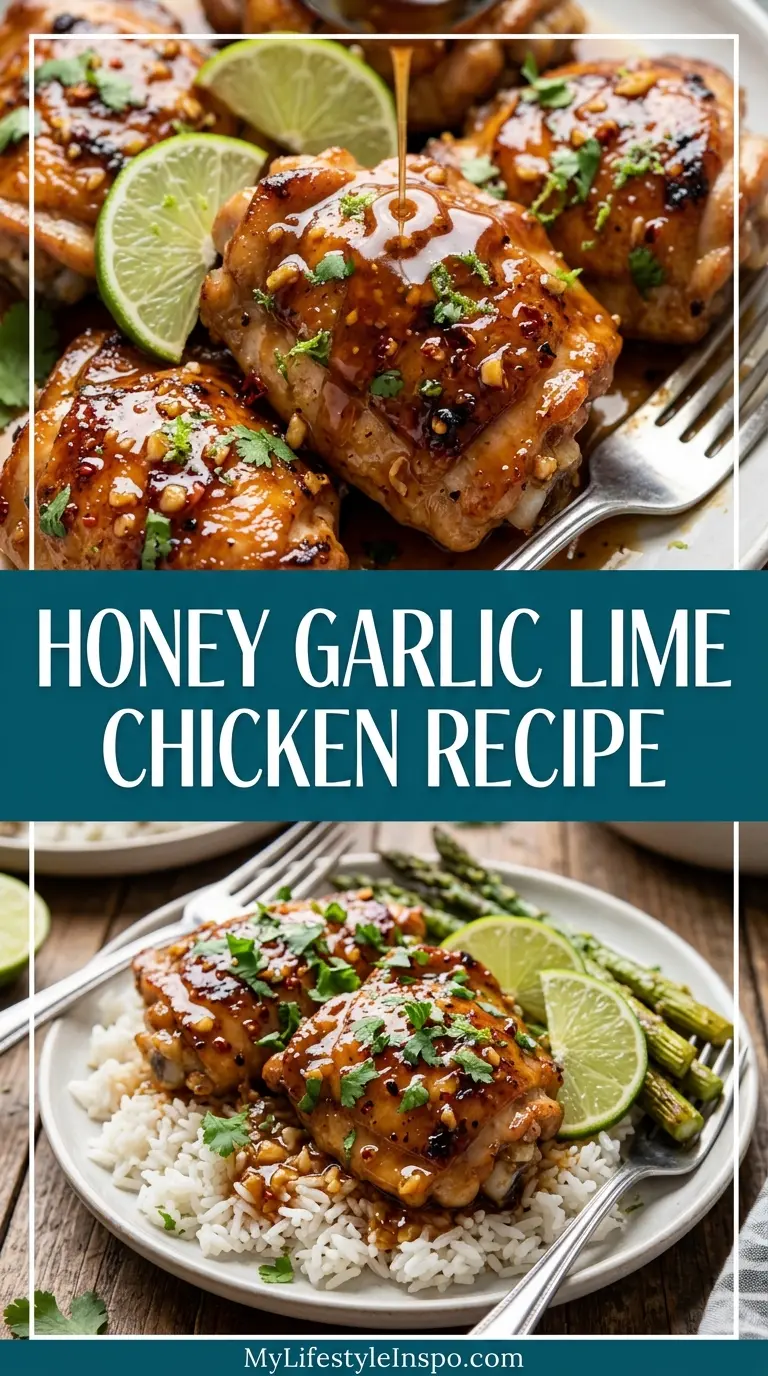
If you are looking for a weeknight dinner that delivers big flavor without a lot of fuss, this Honey Garlic Lime Chicken Recipe is going to become a regular at your table. It features juicy, pan-seared chicken thighs coated in a sticky, sweet-and-tangy glaze made from real honey, plenty of fresh garlic, bright lime juice, and a splash of soy sauce for depth. The whole dish comes together in one skillet in about 30 minutes, and the sauce is so good you will want to spoon it over everything on your plate.
The combination of honey, garlic, and lime is a classic for a reason. The honey caramelizes beautifully in a hot pan, creating that gorgeous golden color on the chicken. The garlic adds savory punch, and the lime cuts through the sweetness with a fresh, citrusy brightness that keeps every bite from feeling heavy. Soy sauce ties it all together and gives the glaze a beautiful umami richness.
This recipe is forgiving and beginner-friendly. You do not need any special equipment, no overnight marinating is required (though it can help if you have the time), and the ingredients are pantry staples you likely already have on hand. Serve it over a bed of steamed rice with your favorite vegetable and dinner is done.
If you love bold, citrusy chicken recipes, you will also enjoy our Garlic Lime Chicken Recipe for another easy weeknight variation.
Why You’ll Love This Honey Garlic Lime Chicken Recipe
This dish earns a permanent spot in the weeknight rotation because it checks every box that matters for home cooking.
It is genuinely fast. From the moment you pick up a knife to the moment you sit down to eat, you are looking at around 30 minutes. That is hard to beat for a meal this flavorful.
The flavor payoff is completely out of proportion to the effort involved. The sauce develops deep, complex, sweet-savory notes that taste like something from a restaurant.
Cleanup is minimal too. One skillet, one small bowl for the sauce, and you are done.
- One pan from start to finish with no need to dirty extra dishes
- Kid-friendly flavor that is sweet, mild, and satisfying without being spicy (though you can easily add heat)
- Versatile protein options, works just as well with chicken breasts as with thighs
- Pantry-friendly ingredients you likely already have at home
- Makes excellent leftovers that taste just as good the next day
- Naturally gluten-free adaptable by swapping soy sauce for tamari
Another weeknight favorite worth bookmarking: Baked Honey Mustard Chicken.
Ingredients
All you need for this recipe is a handful of simple, accessible ingredients that work together to create something really special.
The quality of your honey matters here. A good raw or local honey has more complex floral notes than the ultra-processed squeeze-bottle varieties, and you will taste the difference in the final glaze. Freshly squeezed lime juice is also non-negotiable. Bottled lime juice lacks the bright, vibrant flavor that makes this dish pop.
- 2 lbs (900g) boneless, skinless chicken thighs (about 6-8 pieces)
- Salt and black pepper, to taste
- 1 tablespoon olive oil
- 3 tablespoons raw honey
- 4 cloves garlic, minced
- 3 tablespoons fresh lime juice (about 2 limes)
- 1 teaspoon lime zest
- 2 tablespoons low-sodium soy sauce
- 1/4 teaspoon crushed red pepper flakes (optional, for heat)
- 1/4 cup (60ml) water or low-sodium chicken broth (for deglazing)
- 2 tablespoons unsalted butter
- 2 tablespoons fresh cilantro, chopped (for garnish)
- Lime wedges, for serving
You might also love this Cilantro Lime Rice Recipe as the perfect side dish to soak up all that gorgeous glaze.
Kitchen Equipment Needed
This is a minimal-equipment recipe, but a few key tools will make the process much smoother and more successful.
A heavy-bottomed, oven-safe skillet is the single most important piece of equipment here. Cast iron or stainless steel will give you that beautiful brown sear on the chicken. Non-stick pans can work but will not achieve the same level of caramelization.
- Large cast iron skillet or heavy-bottomed oven-safe pan (12-inch recommended)
- Microplane zester (for lime zest)
- Citrus juicer or reamer
- Small mixing bowl (for the sauce)
- Whisk or fork
- Tongs or spatula
- Instant-read meat thermometer
- Cutting board and sharp knife
- Measuring spoons and cups
Read Also: Grilled Lemon Pepper Chicken Recipe
Recommended Products for This Recipe
These are products selected based on quality and performance, not just for the sake of recommendations. Each one genuinely makes a difference in how this recipe turns out.
1. Lodge Cast Iron Skillet (12-inch)
A good cast iron skillet is the backbone of this recipe. It retains heat beautifully and gives the chicken that deep golden-brown sear that creates all the flavor. Lodge is a trusted brand with decades of reliability, and this skillet will last a lifetime with proper care.
2. Microplane Premium Classic Zester
Fresh lime zest contains the essential oils that give this dish an intensely bright citrus flavor. A quality microplane makes zesting fast, effortless, and safe, producing fine, fluffy zest instead of chunky pieces. It is one of those tools that you will use constantly once you own it.
3. ThermoPop 2 Instant Read Thermometer
Perfectly cooked chicken every single time. This thermometer eliminates guessing and gives you a reading in 3 seconds, so you know the moment your chicken hits 165°F (74°C) without cutting it and losing all the juices. Highly recommended for any home cook.
4. Vitamix Citrus Press
Fresh lime juice is truly essential for this recipe, and a dedicated citrus press extracts significantly more juice than squeezing by hand. More juice means more flavor in your glaze. This is particularly useful when you double or triple the recipe.
Another easy citrus chicken to try: Lemon Chicken Recipe
Step-by-Step Instructions
Step 1: Prepare the Honey Garlic Lime Sauce
- In a small bowl, combine the honey, minced garlic, fresh lime juice, lime zest, soy sauce, and crushed red pepper flakes (if using).
- Whisk everything together thoroughly until the honey is fully incorporated and the mixture is smooth and uniform.
- Set the sauce aside on the counter. You want it nearby when the pan is hot because this recipe moves quickly.
- Taste the sauce before cooking. It should be sweet, tangy, garlicky, and savory all at once. Adjust lime juice or honey to your preference at this stage.
Step 2: Season and Prep the Chicken
- Remove the chicken thighs from the packaging and pat them completely dry with paper towels. This step is critical. Moisture on the surface of the chicken creates steam in the pan, which prevents browning and ruins your sear.
- Season both sides of each chicken thigh generously with salt and freshly cracked black pepper.
- Let the seasoned chicken sit at room temperature for 10 minutes if you have the time. This helps the chicken cook more evenly from edge to center.
Step 3: Sear the Chicken
- Heat your cast iron skillet or heavy-bottomed pan over medium-high heat until it is properly hot. A drop of water should evaporate instantly when the pan is ready.
- Add the olive oil and swirl to coat the bottom of the pan.
- Place the chicken thighs in a single layer, smooth side down. Do not overcrowd the pan. If your thighs are large, cook in two batches rather than crowding, as crowding causes steaming instead of searing.
- Cook undisturbed for 5 to 6 minutes. Resist the urge to move the chicken. It will release naturally from the pan when it is properly seared. If it sticks, it is not ready yet.
- Flip the chicken thighs using tongs and cook on the other side for an additional 4 to 5 minutes.
- The chicken does not need to be cooked through at this point. You are looking for a deep golden-brown color on both sides. The internal temperature should be around 155-160°F (68-71°C) at this stage.
- Remove the chicken to a clean plate and set aside.
Step 4: Build the Glaze
- Reduce the heat to medium. You should still see some browning bits (called fond) on the bottom of the pan. This is flavor.
- Add the garlic from the sauce mixture first if you want a more toasted garlic flavor, OR add all the sauce at once for a brighter, fresher garlic note. For this recipe, add the entire prepared sauce directly to the pan.
- The sauce will bubble vigorously. Use a wooden spoon to scrape up all the browned bits from the bottom of the pan. These dissolve into the sauce and add incredible depth of flavor.
- Add the water or chicken broth and stir to combine. This helps control the reduction and keeps the garlic from burning.
- Let the sauce cook for 1 to 2 minutes, stirring frequently, until it begins to thicken slightly.
- Add the unsalted butter and stir until melted and incorporated. The butter adds a silky richness to the glaze and helps it cling to the chicken.
Step 5: Finish the Chicken in the Sauce
- Return the seared chicken thighs to the pan, placing them smooth side up.
- Spoon the glaze generously over each piece of chicken, making sure they are well coated.
- Reduce the heat to medium-low, cover the pan partially with a lid or a piece of foil, and cook for an additional 5 to 7 minutes.
- Continue basting the chicken with the sauce every 2 minutes using a spoon. This basting step creates the sticky, lacquered glaze that makes this dish irresistible.
- Check the internal temperature of the thickest thigh with your instant-read thermometer. The chicken is fully cooked when it reaches 165°F (74°C) internally.
- If the sauce becomes too thick during this step, add a splash more water or broth to loosen it.
Step 6: Rest and Serve
- Remove the pan from the heat and let the chicken rest in the sauce for 3 to 5 minutes. Resting allows the juices to redistribute throughout the meat so every bite stays juicy.
- Taste the sauce one final time and adjust seasoning as needed. A small pinch of salt or an extra squeeze of lime can brighten everything at the end.
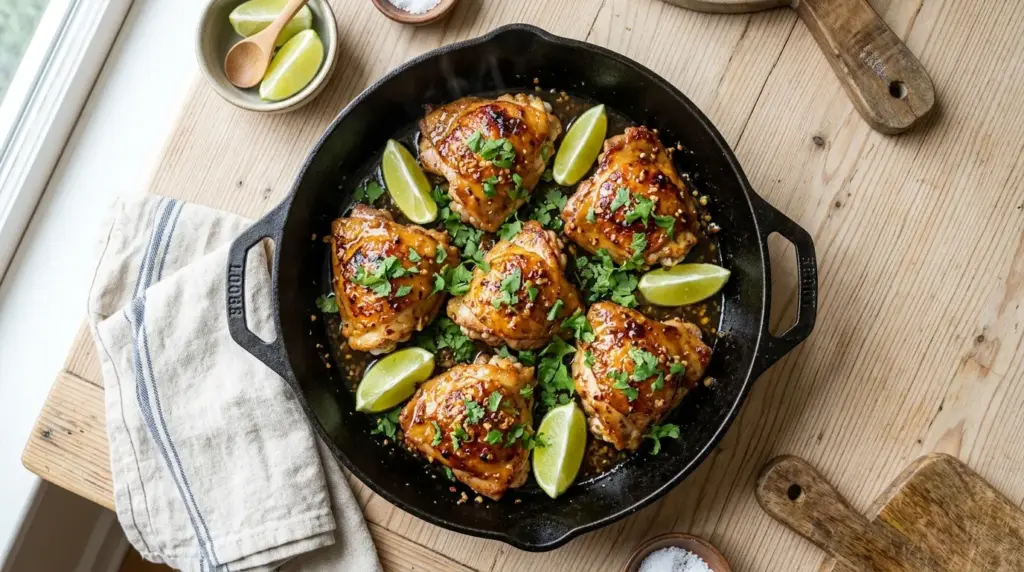
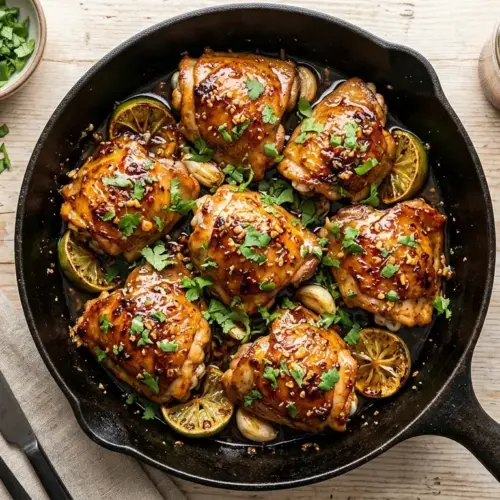
- Garnish with freshly chopped cilantro and lime wedges.
- Serve immediately over steamed white rice, cilantro lime rice, or your favorite grain, with the pan sauce spooned generously over the top.
For another easy skillet chicken dinner idea, check out this Chicken Stir Fry Recipe.
Tips for Success
A few small adjustments can make the difference between a good result and a great one.
Mastering the sear is the single most impactful skill in this recipe. A properly preheated pan and completely dry chicken are the two non-negotiables for getting that beautiful golden crust that locks in all the flavor.
- Dry the chicken thoroughly before seasoning to ensure proper browning, not steaming
- Do not overcrowd the skillet, cook in batches if necessary to maintain high, consistent heat
- Use fresh limes, not bottled lime juice, the difference in brightness is noticeable and significant
- Watch the garlic carefully once the sauce hits the pan, burnt garlic turns bitter and can ruin the whole dish
- Baste frequently during the final stage to build up that gorgeous, sticky lacquered glaze
- Let the chicken rest before serving to keep it juicy and prevent the juices from running out when you cut into it
- Taste and adjust the sauce before adding the chicken back, it should be balanced between sweet, sour, and salty
You might also enjoy: Chicken Teriyaki Recipe
Serving Suggestions
This honey garlic lime chicken is versatile enough to pair with a wide range of sides, and it works beautifully across different cuisine styles.
The sweet, sticky sauce practically begs for a grain to soak it up. Rice is the most natural choice, and Cilantro Lime Rice pairs especially beautifully with the citrus notes in this dish.
- Steamed white or brown rice, the classic base for soaking up all that delicious glaze
- Roasted Broccoli alongside the chicken for a nutritious, simple plate
- Warm flour tortillas for a casual taco-style dinner with avocado and shredded cabbage
- Green salad with a lime vinaigrette to complement the citrus flavors already in the dish
- Mashed potatoes for a more comfort-food style approach, especially in cooler months
- Steamed jasmine rice with sliced cucumber and a drizzle of extra sauce
- Cauliflower rice for a lighter, low-carb option that still soaks up the glaze well
Variations to Try
The basic formula for this recipe is endlessly adaptable. Once you master the technique, you can riff on the flavors in dozens of different ways.
Using chicken breasts instead of thighs works perfectly, though you should reduce the cooking time slightly and be careful not to overcook them, as breasts dry out faster than thighs.
- Spicy version: Double the red pepper flakes or add a tablespoon of sriracha to the sauce for serious heat
- Coconut lime: Replace 2 tablespoons of the water with full-fat coconut milk for a creamy, tropical twist
- Lemon substitution: Swap the lime for lemon juice and zest when limes are out of season or unavailable
- Honey garlic lime chicken thighs (bone-in): Works beautifully, just increase the oven time to 35-40 minutes
- Sheet pan version: Toss the sauce with the chicken, spread on a sheet pan, and bake at 400°F (200°C) for 25-30 minutes for an even easier hands-off dinner
- Grilled version: Marinate the chicken in the sauce for 1-4 hours, then grill over medium-high heat for 5-7 minutes per side
- Air fryer version: Cook the seasoned thighs at 400°F (200°C) for 20 minutes, flipping halfway, then toss with the warmed glaze
For more sweet-citrus chicken inspiration, try the Pineapple Salsa Chicken Recipe.
Storage and Reheating
Leftovers from this recipe are genuinely worth saving. The chicken actually tastes even better the next day once the flavors have had more time to meld together.
The glaze thickens further as it chills in the fridge, so add a tiny splash of water when reheating to loosen it back up to the right consistency.
- Refrigerator: Store leftovers in an airtight container for up to 4 days
- Freezer: Freeze cooled chicken in a sealed freezer bag for up to 2 months; thaw overnight in the fridge before reheating
- Stovetop reheating: Place the chicken and sauce in a skillet over medium-low heat with a splash of water, cover and heat for 5-7 minutes until warmed through
- Microwave reheating: Place chicken in a microwave-safe dish with a small splash of water, cover loosely, and heat in 30-second intervals until hot
- Avoid high heat when reheating, as it can cause the honey in the glaze to burn and the chicken to dry out
- Meal prep tip: Make a double batch of the sauce and keep it separately in the fridge for up to 5 days for quick weeknight assembly
Read Also: Bourbon Chicken Recipe
Nutritional Facts
(Per serving, based on 4 servings. Values are approximate and will vary based on specific ingredients and portion sizes.)
| Nutrient | Amount |
|---|---|
| Calories | 360 kcal |
| Protein | 42g |
| Total Fat | 14g |
| Saturated Fat | 4g |
| Carbohydrates | 16g |
| Sugar | 14g |
| Fiber | 0.3g |
| Sodium | 580mg |
| Potassium | 590mg |
| Cholesterol | 215mg |
Note: Nutritional values do not include any side dishes or garnishes. Using chicken breasts will reduce the fat and calorie content. Using tamari instead of soy sauce will reduce the sodium.
Another flavorful chicken recipe worth trying: Chipotle Chicken Recipe
Health Benefits of Key Ingredients
This recipe is not just delicious, it also brings some genuinely valuable nutritional benefits to the table.
Chicken thighs are one of the most nutritionally dense cuts of poultry available. They are rich in protein, B vitamins (especially niacin and B6), phosphorus, and selenium, all of which support energy metabolism, immune function, and muscle maintenance.
- Honey: Contains trace antioxidants and has natural antimicrobial properties; raw honey specifically retains more beneficial compounds than heavily processed varieties
- Garlic: A nutritional powerhouse containing allicin, a compound with well-documented anti-inflammatory and immune-supportive properties; garlic also supports heart health and may help regulate blood sugar
- Lime juice: An excellent source of vitamin C, which supports immune function, skin health, and iron absorption; the acidity also helps tenderize the chicken naturally
- Chicken thighs: High in quality protein for muscle repair, rich in B vitamins for energy production, and provide healthy fats including oleic acid
- Olive oil: A source of heart-healthy monounsaturated fats and polyphenol antioxidants; using a quality extra-virgin olive oil adds both nutrition and flavor
- Soy sauce: Adds umami depth with minimal calories; using low-sodium versions allows you to control the salt content of the dish
For another lean, flavor-packed chicken dish, try our Chicken and Broccoli Recipe.
Frequently Asked Questions
1. Can I use chicken breasts instead of chicken thighs for this recipe?
Yes, absolutely. Boneless, skinless chicken breasts work very well in this recipe. Keep in mind that breasts are leaner and cook faster than thighs, so reduce the searing time to 3-4 minutes per side and monitor the internal temperature carefully. Pull them from the heat as soon as they hit 165°F (74°C) to prevent dryness.
2. Do I need to marinate the chicken ahead of time?
No marinating is required for this recipe. The sauce develops rich flavor during cooking, and the basting process ensures the chicken is well coated. That said, if you want to plan ahead, you can marinate the chicken in the sauce for 30 minutes to 4 hours in the refrigerator for even deeper flavor penetration. Avoid marinating longer than 4 hours, as the lime juice can start to break down the texture of the meat.
3. Can I make this recipe without soy sauce?
Yes. Coconut aminos is the most popular substitute and creates a slightly sweeter, milder flavor that works beautifully. Tamari is a gluten-free soy sauce alternative with an almost identical flavor profile. You can also use fish sauce (just a teaspoon) for a deeper, more savory umami note. If you need to skip all of these, simply increase the salt slightly and add a small splash of Worcestershire sauce.
4. Why is my sauce too thin or not sticking to the chicken?
If the sauce is too thin, the heat may not have been high enough during the reduction phase, or there may have been too much liquid in the pan. To fix this, remove the chicken temporarily and let the sauce reduce over medium heat for 2-3 more minutes, stirring frequently, until it coats the back of a spoon. A small cornstarch slurry (1 teaspoon cornstarch mixed with 1 tablespoon cold water) whisked into the sauce can also thicken it quickly.
5. What can I substitute for honey in this recipe?
Maple syrup is the most popular swap and works beautifully, giving the glaze a slightly deeper, earthier sweetness. Brown sugar dissolved in a small amount of warm water can also work. Agave nectar is another neutral-tasting option with a similar consistency to honey. Keep in mind that each substitute will slightly change the flavor profile of the final dish, but all of them will produce a delicious result.
Read Also: Mango Salsa Chicken Recipe
Honey Garlic Lime Chicken
Equipment
- Cast iron skillet or heavy-bottomed oven-safe pan (12-inch recommended)
- Microplane zester - for lime zest
- Citrus juicer or reamer
- Small mixing bowl - for the sauce
- Whisk or fork
- Tongs or spatula
- Instant-read meat thermometer
- Cutting board and sharp knife
- Measuring spoons and cups
Ingredients
- 2 lbs boneless skinless chicken thighs - 900g, about 6-8 pieces
- salt and black pepper - to taste
- 1 tablespoon olive oil
- 3 tablespoons raw honey
- 4 cloves garlic - minced
- 3 tablespoons fresh lime juice - about 2 limes
- 1 teaspoon lime zest
- 2 tablespoons low-sodium soy sauce
- 1/4 teaspoon crushed red pepper flakes - optional, for heat
- 1/4 cup water or low-sodium chicken broth - 60ml, for deglazing
- 2 tablespoons unsalted butter
- 2 tablespoons fresh cilantro - chopped, for garnish
- lime wedges - for serving
For Serving (Optional)
- steamed white or brown rice
- roasted vegetables - such as broccoli
- warm flour tortillas
Instructions
- In a small bowl, whisk together the honey, minced garlic, fresh lime juice, lime zest, soy sauce, and crushed red pepper flakes (if using) until smooth. Set aside.
- Pat the chicken thighs completely dry with paper towels. Season both sides generously with salt and freshly cracked black pepper. Let sit at room temperature for 10 minutes if time allows.
- Heat a cast iron skillet over medium-high heat. Add olive oil and swirl to coat. Place the chicken thighs in a single layer, smooth side down, and cook undisturbed for 5-6 minutes until golden brown. Flip and cook for 4-5 minutes on the other side. Remove to a plate.
- Reduce heat to medium. Add the prepared sauce to the pan and scrape up the browned bits from the bottom. Add the water or broth and cook for 1-2 minutes until slightly thickened. Stir in the butter until melted and incorporated.
- Return the chicken to the pan, spooning the glaze generously over each piece. Reduce heat to medium-low, partially cover, and cook for 5-7 minutes, basting every 2 minutes. Cook until the internal temperature reaches 165°F (74°C).
- Remove from heat and let the chicken rest in the sauce for 3-5 minutes. Garnish with fresh cilantro and lime wedges. Serve immediately over rice with the pan sauce spooned over the top.
Notes
- Dry chicken is essential: Pat the chicken thoroughly dry before seasoning. Any moisture will create steam and prevent a good sear.
- Don’t crowd the pan: Cook the chicken in batches if necessary. Overcrowding lowers the pan temperature and causes steaming instead of searing.
- Fresh lime juice only: Bottled lime juice lacks the bright, vibrant flavor that makes this dish special. Always use fresh limes.
- Watch the garlic: Burnt garlic turns bitter. If the pan is too hot, add the sauce with the garlic and deglaze immediately to prevent scorching.
- Spicy version: Double the red pepper flakes or add a tablespoon of sriracha to the sauce for extra heat.
- Chicken breast option: Boneless, skinless chicken breasts work well. Reduce searing time to 3-4 minutes per side and cook just until they reach 165°F (74°C) to prevent dryness.
- Storage: Store leftovers in an airtight container in the refrigerator for up to 4 days. The glaze will thicken as it chills.
- Reheating: Reheat gently in a skillet over medium-low heat with a splash of water to loosen the sauce. Avoid high heat to prevent the honey from burning.
- Make it gluten-free: Substitute tamari or coconut aminos for the soy sauce.
- Freezer-friendly: Freeze cooled chicken in a sealed bag for up to 2 months. Thaw overnight in the fridge before reheating.
Final Thoughts
This Honey Garlic Lime Chicken Recipe is exactly the kind of dish that reminds you why home cooking is so rewarding. Simple ingredients, one pan, 30 minutes, and the result is a sticky, glossy, incredibly flavorful meal that feels special even on the most ordinary Tuesday night.
The magic is in the balance. Honey brings warmth and sweetness. Garlic adds depth and savory backbone. Lime keeps everything bright and vibrant. Soy sauce holds it all together with richness and complexity. Together, they create a glaze that is honestly hard to stop eating.
Give this recipe a try this week, and do not be surprised when it immediately becomes a household favorite. If you make it, leave a comment below to share how it turned out, what sides you paired it with, or any fun variations you tried. Sharing your experience helps other readers and it genuinely makes my day!
Recommended:
- Garlic Lime Chicken Recipe
- Chicken Lettuce Wraps Recipe
- Thai Green Curry Chicken Recipe
- Honey Mustard Chicken Sheet Pan Dinner
- Orange Chicken Sheet Pan Dinner
- Baked Chicken Breast Recipe
- Chicken Tacos Recipe
- Teriyaki Sauce Recipe
- Mexican Rice Recipe
- Mango Chutney Recipe


