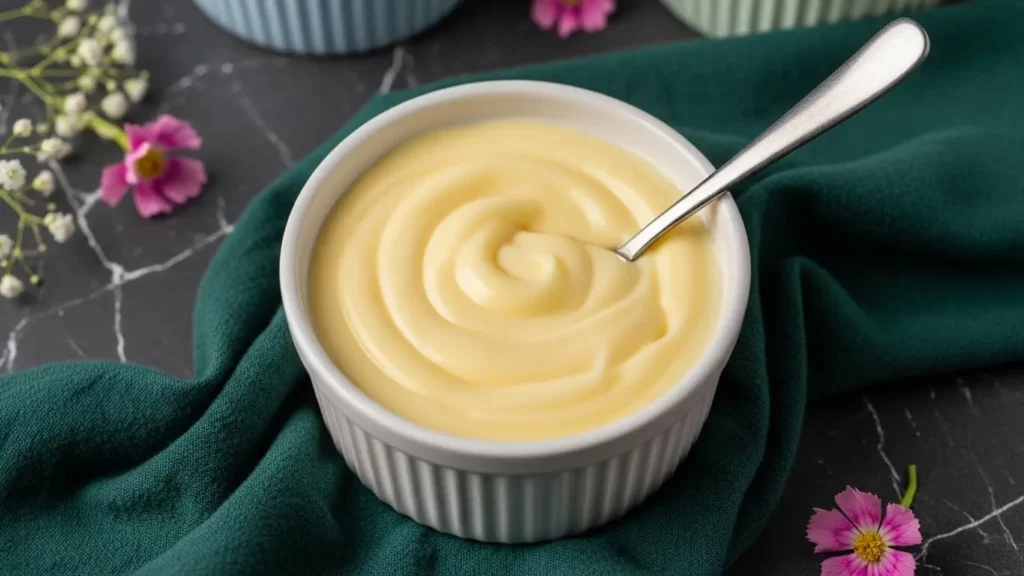
Making a creamy, silky vanilla pudding recipe from scratch is one of those simple pleasures that brings comfort to any day. This classic dessert has been gracing dinner tables for generations, and once you taste homemade pudding, you’ll never want to go back to the boxed stuff.
I grew up watching my grandmother stir pudding on the stovetop, and the sweet vanilla aroma would fill the entire kitchen. Now I make this same recipe for my own family, and it never fails to bring smiles.
The best part about homemade vanilla pudding is how easy it is to make. You probably already have all the ingredients in your pantry right now, and the whole process takes less than 20 minutes from start to finish.
Why You’ll Love This Vanilla Pudding Recipe
This homemade vanilla pudding is silky smooth with a rich, custard-like texture that melts on your tongue. The pure vanilla flavor shines through in every spoonful, and you can actually taste the quality of real ingredients.
It’s incredibly versatile and works beautifully as a standalone dessert or as a filling for cakes, pies, and pastries. You control the sweetness level and can adjust it to your preference.
Here’s what makes this recipe special:
- Ready in under 20 minutes – No overnight chilling or complicated techniques required
- Budget-friendly – Uses simple pantry staples that cost less than store-bought versions
- No artificial ingredients – Just real milk, eggs, sugar, and vanilla extract
- Perfect consistency every time – The cooking method ensures smooth, lump-free results
- Kid-approved – Even picky eaters love this classic comfort dessert
- Easily customizable – Serve it plain, topped with fruit, or layered in parfaits
You might also enjoy: Chocolate Pudding Recipe
Ingredients
This vanilla pudding comes together with just a handful of basic ingredients that you likely already have in your kitchen. The key is using good quality vanilla extract for the best flavor.
- 2½ cups whole milk
- ½ cup granulated sugar
- ¼ cup cornstarch
- ¼ teaspoon salt
- 4 large egg yolks
- 2 tablespoons unsalted butter
- 2 teaspoons pure vanilla extract
Kitchen Equipment Needed
Having the right tools makes pudding preparation much smoother and helps prevent common issues like lumps or scorching. I’ve learned that a heavy-bottomed saucepan is worth its weight in gold for even heat distribution.
- Heavy-bottomed saucepan (2-3 quart capacity)
- Whisk
- Medium mixing bowl
- Fine-mesh strainer
- Rubber spatula
- Measuring cups and spoons
- 4-6 individual serving dishes or one large bowl
Read Also: Banana Pudding Recipe
Recommended Products for This Recipe
After making countless batches of pudding over the years, I’ve found that certain products really do make a difference in achieving that perfect, silky texture. Here are my top recommendations that will help you create restaurant-quality pudding at home.
1. Nielsen-Massey Madagascar Bourbon Pure Vanilla Extract
This is hands-down the best vanilla extract I’ve ever used for pudding. The rich, complex flavor profile adds incredible depth that you just don’t get from imitation vanilla. A little goes a long way, and you can really taste the difference in the final product.
2. All-Clad Stainless Steel Saucepan
This heavy-bottomed saucepan distributes heat so evenly that you’ll never have to worry about scorched pudding on the bottom. The responsive temperature control makes it easy to maintain that gentle simmer that’s crucial for perfect pudding texture. It’s pricey, but it’s a lifetime investment.
3. OXO Good Grips Silicone Whisk
The flexible silicone coating on this whisk won’t scratch your saucepan, and the wire design is perfect for getting into the corners where pudding tends to stick. It’s heat-resistant up to 600°F, so you can leave it in the pot while cooking without worrying about melting.
4. Fine Mesh Strainer Set
A good strainer is essential for achieving that ultra-smooth, lump-free texture. This removes any bits of cooked egg or undissolved cornstarch that might have formed during cooking. I use mine for every batch of pudding I make.
Step-by-Step Instructions
Follow these detailed instructions for foolproof vanilla pudding every time. Take your time with each step, especially the tempering process, which is crucial for preventing scrambled eggs in your dessert.
1. Combine the Dry Ingredients
- In your heavy-bottomed saucepan, whisk together the sugar, cornstarch, and salt until well combined
- Make sure there are no lumps in the cornstarch, as these can create texture issues later
- This dry mixture will help thicken the pudding and provide structure
2. Add the Milk Gradually
- Pour in about ½ cup of the milk and whisk vigorously until the mixture forms a smooth paste
- Gradually add the remaining milk while continuing to whisk
- This gradual addition helps prevent lumps from forming in the cornstarch mixture
- The mixture should be completely smooth with no visible dry pockets
3. Cook the Milk Mixture
- Place the saucepan over medium heat and cook, whisking constantly
- Continue whisking in a figure-eight pattern to reach all areas of the pan bottom
- After about 5-7 minutes, the mixture will start to thicken noticeably
- Once it reaches a gentle boil and has thickened to coat the back of a spoon, remove from heat
- The mixture should look glossy and smooth
4. Temper the Egg Yolks
- In a medium bowl, whisk the egg yolks until they’re smooth and slightly lightened in color
- Slowly drizzle about 1 cup of the hot milk mixture into the yolks while whisking constantly
- This tempering process gradually raises the temperature of the yolks without cooking them
- Continue whisking for about 30 seconds after adding the hot liquid to ensure even temperature distribution
5. Combine and Continue Cooking
- Pour the tempered egg mixture back into the saucepan with the remaining milk mixture
- Return the pan to medium heat and cook, whisking constantly, for another 2-3 minutes
- The pudding will thicken considerably and should coat the back of a spoon thickly
- You’ll see the mixture become noticeably glossier and more cohesive
- Small bubbles will break the surface, but don’t let it come to a rolling boil
6. Strain and Finish
- Remove the saucepan from heat and immediately strain the pudding through a fine-mesh strainer into a clean bowl
- Use a rubber spatula to press the pudding through the strainer, leaving any lumps behind
- Stir in the butter and vanilla extract until the butter is completely melted and incorporated
- The butter adds richness and gives the pudding a beautiful sheen
7. Chill the Pudding
- Transfer the pudding to individual serving dishes or one large bowl
- Press plastic wrap directly onto the surface of the pudding to prevent a skin from forming
- Refrigerate for at least 2 hours or until completely chilled and set
- The pudding will continue to thicken as it cools
If you’re in the mood for something different, my Rice Pudding Recipe is another comforting classic.
Tips for Success
These tried-and-true tips will help you avoid common pitfalls and create the smoothest, most flavorful vanilla pudding possible. I’ve learned these lessons through years of pudding-making experience.
- Use whole milk for best results – The fat content creates a richer, creamier texture that skim milk just can’t match
- Whisk constantly during cooking – This is non-negotiable for preventing lumps and scorching on the bottom
- Don’t rush the tempering process – Adding hot liquid too quickly to egg yolks will cook them and create scrambled eggs
- Strain the pudding – Even if it looks smooth, straining ensures the silkiest possible texture
- Chill with direct contact – Pressing plastic wrap onto the surface prevents that rubbery skin from forming
- Use room temperature eggs – They incorporate more smoothly and temper more evenly than cold eggs
- Keep the heat medium – High heat can cause the milk to scorch or the eggs to scramble
- Measure cornstarch carefully – Too much makes the pudding stiff and starchy; too little leaves it runny
Another favorite: Chia Seed Pudding Recipe
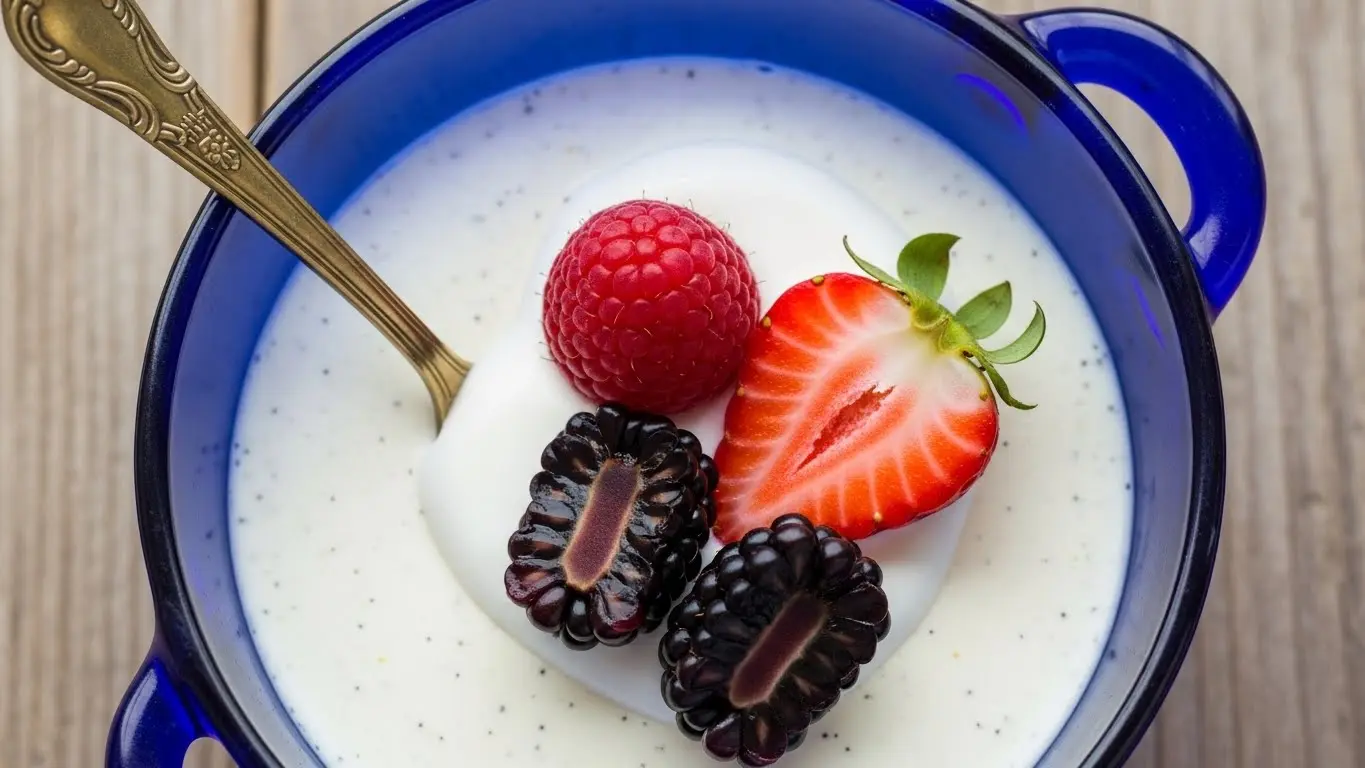
Serving Suggestions
Vanilla pudding is wonderfully versatile and can be dressed up or kept simple depending on the occasion. The creamy texture pairs beautifully with crunchy toppings and fresh fruit.
Here are my favorite ways to serve this classic dessert:
- Classic style – Serve chilled in individual cups with a dollop of whipped cream and a sprinkle of cinnamon
- Banana pudding – Layer with vanilla wafers and fresh banana slices for a Southern favorite
- Parfait presentation – Alternate layers with fresh berries, granola, or crushed cookies
- Pie filling – Use as a filling for cream pies with a graham cracker or vanilla wafer crust
- Fruit topping – Top with fresh strawberries, blueberries, or sliced peaches
- Caramel drizzle – A swirl of Caramel Sauce adds delicious complexity
- Chocolate shavings – Garnish with dark chocolate curls for an elegant touch
- Crushed cookies – Sprinkle crushed vanilla wafers or graham crackers on top for texture contrast
Variations to Try
Once you’ve mastered the basic recipe, these variations will keep your dessert repertoire exciting. Each one builds on the same foolproof technique with simple flavor additions.
- Chocolate vanilla swirl – Divide the pudding in half and stir 3 oz melted dark chocolate into one portion before chilling
- Coconut vanilla – Replace 1 cup of milk with coconut milk and add ½ cup sweetened shredded coconut
- Butterscotch pudding – Replace granulated sugar with dark brown sugar and add an extra tablespoon of butter
- Coffee-infused – Steep 2 tablespoons instant espresso powder in the milk for 5 minutes before making the pudding
- Citrus vanilla – Add 1 tablespoon orange or lemon zest along with the vanilla extract
- Almond vanilla – Use 1 teaspoon vanilla and 1 teaspoon almond extract for a lovely twist
- Maple vanilla – Replace 2 tablespoons of sugar with pure maple syrup added at the end
This pairs beautifully with my Fruit Salad Recipe for a light dessert combination.
Storage and Reheating
Proper storage keeps your vanilla pudding fresh and delicious for several days. I always make a double batch because it disappears so quickly in my house.
- Refrigerator storage – Keep covered with plastic wrap pressed directly on the surface for up to 4 days
- Airtight containers – Transfer to containers with tight-fitting lids for easiest storage
- Prevent skin formation – Always ensure plastic wrap touches the entire pudding surface
- Freezing – Not recommended, as the texture becomes grainy and watery when thawed
- Serving temperature – Best served cold straight from the refrigerator
- Stirring before serving – If the pudding has set very firm, give it a gentle stir to loosen the texture
Read Also: Corn Pudding Recipe
Nutritional Facts
Per serving (based on 6 servings):
- Calories: 215
- Total Fat: 8g
- Saturated Fat: 4g
- Cholesterol: 155mg
- Sodium: 150mg
- Total Carbohydrates: 30g
- Dietary Fiber: 0g
- Sugars: 22g
- Protein: 6g
- Calcium: 15% DV
- Vitamin D: 10% DV
Health Benefits of Key Ingredients
While vanilla pudding is definitely a dessert, it does contain some nutritious ingredients that provide valuable nutrients. Everything in moderation, right?
Milk provides calcium and vitamin D for strong bones and teeth, plus protein for muscle maintenance. The dairy also contains B vitamins that support energy metabolism.
Eggs are packed with high-quality protein and essential amino acids your body needs. They’re also rich in choline, which supports brain health and development.
Vanilla extract contains trace amounts of antioxidants and has been shown to have calming properties that may help reduce stress and anxiety.
For a healthier dessert option, you might like my Brownie Pudding Recipe.
Frequently Asked Questions
1. Can I use skim milk or low-fat milk instead of whole milk?
Yes, you can use lower-fat milk, but the pudding won’t be quite as rich and creamy. Whole milk contains more fat, which contributes to the luxurious mouthfeel and fuller flavor. If you do use skim or 2% milk, consider adding an extra tablespoon of butter at the end to compensate for the missing richness.
2. Why did my pudding turn out lumpy?
Lumps typically form when the cornstarch isn’t fully dissolved before heating, or when the mixture isn’t whisked constantly during cooking. Make sure to create a smooth paste with the cornstarch and a small amount of milk before adding the rest. Always strain your finished pudding through a fine-mesh strainer to catch any lumps that did form.
3. Can I make this pudding dairy-free?
Absolutely! Replace the whole milk with full-fat coconut milk or oat milk for best results. Use vegan butter or coconut oil instead of regular butter. The texture will be slightly different but still delicious and creamy.
4. How do I prevent a skin from forming on top?
Press plastic wrap directly onto the surface of the pudding while it’s still warm. Make sure the wrap touches the entire surface with no air pockets. This creates a barrier that prevents moisture evaporation, which is what causes that rubbery skin to form.
5. Can I double or triple this recipe?
Yes, this recipe scales beautifully! Just use a larger saucepan to accommodate the increased volume, and be prepared to whisk for a few minutes longer. The cooking time may increase slightly, but watch for the same visual cues of thickening and glossiness.
Final Thoughts
There’s something incredibly satisfying about making vanilla pudding from scratch. The way the ingredients transform into a silky, spoon-coating dessert right before your eyes is almost magical.
This recipe has been a favorite in my kitchen for years, and I hope it becomes one in yours too. The pure vanilla flavor and creamy texture are simply unmatched by anything you can buy at the store.
Give this vanilla pudding recipe a try this week and taste the difference homemade makes. I’d love to hear how it turns out for you, so drop a comment below and let me know if you tried any of the variations!
Recommended:
- Yorkshire Pudding Recipe
- Hot Chocolate Recipe
- Sugar Cookies Recipe
- Fruit Tart Recipe
- Dutch Baby Recipe
- Pumpkin Roll Recipe
- Tres Leches Cake Recipe
- Boston Cream Pie Recipe
- Dinner Rolls Recipe
- Scrambled Eggs Recipe


