If you have been craving something that completely reimagines taco night, this Smashed Chicken Caesar Tacos Recipe is exactly what you need on your dinner table.
It takes everything you already love about a creamy, garlicky Caesar salad and wraps it up in a golden, crispy tortilla loaded with seasoned ground chicken, fresh romaine, shaved Parmesan, and a tangy homemade Caesar dressing.
The magic is in the technique. Seasoned ground chicken is pressed directly onto a flour tortilla and cooked meat-side down in a screaming-hot skillet. This creates a caramelized, crispy chicken crust that fuses right into the tortilla, giving you incredible texture in every single bite.
The cool, creamy Caesar slaw on top provides the perfect contrast to that hot, crispy base. It is the kind of weeknight dinner that feels fun to make, comes together in under 30 minutes, and genuinely impresses everyone at the table.
If you love the classic smash burger concept, you are going to be absolutely hooked on this taco version. Every element works in harmony, from the juicy chicken to the crunch of toasted breadcrumbs and the bright hit of lemon in the dressing.
You might also enjoy: Chicken Tacos Recipe
Why You’ll Love This Smashed Chicken Caesar Tacos Recipe
This recipe hits every note you want in a satisfying weeknight dinner. It is fast, flavorful, and requires minimal cleanup since everything happens in one skillet.
The smashing technique is a genuine revelation for taco lovers. Pressing the seasoned ground chicken flat onto the tortilla before cooking means the chicken cooks in its own juices while developing a gorgeous golden crust on the bottom, which regular tacos simply cannot achieve.
The homemade Caesar dressing takes about three minutes to whisk together but makes a massive difference compared to anything from a bottle. It is creamy, punchy, and perfectly salty with just the right amount of anchovy depth without tasting fishy.
This recipe is also endlessly adaptable. You can easily scale it up for a crowd, swap in ground turkey, or adjust the dressing to suit your family’s tastes.
Here is why this recipe will become a regular:
- Ready in under 30 minutes, making it ideal for busy weeknights
- One-pan cooking means easy cleanup
- High in protein thanks to lean ground chicken
- Customizable toppings so everyone can build their own taco
- No special equipment needed beyond a heavy skillet and a spatula
- Kid-friendly flavors with the creamy, cheesy Caesar topping
- Feels restaurant-worthy without any complicated techniques
Read Also: Sheet Pan Tacos Recipe
Ingredients
You only need a handful of pantry staples and fresh ingredients to pull this recipe together. The Caesar dressing ingredients are what really elevate this dish from good to absolutely craveable.
Here is everything you will need for 8 tacos (serves 4):
For the Chicken:
- 1 lb (450g) ground chicken
- 1 teaspoon Italian seasoning
- 1 teaspoon garlic powder
- 1/2 teaspoon onion powder
- 1/2 teaspoon smoked paprika
- 1/2 teaspoon fine sea salt
- 1/4 teaspoon black pepper
- 1 tablespoon avocado oil (plus more for brushing)
For the Flour Tortillas:
- 8 small (6-inch / 15cm) flour tortillas
For the Shredded Mozzarella:
- 1 cup (113g) shredded mozzarella cheese
For the Caesar Dressing:
- 1/3 cup (80g) plain full-fat Greek yogurt
- 2 tablespoons mayonnaise
- 2 tablespoons grated Parmigiano Reggiano (plus more for topping)
- 1 tablespoon fresh lemon juice
- 1 teaspoon Dijon mustard
- 1 teaspoon Worcestershire sauce
- 2 anchovy fillets, finely minced (or 1 teaspoon anchovy paste)
- 2 garlic cloves, finely minced or grated
- Salt and pepper to taste
For the Caesar Slaw Topping:
- 3 cups (180g) romaine lettuce, finely chopped
- Reserved Caesar dressing (from above)
For the Toasted Breadcrumbs:
- 1 tablespoon unsalted butter
- 1/2 cup (30g) panko breadcrumbs
- Pinch of salt
For another weeknight taco favorite, check out these Birria Tacos.
Kitchen Equipment Needed
Nothing fancy required here. The most important tool is a heavy, wide skillet that holds heat well, because that direct contact heat is what creates the signature crispy base.
Here is what you will need:
- Large cast iron skillet or heavy non-stick skillet (12-inch / 30cm recommended)
- Burger press or flat-bottomed spatula for smashing the chicken
- Large mixing bowl for seasoning the chicken
- Small mixing bowl for the Caesar dressing
- Whisk
- Tongs or a wide spatula for flipping
- Microplane grater or box grater for the Parmesan
- Sharp knife and cutting board
- Pastry brush (for oiling the tortilla tops)
- Measuring spoons and cups
Read Also: Taco Seasoning Recipe
Recommended Products for This Recipe
These are products I genuinely recommend based on quality and performance. They can make a real difference in how your smashed chicken caesar tacos turn out.
1. Lodge 12-Inch Cast Iron Skillet
A well-seasoned cast iron skillet holds heat better than almost any other pan, which is the secret to getting that deep golden crust on the chicken. It distributes heat evenly across the tortilla, ensuring every bite is perfectly crisped rather than soft and pale in the middle. This is a workhorse pan you will reach for constantly.
2. OXO Good Grips Burger Press
Getting the chicken thin enough for even cooking is the most important step in smash tacos. A dedicated burger press applies uniform pressure across the entire surface, giving you a perfectly flat, even chicken layer every time rather than an uneven patchwork. It makes the smashing step genuinely effortless.
3. Microplane Premium Zester Grater
Freshly grated Parmesan makes a noticeable difference in both the dressing and the topping. A Microplane produces ultra-fine, feathery Parmesan shavings that melt into the dressing beautifully and cling to the tacos rather than sliding off. Pre-shredded Parmesan simply cannot compete.
4. Anchovy Paste in a Tube
Anchovy paste is the secret ingredient that gives Caesar dressing its signature savory depth without any fishy taste. Using a tube rather than a tin means you can use just the right amount and keep the rest fresh in the fridge for future batches of dressing, without any waste.
5. Panko Breadcrumbs
Panko breadcrumbs are significantly larger and flakier than regular breadcrumbs, which means they toast up into a much crunchier, lighter topping. That toasty crunch on top of these tacos is the finishing touch that takes them over the top.
This Caesar dressing base is also fantastic drizzled over a simple Broccoli Salad.

Step-by-Step Instructions
Step 1: Make the Caesar Dressing
- In a small bowl, add the Greek yogurt, mayonnaise, grated Parmesan, fresh lemon juice, Dijon mustard, Worcestershire sauce, and minced anchovy fillets (or anchovy paste).
- Add the grated garlic cloves directly into the bowl. Using a Microplane or the fine side of a box grater ensures the garlic is completely broken down and blends seamlessly into the dressing.
- Whisk everything together vigorously until the dressing is completely smooth and creamy, with no streaks of Greek yogurt visible.
- Taste the dressing and season with salt and pepper. The saltiness will depend on your Parmesan and anchovies, so always taste before adding extra salt.
- Set the dressing aside. You will use about half of it to dress the romaine and reserve the rest for drizzling over the finished tacos.
Step 2: Toast the Panko Breadcrumbs
- Place your skillet over medium heat and add 1 tablespoon of unsalted butter.
- Once the butter has fully melted and is just beginning to foam, add the panko breadcrumbs to the pan.
- Stir the breadcrumbs constantly with a wooden spoon or silicone spatula to ensure they toast evenly. They can go from golden to burnt very quickly, so keep them moving.
- Cook for 1 to 2 minutes until the breadcrumbs are a deep golden brown and smell nutty and toasted.
- Immediately transfer them to a small bowl or plate to stop the cooking process. Season with a pinch of salt. Set aside.
- Wipe the skillet clean with a folded piece of paper towel held with tongs, being careful as the pan is still hot.
Step 3: Season the Ground Chicken
- Add the ground chicken to a large mixing bowl.
- Sprinkle over the Italian seasoning, garlic powder, onion powder, smoked paprika, salt, and black pepper.
- Using clean hands or a wooden spoon, mix the seasoning into the chicken just until everything is evenly combined. Do not overmix, as this can make the chicken tough and dense.
- Divide the seasoned chicken into 8 equal portions, roughly 2 ounces (57g) each.
- Roll each portion loosely into a ball. Do not pack them tightly; loose portions are easier to smash flat onto the tortilla.
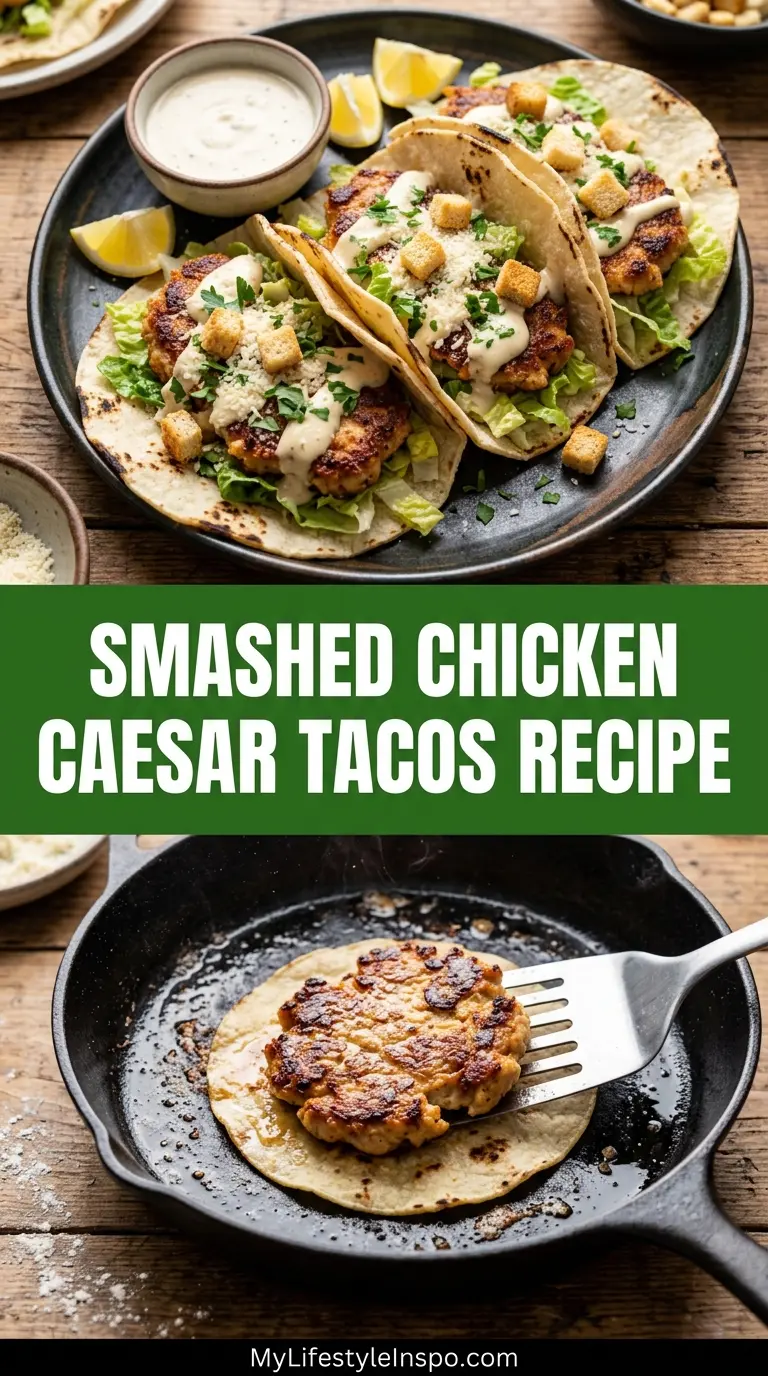
Step 4: Assemble the Smash Tacos
- Lay all 8 flour tortillas flat on your work surface.
- Place one ball of seasoned ground chicken in the center of each tortilla.
- Using the back of a spoon or your fingertips, gently press and spread the chicken ball toward the edges of the tortilla, leaving about a 1/2-inch (1.25cm) border around the edge.
- The chicken layer should be roughly 1/4 inch (6mm) thick across the entire surface. A thin, even layer is the key to getting the chicken cooked through before the tortilla burns.
- Repeat this process with all 8 tortillas and set them aside on the counter while you heat your skillet.
Step 5: Cook the Smash Tacos
- Place your large cast iron skillet or heavy non-stick skillet over medium-high heat and add 1 tablespoon of avocado oil. Allow the oil to heat for about 1 minute until it shimmers but does not smoke.
- Working in batches of 2 to 3 tacos at a time (do not crowd the pan, as this steams the chicken rather than searing it), carefully pick up one assembled taco and place it chicken-side down into the hot skillet.
- Immediately press down firmly on the tortilla using your burger press or the flat bottom of a wide spatula. Hold the pressure for about 20 to 30 seconds to ensure the chicken makes full contact with the pan.
- Cook for 2 to 3 minutes without moving the taco. You will see the edges of the chicken beginning to turn opaque and golden around the perimeter.
- Using a pastry brush, lightly brush the top (tortilla side) of the taco with a small amount of avocado oil. This helps the tortilla side crisp up when you flip.
- Sprinkle about 2 tablespoons of shredded mozzarella over the tortilla side while the taco is still cooking chicken-side down.
- Carefully flip the taco using a wide spatula so the tortilla side is now down and the cheese is melting directly on the hot surface. The tortilla should be golden brown on the underside.
- Cook for an additional 1 minute until the tortilla is lightly browned and the cheese is melted and beginning to form a slightly crispy layer.
- Transfer the cooked taco to a plate and repeat with the remaining tacos. Add a fresh drizzle of avocado oil to the pan between each batch as needed.
Step 6: Dress the Romaine
- While the tacos are cooking in batches, add the finely chopped romaine lettuce to a large bowl.
- Drizzle over roughly half of the prepared Caesar dressing, using about 2 to 3 tablespoons to start.
- Toss the romaine gently until every piece is lightly coated. You want the lettuce to be dressed but not soggy. Adjust the amount of dressing to your preference.
- Keep the dressed romaine cold until you are ready to assemble. The contrast between the cold, crisp lettuce and the hot taco is a big part of what makes this dish so satisfying.
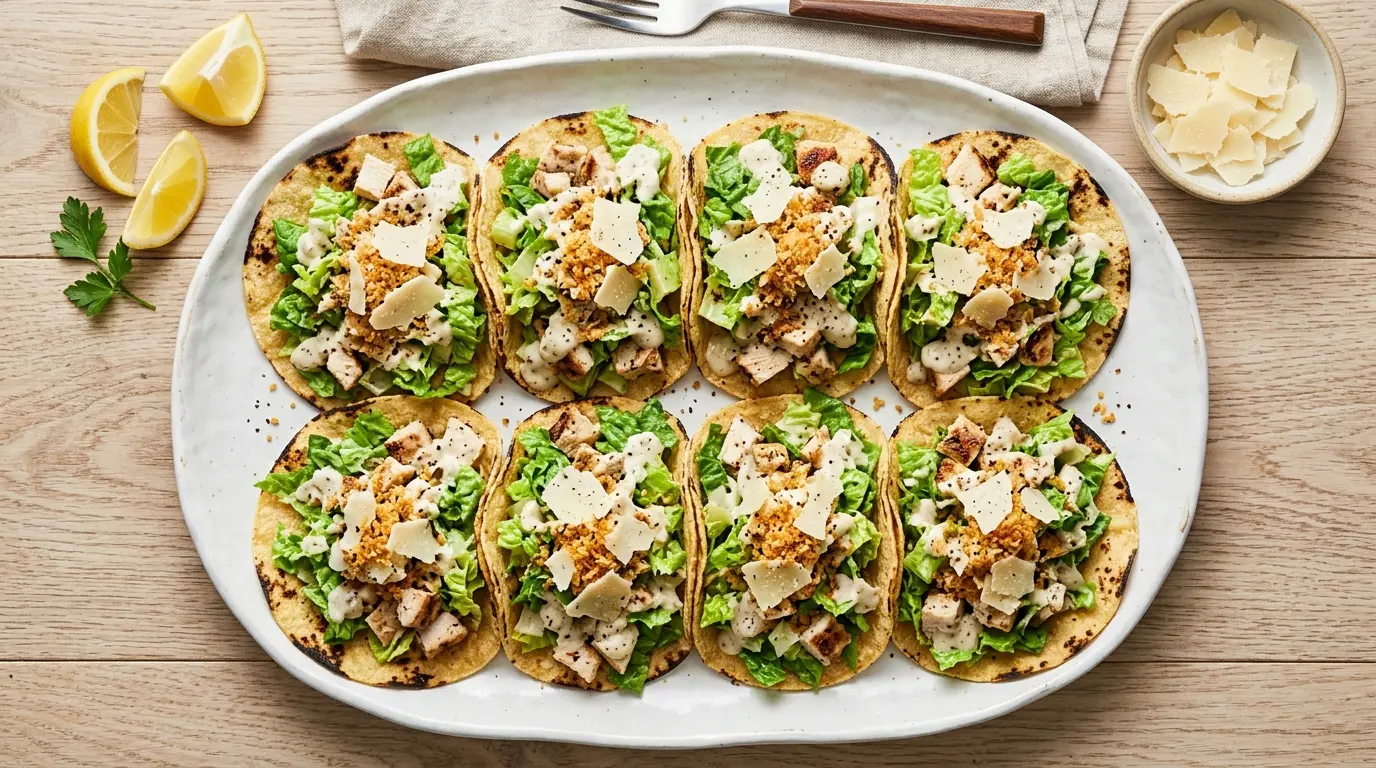
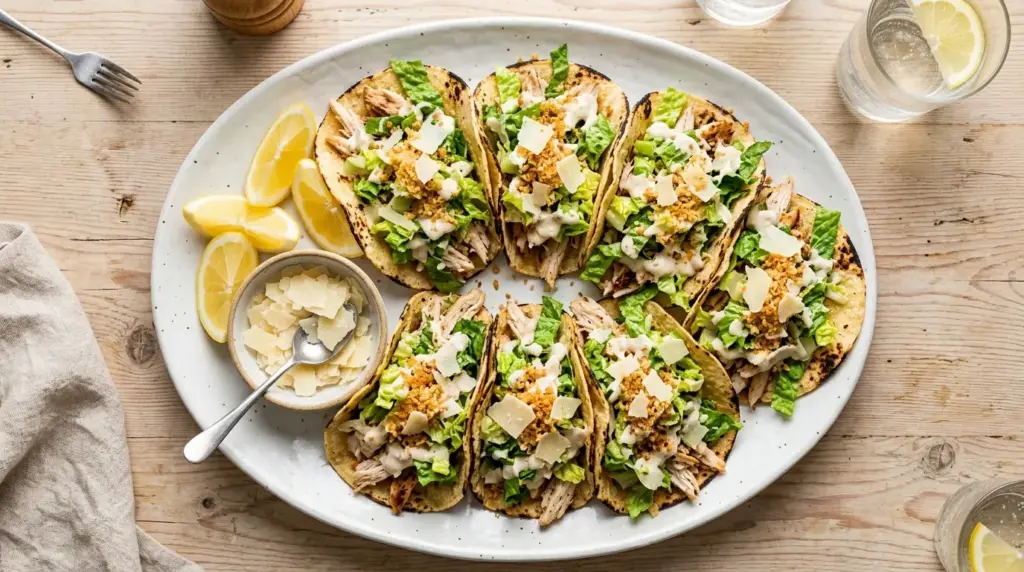
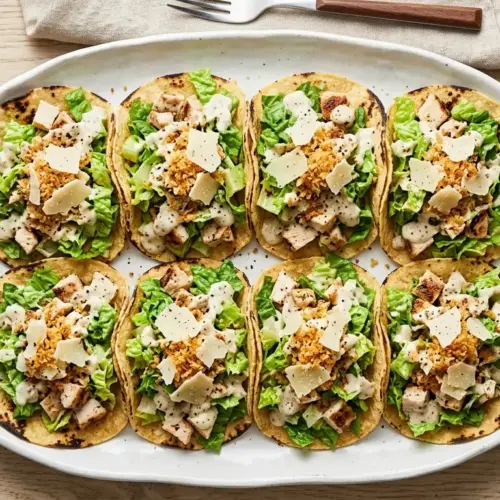
Step 7: Assemble and Serve
- Place the finished smash tacos on a serving platter or individual plates with the crispy cheese side facing up.
- Pile a generous handful of the dressed Caesar romaine on top of each taco.
- Drizzle extra Caesar dressing over the top of the romaine.
- Scatter the toasted panko breadcrumbs liberally over each taco for the signature crunch.
- Finish with a generous amount of freshly grated Parmesan cheese over everything.
- Serve immediately while the tacos are still hot and crispy. These do not hold well, so eat them right away for the best texture.
For another crowd-pleasing handheld meal, you might also love these Street Tacos.
Tips for Success
A few small adjustments make a big difference between a good smash taco and a truly exceptional one. These are the details worth paying attention to.
Here are the key tips for nailing this recipe every time:
- Use a very hot pan. The high heat is what creates the golden, caramelized crust on the chicken. If your pan is not hot enough, the chicken will steam rather than sear, and you will miss that beautiful crispy texture.
- Do not skip the pressing step. Holding firm pressure on the taco for the first 20 to 30 seconds of cooking ensures the chicken fuses to the tortilla. If you skip this, the chicken will pull away from the tortilla when you flip.
- Keep the chicken layer thin and even. A thick or uneven chicken layer means the edges might be overcooked before the center reaches a safe temperature. Aim for a consistent 1/4-inch (6mm) thickness across the entire tortilla.
- Cook in batches. Overcrowding the pan drops the temperature and leads to steamed rather than seared chicken. Two to three tacos at a time is ideal for most home skillets.
- Use fresh Parmesan, not pre-shredded. Freshly grated Parmesan has far more flavor and a finer texture that integrates into the dressing much better than the pre-shredded variety.
- Keep your romaine cold. Toss the romaine in dressing just before assembling so it stays crisp and cool, which contrasts beautifully with the hot, crispy taco base.
- Taste your dressing before adding salt. Anchovies, Parmesan, and Worcestershire sauce all contribute significant saltiness. Always taste and adjust rather than defaulting to a set amount.
You might also enjoy: Homemade Caesar Salad Dressing Recipe
Serving Suggestions
These tacos are a complete meal on their own, but a few well-chosen sides can round out the table beautifully without competing with the Caesar flavors.
Try pairing these smashed chicken Caesar tacos with any of the following:
- Mexican Street Corn for a charred, smoky contrast to the creamy Caesar
- Cilantro Lime Rice as a light, zesty base to serve alongside
- A simple Corn Salsa for a fresh, sweet-and-spicy topping option
- Homemade Tortilla Chips and Easy Guacamole as a crowd-pleasing starter
- Refried Beans on the side for a protein-rich accompaniment
- A simple green salad with lemon vinaigrette to keep the citrus theme going
Read Also: Seven Layer Dip Recipe
Variations to Try
Once you have the basic smash taco technique down, you can adapt this recipe endlessly. The core method stays the same; only the toppings and seasonings change.
Here are some fun variations worth exploring:
- Spicy Caesar Tacos: Add 1/2 teaspoon of cayenne pepper or red pepper flakes to the ground chicken mixture and a few dashes of hot sauce into the Caesar dressing for a kick.
- Ground Turkey Version: Swap the ground chicken for lean ground turkey. The cooking time stays the same, and the flavor is just as satisfying.
- Bacon Caesar Tacos: Cook 4 strips of bacon in the skillet before making the tacos, crumble them, and scatter the bacon pieces over the finished tacos alongside the romaine.
- Corn Tortilla Version: Small corn tortillas work well here for a more traditional taco texture. They crisp up slightly differently than flour tortillas but are equally delicious.
- Extra Cheesy Version: Add a thin layer of shredded mozzarella directly onto the raw chicken side of the tortilla before cooking. It creates a cheese crust that fuses into the chicken as it cooks.
- Lemon Herb Chicken: Replace the Italian seasoning and smoked paprika with the zest of one lemon, dried oregano, and fresh thyme for a brighter, more herby flavor profile.
- Vegan Caesar Tacos: Use a plant-based ground “chicken,” substitute the Greek yogurt and mayonnaise for vegan alternatives, and use a Vegan Caesar Salad Dressing for a fully plant-based version.
For another popular taco night option, check out the Carne Asada Tacos Recipe.
Storage and Reheating
Smash tacos are best enjoyed fresh from the pan, but leftovers can be stored and reheated with good results if you keep the components separate.
Here is how to store and reheat this recipe properly:
- Cooked taco shells: Store the cooked chicken-tortilla shells in an airtight container in the refrigerator for up to 3 days. Keep them separate from the romaine and dressing.
- Caesar dressing: Store in a sealed jar or airtight container in the refrigerator for up to 5 days. Give it a good stir before using again.
- Dressed romaine: The lettuce will wilt if stored dressed. Keep the undressed romaine in a separate bag and dress it fresh each time you eat.
- Toasted breadcrumbs: Store at room temperature in a small airtight container for up to 3 days. They will stay crunchy this way.
- Reheating the taco shells: The best method is to reheat in a dry skillet over medium heat for 1 to 2 minutes per side until warm and re-crisped. Avoid the microwave, which makes the tortilla soft and the chicken rubbery.
- Freezing: These tacos are not ideal for freezing, as the textures of the tortilla and chicken change significantly upon thawing.
Read Also: Chicken Fajita Recipe
Nutritional Facts
The following is an estimate per taco (1 of 8 tacos), including the Caesar dressing and toasted breadcrumbs. Actual values will vary based on specific brands and portion sizes used.
| Nutrient | Amount Per Taco |
|---|---|
| Calories | ~290 kcal |
| Protein | ~20g |
| Total Fat | ~14g |
| Saturated Fat | ~4g |
| Carbohydrates | ~20g |
| Fiber | ~1g |
| Sugar | ~1g |
| Sodium | ~480mg |
| Cholesterol | ~65mg |
These tacos are a strong source of lean protein and deliver a satisfying, balanced macro profile, especially when served with extra romaine for added fiber.
This recipe pairs beautifully with Cilantro Lime Rice for a well-rounded, nutritious plate.
Health Benefits of Key Ingredients
Beyond just tasting great, each major ingredient in this recipe brings real nutritional value to the table.
Here is a closer look at what makes this recipe a smart choice:
- Ground chicken is an excellent source of lean protein with fewer calories and less saturated fat than ground beef. Protein is essential for muscle repair, satiety, and overall metabolic health.
- Romaine lettuce is rich in vitamins A, C, and K, as well as folate and fiber. It is one of the more nutritious salad greens and adds significant crunch and volume with minimal calories.
- Greek yogurt (in the dressing) replaces much of the oil or mayo typically found in Caesar dressings, adding protein and probiotics while reducing the overall calorie count without sacrificing creaminess.
- Garlic is well-documented for its immune-supporting properties and contains allicin, a compound associated with anti-inflammatory and cardiovascular benefits.
- Parmesan cheese is a concentrated source of calcium and protein, and because it has such an intense flavor, you only need a small amount to make a big impact.
- Lemon juice provides vitamin C and brightens the dressing with a fresh acidity that also helps the body absorb iron from the romaine lettuce.
- Anchovy fillets are a small but mighty source of omega-3 fatty acids, which support heart and brain health, as well as selenium and B12.
For another healthy, protein-forward dinner idea, try the Healthy Chicken Salad Recipe.
Frequently Asked Questions
1. Can I use pre-made Caesar dressing instead of homemade?
Yes, you absolutely can use store-bought Caesar dressing to save time. The tacos will still be delicious.
That said, the homemade version in this recipe is noticeably fresher, tangier, and less sweet than most bottled options. If you have five minutes, it is genuinely worth making from scratch.
2. What is the best way to prevent the chicken from sticking to the pan?
The key is ensuring your pan and oil are properly preheated before adding the taco. The oil should shimmer when you add the taco.
A well-seasoned cast iron skillet or a quality non-stick pan also helps tremendously. Avoid stainless steel pans for this recipe, as they are more prone to sticking with ground chicken.
3. Can I make this recipe ahead of time?
You can prepare the Caesar dressing up to 5 days in advance and store it in the refrigerator. You can also season the ground chicken the night before and keep it covered in the fridge.
The actual smash taco cooking and assembly, however, should happen right before serving. These tacos do not hold well once assembled, as the lettuce wilts and the tortilla softens.
4. My chicken is not getting crispy. What am I doing wrong?
The two most common causes are a pan that was not hot enough and chicken that was spread too thick. Make sure your skillet is fully preheated over medium-high heat before adding any tacos.
Also, press firmly for a full 20 to 30 seconds when you first place the taco meat-side down. This contact is what initiates the searing process.
5. Can I use ground beef instead of ground chicken?
Ground beef works well with this smash technique and pairs nicely with Caesar flavors. An 80/20 ground beef blend will give you more fat for even crispier edges.
The cooking time is essentially the same. Just ensure the internal temperature reaches 160°F (71°C) for ground beef.
Read Also: Original Caesar Salad Dressing Recipe
Smashed Chicken Caesar Tacos
Equipment
- Large cast iron skillet or heavy non-stick skillet - 12-inch / 30cm recommended
- Burger press or flat-bottomed spatula - For smashing the chicken
- Large mixing bowl - For seasoning the chicken
- Small mixing bowl - For the Caesar dressing
- Whisk
- Tongs or wide spatula - For flipping
- Microplane grater or box grater - For the Parmesan
- Sharp knife and cutting board
- Pastry brush - For oiling the tortilla tops
- Measuring spoons and cups
Ingredients
- 1 lb ground chicken - 450g
- 1 teaspoon Italian seasoning
- 1 teaspoon garlic powder
- 1/2 teaspoon onion powder
- 1/2 teaspoon smoked paprika
- 1/2 teaspoon fine sea salt
- 1/4 teaspoon black pepper
- 1 tablespoon avocado oil - plus more for brushing
For the Flour Tortillas
- 8 small flour tortillas - 6-inch / 15cm
For the Shredded Mozzarella
- 1 cup shredded mozzarella cheese - 113g
For the Caesar Dressing
- 1/3 cup plain full-fat Greek yogurt - 80g
- 2 tablespoons mayonnaise
- 2 tablespoons grated Parmigiano Reggiano - plus more for topping
- 1 tablespoon fresh lemon juice
- 1 teaspoon Dijon mustard
- 1 teaspoon Worcestershire sauce
- 2 anchovy fillets - finely minced, or 1 teaspoon anchovy paste
- 2 garlic cloves - finely minced or grated
- salt and pepper - to taste
For the Caesar Slaw Topping
- 3 cups romaine lettuce - 180g, finely chopped
- reserved Caesar dressing - from above
For the Toasted Breadcrumbs
- 1 tablespoon unsalted butter
- 1/2 cup panko breadcrumbs - 30g
- pinch of salt
Instructions
- In a small bowl, whisk together Greek yogurt, mayonnaise, grated Parmesan, lemon juice, Dijon mustard, Worcestershire sauce, minced anchovy, and grated garlic until smooth and creamy. Taste and season with salt and pepper. Set aside.
- Melt butter in a skillet over medium heat. Add panko breadcrumbs and toast, stirring constantly, for 1-2 minutes until golden brown and nutty. Immediately transfer to a small bowl and season with salt. Wipe the skillet clean.
- In a large bowl, combine ground chicken with Italian seasoning, garlic powder, onion powder, smoked paprika, salt, and pepper. Mix until just combined. Divide into 8 equal portions (about 2 ounces each) and roll into loose balls.
- Place one ball of seasoned chicken in the center of each tortilla. Gently press and spread toward the edges, leaving about a 1/2-inch border. The chicken layer should be roughly 1/4 inch thick across the entire surface.
- Heat avocado oil in a large skillet over medium-high heat until shimmering. Working in batches of 2-3, place tacos chicken-side down in the skillet and press firmly for 20-30 seconds. Cook for 2-3 minutes until golden and crisp. Brush tortilla tops with oil and sprinkle with mozzarella. Flip and cook for 1 more minute until tortilla is browned and cheese is melted.
- While tacos cook, toss the finely chopped romaine with about half of the prepared Caesar dressing until lightly coated. Keep cold until ready to assemble.
- Place finished tacos on a serving platter with the crispy cheese side facing up. Top with a generous handful of dressed romaine, drizzle with extra Caesar dressing, scatter with toasted panko breadcrumbs, and finish with freshly grated Parmesan. Serve immediately.
Notes
- Use a very hot pan: The high heat is essential for creating the golden, caramelized crust on the chicken. If the pan isn’t hot enough, the chicken will steam instead of sear.
- Don’t skip the pressing step: Holding firm pressure on the taco for the first 20-30 seconds ensures the chicken fuses to the tortilla. If you skip this, the chicken will pull away when you flip.
- Keep the chicken layer thin and even: Aim for a consistent 1/4-inch thickness across the entire tortilla to ensure even cooking.
- Cook in batches: Overcrowding the pan drops the temperature and leads to steamed rather than seared chicken. 2-3 tacos at a time is ideal for most home skillets.
- Use fresh Parmesan: Freshly grated Parmesan has far more flavor and a finer texture than pre-shredded varieties.
- Keep your romaine cold: Toss the romaine in dressing just before assembling so it stays crisp and cool, contrasting beautifully with the hot taco base.
- Make-ahead tips: The Caesar dressing can be made up to 5 days in advance. The ground chicken can be seasoned the night before and kept covered in the fridge.
- Storage: Store cooked taco shells in an airtight container in the refrigerator for up to 3 days. Reheat in a dry skillet over medium heat for 1-2 minutes per side. Store dressing separately for up to 5 days.
- Variations: Try ground turkey instead of chicken, add cayenne for spicy tacos, or use corn tortillas for a more traditional texture. For extra cheesiness, add a thin layer of mozzarella directly onto the raw chicken before cooking.
Final Thoughts
This Smashed Chicken Caesar Tacos Recipe is the kind of dish that earns a permanent spot in your weeknight rotation after the very first bite.
It is quick enough for a Tuesday night, impressive enough to serve to friends on a Friday, and flexible enough that you can put your own spin on it with different proteins or toppings.
The combination of that golden, crispy chicken base, the cold and creamy Caesar-dressed romaine, the salty Parmesan, and the crunch of toasted panko is genuinely addictive.
Once you try the smash technique, it will completely change how you think about taco night. Give this recipe a try this week, and share your results in the comments below.
Did you try a fun variation or add your own twist? I would love to hear about it.
Recommended:
- Fish Tacos Recipe
- Black Bean Quesadilla Recipe
- Chicken Enchiladas Recipe
- Taco Skillet Recipe
- Beef Short Rib Taco Recipe
- Chicken Lettuce Wraps Recipe
- Pico de Gallo Recipe
- Enchilada Sauce Recipe
- Mexican Rice Recipe
- Taco Casserole Recipe


