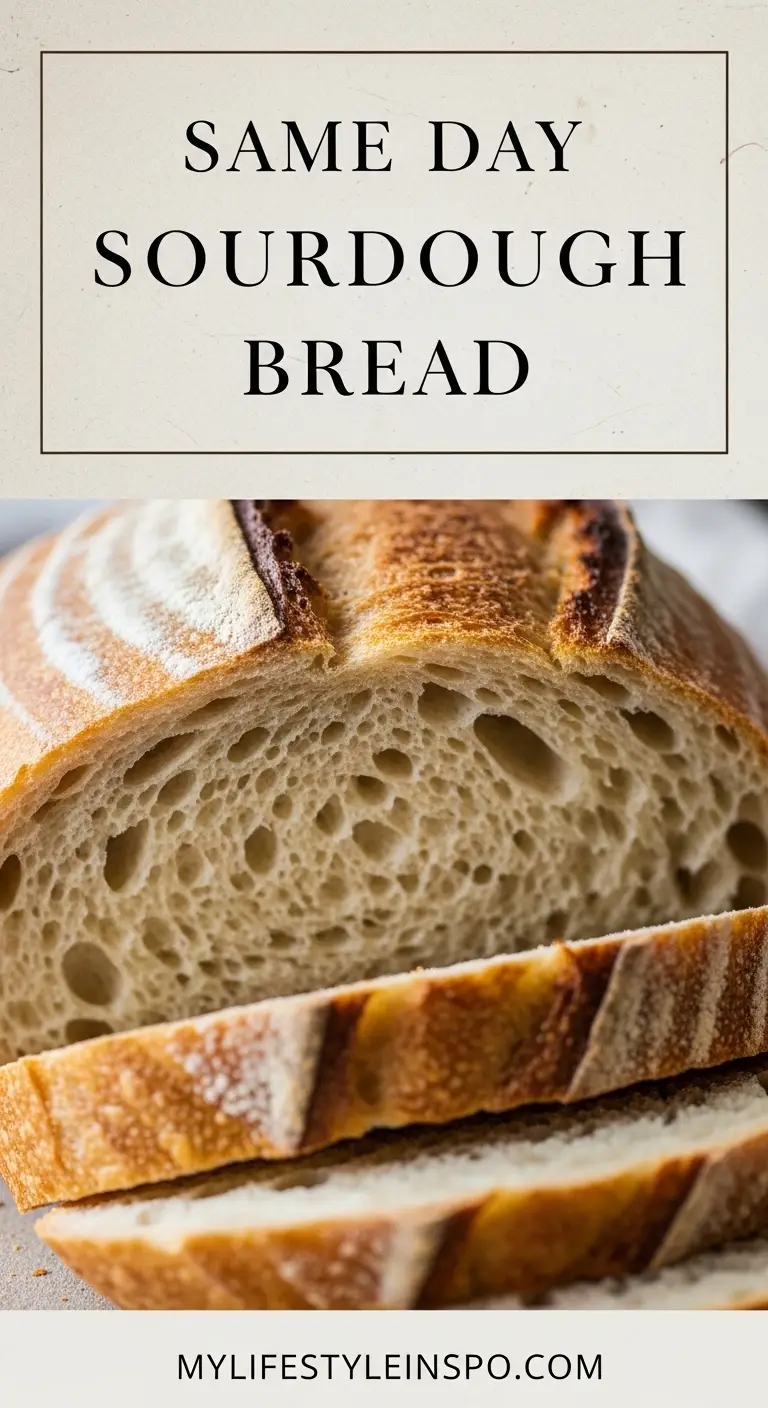
Making fresh, crusty sourdough bread doesn’t have to take multiple days. This same day sourdough bread recipe lets you enjoy a homemade loaf with a golden crust and airy crumb in just one day, perfect for busy schedules without sacrificing that authentic sourdough flavor.
Many home bakers shy away from sourdough because they think it requires days of planning and complex schedules. The truth is, with an active starter and the right technique, you can mix, ferment, shape, and bake a beautiful loaf all in one day.
This recipe uses a higher ratio of active sourdough starter to flour, which speeds up the fermentation process. Combined with warm dough temperatures and proper stretching and folding techniques, you’ll achieve that characteristic chewy texture and tangy flavor sourdough lovers crave.
The key is starting with a well-fed, bubbly starter. Feed your starter the night before so it’s at peak activity when you wake up, doubling in size and passing the float test.
This approach works wonderfully for beginners just starting their sourdough journey or experienced bakers who want fresh bread without the overnight wait.
Why You’ll Love This Same Day Sourdough Bread Recipe
This same day sourdough bread recipe delivers authentic sourdough character without the typical two-day process, making it perfect for spontaneous baking sessions or when you forget to start bread the day before. The shorter fermentation creates a milder, less tangy flavor that many families prefer, especially children who might find traditional sourdough too sour.
The recipe requires no special equipment like a banneton basket or stand mixer. You’ll achieve professional results using just your hands and basic kitchen tools.
- Quick timeline: Complete the entire process in 7-10 hours from mixing to baking
- Beginner friendly: Simple stretch and fold technique with no kneading required
- Flexible schedule: Adjust proofing times to fit your daily routine
- Beautiful results: Achieve a crispy golden crust with an open, airy crumb
- No commercial yeast: Uses only natural fermentation from your sourdough starter
- Milder flavor: Shorter fermentation produces less tang than overnight methods
You might also enjoy: Sweet Sourdough Bread Recipe
Ingredients
This simple recipe requires just four basic ingredients that create a beautifully complex loaf. The higher proportion of starter to flour is what makes same day baking possible, providing enough leavening power to complete fermentation in just several hours instead of overnight.
- 150g (2/3 cup) active sourdough starter, fed and bubbly
- 350g (1 1/2 cups) lukewarm water, around 85-90°F (29-32°C)
- 500g (4 cups) bread flour, plus extra for dusting
- 10g (2 teaspoons) sea salt
Kitchen Equipment Needed
You don’t need fancy equipment to make excellent sourdough bread. These basic tools will help you achieve professional results, though many can be improvised with items you already have in your kitchen.
- Large mixing bowl
- Kitchen scale for accurate measurements
- Dutch oven or cast iron pot with lid
- Bench scraper or sharp knife for scoring
- Kitchen towel or plastic wrap for covering dough
- Parchment paper
Read Also: Einkorn Bread Recipe
Recommended Products for This Recipe
Having the right tools makes a significant difference in your sourdough baking success. These carefully selected products will help you achieve better results and make the process more enjoyable.
1. Lodge Cast Iron Dutch Oven
This Dutch oven retains heat beautifully and creates the perfect steam environment for developing that crispy, crackly crust sourdough is known for. The heavy lid traps moisture during the first half of baking, mimicking professional steam-injected ovens. It’s versatile enough to use for countless other recipes beyond bread.
2. King Arthur Bread Flour
This high-protein bread flour is specifically milled for bread baking and provides the gluten structure needed for proper rise and that characteristic chewy texture. The consistent protein content ensures reliable results every time you bake.
3. Digital Kitchen Scale
Precision matters in bread baking, and this digital kitchen scale ensures your measurements are accurate every time. Weight measurements are far more reliable than volume measurements for consistent results, especially with flour which can vary significantly when measured by cups.
4. Bread Lame or Scoring Tool
A bread lame gives you clean, professional scores that help control how your bread expands in the oven. The razor-sharp blade slices through the dough surface without dragging, creating those beautiful ear formations that bakery breads have.
Another favorite: Fresh Milled Flour Bread Recipe
Step-by-Step Instructions
Follow these detailed instructions to create your same day sourdough bread. Each step is important for developing flavor, structure, and that perfect texture.
1. Feed Your Sourdough Starter (The Night Before)
- The evening before you plan to bake, feed your sourdough starter with equal parts flour and water (for example, 50g starter, 50g flour, 50g water)
- Stir thoroughly to combine, cover loosely, and leave at room temperature overnight
- By morning, your starter should be bubbly, doubled in size, and pass the float test (drop a small spoonful in water and it should float)
- This active, peak starter is crucial for same day baking success
2. Mix the Dough
- In a large mixing bowl, combine the lukewarm water and active sourdough starter
- Stir with a wooden spoon or your hand until the starter dissolves into the water
- Add the bread flour and salt to the bowl
- Mix everything together using your hand or a sturdy spoon until no dry flour remains and you have a shaggy, sticky dough
- This initial mixing takes about 2-3 minutes
- Don’t worry if the dough looks rough, it will smooth out during the stretch and folds
3. Autolyse Rest
- Cover the bowl with a damp kitchen towel, plastic wrap, or a shower cap
- Let the dough rest for 30 minutes at room temperature
- During this autolyse period, the flour absorbs the water and gluten begins developing naturally
- You’ll notice the dough becomes smoother and more elastic after this rest
4. Perform Stretch and Folds (First Set)
- Wet your hands with water to prevent sticking
- Grab one edge of the dough and stretch it upward as far as it will go without tearing
- Fold that stretched portion over to the opposite side of the dough
- Rotate the bowl 90 degrees (a quarter turn)
- Repeat the stretch and fold motion
- Continue rotating and folding until you’ve completed all four sides of the dough
- This first set of folds begins building gluten structure
5. Rest and Repeat Stretch and Folds
- Cover the bowl and let the dough rest for 30 minutes
- After 30 minutes, perform another complete set of stretch and folds (grabbing all four sides)
- Cover and rest another 30 minutes
- Perform a third and final set of stretch and folds
- After each set, you’ll notice the dough becoming stronger, smoother, and more cohesive
- Total stretch and fold period: 1.5 hours with three sets
6. Bulk Fermentation
- After the final stretch and fold, cover the bowl tightly
- Place the dough in a warm spot in your kitchen (75-80°F or 24-27°C is ideal)
- Let the dough ferment for 3-5 hours until it has increased in size by 50-75%
- The dough should look puffy with visible bubbles on the surface and underneath
- If your kitchen is cooler, this may take closer to 5 hours
- If your kitchen is very warm, it might only take 3 hours
- Use visual cues rather than just time to judge when bulk fermentation is complete
7. Shape the Dough
- Lightly flour your work surface
- Gently turn the dough out of the bowl onto the floured surface
- The dough should release easily without deflating too much
- Use your hands to gently shape the dough into a round by folding the edges toward the center
- Flip the dough over so the seam side is down
- Using your hands or a bench scraper, gently drag the dough in a circular motion to create surface tension
- This tension helps the bread hold its shape and rise properly in the oven
8. Final Proof
- Line a bowl with a heavily floured kitchen towel or place the dough in a banneton basket if you have one
- Carefully place the shaped dough into the bowl seam-side up
- Cover with a kitchen towel
- Let the dough proof for 1-2 hours at room temperature until it looks puffy and springs back slowly when gently pressed
- You can also place the dough in the refrigerator for 30-60 minutes before baking if you want to slow down the process
9. Preheat the Oven
- About 45 minutes before baking, place your Dutch oven with its lid in the oven
- Preheat to 450°F (232°C)
- The preheated pot is essential for achieving maximum oven spring and a crispy crust
- Never put a cold Dutch oven in a hot oven as it can crack
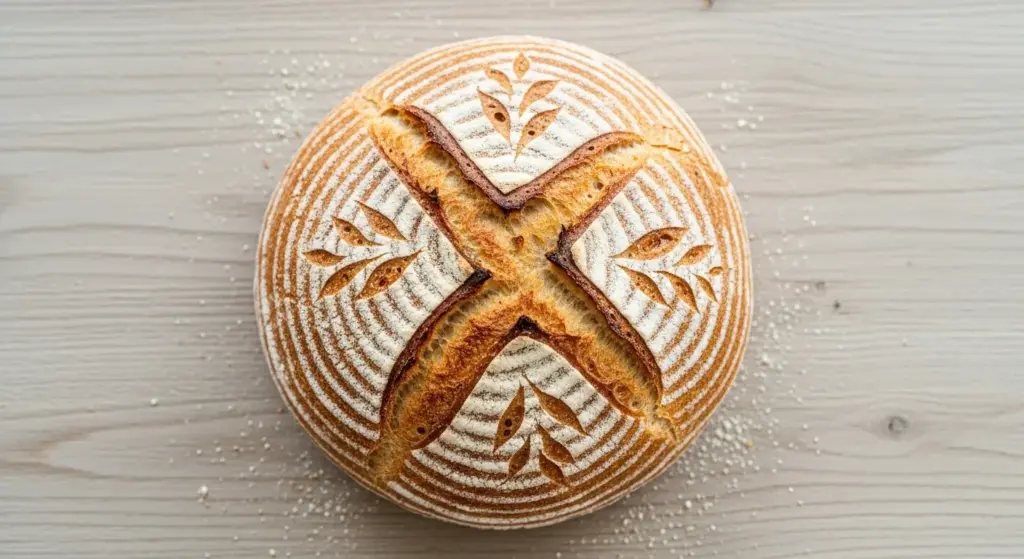
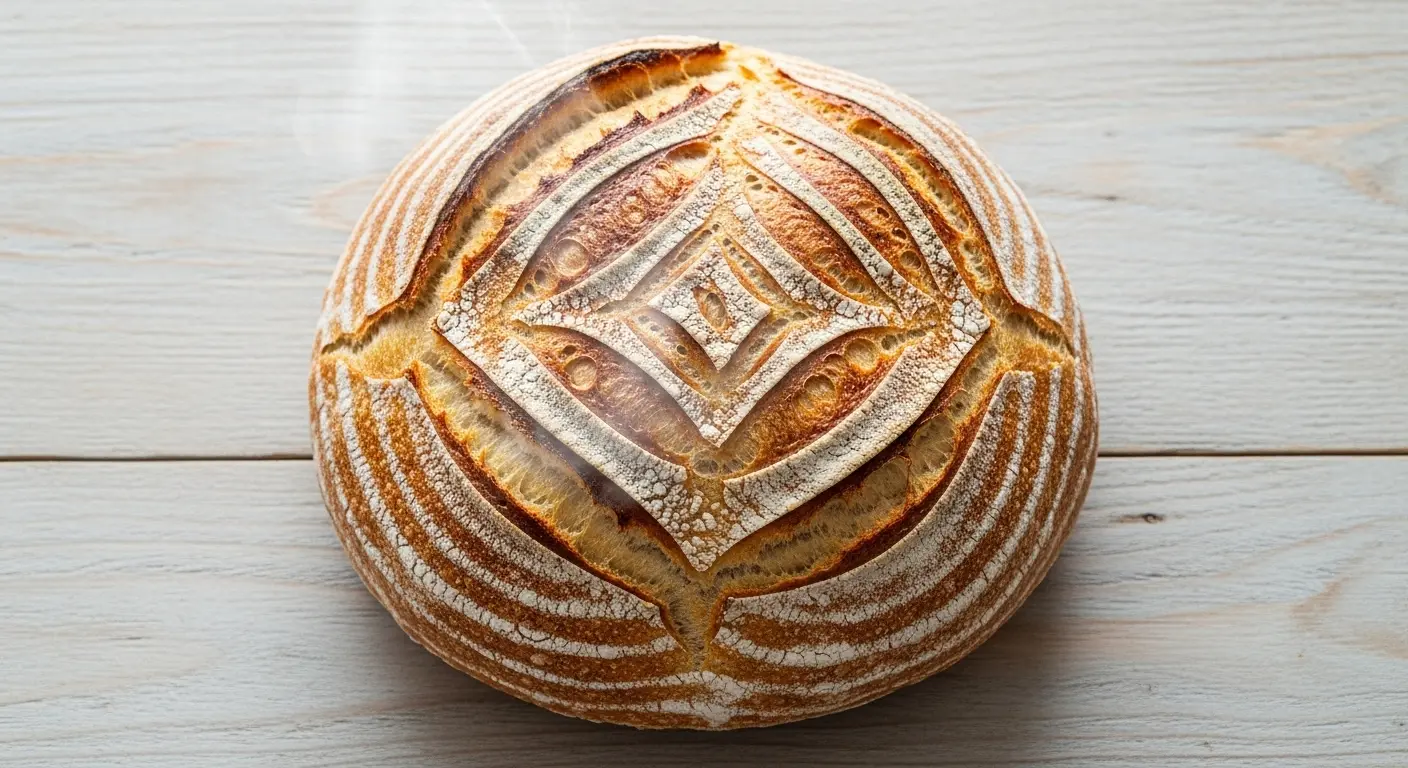
10. Score and Bake
- Carefully remove the hot Dutch oven from the oven using oven mitts
- Place a piece of parchment paper on your work surface
- Gently turn your proofed dough out onto the parchment paper so the seam side is now down
- Using a sharp knife, razor blade, or bread lame, make one or more quick, decisive cuts across the top of the dough at a 45-degree angle
- These scores allow the bread to expand properly and create those beautiful patterns
- Carefully lift the parchment paper with the dough and lower it into the hot Dutch oven
- Put the lid on immediately
11. Bake Covered
- Bake the bread covered with the lid on for 20 minutes at 450°F (232°C)
- This initial covered baking creates steam that helps the bread rise dramatically
- Don’t open the oven during this time
12. Bake Uncovered
- After 20 minutes, carefully remove the lid from the Dutch oven
- Continue baking uncovered for another 25-30 minutes until the crust is deep golden brown
- The internal temperature should reach 205-210°F (96-99°C) when done
- If the top is browning too quickly, you can lower the oven temperature to 425°F (218°C)
13. Cool and Enjoy
- Using oven mitts, carefully remove the Dutch oven from the oven
- Lift the bread out using the parchment paper and transfer to a wire cooling rack
- Let the bread cool completely for at least 1 hour before slicing
- This cooling time allows the interior crumb to set properly
- Cutting into hot bread will result in a gummy texture
- Once cooled, slice and enjoy your same day sourdough bread
This pairs beautifully with honey butter or your favorite spreads.
Tips for Success
These practical tips will help you troubleshoot common issues and achieve the best possible results with your same day sourdough bread. Small adjustments can make a significant difference in your final loaf.
- Use a mature starter: Your sourdough starter should be at least 2-3 weeks old and consistently doubling within 4-8 hours after feeding for reliable results
- Temperature matters: Keep your dough around 75-80°F (24-27°C) during fermentation by placing it near a warm oven, using a proofing box, or setting it in a turned-off oven with the light on
- Don’t skip the float test: Before mixing your dough, drop a teaspoon of starter in water to ensure it’s active enough
- Watch the dough, not the clock: Fermentation times vary based on temperature and starter strength, so rely on visual cues like increased volume and bubbles
- Use a kitchen scale: Weight measurements are far more accurate than volume measurements and will give you consistent results
- Score with confidence: Make your cuts quick and decisive with a sharp blade for clean lines that don’t drag
- Adjust hydration if needed: If your dough feels too sticky to handle, reduce the water by 25g next time
- Steam is crucial: The covered Dutch oven method traps steam perfectly, but you can also spray water in the pot before covering
- Cool completely: Resist the temptation to slice hot bread, as it needs time for the crumb structure to set properly
For a lighter option, try: Sweet Potato Bread Recipe
Serving Suggestions
Same day sourdough bread is incredibly versatile and works beautifully for everything from simple toast to gourmet sandwiches. The mild tang and sturdy texture make it perfect for both sweet and savory applications.
This bread makes exceptional toast in the morning, topped with butter and jam, mashed avocado, or classic egg salad. The thick slices hold up beautifully to generous amounts of toppings without getting soggy.
- Slice thick for classic French toast that has a crispy exterior and custardy center
- Make artisan grilled cheese sandwiches with your favorite cheeses
- Toast slices for bruschetta topped with fresh tomatoes and basil
- Serve alongside hearty soups like Mediterranean Lentil Soup or Cream of Mushroom Soup
- Use for open-faced sandwiches piled high with Classic Chicken Salad
- Cut into cubes for homemade croutons or bread stuffing
- Serve with olive oil and balsamic vinegar for dipping at dinner parties
- Make paninis or pressed sandwiches that benefit from the sturdy structure
Read Also: Chocolate Chip Bread Recipe
Variations to Try
Once you’ve mastered the basic same day sourdough bread recipe, these creative variations will keep your bread basket interesting and help you customize the flavor to your preferences.
- Whole wheat sourdough: Replace up to 100g of the bread flour with whole wheat flour for added nutrition and a nuttier flavor, adding 10-15g extra water to compensate for absorption
- Seeded sourdough: Add 50-75g of mixed seeds (sunflower, pumpkin, sesame, flax) during the final stretch and fold for extra texture and nutrition
- Herb and garlic: Fold in 2 tablespoons of dried herbs (rosemary, thyme, oregano) and 3 minced garlic cloves during shaping
- Olive and rosemary: Mix in 100g chopped olives and 2 tablespoons fresh rosemary for a Mediterranean twist
- Cheddar jalapeño: Add 100g shredded sharp cheddar and 2 diced jalapeños during the final fold for a spicy, cheesy loaf
- Cinnamon raisin: Incorporate 100g raisins and 2 teaspoons cinnamon, and add 1 tablespoon honey to the dough for a sweet breakfast bread
- Everything bagel: After scoring, brush with water and sprinkle generously with everything bagel seasoning
- Cranberry walnut: Fold in 75g dried cranberries and 75g chopped walnuts for a festive, slightly sweet loaf
You might also enjoy: Pineapple Quick Bread Recipe
Storage and Reheating
Proper storage keeps your same day sourdough bread fresh and delicious for several days. The natural fermentation actually helps bread stay fresh longer than conventional yeasted breads.
Store the completely cooled bread at room temperature in a paper bag or bread box for up to 3 days. Avoid plastic bags for room temperature storage as they trap moisture and make the crust soft and potentially encourage mold growth.
- Freezing: Slice the bread before freezing, then wrap tightly in plastic wrap and place in a freezer bag for up to 3 months
- Thawing: Remove slices as needed and toast directly from frozen, or let thaw at room temperature for 15-20 minutes
- Reviving stale bread: Wrap the whole loaf in aluminum foil and warm in a 350°F (177°C) oven for 10-15 minutes to refresh the crust
- Refreshing slices: Toast or grill slices to bring back crispness and enhance flavor
- Repurposing: Use day-old bread for French Toast Casserole, bread pudding, or homemade breadcrumbs
- Refrigeration: Only refrigerate sourdough if you live in a very humid climate, as cold temperatures accelerate staling
Another favorite: Blackberry Bread Recipe
Nutritional Facts
Per slice (based on 12 slices per loaf):
- Calories: 182
- Total Fat: 0.5g
- Saturated Fat: 0.1g
- Polyunsaturated Fat: 0.2g
- Monounsaturated Fat: 0.04g
- Sodium: 390mg
- Total Carbohydrates: 38g
- Dietary Fiber: 1g
- Sugars: 0.1g
- Protein: 5g
- Potassium: 51mg
- Calcium: 8mg
- Iron: 2mg
Note: Nutritional information is automatically calculated and should be used as an approximation only.
Health Benefits of Key Ingredients
Same day sourdough bread offers several nutritional advantages over regular bread, even with the shorter fermentation time. The natural fermentation process creates beneficial changes in the dough that make it more digestible and nutritious.
Sourdough fermentation breaks down phytic acid in the flour, which improves mineral absorption from the bread. This means your body can better access the iron, zinc, and magnesium naturally present in wheat.
- Better digestibility: The wild yeast and lactic acid bacteria pre-digest some of the gluten and starches, making the bread easier on your digestive system
- Lower glycemic index: Sourdough bread causes a slower rise in blood sugar compared to conventional bread
- Probiotic benefits: While baking kills most bacteria, the fermentation process creates beneficial acids and compounds
- Increased B vitamins: Fermentation increases certain B vitamins, including folate
- Improved mineral bioavailability: The breakdown of phytic acid allows better absorption of minerals like iron and zinc
- Natural preservation: The acidic environment created by fermentation helps bread stay fresh longer without preservatives
- Less sodium per slice: Homemade sourdough typically contains less sodium than commercial breads
For more sourdough options, try: Amish Banana Bread Recipe
Frequently Asked Questions
1. Can I really make sourdough bread in one day?
Yes, absolutely. The key is using a higher ratio of active starter to flour and maintaining warm dough temperatures throughout the process. Starting with a freshly fed, bubbly starter that’s at peak activity is crucial for success.
2. Why isn’t my dough rising as quickly as the recipe states?
Temperature is the most common culprit. If your kitchen is below 70°F (21°C), fermentation will take significantly longer. Try placing your dough in a turned-off oven with just the light on, or near a warm (not hot) radiator to speed things up.
3. Can I use all-purpose flour instead of bread flour?
You can substitute all-purpose flour, but your bread will have a slightly softer texture and less chewy crumb. Bread flour has higher protein content (12-14%) which creates more gluten structure. If using all-purpose flour, reduce the water by about 25g as it absorbs less liquid.
4. How do I know when bulk fermentation is complete?
Look for these signs: the dough has increased in volume by 50-75%, you see bubbles on the surface and along the sides of the bowl, the dough looks puffy and slightly domed, and when you gently shake the bowl, the dough jiggles. It should also pass the poke test where a wet finger pressed into the dough leaves an indentation that slowly springs back.
5. What if I don’t have a Dutch oven?
You can bake the bread on a preheated baking stone or heavy baking sheet. To create steam, place a shallow pan of water on the bottom rack of your oven before preheating. Alternatively, spray water into the oven when you first put the bread in and again 5 minutes later, working quickly to keep heat in.
This technique works wonderfully in Jiffy Spoon Bread Recipe as well.
Same Day Sourdough Bread
Equipment
- Large mixing bowl
- Kitchen scale - For accurate measurements
- Dutch oven or cast iron pot with lid - Essential for crust development
- Bench scraper or sharp knife - For scoring the dough
- Kitchen towel or plastic wrap - For covering dough during rests
- Parchment paper
- Wire cooling rack
- Banneton basket - (optional) For final proof
- Bread lame or scoring tool - (optional) For clean, professional scores
- Proofing box - (optional) For maintaining dough temperature
Ingredients
- 150 g active sourdough starter - 2/3 cup; fed and bubbly, at peak activity
- 350 g lukewarm water - 1 1/2 cups; around 85-90°F (29-32°C)
- 500 g bread flour - 4 cups; plus extra for dusting
- 10 g sea salt - 2 teaspoons
Instructions
- The evening before baking, feed your starter with equal parts flour and water (e.g., 50g each), stir well, cover loosely, and leave at room temperature overnight. By morning it should be bubbly, doubled in size, and pass the float test.
- In a large bowl, combine the lukewarm water and active starter, stirring until dissolved, then add the bread flour and salt and mix until no dry flour remains — about 2-3 minutes. The dough will look shaggy and sticky; that’s fine.
- Cover the bowl with a damp kitchen towel or plastic wrap and let the dough rest for 30 minutes at room temperature. The flour will absorb the water and the dough will become smoother and more elastic.
- With wet hands, grab one edge of the dough, stretch it upward, and fold it to the opposite side; rotate the bowl 90° and repeat until all four sides are folded. This begins building gluten structure.
- Cover and rest the dough for 30 minutes, then perform a second complete set of stretch and folds; rest another 30 minutes and perform a third and final set. The dough will become noticeably stronger and smoother with each round.
- Cover the bowl tightly and place in a warm spot (75-80°F / 24-27°C) for 3-5 hours, until the dough has increased in volume by 50-75% and appears puffy with visible surface bubbles. Use visual cues — not just the clock — to judge readiness.
- Turn the dough out onto a lightly floured surface, fold the edges toward the center to form a round, then flip seam-side down and use your hands or a bench scraper to drag it in a circular motion to build surface tension.
- Place the shaped dough seam-side up into a heavily floured towel-lined bowl (or banneton), cover, and let proof for 1-2 hours at room temperature until puffy and slowly springing back when gently pressed. You can also refrigerate for 30-60 minutes to slow things down.
- About 45 minutes before baking, place your Dutch oven with its lid inside the oven and preheat to 450°F (232°C). The preheated pot is essential for oven spring and a crispy crust.
- Carefully remove the hot Dutch oven, turn the proofed dough out onto parchment paper seam-side down, and make one or more quick, decisive cuts at a 45-degree angle with a sharp blade or lame. Lower the dough on the parchment into the Dutch oven and cover immediately.
- Bake covered at 450°F (232°C) for 20 minutes without opening the oven; the trapped steam helps the bread rise dramatically during this phase.
- Remove the lid and continue baking for 25-30 minutes until the crust is deep golden brown and the internal temperature reaches 205-210°F (96-99°C). Lower to 425°F if the top is browning too quickly.
- Lift the bread out using the parchment paper and transfer to a wire cooling rack; let cool for at least 1 hour before slicing to allow the crumb to set properly. Cutting into hot bread will result in a gummy texture.
Notes
- Starter readiness: Your starter should be at least 2-3 weeks old and consistently doubling within 4-8 hours of feeding. Always do the float test before mixing.
- Temperature is everything: Keep dough at 75-80°F (24-27°C) during fermentation. A turned-off oven with the light on works perfectly as a proofing spot.
- Watch the dough, not the clock: Fermentation times vary based on your kitchen temperature and starter strength — always rely on visual cues like volume increase and bubbles.
- Flour substitution: All-purpose flour can be used, but reduce water by 25g and expect a slightly softer, less chewy crumb. Bread flour is strongly recommended.
- Too sticky to handle? Reduce water by 25g on your next bake. Wet hands (not extra flour) are the best tool for handling sticky dough during stretch and folds.
- No Dutch oven? Bake on a preheated baking stone or heavy baking sheet and place a shallow pan of hot water on the bottom rack to create steam.
- Storage: Store cooled bread in a paper bag or bread box at room temperature for up to 3 days. Avoid plastic bags, which soften the crust.
- Freezing: Slice before freezing, wrap tightly in plastic wrap, and freeze for up to 3 months. Toast slices directly from frozen.
- Reviving stale bread: Wrap in foil and warm in a 350°F (177°C) oven for 10-15 minutes to refresh the crust.
- Flavor variations: Try folding in 50-75g seeds, 100g shredded cheddar with diced jalapeño, or chopped olives and fresh rosemary during the final stretch and fold for a custom loaf.
Final Thoughts
This same day sourdough bread recipe proves that you don’t need complicated schedules or days of waiting to enjoy fresh, homemade sourdough. With just a few hours and some simple techniques, you can bake a beautiful loaf with a crispy crust and soft, airy interior.
Give this recipe a try this weekend and experience the satisfaction of slicing into warm, crusty bread you made entirely from scratch. Have you tried making same day sourdough? Share your results in the comments below or tag me on social media with your beautiful loaves!
Recommended:
- Starbucks Banana Bread Recipe
- Keto Banana Bread Recipe
- Eggless Banana Bread Recipe
- Old Fashioned Pumpkin Bread Recipe
- Snickerdoodle Banana Bread Recipe
- Banana Nut Bread Recipe with Pecans
- Maui Banana Bread Recipe
- Paula Deen Banana Bread Recipe
- Macaroni Grill Bread Recipe
- Vasilopita Bread Recipe


