
If you’ve ever ordered from an Indian restaurant and wondered why the rice tasted so much better than plain white rice, the answer is almost always a jeera rice recipe.
“Jeera” simply means cumin in Hindi, and this classic North Indian side dish transforms everyday basmati rice into something truly special using just a handful of pantry staples.
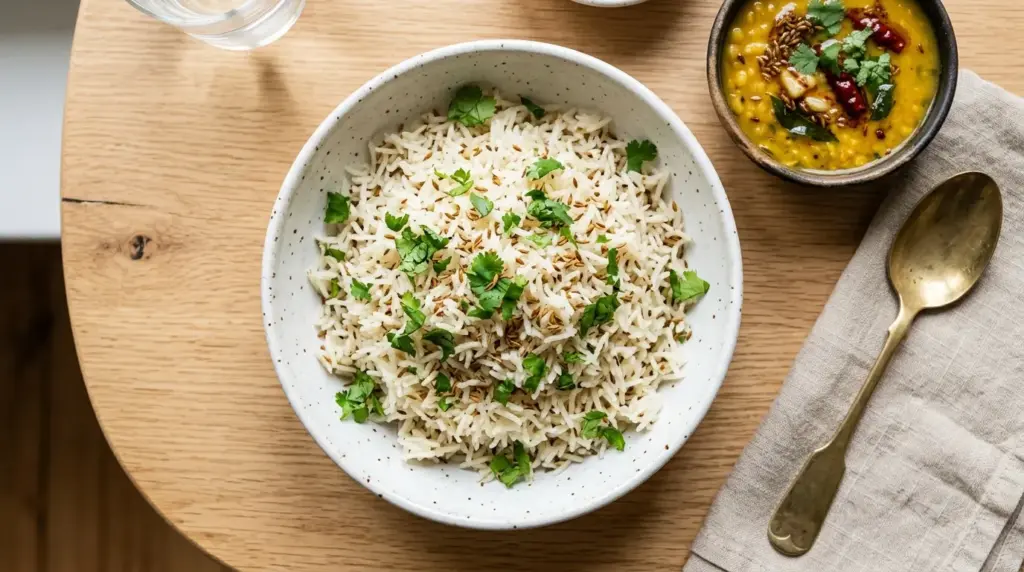
The magic starts the moment cumin seeds hit hot ghee. They sizzle, pop, and release a warm, nutty, slightly smoky aroma that infuses every single grain of rice as it cooks.
The result? Fluffy, non-sticky, beautifully fragrant rice that pairs effortlessly with dals, curries, and grilled meats.
This homestyle version of jeera rice is the most popular and practical approach. It cooks everything in one pot from start to finish, making it totally beginner-friendly.
You rinse and soak the basmati, bloom your spices in ghee, toast the rice briefly, then let it simmer gently until each grain is perfectly cooked through. That’s really all there is to it.
Once you understand the technique, this becomes one of those recipes you can make without even thinking about it.
Pair it alongside our Chicken Korma for a complete, restaurant-worthy Indian dinner right at home.
Why You’ll Love This Jeera Rice Recipe
This jeera rice recipe is the kind of dish that punches way above its weight.
With just a few simple ingredients and about 30 minutes of your time, you get rice that tastes like it came straight from your favorite Indian restaurant.
Here’s why this recipe deserves a permanent spot in your rotation:
- It’s a one-pot wonder. Everything cooks in a single saucepan, which means minimal cleanup and maximum convenience.
- The flavor is incredible for the effort required. Blooming cumin seeds in ghee takes less than a minute, but it elevates the entire dish completely.
- It’s naturally gluten-free and vegetarian. This makes it a crowd-pleasing side dish for nearly any dietary need.
- It scales up beautifully. Cooking for two or cooking for a crowd, this recipe adjusts easily.
- It pairs with almost everything. From spicy curries to simple yogurt, jeera rice is the perfect neutral-but-flavorful base.
- Leftovers reheat perfectly. A splash of water and a minute in the microwave brings everything back to life.
- The technique teaches you a core Indian cooking skill. Once you learn how to bloom spices in fat, you’ll apply it to dozens of other Indian recipes.
You might also enjoy: Chicken Tikka Masala Recipe
Ingredients
The beauty of jeera rice lies in its simplicity. You don’t need a long shopping list, but quality does matter, especially when it comes to the rice and ghee.
Here’s everything you’ll need to make a classic jeera rice recipe:
- 1 cup (200g) basmati rice, rinsed and soaked
- 2 cups (475ml) water
- 2 tablespoons ghee (or unsalted butter as a substitute)
- 1 teaspoon cumin seeds
- 1 small green chili, finely chopped (optional, adjust to heat preference)
- 1 bay leaf
- 2-3 whole cloves
- 2-3 green cardamom pods, lightly crushed
- 1 small cinnamon stick (about 1 inch / 2.5cm)
- 3/4 teaspoon salt, or to taste
- 2 tablespoons fresh cilantro (coriander), chopped, for garnish
Read Also: Basmati Rice Recipe
Kitchen Equipment Needed
You don’t need any specialized tools to make this recipe. A simple saucepan and a lid are really all you need.
Here’s what to have ready before you start:
- Heavy-bottomed saucepan with a tight-fitting lid (2-3 quart / 2-3 liter capacity)
- Mixing bowl for rinsing and soaking rice
- Fine mesh strainer or colander for draining
- Measuring cups and spoons
- Wooden spoon or heat-safe silicone spatula
- Fork for fluffing the cooked rice
- Sharp knife and cutting board for the green chili
Another favorite: Mulligatawny Soup Recipe
Recommended Products for This Recipe
These are products I genuinely recommend based on quality and performance. Using the right tools and ingredients makes a real difference in getting that perfectly fluffy, restaurant-style result.
1. Royal Basmati Rice (10 lb Bag)
Long-grain aged basmati is the non-negotiable foundation of a great jeera rice recipe. Royal Basmati is one of the most trusted brands, with fragrant, separate grains that cook up beautifully every time. Using a shorter-grain or lower-quality rice will result in clumpy, less aromatic results.
2. Pure Indian Foods Organic Grass-Fed Ghee
Ghee is the soul of this dish. Its higher smoke point and deep, nutty flavor can’t quite be replicated with regular butter or oil. This organic grass-fed ghee has a beautiful golden color and a rich, authentic flavor that makes the cumin seeds bloom perfectly.
3. Heavy-Bottomed Stainless Steel Saucepan with Lid
An even-cooking, heavy-bottomed pot prevents hot spots that can scorch the rice on the bottom while leaving the top undercooked. A well-fitting lid is equally important for trapping steam during the simmer phase.
4. OXO Fine Mesh Strainer
Rinsing and draining the soaked rice properly is key to removing excess starch and achieving separated, non-clumpy grains. A quality fine mesh strainer makes this step quick and efficient.
This pairs wonderfully with our Authentic Butter Chicken Recipe for the ultimate Indian feast.
Step-by-Step Instructions
1. Rinse and Soak the Basmati Rice
- Place 1 cup (200g) of basmati rice into a deep mixing bowl.
- Fill the bowl with cold water and use your hand to gently swish the rice around. The water will turn white and cloudy from surface starch.
- Pour off the cloudy water carefully using the side of the bowl or a strainer.
- Repeat this rinsing process 3 to 4 times, until the water runs mostly clear. This step removes excess starch that can make rice sticky and gummy.
- After the final rinse, cover the rice with 2 cups of fresh cold water and let it soak for 20 to 30 minutes. Soaking hydrates the grains so they cook evenly and elongate beautifully during cooking.
- When the soaking time is up, drain the rice through your fine mesh strainer and set it aside. Do not skip this step, as soaking is what gives jeera rice its characteristic fluffy texture.
2. Prepare Your Aromatics
- While the rice is soaking, gather and prep all your whole spices: 1 bay leaf, 2-3 whole cloves, 2-3 lightly crushed green cardamom pods, and a 1-inch (2.5cm) cinnamon stick.
- If using a green chili, finely chop it now and set it aside.
- Measure out 1 teaspoon of cumin seeds and keep them within easy reach of the stove. Once the ghee is hot, the process moves quickly.
- Roughly chop 2 tablespoons of fresh cilantro for the garnish and set aside.
3. Bloom the Spices in Ghee
- Place your heavy-bottomed saucepan over medium heat and let it warm for about 30 seconds.
- Add 2 tablespoons of ghee to the pan and allow it to melt completely. The ghee should shimmer and become fluid but should not smoke. If it starts smoking, reduce the heat slightly.
- Add the cumin seeds to the hot ghee. They should immediately begin to sizzle and pop. This is called blooming or tempering, and it’s a foundational technique in Indian cooking that extracts fat-soluble flavors from whole spices.
- Watch the cumin seeds carefully. They go from perfectly golden to burnt very fast. After about 20 to 30 seconds, they should darken slightly and smell intensely nutty and aromatic.
- Add the bay leaf, cloves, cardamom pods, and cinnamon stick to the pan. Stir everything gently and let the whole spices sauté together for another 20 to 30 seconds. The mixture should smell incredible at this point.
- If using green chili, add it now and stir for an additional 10 to 15 seconds.
4. Toast the Drained Rice
- Drain your soaked rice thoroughly in the fine mesh strainer and add it directly to the pan with the bloomed spices.
- Gently stir the rice using a wooden spoon or silicone spatula to coat every grain with the spiced ghee. Be gentle here so you don’t break the delicate basmati grains.
- Continue to toast the rice over medium heat for 1 to 2 minutes, stirring occasionally. You’ll notice the grains become slightly translucent around the edges and smell subtly toasty.
- This toasting step does two important things: it adds a layer of flavor to the rice itself, and it coats each grain with fat, which helps keep the grains separate during cooking.
5. Add Water and Salt, Then Bring to a Boil
- Pour in 2 cups (475ml) of water directly over the toasted rice and spices. The water may spit and steam when it hits the hot pan, so pour carefully.
- Add 3/4 teaspoon of salt and stir gently to combine everything. Taste the water at this point; it should taste pleasantly seasoned, similar to lightly salted pasta water.
- Increase the heat to high and bring the water to a full, rolling boil. This should take about 2 to 3 minutes.
- Do not cover the pan yet during this boiling stage.
6. Simmer, Cover, and Steam
- Once the water reaches a full boil, immediately reduce the heat to the lowest setting your stove allows.
- Place the tight-fitting lid on the saucepan, making sure it seals well. Trapped steam is what finishes cooking the rice.
- Cook on this very low heat for 12 to 15 minutes without lifting the lid. Resist the temptation to check on it. Every time you lift the lid, you release steam that the rice needs to cook through.
- At the 12-minute mark, you can tilt the pan slightly to check if any water pools at the edge; if the pan is dry or nearly dry, the rice is likely done.
7. Rest and Fluff
- Turn the heat completely off and keep the lid on the pan. Allow the rice to rest, undisturbed, for 5 minutes. This resting period allows residual steam to finish cooking any remaining starch in the grains, and allows the grains to firm up slightly so they don’t break when fluffed.
- After 5 minutes, remove the lid and use a fork to gently fluff the rice. Insert the fork down to the bottom of the pan and turn the rice over in sections with a light, lifting motion. Do not stir vigorously, as basmati grains are fragile and can turn mushy if over-handled.
- Remove and discard the bay leaf, cinnamon stick, cardamom pods, and cloves before serving, or at least warn your guests about the whole spices.
- Transfer to a serving bowl, garnish generously with fresh chopped cilantro, and serve immediately.
This technique works wonderfully when you’re also making our Easy Butter Chicken Recipe for a complete meal.
Tips for Success
Getting perfectly fluffy jeera rice is all about a few key details. Master these and you’ll never have sticky, mushy, or unevenly cooked rice again.
- Always rinse and soak your rice. Rinsing removes surface starch that causes clumping, and soaking hydrates the grains for even cooking. Never skip either step.
- Use aged, long-grain basmati. Aged basmati has lower moisture content and a more pronounced aroma. The grains elongate dramatically when cooked, giving you that gorgeous, restaurant-style presentation.
- Watch your cumin seeds closely. They can go from perfectly bloomed to acrid and burnt in under 30 seconds. Keep the heat at medium and your eyes on the pan.
- Toast the rice before adding water. Those 1 to 2 minutes of toasting coat each grain with fat and add a subtle depth of flavor that makes a noticeable difference.
- Use the right water ratio. For soaked basmati, 1:2 (rice to water) is the sweet spot. For unsoaked rice, you’d increase to 1:2.25 or slightly more.
- Keep the lid on during cooking. Steam is what cooks the rice. Every time you lift the lid, you lose cooking steam and throw off the timing.
- Always let the rice rest. Those 5 minutes off the heat with the lid on are not optional. They’re what transforms decent rice into perfect rice.
- Fluff gently with a fork, not a spoon. A fork separates the grains without crushing them.
Read Also: Tandoori Chicken Recipe
Serving Suggestions
Jeera rice is the ultimate versatile side, and it genuinely makes everything it accompanies taste better.
The fragrant cumin base complements bold, spice-forward curries, mild creamy dishes, and simple protein-forward meals with equal ease.
Here are some of the best ways to serve it:
- With dal tadka or dal makhani. This is the most classic, traditional pairing in Indian cooking. The earthy cumin rice and the creamy, spiced lentils are made for each other.
- Alongside butter chicken or tikka masala. The rich tomato-cream sauces cling beautifully to each grain of rice.
- Served with Garlic Naan. Offer both naan and jeera rice as accompaniments for a full, restaurant-style spread.
- With a simple cucumber raita. The cool, yogurt-based condiment provides a refreshing contrast to warm, spiced rice.
- Under a portion of saag paneer or chana masala. The rice acts as the perfect base for scooping up hearty vegetarian curries.
- With grilled or Tandoori Chicken on the side. The smoky, charred flavors of tandoor-style proteins pair beautifully with aromatic cumin rice.
- As part of an Indian feast spread. Set out jeera rice alongside multiple curries, chutneys, and papadums for a true feast experience.
Variations to Try
Once you’ve mastered the classic version of this jeera rice recipe, there are some wonderful variations worth exploring.
Each one builds on the same foundation but adds a unique twist:
- Ghee-heavy restaurant style. Increase the ghee to 3 tablespoons and use pre-cooked plain basmati. Sauté the cumin and spices, then add the cooked rice and toss everything together over high heat. This is how many Indian restaurants finish their jeera rice to order.
- Onion jeera rice. Add a small finely diced onion to the ghee before the cumin seeds. Sauté until translucent and just beginning to turn golden, then proceed with the rest of the recipe. The onion adds a subtle sweetness.
- Mint and cumin rice. Add a small handful of fresh mint leaves along with the cilantro garnish for a cooling, herby finish that pairs especially well with lamb dishes.
- Cashew jeera rice. Toast a small handful of raw cashews in the ghee before adding the spices. The rich, buttery cashews add texture and a nutty richness.
- Vegan jeera rice. Substitute the ghee with refined coconut oil or a neutral cooking oil like avocado or sunflower oil. The flavor will be slightly different but still delicious and completely plant-based.
- Instant Pot jeera rice. Bloom the spices using the sauté function, add the soaked and drained rice, reduce water to 1.25 cups (295ml), seal the lid, and cook on high pressure for 5 minutes followed by a 10-minute natural release.
The same base technique works great for making Chicken Fried Rice once you have leftover jeera rice on hand.
Storage and Reheating
Jeera rice stores and reheats remarkably well, making it a great option for meal prep.
Follow these guidelines to keep it tasting fresh:
- Refrigerator storage. Allow the cooked rice to cool to room temperature before storing. Transfer to an airtight container and refrigerate for up to 3 days. Do not leave cooked rice at room temperature for more than 2 hours to prevent bacterial growth.
- Freezer storage. Portion cooled rice into resealable freezer bags or airtight containers and freeze for up to 3 months. Lay the bags flat to freeze for more efficient storage and quicker reheating.
- Microwave reheating. Add 1 to 2 tablespoons of water per cup of rice, cover with a damp paper towel, and microwave in 1-minute increments, stirring gently between intervals, until heated through.
- Stovetop reheating. Place the rice in a saucepan with 2 to 3 tablespoons of water over medium-low heat. Cover and heat for 3 to 5 minutes, stirring gently once or twice, until warmed through.
- From frozen. You can reheat frozen jeera rice directly from the freezer in the microwave with a splash of water. No thawing needed. Just add a little extra time.
Read Also: Easy Fried Rice Recipe
Nutritional Facts
The following nutritional information is approximate and based on one serving (roughly 1/2 cup cooked rice, or 1/4 of the total recipe). Exact values may vary based on specific brands and portion sizes.
| Nutrient | Per Serving |
|---|---|
| Calories | 220 kcal |
| Carbohydrates | 38g |
| Protein | 4g |
| Fat | 7g |
| Saturated Fat | 4g |
| Fiber | 1g |
| Sodium | 295mg |
| Sugar | 0g |
| Cholesterol | 18mg |
| Iron | 1.5mg |
Servings: 4 | Prep Time: 30 minutes (includes soaking) | Cook Time: 20 minutes | Total Time: 50 minutes
Another favorite rice dish to try: Mexican Rice Recipe
Health Benefits of Key Ingredients
Beyond being delicious, jeera rice is genuinely nourishing. The key ingredients each bring meaningful health benefits to the table.
Here’s a closer look at what makes this dish more than just tasty:
- Cumin seeds (jeera) are one of the most well-researched spices in Ayurvedic and traditional medicine. They contain compounds like thymol and cuminaldehyde that support digestion, help reduce bloating, and may support healthy blood sugar levels. Cumin is also a good source of iron.
- Ghee is rich in fat-soluble vitamins A, D, E, and K. Unlike refined vegetable oils, ghee contains butyric acid, a short-chain fatty acid that has been studied for its anti-inflammatory properties and its role in supporting gut health.
- Basmati rice has a lower glycemic index compared to other white rice varieties, meaning it causes a slower, more gradual rise in blood sugar. It’s also a good source of easily digestible carbohydrates that provide sustained energy.
- Cardamom contains antioxidants and has traditionally been used to support respiratory health and freshen breath. It also contains volatile oils that contribute to better digestion.
- Cinnamon is one of the most antioxidant-rich spices in the world. Even the small amount used in this recipe contributes trace amounts of manganese and may support healthy blood sugar regulation.
- Cilantro (fresh coriander) provides a small but meaningful boost of vitamins C and K, as well as antioxidants that support immune function.
This is a great dish to serve alongside our Lentil Soup Recipe for a complete, protein-rich, nutrient-packed meal.
Frequently Asked Questions
1. Do I have to soak the basmati rice before making jeera rice?
Soaking is strongly recommended and makes a significant difference in the final result. Soaking for 20 to 30 minutes hydrates the rice grains evenly, which allows them to cook through without the outside becoming soft before the inside is done. It also helps the grains elongate more during cooking, giving you that classic, fluffy, long-grain texture. If you’re short on time, even a 10-minute soak is better than none.
2. Can I use oil instead of ghee?
Yes, you absolutely can. A neutral oil like avocado oil, sunflower oil, or grapeseed oil works well as a substitute. The rice will still be delicious. However, ghee brings a distinct, rich nuttiness that is a signature flavor of authentic jeera rice, so if you have it available, it’s worth using.
3. Why is my jeera rice coming out sticky or mushy?
The most common causes are insufficient rinsing, skipping the soak, or adding too much water. Make sure you rinse the rice until the water runs clear to remove excess starch, soak for at least 20 minutes, and stick to the 1:2 rice-to-water ratio for soaked basmati. Cooking over too high a heat after covering can also cause uneven cooking.
4. Can I make jeera rice in an Instant Pot?
Absolutely. Use the sauté function to bloom your cumin and whole spices in ghee, then add the drained soaked rice. Reduce the water to 1.25 cups (295ml) for soaked basmati and add salt. Seal the lid, set the valve to sealing, and cook on high pressure for 5 minutes. Allow a natural pressure release for 10 minutes, then quick release any remaining pressure. Fluff with a fork and serve.
5. How is jeera rice different from biryani or plain rice?
Plain basmati rice is cooked without any added spices or flavoring, making it a clean, neutral accompaniment. Jeera rice sits a step above, adding whole cumin seeds and optionally other warm spices bloomed in ghee for a fragrant, lightly spiced result. Biryani is far more complex, involving marinated meat or vegetables layered with partially cooked rice, saffron, fried onions, and extensive spicing. Jeera rice is the approachable, everyday middle ground between plain rice and biryani.
Read Also: Classic Red Beans and Rice Recipe
Final Thoughts
A great jeera rice recipe is one of those things that once you make it, you’ll wonder how you ever settled for plain rice before.
It takes the same amount of time and barely any extra ingredients, but the result is something infinitely more flavorful, more fragrant, and more satisfying.
The key is in the details: really good basmati rice, properly soaked and rinsed; cumin seeds given just enough time in hot ghee to bloom fully; and patience during the simmer and rest phases.
Follow those steps and the recipe takes care of itself.
If you give this jeera rice recipe a try, I’d love to hear how it goes. Drop a comment below and let me know what you served it with, or share your version on social media and tag us.
Recommended:
- Chicken Korma Recipe
- Basmati Rice Recipe
- Garlic Naan Bread Recipe
- Easy Naan Bread Recipe
- Chicken Rice Soup Recipe
- Rice Pudding Recipe
- Bibimbap Recipe
- Congee Recipe
- Shakshuka Recipe
- Tandoori Chicken Recipe


