Every party spread needs a showstopper, and this cheese ball recipe delivers every single time. It’s one of those retro appetizers that never goes out of style, and once you taste a homemade version, you’ll never reach for a store-bought one again.
This recipe brings together tangy cream cheese, sharp cheddar, savory green onions, a dash of Worcestershire sauce, and a light kick from hot sauce, all blended into a smooth, scoopable ball rolled in toasted chopped pecans. The contrast of creamy inside and crunchy, nutty coating is what makes it so completely irresistible.
The secret to getting a perfect cheese ball every single time? Two things: starting with room-temperature cream cheese (so it blends smoothly without lumps) and chilling the mixture before shaping (so it holds its round shape).
It comes together in about 15 minutes of hands-on time, then you let the fridge do the rest of the work. You can make it up to five days ahead, which makes it perfect for holiday entertaining, game day spreads, and potluck parties alike.
You might also enjoy this Sausage Balls Recipe as another crowd-pleasing party bite to serve alongside your cheese ball.
Why You’ll Love This Cheese Ball Recipe
This appetizer checks every box you could want in a party dish.
It’s shockingly quick to put together, requiring no baking or cooking whatsoever, just a hand mixer and a little patience while it chills.
The flavor is deeply savory and satisfying, with the sharp cheddar cutting through the richness of the cream cheese beautifully.
Making it ahead of time is not just possible but encouraged, because the flavors actually deepen and improve the longer the mixture sits in the fridge.
It’s a total crowd magnet. Every time this cheese ball hits the table, it’s the first thing to disappear.
Here’s why readers keep coming back to this recipe:
- No baking required – just mix, chill, roll, and serve
- Make-ahead friendly – prep it up to 5 days in advance
- Customizable – easily swapped with different cheeses, herbs, or coatings
- Budget-friendly – costs a fraction of a pre-made cheese ball from the grocery store
- Impressive presentation – looks like you spent hours when you actually spent 15 minutes
Read Also: Buffalo Chicken Dip Recipe
Ingredients
A great cheese ball starts with quality ingredients. Use freshly grated cheddar cheese here rather than the pre-shredded bag variety, since the powdery anti-caking coating on bagged cheese prevents it from blending smoothly into the cream cheese base.
- 16 oz (450g) cream cheese, softened to room temperature (2 standard blocks)
- 2 cups (225g) sharp cheddar cheese, freshly grated
- 3 green onions (scallions), thinly sliced (about ¼ cup / 30g)
- 1 teaspoon Worcestershire sauce
- 1 teaspoon hot pepper sauce (such as Tabasco)
- 1 teaspoon dried parsley flakes
- ½ teaspoon garlic powder
- ½ teaspoon dried oregano
- A generous pinch of freshly ground black pepper
- 1½ cups (170g) pecans, finely chopped (for coating)
Read Also: Cheese Sauce Recipe
Kitchen Equipment Needed
You don’t need anything specialized for this recipe, but a few key tools make the process much smoother and cleaner.
- Large mixing bowl – gives you plenty of room to mix without splattering
- Hand mixer or stand mixer – essential for beating the cream cheese until smooth; a fork will leave lumps
- Rubber spatula – helps scrape the sides of the bowl and gather the mixture
- Plastic wrap – used for shaping and chilling the cheese ball
- Sharp cheese grater or box grater – for freshly grating your cheddar
- Cutting board and sharp knife – for chopping the green onions and pecans
- Serving plate or charcuterie board – for presentation
- Butter knife or cheese spreader – for guests to scoop and spread
This pairs wonderfully with a full appetizer spread, and a Classic Bruschetta Recipe alongside it makes for a gorgeous party table.
Recommended Products for This Recipe
These are products I genuinely recommend based on quality and performance when making this cheese ball.
1. OXO Good Grips Box Grater
Freshly grating your own cheddar is the single most important step in getting a silky-smooth, flavorful cheese ball. This grater’s sharp stainless-steel blades make short work of a block of sharp cheddar, and the non-slip base keeps it stable while you work. It’s a kitchen staple that will see use in dozens of recipes beyond this one.
2. KitchenAid 5-Speed Hand Mixer
Getting your cream cheese perfectly smooth is critical to achieving the right texture in your cheese ball. A good hand mixer does the job in under a minute, and this KitchenAid model is well-loved for its powerful motor and easy-to-clean beaters. Using a fork or spoon will likely leave lumpy cream cheese, which can make the final cheese ball uneven.
3. Fisher Premium Pecan Halves
Not all pecans are created equal. Fisher pecans are known for their fresh, buttery flavor and consistent quality, with no added preservatives or fillers. Toasting them briefly before chopping and rolling your cheese ball in them takes the nutty crust to a completely different level.
4. Bamboo Cheese Serving Board Set
Presenting your cheese ball on a beautiful board with crackers and veggies arranged around it transforms it from a simple appetizer into a real centerpiece. A bamboo board with a spreader included is perfect for this, combining good looks with practicality.
Another fantastic option to serve at your next gathering is this Easy Pigs in a Blanket Recipe, which pairs perfectly alongside a cheese ball.
Step-by-Step Instructions
Step 1: Soften the Cream Cheese
- Remove both blocks of cream cheese from the refrigerator at least 30 to 60 minutes before you begin.
- The cream cheese needs to be genuinely room temperature, not just slightly less cold. Press your finger into it: it should indent easily without resistance.
- Cold cream cheese will result in lumps that never fully incorporate, no matter how long you beat it.
- If you forgot to take it out, you can microwave the unwrapped blocks in 10-second intervals, checking after each burst, until just softened.
Step 2: Grate Your Cheddar Cheese
- Use a block of sharp cheddar and grate it using the medium or large holes of a box grater.
- Avoid pre-shredded bagged cheddar, which contains cellulose or starch coatings that prevent smooth incorporation into the cream cheese.
- Freshly grated cheese also has a noticeably stronger, more complex flavor.
- Measure out 2 cups (225g) of grated cheddar and set it aside.
Step 3: Prep the Green Onions and Pecans
- Wash and dry the green onions, then thinly slice them, using both the white and green parts for a balance of sharpness and mild onion flavor.
- Place your pecans on a cutting board and chop them finely with a sharp knife so they’ll coat the outside of the cheese ball evenly without falling off.
- For extra flavor, toast the chopped pecans in a dry skillet over medium heat for 3 to 4 minutes, stirring often, until fragrant and lightly golden. Set them aside to cool completely before using.
Step 4: Beat the Cream Cheese
- Place the softened cream cheese in a large mixing bowl.
- Using a hand mixer or stand mixer on medium speed, beat the cream cheese for about 1 minute until it becomes completely smooth, fluffy, and lump-free.
- Scrape the sides of the bowl with a rubber spatula halfway through to make sure all the cream cheese is incorporated.
Step 5: Add the Seasonings and Mix-Ins
- Add the sliced green onions, Worcestershire sauce, hot pepper sauce, dried parsley flakes, garlic powder, dried oregano, and black pepper to the beaten cream cheese.
- Mix on low speed until everything is just combined, about 30 seconds.
- Add the freshly grated sharp cheddar cheese to the bowl.
- Mix again on low to medium speed until the cheddar is fully incorporated and evenly distributed throughout the cream cheese mixture. The mixture will be thick and slightly sticky.
Step 6: Chill the Mixture
- Lay a large sheet of plastic wrap flat on your countertop.
- Use a rubber spatula to scrape the entire cheese mixture onto the center of the plastic wrap.
- Gather the edges of the plastic wrap up and over the mixture, then twist and squeeze it into a rough ball shape.
- Refrigerate for at least 1 hour, or up to overnight. This step is non-negotiable: chilling firms up the mixture so you can actually shape it into a clean, round ball.
- Skipping the chill time means the mixture will be too soft to hold its shape.
Step 7: Shape the Cheese Ball
- Once the mixture has chilled and firmed up, remove it from the refrigerator.
- Lightly grease your hands with a small amount of cooking spray or a few drops of neutral oil to prevent sticking.
- Unwrap the chilled mixture and, using your hands, roll and press it firmly into a smooth, round ball.
- If it starts sticking to your hands too much, pop the mixture back in the fridge for 15 more minutes and try again.
Step 8: Coat in Pecans
- Spread your finely chopped (and optionally toasted) pecans in an even layer on a plate or shallow baking dish.
- Place the cheese ball on the pecan-covered plate and gently roll it, pressing lightly with your hands, turning it until the entire surface is covered with pecans.
- Press any gaps in the coating with a pinch of pecans and your fingers to make sure the whole ball is fully coated.
Step 9: Serve or Store
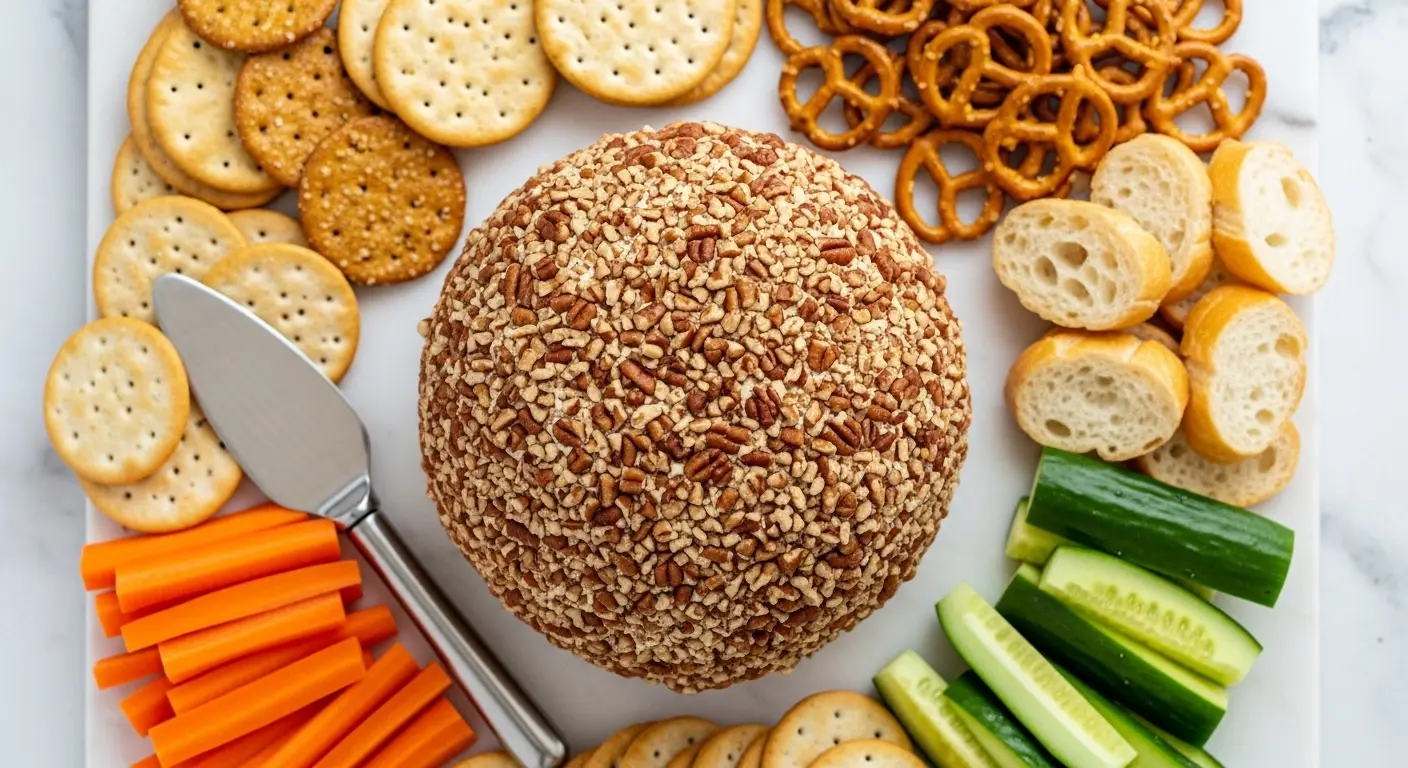
- Transfer the coated cheese ball to your serving plate or board.
- Arrange crackers, pretzels, sliced baguette, or fresh vegetables around it.
- Set out a butter knife or cheese spreader for guests.
- If serving immediately, let the cheese ball sit at room temperature for 15 to 20 minutes before serving so it softens slightly and is easier to spread.
- If making ahead, wrap the coated cheese ball loosely in plastic wrap and refrigerate until ready to serve.
Read Also: Easy Nachos Recipe
Tips for Success
A few simple techniques separate a good cheese ball from a great one. Keep these in mind every time you make this recipe.
- Start with soft cream cheese. This is the most important rule. Room-temperature cream cheese blends smoothly and evenly, giving you a creamy, uniform texture throughout.
- Grate your own cheese. Pre-shredded cheese is coated in anti-caking agents that block smooth blending. Freshly grated sharp cheddar will give you far better flavor and texture.
- Don’t skip chilling. The mixture must be cold enough to shape. If you try to form the ball while the mixture is still warm, it will just spread and flatten.
- Toast your pecans. It only takes a few minutes but adds a noticeably deeper, richer, nuttier flavor to the outer crust.
- Keep liquids minimal. If you’re customizing the recipe, keep liquid additions (Worcestershire, hot sauce, lemon juice) to no more than 3 tablespoons total, or the mixture may not firm up properly.
- Coat right before serving. The pecans stay crunchier when you roll the cheese ball in them no more than an hour or two before guests arrive.
- Use a butter knife for spreading. Trying to scoop the cheese ball with a cracker is a recipe for broken crackers. Set out a dedicated spreader.
You might also love this Classic Deviled Eggs Recipe as another classic party appetizer to serve alongside your cheese ball spread.
Serving Suggestions
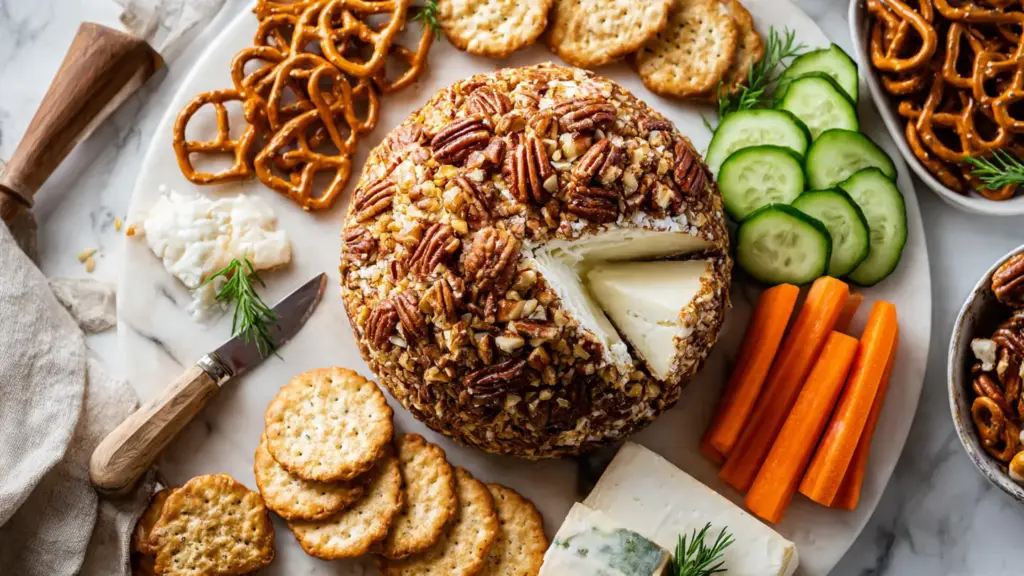
A cheese ball becomes an entire appetizer moment when you build a proper spread around it. The goal is giving guests a variety of textures and flavors that all pair well with the rich, savory cheese.
Set out a generous assortment of dippers in different categories so everyone finds something they love:
- Crackers – Ritz, wheat thins, water crackers, or buttery club crackers all work beautifully
- Pretzels – pretzel crisps or small twisted pretzels add a nice salty crunch
- Sliced baguette or crostini – perfect for a more substantial spread
- Fresh vegetables – carrot sticks, celery, cucumber rounds, sliced bell pepper, and cherry tomatoes
- Fruit slices – apple slices, pear slices, and red grapes add a sweet contrast that pairs surprisingly well with the sharp cheddar
- Breadsticks – great for elegant presentations
You might also enjoy this Easy Granola for a crunchy homemade snack element you can add to your party board.
Variations to Try
Once you’ve made the classic version, it’s fun to play around with different flavors and coatings. The cream cheese and cheddar base is incredibly versatile.
- Bacon Ranch Cheese Ball – Add 4 strips of crumbled cooked bacon and 2 tablespoons of dry ranch seasoning mix to the base. Roll in a combination of bacon bits, chopped pecans, and fresh chives.
- Cranberry Pecan Holiday Cheese Ball – Fold in ¼ cup of sweetened dried cranberries and roll the outside in a mixture of pecans and more dried cranberries. The sweet-savory combination is incredible for Thanksgiving and Christmas parties.
- Spicy Jalapeño Cheese Ball – Add 2 tablespoons of finely diced pickled or fresh jalapeños and replace the hot sauce with a full tablespoon of sriracha. Roll in crushed tortilla chips for extra heat.
- Everything Bagel Cheese Ball – Skip the pecans and roll the finished ball in everything bagel seasoning instead. It’s a brilliant shortcut with fantastic flavor.
- Smoked Gouda Cheese Ball – Replace the sharp cheddar with freshly grated smoked Gouda for a deeper, smokier flavor. Roll in chopped walnuts.
- Pepper Jack and Green Chile – Use pepper jack cheese in place of cheddar and fold in a small can of drained, diced green chiles for a Southwestern twist.
Read Also: Stuffed Shells Recipe
Storage and Reheating
A cheese ball is one of the most make-ahead-friendly appetizers you’ll ever encounter, which makes it invaluable for holiday entertaining and party planning.
- In the refrigerator: Wrap the cheese ball tightly in plastic wrap. Store in the refrigerator for up to 5 days. For best results when making it more than 1 day ahead, store the shaped ball without the pecan coating and roll it in the pecans within a couple of hours of serving to keep the crust fresh and crunchy.
- In the freezer: Form the cheese ball into shape but do not roll it in the pecans. Wrap it tightly in a layer of plastic wrap followed by a layer of aluminum foil, or place it in a freezer-safe zip-top bag. Freeze for up to 1 month. To thaw, move the wrapped cheese ball to the refrigerator and let it thaw overnight. Once fully thawed, roll it in the pecans and serve.
- Before serving from the fridge: Let the cheese ball sit at room temperature for 15 to 20 minutes before serving. This softens it slightly and makes it much easier to spread onto crackers.
- Do not refreeze once thawed.
This Bourbon Balls Recipe is another no-bake make-ahead treat that stores beautifully if you’re planning a bigger party spread.
Nutritional Facts
The following nutrition information is based on a standard serving size of approximately 2 tablespoons (about 30g), assuming the recipe makes 14 servings.
| Nutrient | Per Serving |
|---|---|
| Calories | ~124 kcal |
| Total Fat | 12g |
| Saturated Fat | 6g |
| Cholesterol | 29mg |
| Sodium | 129mg |
| Total Carbohydrates | 2g |
| Dietary Fiber | 0.3g |
| Sugar | 1g |
| Protein | 4g |
| Vitamin A | 361 IU |
| Calcium | 89mg |
Nutritional values are estimates and will vary based on specific brands and ingredients used. Crackers, pretzels, or vegetables served alongside are not included.
The Easy Hummus Recipe is a lighter, plant-based dip option if you’re building out a spread for guests with different dietary needs.
Health Benefits of Key Ingredients
While this is definitely a treat and not a health food, a few of the key ingredients do bring genuine nutritional value to the table.
The cream cheese and cheddar base provides a meaningful amount of calcium and protein per serving, which supports bone health and muscle function.
Here’s a closer look at the standout ingredients:
- Sharp Cheddar Cheese – A good source of calcium, phosphorus, and protein. Aged cheeses like sharp cheddar also contain small amounts of vitamin K2, which plays a role in bone and cardiovascular health.
- Cream Cheese – Provides fat-soluble vitamins A and D. Full-fat cream cheese is also lower in carbohydrates than many other spreads, making it a reasonable choice for lower-carb eating patterns.
- Pecans – Rich in healthy monounsaturated fats, magnesium, zinc, and antioxidants. Studies suggest that regular nut consumption is associated with improved heart health and reduced inflammation.
- Green Onions (Scallions) – A surprising nutritional powerhouse in small amounts. They contain vitamin K, vitamin C, folate, and various antioxidants. The sulfur compounds in green onions also have mild antibacterial properties.
- Garlic Powder – Derived from garlic, which has been widely studied for its immune-supporting and anti-inflammatory properties. Even in small amounts, garlic powder adds both flavor and a trace of these benefits.
Read Also: Broccoli Salad Recipe
Frequently Asked Questions
1. Can I make a cheese ball without a mixer?
You can, but it takes significantly more effort. The key is making sure your cream cheese is very soft, almost room-temperature soft, before you start. Use a sturdy wooden spoon or a strong fork and work the cream cheese against the side of the bowl until it’s completely smooth before adding any other ingredients. Any lumps in the cream cheese will remain in the finished cheese ball. A hand mixer genuinely makes the process easier and produces better results.
2. Why won’t my cheese ball hold its shape?
The most common reason a cheese ball won’t hold its shape is that the mixture wasn’t chilled long enough before shaping. The cream cheese mixture needs at least 1 hour in the refrigerator (and ideally 2 hours or overnight) to firm up enough to be shaped. Another possible culprit is too many liquid ingredients, so make sure you’re keeping liquid additions to no more than 3 tablespoons total.
3. Can I use a different cheese instead of cheddar?
Absolutely. Sharp cheddar is the classic choice because its bold flavor balances the mild tang of cream cheese, but you can swap it for smoked Gouda, pepper jack, Colby Jack, gruyere, or even a combination of cheeses. The key rule is to always grate it fresh yourself rather than using pre-shredded, which will produce a smoother, better-flavored result regardless of which cheese you choose.
4. How far in advance can I make a cheese ball?
You can make the cheese ball mixture and shape it up to 5 days in advance if you keep it tightly wrapped in plastic wrap in the refrigerator. For best results, hold off on rolling it in the pecan coating until a few hours before serving, since the pecans will stay crunchier and look prettier when they haven’t been sitting against the moist cheese ball overnight. If you want to make it even further in advance, you can freeze the uncoated ball for up to 1 month.
5. What if I or my guests have a nut allergy?
No problem at all. You can skip the pecan coating entirely and replace it with a wide variety of other options. Fresh chopped chives or parsley give a beautiful green herb coating. Crushed pretzels, everything bagel seasoning, crumbled cooked bacon, smoked paprika, or dried cranberries all make excellent nut-free alternatives. The coating is entirely flexible, so use whatever works best for your guests.
For another classic make-ahead party bite, check out this Little Smokies Recipe with Jelly.
Final Thoughts
This classic cheese ball recipe is proof that the best appetizers don’t have to be complicated. With just a handful of everyday ingredients, 15 minutes of hands-on prep, and a little chilling time, you’ve got a show-stopping party dish that people will genuinely rave about.
The combination of tangy cream cheese, bold sharp cheddar, savory seasonings, and that satisfying crunchy pecan crust is timeless for a reason. It works for game day, holiday parties, casual get-togethers, or even just a Saturday afternoon snack board.
Give this cheese ball recipe a try, and then come back and leave a comment below to let me know how it went! Did you try any of the variations? Roll it in something other than pecans? I’d love to hear about it, so share your experience in the comments or tag me on social media.
Recommended:
- Easy Deviled Eggs Recipe
- Swedish Meatball Recipe
- Easy Guacamole Recipe
- Classic Guacamole Recipe
- Fruit Salad Recipe
- Fresh Salsa Recipe
- Loaded Nachos Recipe
- Potato Salad Recipe
- Comeback Sauce Recipe
- Easy Pico de Gallo Recipe


