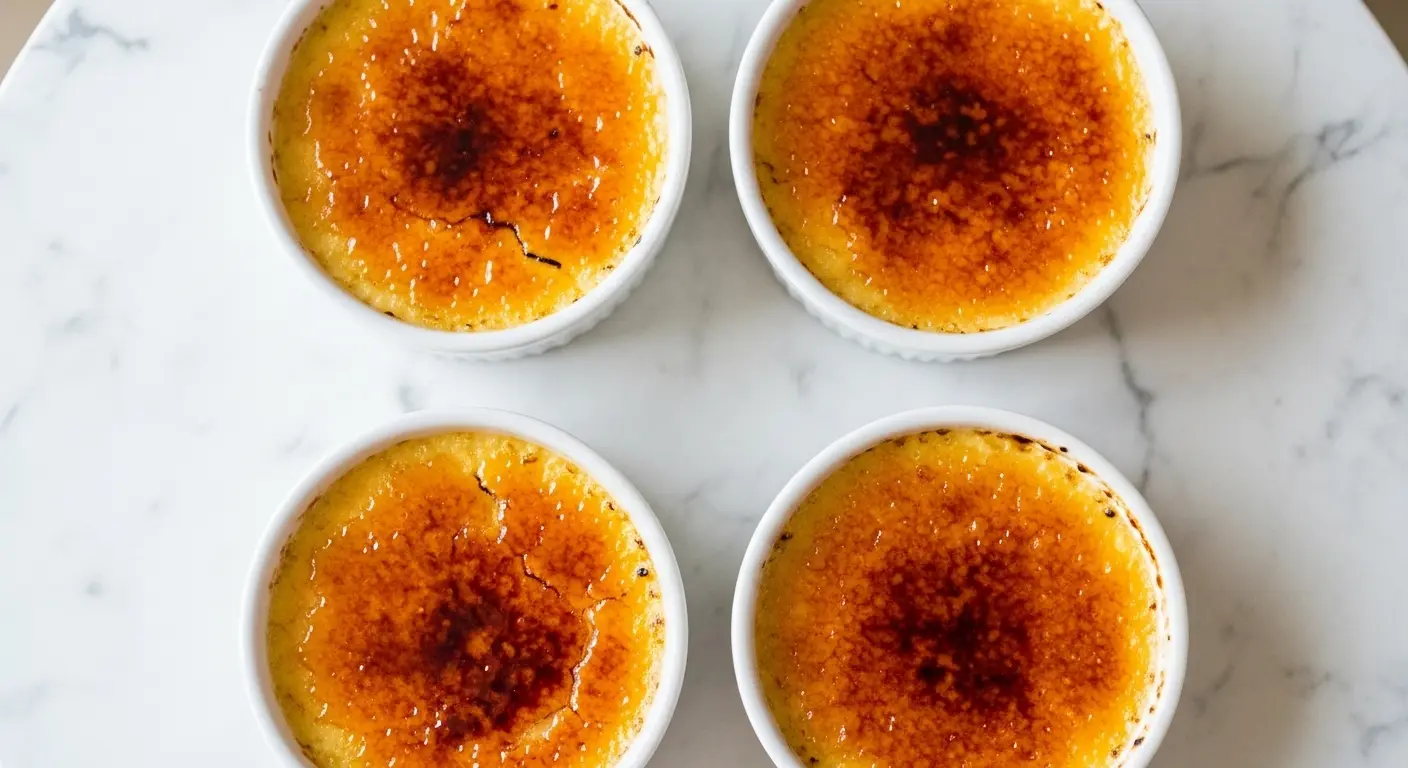
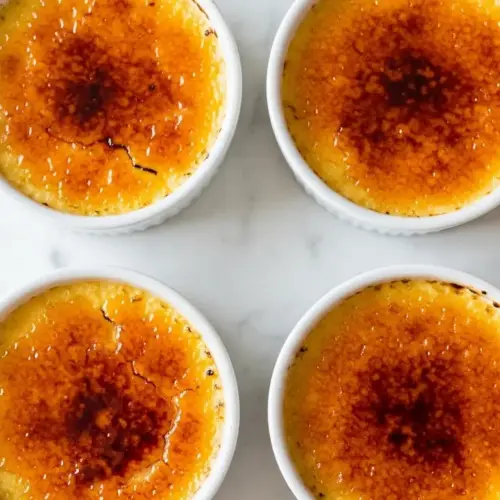
Imagine cracking through a thin layer of caramelized sugar to reveal the silkiest, creamiest vanilla custard underneath. That satisfying crack, followed by a spoonful of velvety smooth custard, is what makes this easy creme brulee recipe so irresistible.
This classic French dessert has a reputation for being fancy and intimidating, but the truth is quite the opposite. With just five simple ingredients and straightforward techniques, you can create restaurant-quality creme brulee right in your own kitchen.
The beauty of creme brulee lies in its simplicity. Unlike complicated layer cakes or intricate pastries, this dessert relies on the quality of a few key ingredients and proper technique. The result is a luxurious treat that looks impressive but requires minimal effort.
The contrast between the crisp, golden caramelized top and the cool, creamy custard below creates a textural experience that never gets old. Each spoonful is a perfect balance of sweetness and richness.
Best of all, you can make the custards ahead of time and caramelize the tops just before serving. This makes it an ideal dessert for dinner parties, special occasions, or any time you want to treat yourself to something truly special.

Why You’ll Love This Easy Creme Brulee Recipe
This classic dessert delivers impressive results with minimal ingredients and simple techniques. The custard base comes together in minutes, and the baking process is completely hands-off.
You only need five pantry staples to create this elegant dessert. Heavy cream, egg yolks, sugar, vanilla, and a pinch of salt transform into something truly spectacular.
The make-ahead factor is a game-changer for entertaining. You can prepare the custards up to three days in advance and caramelize the sugar tops right before serving.
That signature crack when you tap through the caramelized sugar is pure satisfaction. The contrast between the crispy top and silky custard creates an unforgettable textural experience.
This recipe is surprisingly forgiving for beginners. The water bath ensures even cooking, preventing curdling and giving you perfectly smooth custards every time.
Here’s what makes this recipe so special:
- Simple ingredients: Just heavy cream, egg yolks, sugar, vanilla, and salt create restaurant-quality results
- Make-ahead friendly: Prepare custards up to 3 days in advance
- Impressive presentation: Looks and tastes like fine dining at home
- Customizable flavors: Easy to add espresso, citrus, or other flavors
- Perfect texture: Silky smooth custard with a crispy caramelized top
- Beginner-friendly: Clear instructions make it foolproof
For more elegant dessert options, you might enjoy Classic Tiramisu.
Ingredients
This easy creme brulee recipe uses just five essential ingredients to create a decadent French dessert. The key is using high-quality ingredients, especially the vanilla and cream, since they’re the stars of this custard.
- 2 cups (480 ml) heavy cream
- 5 large egg yolks
- 1/3 cup (67 g) granulated sugar, plus extra for topping
- 1 tablespoon (15 ml) pure vanilla extract or 1 vanilla bean, split and scraped
- 1/4 teaspoon (1.25 ml) fine sea salt
- 4-6 tablespoons (50-75 g) granulated sugar or turbinado sugar for caramelizing
Kitchen Equipment Needed
Having the right equipment makes the creme brulee process smooth and ensures perfect results. The most important pieces are the ramekins and either a kitchen torch or access to a broiler for caramelizing the sugar top.
- 4-6 shallow oven-safe ramekins (6-8 oz capacity each)
- Large roasting pan or baking dish (for water bath)
- Medium saucepan
- Mixing bowls
- Whisk
- Fine-mesh strainer or sieve
- Measuring cups and spoons
- Kitchen torch (or use oven broiler)
- Kettle for boiling water
Recommended Products for This Recipe
These carefully selected products will help you achieve professional results and make the creme brulee process easier and more enjoyable.
1. Le Creuset Stoneware Ramekins
These shallow ramekins are specifically designed for creme brulee, offering the perfect depth for an ideal custard-to-caramel ratio. The stoneware conducts heat evenly, ensuring your custards bake uniformly. Their classic design transitions beautifully from oven to table.
2. Madagascar Vanilla Beans
Using genuine Madagascar vanilla beans elevates this dessert from good to extraordinary. The tiny black specks throughout the custard signal quality and deliver incomparable flavor. One bean is enough for this recipe, and the depth of vanilla flavor it provides simply cannot be matched by extract alone.
3. Professional Kitchen Torch
A reliable kitchen torch gives you complete control over caramelizing the sugar top. Unlike the broiler method, a torch allows you to achieve that perfect golden crust without overheating the custard underneath. It’s also surprisingly useful for other cooking tasks like toasting meringue or searing proteins.
4. Fine Mesh Strainer
Straining the custard mixture removes any cooked egg bits and creates an impossibly smooth texture. A fine mesh strainer catches even the smallest particles, ensuring your finished custards are silky and luxurious. This step makes the difference between good and restaurant-quality results.
Another impressive make-ahead dessert is Easy Tiramisu.

Step-by-Step Instructions
Follow these detailed instructions to create perfectly smooth, creamy creme brulee with a crisp caramelized top. Each step is broken down to ensure success, even for first-time makers.
1. Prepare Your Oven and Equipment
- Preheat your oven to 325°F (163°C) and position the rack in the center of the oven
- Place 4-6 ramekins in a large roasting pan or deep baking dish, ensuring they fit comfortably without touching
- Boil water in a kettle (you’ll need this for the water bath later)
- Set a fine-mesh strainer over a large measuring cup or bowl with a pour spout for easy filling
2. Heat the Cream Mixture
- Pour the heavy cream into a medium saucepan
- If using a vanilla bean, split it lengthwise with a sharp knife, scrape out the seeds using the back of the knife, and add both the seeds and the pod to the cream
- Heat the cream over medium-low heat, stirring occasionally, until it’s hot and small bubbles form around the edges (do not let it boil)
- Remove from heat and let it sit for 10-15 minutes if using a vanilla bean to allow the flavor to infuse (if using vanilla extract, you’ll add it later)
- Remove and discard the vanilla bean pod if you used one
3. Whisk the Egg Yolk Mixture
- Separate 5 egg yolks into a medium mixing bowl, being careful not to get any white in the yolks
- Add 1/3 cup granulated sugar and the salt to the egg yolks
- Whisk vigorously for about 1-2 minutes until the mixture becomes pale yellow and slightly thickened
- The sugar should be mostly dissolved and the mixture should be smooth
4. Temper the Eggs
- Very slowly pour about 1/4 cup of the warm cream into the egg yolk mixture while whisking constantly (this is called tempering and prevents the eggs from scrambling)
- Continue adding the warm cream in a slow, steady stream while whisking continuously
- Once all the cream is incorporated, stir in the vanilla extract if you didn’t use a vanilla bean
- Mix until completely smooth and homogeneous
5. Strain and Fill the Ramekins
- Pour the custard mixture through the fine-mesh strainer into your measuring cup or bowl with a spout (this removes any bits of cooked egg and ensures silky texture)
- Carefully pour the strained custard into each ramekin, filling them about 3/4 full or leaving about 1/4 inch from the top
- Use a spoon to skim off any bubbles that form on the surface of the custards
- If you see any small bubbles remaining, you can use a kitchen torch to quickly pop them
6. Create the Water Bath and Bake
- Carefully place the roasting pan with the filled ramekins into the preheated oven
- Pour the hot water from the kettle into the roasting pan, filling it until the water comes halfway up the sides of the ramekins (be careful not to splash water into the custards)
- Gently close the oven door
- Bake for 35-45 minutes, checking at 35 minutes (baking time varies based on ramekin size and depth)
- The custards are done when the edges are set but the centers still have a slight wobble when gently shaken (they should jiggle like Jell-O, not slosh like liquid)
- They will continue to set as they cool
7. Cool and Chill
- Carefully remove the roasting pan from the oven
- Use tongs or a spatula to lift each ramekin out of the water bath and place on a cooling rack
- Let the custards cool at room temperature for about 30 minutes
- Once cooled to room temperature, cover each ramekin with plastic wrap
- Refrigerate for at least 4 hours, or preferably overnight (custards can be refrigerated for up to 3 days before caramelizing)
8. Caramelize the Sugar Top
- Just before serving, remove the custards from the refrigerator
- If there’s any condensation on the surface, gently blot it with a paper towel
- Sprinkle 1-2 teaspoons of sugar evenly over the surface of each custard, tilting the ramekin to distribute it evenly
- Tap out any excess sugar
- If using a kitchen torch, hold it about 2-3 inches from the surface and move it in circular motions until the sugar melts and turns golden brown (this takes about 1-2 minutes per ramekin)
- If using the broiler, place ramekins on a baking sheet on the top oven rack, 4-5 inches from the broiler element, and broil for 2-4 minutes, rotating the pan as needed, watching constantly to prevent burning
- Let the caramelized tops cool for 2-3 minutes before serving (the sugar will harden into a crispy shell)
You can serve these alongside Classic Chocolate Chip Cookies for a dessert spread.
Tips for Success
These expert tips will help you achieve perfect creme brulee every time. Pay special attention to the baking and caramelizing steps, as they make the biggest difference in texture and presentation.
Here are the key tips for flawless results:
- Use room temperature egg yolks: Cold eggs can cause the cream to cool too quickly, making it harder to create a smooth mixture
- Don’t skip the straining step: This removes any cooked egg bits and ensures an ultra-smooth custard texture
- Watch the water bath carefully: The water should come halfway up the ramekins but not so high that they float
- Check for doneness by the jiggle: The centers should wobble like set Jell-O, not slosh like liquid
- Blot surface moisture before caramelizing: Any condensation on the cold custards will prevent the sugar from caramelizing properly
- Use an even layer of sugar: Too much sugar creates a thick, hard crust; too little won’t caramelize properly
- Work quickly with the torch: Keep the torch moving to avoid burning spots and achieve even caramelization
- Let the caramel cool briefly: Wait 2-3 minutes after torching so the sugar hardens into a crispy shell
Serving Suggestions

Creme brulee is elegant enough to serve on its own, but pairing it with complementary flavors and textures can create an even more memorable dessert experience.
The classic presentation involves serving the custard in its ramekin with a small spoon, allowing guests to crack through the caramelized top themselves. This creates an interactive element that adds to the enjoyment.
Consider these delicious serving ideas:
- Fresh berries: Serve with a handful of fresh raspberries, strawberries, or blueberries on the side for a pop of color and tartness
- Whipped cream: A small dollop of lightly sweetened whipped cream adds an extra layer of richness
- Shortbread cookies: Pair with buttery Easy Sugar Cookies for textural contrast
- Coffee or espresso: The bitter notes of coffee complement the sweet custard beautifully
- Fruit compote: Spoon berry or stone fruit compote alongside for a fruity accent
- After-dinner cordials: Serve with small glasses of dessert wine, port, or Irish cream
- Chocolate shavings: Garnish with dark chocolate curls for chocolate lovers
For another make-ahead option, try Healthy Chicken Salad.
Variations to Try
Once you’ve mastered the classic vanilla creme brulee, these creative variations offer exciting new flavor profiles while using the same basic technique.
Here are some delicious ways to customize your custards:
- Espresso creme brulee: Add 2 tablespoons of instant espresso powder to the warm cream for a coffee-flavored custard
- Chocolate creme brulee: Whisk 4 ounces of melted dark chocolate into the warm cream mixture
- Citrus creme brulee: Add the zest of 2 oranges or 3 lemons to the cream while heating, then strain it out
- Lavender creme brulee: Steep 1 tablespoon of dried culinary lavender in the warm cream, then strain before mixing with eggs
- Maple creme brulee: Replace half the sugar with pure maple syrup and add 1/2 teaspoon maple extract
- Coconut creme brulee: Replace half the heavy cream with full-fat coconut milk and add 1/2 teaspoon coconut extract
- Brown butter creme brulee: Brown 4 tablespoons of butter and add it to the cream for a nutty flavor
- Pumpkin spice creme brulee: Add 1/4 cup pumpkin puree and 1 teaspoon pumpkin pie spice to the custard base
Storage and Reheating
Proper storage keeps your creme brulee fresh and maintains its texture. The make-ahead nature of this dessert makes it perfect for entertaining.
Follow these storage guidelines:
- Refrigerate unbaked custards: Cover tightly with plastic wrap and refrigerate for up to 3 days before caramelizing the tops
- Don’t caramelize too early: Only torch the sugar within 1 hour of serving for the best crispy texture
- Cover leftovers: If you have leftover creme brulee with caramelized tops, cover loosely with plastic wrap and refrigerate
- Consume within 2 days: Once caramelized, the sugar top will soften in the refrigerator, so enjoy within 1-2 days
- Re-torch if needed: If the caramelized top becomes soft, you can re-torch it, though the custard underneath will be cold
- Freezing not recommended: The custard texture changes when frozen, becoming grainy and separated
The versatility of Classic French Toast makes it another great make-ahead breakfast option.
Nutritional Facts
Per serving (based on 6 servings):
- Calories: 320
- Total Fat: 28g
- Saturated Fat: 17g
- Cholesterol: 285mg
- Sodium: 70mg
- Total Carbohydrates: 16g
- Sugars: 15g
- Protein: 3g
Note: Nutritional information is approximate and will vary based on specific ingredients used and serving size.
Health Benefits of Key Ingredients
While creme brulee is certainly an indulgent treat, the simple ingredients offer some nutritional value alongside the rich flavor experience.
The egg yolks provide high-quality protein and essential nutrients. They’re rich in vitamins A, D, E, and K, as well as choline, which supports brain health and liver function.
Heavy cream contributes calcium and vitamin D, both important for bone health. The fat content helps your body absorb fat-soluble vitamins from the eggs.
Here’s what each ingredient contributes:
- Egg yolks: Rich in choline, vitamin A, vitamin D, and lutein for eye health
- Heavy cream: Provides calcium, vitamin D, and conjugated linoleic acid (CLA)
- Vanilla: Contains small amounts of antioxidants and has been linked to mood enhancement
- Minimal processing: Unlike many desserts, creme brulee contains no artificial ingredients or preservatives
Another dessert with simple ingredients is Dutch Apple Pie.
Frequently Asked Questions
1. Can I make creme brulee without a kitchen torch?
Yes, you can absolutely make creme brulee using your oven’s broiler instead of a torch. Place the chilled custards on a baking sheet and position them on the top rack, about 4-5 inches from the broiler element. Broil for 2-4 minutes, watching constantly and rotating the pan as needed to ensure even caramelization. The key is to work quickly and watch carefully, as the sugar can go from perfectly golden to burnt in seconds.
2. Why is my creme brulee custard grainy or curdled?
Grainy or curdled custard typically results from overcooking or cooking at too high a temperature. The water bath helps regulate temperature, but if the water gets too hot or the custards bake too long, the eggs can scramble. Make sure your oven temperature is accurate (use an oven thermometer to check), and remove the custards when they still have a slight wobble in the center.
3. How far in advance can I make creme brulee?
You can make the custards up to 3 days in advance and store them covered in the refrigerator. However, only caramelize the sugar topping within 1 hour of serving for the best texture. Once caramelized, the sugar will begin to absorb moisture from the custard and lose its crispy texture over time.
4. What’s the best sugar to use for the caramelized top?
Regular granulated white sugar works perfectly well and creates a thin, crispy caramel layer. Turbinado sugar (also called raw sugar or sugar in the raw) is coarser and creates a slightly thicker, more textured crust with a subtle molasses flavor. Both options are delicious, so choose based on your preference.
5. Can I use vanilla extract instead of vanilla beans?
Absolutely! While vanilla beans provide the most intense flavor and those beautiful dark specks throughout the custard, pure vanilla extract is an excellent alternative. Use 1 tablespoon of high-quality pure vanilla extract added after removing the cream from the heat. Avoid imitation vanilla, as it can taste artificial and won’t provide the same depth of flavor.
You might also like Classic Pumpkin Pie for another classic dessert.
Easy Creme Brulee
Equipment
- Oven - Preheated to 325°F
- Ramekins - 4-6 shallow oven-safe ramekins, 6-8 oz capacity each
- Roasting pan - Large pan or deep baking dish for water bath
- Medium saucepan
- Mixing bowls
- Whisk
- Fine-mesh strainer - Also called a sieve
- Measuring cups and spoons
- Kitchen torch - Or use oven broiler (optional)
- Kettle - For boiling water
Ingredients
- 2 cups heavy cream - 480ml
- 5 large egg yolks - Room temperature
- 1/3 cup granulated sugar - 67g, plus extra for topping
- 1 tablespoon pure vanilla extract - 15ml, or 1 vanilla bean, split and scraped
- 1/4 teaspoon fine sea salt - 1.25ml
- 4-6 tablespoons granulated sugar - 50-75g, or turbinado sugar for caramelizing
Instructions
- Preheat oven to 325°F (163°C) and position rack in center. Place ramekins in a large roasting pan and boil water for the water bath. Set a fine-mesh strainer over a large measuring cup with a pour spout.
- Pour heavy cream into a medium saucepan. If using a vanilla bean, split lengthwise, scrape out seeds, and add both seeds and pod to the cream. Heat over medium-low until hot with small bubbles around the edges, do not boil. Remove from heat and let sit 10-15 minutes if using vanilla bean. Remove and discard pod.
- Separate egg yolks into a medium bowl. Add 1/3 cup sugar and salt. Whisk vigorously for 1-2 minutes until pale yellow and slightly thickened, with sugar mostly dissolved.
- Slowly pour about 1/4 cup of warm cream into the egg yolk mixture while whisking constantly to temper the eggs. Continue adding remaining cream in a slow stream while whisking. If using vanilla extract instead of bean, stir it in now.
- Pour custard mixture through the fine-mesh strainer into the measuring cup. Carefully pour into each ramekin, filling about 3/4 full. Skim off any bubbles from the surface with a spoon or torch.
- Place roasting pan with filled ramekins in the oven. Carefully pour hot water into the pan until it comes halfway up the sides of the ramekins. Bake for 35-45 minutes until edges are set but centers still have a slight wobble when shaken.
- Carefully remove roasting pan from oven. Use tongs to lift each ramekin out and place on a cooling rack. Cool at room temperature for 30 minutes, then cover with plastic wrap and refrigerate for at least 4 hours or up to 3 days.
- Just before serving, remove custards from refrigerator. Blot any condensation with a paper towel. Sprinkle 1-2 teaspoons of sugar evenly over each surface, tilting to distribute and tapping out excess.
- If using a kitchen torch, hold it 2-3 inches from the surface and move in circular motions until sugar melts and turns golden brown, about 1-2 minutes per ramekin. If using broiler, place on top rack 4-5 inches from element and broil 2-4 minutes, watching constantly.
- Let caramelized tops cool for 2-3 minutes to harden into a crispy shell before serving. Enjoy the satisfying crack of the sugar top and the creamy custard beneath.
Notes
- Use room temperature egg yolks: Cold eggs can cool the cream too quickly, making it harder to create a smooth mixture.
- Don’t skip the straining step: This removes any cooked egg bits and ensures an ultra-smooth custard texture.
- Watch the water bath carefully: Water should come halfway up the ramekins but not so high that they float.
- Check for doneness by the jiggle: Centers should wobble like set Jell-O, not slosh like liquid.
- Blot surface moisture before caramelizing: Any condensation on cold custards will prevent the sugar from caramelizing properly.
- Use an even layer of sugar: Too much sugar creates a thick, hard crust; too little won’t caramelize properly.
- Work quickly with the torch: Keep the torch moving to avoid burning spots and achieve even caramelization.
- Let the caramel cool briefly: Wait 2-3 minutes after torching so the sugar hardens into a crispy shell.
- Make-ahead friendly: Custards can be prepared up to 3 days in advance and refrigerated before caramelizing.
- Freezing not recommended: The custard texture changes when frozen, becoming grainy and separated.
Final Thoughts
This easy creme brulee recipe proves that restaurant-quality desserts are absolutely achievable at home. With just five simple ingredients and a little patience, you can create an elegant dessert that looks and tastes like it came from a French bistro.
The silky smooth custard paired with that satisfying crack of caramelized sugar never fails to impress. Give this recipe a try for your next special occasion or whenever you’re craving something truly indulgent.
I’d love to hear how your creme brulee turns out! Leave a comment below sharing your experience or any variations you tried.
Recommended:
- Easy Shepherds Pie
- Classic Shepherds Pie
- Classic Chicken Pot Pie
- Easy Chicken Pot Pie
- Classic Guacamole
- Easy Guacamole
- Classic Apple Pie
- Creamy Mashed Potatoes
- Garlic Mashed Potatoes
- Classic Sloppy Joe


