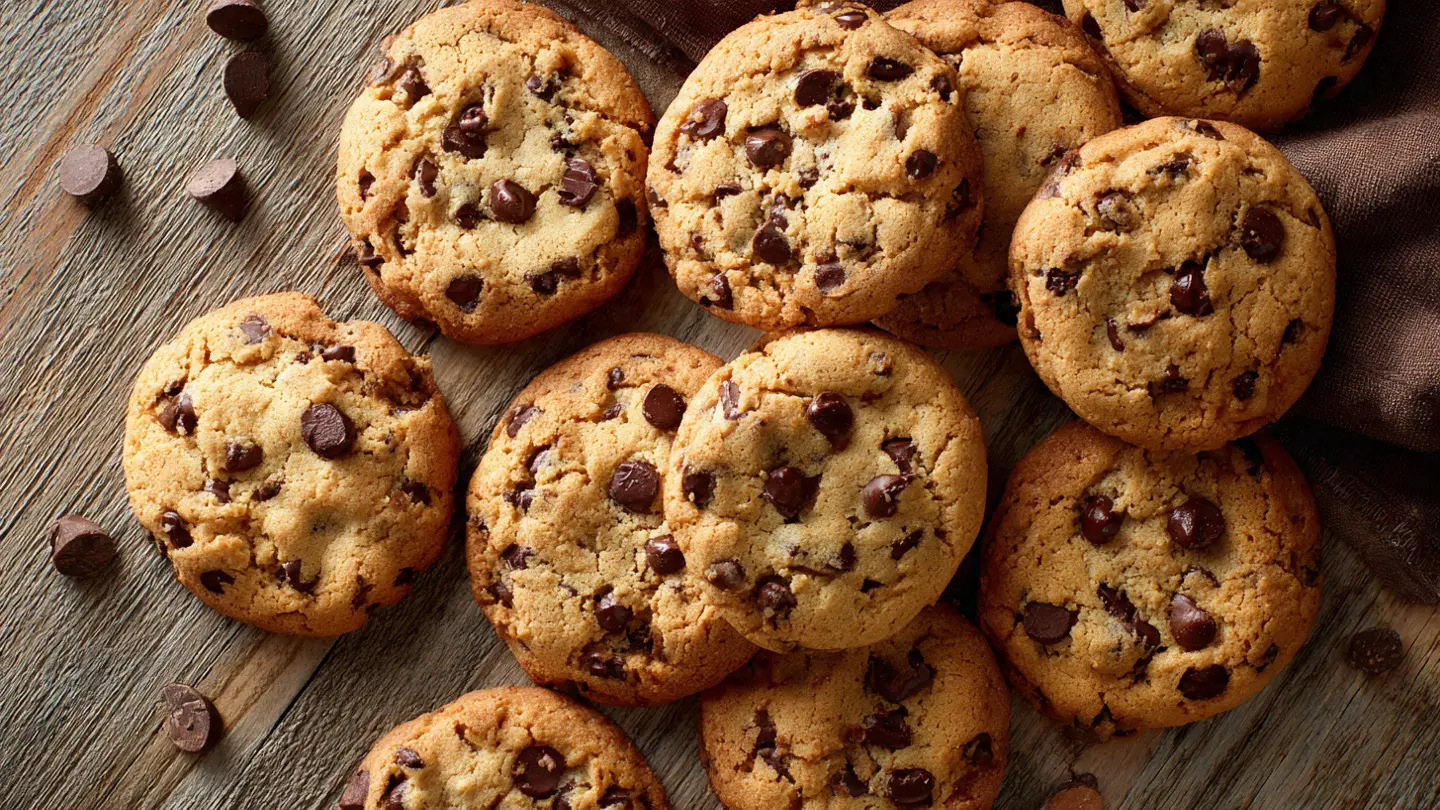
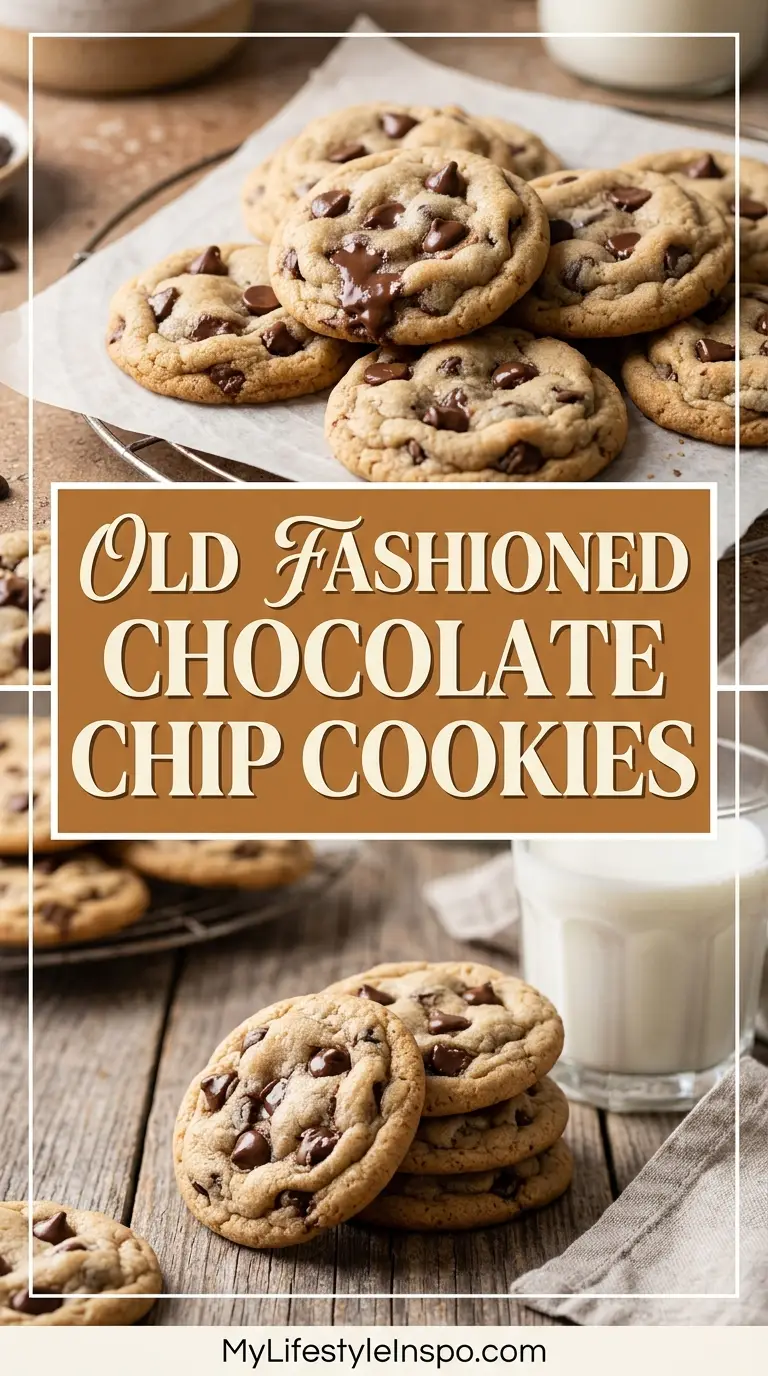
Nothing quite compares to the aroma of freshly baked chocolate chip cookies wafting through your kitchen. This old fashioned chocolate chip cookie recipe has been passed down through generations, capturing the essence of what made the original Toll House cookies so beloved since the 1930s.
These cookies deliver everything you crave: crispy golden edges that give way to soft, chewy centers loaded with melty chocolate chips. The secret lies in the careful balance of butter, sugars, and quality ingredients that work together to create cookie perfection.
What makes this recipe truly special is its simplicity and reliability. You don’t need fancy equipment or hard-to-find ingredients. Just a mixing bowl, basic pantry staples, and about 30 minutes from start to finish. The combination of brown sugar for moisture and chewiness with granulated sugar for structure creates the ideal texture that stays fresh for days.
The beauty of this old fashioned chocolate chip cookie recipe is that it’s virtually foolproof. Even beginner bakers can achieve bakery-quality results by following the straightforward instructions and understanding a few key techniques, like properly creaming the butter and sugar, and knowing when to pull the cookies from the oven for that perfect soft center.
Why You’ll Love This Old Fashioned Chocolate Chip Cookie Recipe
This recipe has stood the test of time for good reason. It’s been perfected over decades of home baking, delivering consistently delicious results every single time.
These cookies strike the perfect balance between nostalgia and quality. They taste exactly like the cookies your grandmother used to make, with that unmistakable homemade flavor that store-bought versions simply can’t replicate. The texture alone sets them apart from modern variations that often end up too cakey or flat.
- Simple ingredients you already have: No specialty items required, just butter, all-purpose flour, sugars, eggs, vanilla, and chocolate chips
- Quick preparation time: From mixing bowl to oven in under 15 minutes
- Perfect texture every time: Crispy edges with soft, chewy centers that don’t harden the next day
- Freezer-friendly dough: Make a double batch and freeze the dough balls for fresh-baked cookies anytime
- Customizable: Easy to adapt with nuts, different chocolate varieties, or flavor additions
- Family-approved classic: A recipe that pleases everyone from picky toddlers to discerning adults
For more delicious cookie recipes, check out these Best Chocolate Chip Cookies.
Ingredients
Creating perfect old fashioned chocolate chip cookies starts with quality ingredients measured accurately. This recipe makes about 48 cookies, perfect for sharing at gatherings or keeping a stash in your cookie jar. Each ingredient plays a crucial role in developing the signature taste and texture that makes these cookies irresistible.
Dry Ingredients
- 2 1/4 cups (281g) all-purpose flour
- 1 teaspoon (6g) baking soda
- 1 teaspoon (6g) salt
Wet Ingredients
- 1 cup (226g) unsalted butter, softened to room temperature
- 3/4 cup (150g) granulated sugar
- 3/4 cup (165g) packed light brown sugar
- 2 large eggs, at room temperature
- 2 teaspoons (10ml) pure vanilla extract
Mix-Ins
- 2 cups (340g) semi-sweet chocolate chips
- 1 cup (120g) chopped walnuts or pecans (optional)
You might also enjoy making Chewy Chocolate Chip Cookies.
Kitchen Equipment Needed
Having the right tools makes cookie baking smoother and more enjoyable. While you don’t need specialized equipment, these essentials will help you achieve perfect results. Quality baking sheets with even heat distribution and proper measuring tools ensure consistency batch after batch.
- Large mixing bowl
- Electric hand mixer or stand mixer
- Medium mixing bowl
- Measuring cups and spoons
- Cookie scoop or tablespoon
- Baking sheets (2-3 sheets)
- Parchment paper or silicone baking mats
- Wire cooling racks
- Rubber spatula
- Whisk
Recommended Products for This Recipe
Based on extensive testing and feedback from home bakers, these products will elevate your cookie-baking experience and help you achieve professional results every time.
1. Nordic Ware Natural Aluminum Commercial Baker’s Half Sheet
This heavy-duty aluminum baking sheet distributes heat evenly, preventing hot spots that can burn the bottoms of your cookies while leaving the centers undercooked. The reinforced encapsulated steel rim prevents warping even at high temperatures, and the natural aluminum finish promotes even browning without over-darkening.
2. OXO Good Grips Cookie Scoop
This spring-loaded cookie scoop ensures uniform cookie sizes for even baking, which means all your cookies finish at the same time. The comfortable non-slip handle and efficient release mechanism make scooping dozens of cookies effortless, and the dishwasher-safe construction means easy cleanup.
3. Ghirardelli Semi-Sweet Chocolate Chips
Premium chocolate makes a noticeable difference in the final cookie. These chips maintain their shape during baking while still becoming wonderfully melty, offering a rich chocolate flavor that balances perfectly with the cookie dough’s sweetness.
4. KitchenAid Stand Mixer
While not essential, a stand mixer makes creaming butter and sugar effortless and consistent. The powerful motor handles thick cookie dough without straining, and the hands-free operation lets you measure other ingredients while mixing. This investment pays off across countless baking projects.
Another great recipe to try is this Easy Sugar Cookie.
Step-by-Step Instructions
Follow these detailed instructions carefully for perfect old fashioned chocolate chip cookies every time. Taking your time with each step ensures proper texture development and flavor balance.
1. Preheat and Prepare
- Preheat your oven to 375°F (190°C)
- Line your baking sheets with parchment paper or silicone baking mats
- Position oven racks in the upper and lower thirds of the oven for even heat circulation
- Allow 10-15 minutes for the oven to reach proper temperature before baking
2. Mix the Dry Ingredients
- In a medium bowl, whisk together the flour, baking soda, and salt
- Whisk for at least 30 seconds to ensure even distribution of the leavening agent
- Set the bowl aside while you prepare the wet ingredients
- This pre-mixing prevents pockets of baking soda in your finished cookies
3. Cream the Butter and Sugars
- In a large mixing bowl, combine the softened butter, granulated sugar, and brown sugar
- Using an electric mixer on medium speed, beat for 3-4 minutes until the mixture is light, fluffy, and pale in color
- Scrape down the sides of the bowl halfway through to ensure even mixing
- Properly creamed butter and sugar creates air pockets that give cookies their texture
- The mixture should look almost mousse-like when ready
4. Add Eggs and Vanilla
- Add the first egg and beat on medium speed for about 30 seconds until fully incorporated
- Add the second egg and beat for another 30 seconds
- Pour in the vanilla extract and mix until evenly distributed
- Scrape down the bowl sides to incorporate any unmixed ingredients
- The mixture may look slightly curdled at this stage, which is completely normal
5. Incorporate Dry Ingredients
- With the mixer on low speed, gradually add the flour mixture in three additions
- Mix just until the flour disappears after each addition, about 10-15 seconds
- Stop mixing as soon as no white streaks remain visible
- Overmixing at this stage develops gluten, which can make cookies tough and cakey
- The dough should be thick, cohesive, and pull away from the bowl sides
6. Fold in Chocolate Chips
- Remove the bowl from the mixer and add the chocolate chips (and nuts if using)
- Using a rubber spatula or wooden spoon, fold the chips into the dough with a gentle turning motion
- Continue folding until the chips are evenly distributed throughout the dough
- This gentle hand-mixing prevents breaking the chocolate chips and overworking the dough
- Reserve a small handful of chips to press into the tops of cookies before baking for a bakery-style appearance
7. Shape the Cookies
- Use a cookie scoop or tablespoon to portion out rounded balls of dough (about 2 tablespoons each)
- Roll each portion between your palms to create smooth balls
- Place the dough balls on prepared baking sheets, spacing them at least 2 inches apart
- Each sheet should hold 6-8 cookies to allow for spreading
- For uniform size, weigh each dough ball (approximately 35-40g for standard cookies)
- Press 2-3 reserved chocolate chips into the top of each dough ball for visual appeal
8. Bake to Perfection
- Bake for 9-11 minutes, rotating the pans halfway through for even browning
- Cookies are done when edges are golden brown and centers still look slightly underbaked and puffy
- The tops should have a matte finish with some cracks forming
- Do not wait for cookies to brown completely, as they continue cooking on the hot pan
- For chewier cookies, pull them at 9 minutes; for crispier edges, bake the full 11 minutes
9. Cool Properly
- Let cookies rest on the baking sheet for 5 minutes after removing from the oven
- This resting time allows them to set and firm up while finishing the baking process from residual heat
- After 5 minutes, use a spatula to transfer cookies to a wire cooling rack
- Allow cookies to cool completely on the rack for at least 15 minutes before serving
- Cooling on racks prevents soggy bottoms by allowing air circulation
- For the best texture, let them cool for 30 minutes before eating, though warm cookies are undeniably tempting
If you love classic recipes, try Classic French Toast for breakfast.
Tips for Success
Mastering these simple techniques will elevate your cookies from good to exceptional. Small details make a big difference in achieving that perfect old fashioned chocolate chip cookie texture and flavor.
- Use room temperature ingredients: Butter, eggs, and even vanilla blend more smoothly when at room temperature, creating a more uniform dough. Set butter out 30-60 minutes before baking, or cut it into small pieces to speed softening.
- Don’t skip the creaming step: Beating butter and sugar for the full 3-4 minutes incorporates air that creates lighter cookies. Under-creaming results in dense, flat cookies.
- Measure flour correctly: Spoon flour into your measuring cup and level it off with a knife. Scooping directly from the bag compacts the flour, giving you up to 25% more flour than needed, which makes dry, tough cookies.
- Chill dough if it feels too soft: If your kitchen is warm or the dough seems greasy, refrigerate it for 15-30 minutes. This prevents excessive spreading during baking.
- Watch oven temperature carefully: An oven thermometer ensures accuracy since many ovens run hot or cold. Even 25°F difference affects cookie texture significantly.
- Don’t overbake: Cookies may look underdone when you pull them out, but they’ll firm up as they cool. Overbaked cookies become hard and dry rather than chewy.
- Use parchment paper: This prevents sticking and promotes even browning on the bottom. Reuse the same parchment for multiple batches.
- Space cookies properly: Crowding causes uneven baking and cookies that merge together. Two inches of space allows for spreading.
- Rotate pans halfway through: This compensates for oven hot spots and ensures even browning on all cookies.
- Let baking sheets cool between batches: Placing dough on hot sheets causes cookies to spread too much before they set. Run sheets under cold water to cool them quickly.
Serving Suggestions
These old fashioned chocolate chip cookies shine on their own, but they also pair beautifully with various accompaniments. The classic combination of cookies and cold milk remains unbeatable, but don’t be afraid to get creative with your presentations.
- Classic pairing: Serve warm cookies with a tall glass of cold whole milk for the ultimate nostalgic experience
- Ice cream sandwiches: Sandwich a scoop of vanilla ice cream between two cookies for an indulgent dessert
- Coffee companion: Enjoy alongside your morning coffee or afternoon espresso for a perfect pick-me-up
- Cookie plate variety: Combine with other classics like Cut Out Sugar Cookies for holiday cookie exchanges
- Dessert boards: Add to a dessert charcuterie board with brownies, fruit, and cheese for entertaining
- Crumbled topping: Break cookies into chunks and sprinkle over ice cream sundaes or parfaits
- Gift packaging: Layer in decorative tins or mason jars tied with ribbon for thoughtful homemade gifts
- After-school snack: Keep a batch on hand for kids coming home from school, paired with fruit slices for balance
You might also enjoy Classic Tiramisu for an elegant dessert.
Variations to Try
Once you’ve mastered the classic recipe, experiment with these delicious variations to keep things interesting. Each modification brings unique flavors while maintaining the beloved chewy texture of traditional chocolate chip cookies.
- Double chocolate: Replace 1/4 cup flour with unsweetened cocoa powder and use both semi-sweet and white chocolate chips for a richer chocolate experience
- Oatmeal chocolate chip: Substitute 1 cup flour with old-fashioned rolled oats for added texture and a slightly heartier cookie
- Peanut butter chip: Swap half the chocolate chips for peanut butter chips, creating a chocolate-peanut butter flavor combination
- Dark chocolate sea salt: Use dark chocolate chunks instead of chips and sprinkle flaky sea salt on top before baking for sophisticated flavor
- Espresso enhanced: Add 1 tablespoon instant espresso powder to the dry ingredients to intensify the chocolate flavor
- Butterscotch blend: Mix butterscotch chips with chocolate chips for a sweet, caramel-like flavor profile
- Toasted nut addition: Add 1 cup toasted pecans, walnuts, or macadamia nuts for extra crunch and richness
- Cinnamon spice: Incorporate 1 teaspoon ground cinnamon into the dry ingredients for warmth
- Brown butter version: Brown the butter before creaming it with sugars for deep, nutty flavor notes
- Coconut chocolate: Add 1 cup sweetened shredded coconut along with the chocolate chips for tropical flair
Storage and Reheating
Proper storage keeps your old fashioned chocolate chip cookies fresh and delicious for days. Follow these guidelines to maintain optimal texture and flavor, ensuring every cookie tastes as good as the first batch fresh from the oven.
- Room temperature storage: Store cooled cookies in an airtight container at room temperature for up to 5 days. Place parchment paper between layers to prevent sticking.
- Refrigerator storage: While not necessary, refrigeration extends shelf life to 1 week. Bring cookies to room temperature before serving for best texture.
- Freezer storage for cookies: Freeze baked cookies in freezer-safe containers or bags for up to 3 months. Separate layers with parchment paper to prevent sticking.
- Freezer storage for dough: Shape dough into balls and freeze on a baking sheet until solid, then transfer to freezer bags for up to 3 months. Bake from frozen, adding 2-3 minutes to baking time.
- Refreshing cookies: Warm stored cookies in a 300°F (150°C) oven for 3-5 minutes to restore the fresh-baked texture and melt the chocolate chips slightly.
- Microwave method: Heat individual cookies for 10-15 seconds on medium power to soften them quickly, though this method doesn’t restore crispiness.
- Maintaining softness: Place a slice of bread in the storage container with cookies. The cookies absorb moisture from the bread, staying soft longer.
- Preventing staleness: Always cool cookies completely before storing. Trapping warmth creates condensation that makes cookies soggy.
For another great cookie recipe, check out Single Serving Sugar Cookie.
Nutritional Facts
Per cookie (based on 48 cookies, without nuts):
- Calories: 110
- Total Fat: 5g
- Saturated Fat: 3g
- Trans Fat: 0g
- Cholesterol: 18mg
- Sodium: 75mg
- Total Carbohydrates: 15g
- Dietary Fiber: 0.5g
- Total Sugars: 10g
- Protein: 1g
- Vitamin D: 0.1mcg
- Calcium: 8mg
- Iron: 0.6mg
- Potassium: 35mg
Note: Nutritional values are approximate and may vary based on specific ingredients used and cookie size. Adding nuts increases calories, fat, and protein content per cookie.
Health Benefits of Key Ingredients
While chocolate chip cookies are certainly a treat, several ingredients offer nutritional value beyond pure indulgence. Understanding these benefits helps you appreciate the recipe from a different perspective.
Dark chocolate contains flavonoids, powerful antioxidants that support heart health and may improve blood flow. Semi-sweet chocolate chips provide these benefits in moderation, along with minerals like iron and magnesium that support various body functions.
- Eggs provide high-quality protein: Complete protein source containing all nine essential amino acids, plus choline for brain health
- Butter offers fat-soluble vitamins: Contains vitamins A, D, E, and K that support immune function, bone health, and vision
- Whole grain flour option: Substituting some all-purpose flour with whole wheat adds fiber, B vitamins, and minerals
- Vanilla extract contains antioxidants: Small amounts of polyphenols that combat oxidative stress in the body
- Walnuts boost omega-3 fatty acids: Adding walnuts provides alpha-linolenic acid, supporting heart and brain health
- Dark chocolate supports mood: Contains compounds that may increase serotonin and endorphin levels, improving well-being
- Moderation is key: Enjoying cookies as an occasional treat as part of a balanced diet maintains both physical and mental health
Try pairing with Healthy Chicken Salad for a balanced meal.
Frequently Asked Questions
1. Why are my cookies spreading too much?
This usually happens when the dough is too warm or the butter was too soft when mixed. Refrigerate the dough for 30 minutes before baking to firm up the fats.
Additionally, using melted butter instead of softened butter causes excessive spreading. Make sure your oven temperature is accurate, as a too-cool oven allows cookies to spread before they set.
2. Can I use salted butter instead of unsalted?
Yes, you can substitute salted butter, but reduce the added salt to 1/2 teaspoon or omit it entirely. Salted butter contains varying amounts of salt depending on the brand, which can make your cookies too salty.
Unsalted butter gives you better control over the final flavor. If using salted butter, taste your dough before adding chocolate chips to check saltiness.
3. How do I make cookies thicker and less flat?
Chill the dough for at least 1 hour before baking, which prevents excessive spreading. Increase the flour by 2-3 tablespoons for a thicker dough that holds its shape better.
Using a higher ratio of brown sugar to white sugar also helps cookies retain moisture and puff up more. Baking at a slightly higher temperature (385°F) sets the edges faster, preventing flattening.
4. Can I make this recipe without eggs?
Yes, replace each egg with one of these alternatives: 1/4 cup applesauce, 1/4 cup mashed banana, or 1 tablespoon ground flaxseed mixed with 3 tablespoons water (let sit 5 minutes). These substitutions slightly alter texture and flavor but still produce delicious cookies.
Commercial egg replacers also work well following package directions. The cookies may be slightly denser but equally tasty.
5. Why did my cookies turn out cakey instead of chewy?
Too much flour is the most common culprit, often from scooping flour directly from the bag. Always spoon flour into measuring cups and level off with a knife.
Overbaking also creates a cake-like texture rather than chewy centers. Pull cookies when centers still look slightly underdone, and make sure you’re using enough brown sugar, which adds moisture and chewiness.
Looking for more desserts? Try this Classic Pumpkin Pie.

Old Fashioned Chocolate Chip Cookies
Equipment
- Large mixing bowl
- Electric hand mixer or stand mixer - Stand mixer is optional but recommended for ease
- Medium mixing bowl - For dry ingredients
- Measuring cups and spoons
- Cookie scoop or tablespoon - Use a 2-tablespoon scoop for uniform cookies
- Baking sheets - 2–3 sheets recommended for multiple batches
- Parchment paper or silicone baking mats
- Wire cooling racks
- Rubber spatula
- Whisk
Ingredients
Dry Ingredients
- 2 1/4 cups all-purpose flour - 281g; spoon into measuring cup and level off
- 1 tsp baking soda - 6g
- 1 tsp salt - 6g
Wet Ingredients
- 1 cup unsalted butter - 226g, softened to room temperature
- 3/4 cup granulated sugar - 150g
- 3/4 cup packed light brown sugar - 165g
- 2 large eggs - at room temperature
- 2 tsp pure vanilla extract - 10ml
Mix-Ins
- 2 cups semi-sweet chocolate chips - 340g
- 1 cup chopped walnuts or pecans - 120g; optional
Instructions
- Preheat your oven to 375°F (190°C) and line baking sheets with parchment paper or silicone mats. Position oven racks in the upper and lower thirds and allow 10–15 minutes to fully preheat.
- In a medium bowl, whisk together the flour, baking soda, and salt for at least 30 seconds to evenly distribute the leavening agent. Set aside.
- Beat the softened butter, granulated sugar, and brown sugar together on medium speed for 3–4 minutes until light, fluffy, and pale. Scrape down the bowl sides halfway through.
- Add eggs one at a time, beating for 30 seconds after each, then mix in the vanilla extract. Scrape down the bowl; the mixture may look slightly curdled, which is normal.
- With the mixer on low, add the flour mixture in three additions, mixing just until no white streaks remain after each. Do not overmix — the dough should be thick and pull away from the bowl sides.
- Remove from the mixer and fold in the chocolate chips (and nuts if using) with a rubber spatula using a gentle turning motion. Reserve a small handful of chips to press into the tops before baking.
- Scoop rounded 2-tablespoon balls of dough, roll between your palms, and place at least 2 inches apart on prepared baking sheets (6–8 per sheet). Press 2–3 reserved chips into the top of each ball.
- Bake for 9–11 minutes, rotating pans halfway through, until edges are golden brown and centers look slightly underbaked and puffy. Pull at 9 minutes for chewier cookies, 11 minutes for crispier edges.
- Let cookies rest on the baking sheet for 5 minutes to set, then transfer to a wire cooling rack. Allow at least 15–30 minutes before serving for the best texture.
Notes
- Room temperature ingredients: Set butter out 30–60 minutes before baking so it creams properly; cold butter leads to dense, flat cookies.
- Measure flour correctly: Spoon flour into the measuring cup and level with a knife — scooping directly from the bag adds up to 25% more flour, making cookies dry and tough.
- Don’t skip creaming: Beat butter and sugar the full 3–4 minutes to incorporate air; under-creaming results in dense, flat cookies.
- Dough too soft? If your kitchen is warm or the dough seems greasy, refrigerate for 15–30 minutes before baking to prevent excessive spreading.
- Don’t overbake: Cookies will look underdone when pulled from the oven but firm up as they cool — overbaked cookies turn hard and dry instead of chewy.
- Salted butter substitute: If using salted butter, reduce added salt to ½ tsp or omit entirely to avoid over-salting.
- Freeze the dough: Shape dough into balls, freeze solid on a baking sheet, then transfer to freezer bags for up to 3 months. Bake from frozen, adding 2–3 minutes to the baking time.
- Storage: Store cooled cookies in an airtight container at room temperature for up to 5 days, or freeze baked cookies for up to 3 months.
- Keep cookies soft: Place a slice of bread in the storage container — the cookies absorb moisture from the bread and stay soft longer.
- Reheat for fresh-baked taste: Warm stored cookies in a 300°F (150°C) oven for 3–5 minutes to restore texture and re-melt the chocolate chips.
Final Thoughts
This old fashioned chocolate chip cookie recipe represents more than just a dessert. It’s a connection to simpler times, cherished memories, and the joy of home baking.
These cookies bring people together around the kitchen table, creating new traditions while honoring old ones. The aroma alone evokes warmth and comfort that no store-bought cookie can replicate.
I hope this recipe becomes a staple in your home, bringing as much joy to your family as it has to countless others over the decades. Don’t be afraid to make it your own by trying different variations or adding your personal touch.
Give this recipe a try and let me know how your cookies turn out! Share your photos and any creative twists you’ve added in the comments below. Happy baking!
Recommended:
- Belgian Waffle Recipe
- Easy Waffle Recipe
- Classic Apple Pie Recipe
- Dutch Apple Pie Recipe
- Best Carrot Cake Recipe
- Carrot Cake With Cream Cheese Frosting Recipe
- Easy Tiramisu Recipe
- Buttermilk Pancake Recipe
- Old Fashioned Pancake Recipe
- Baked Mac and Cheese Recipe