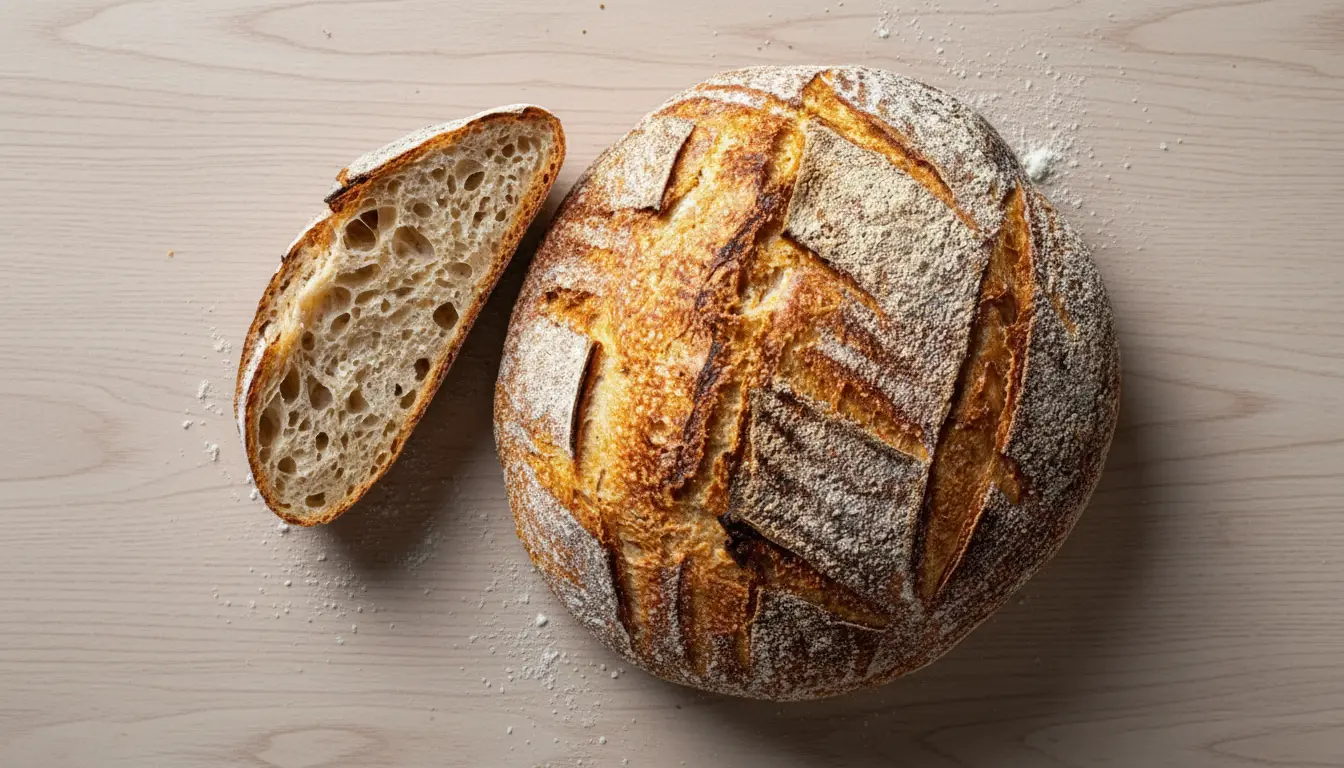
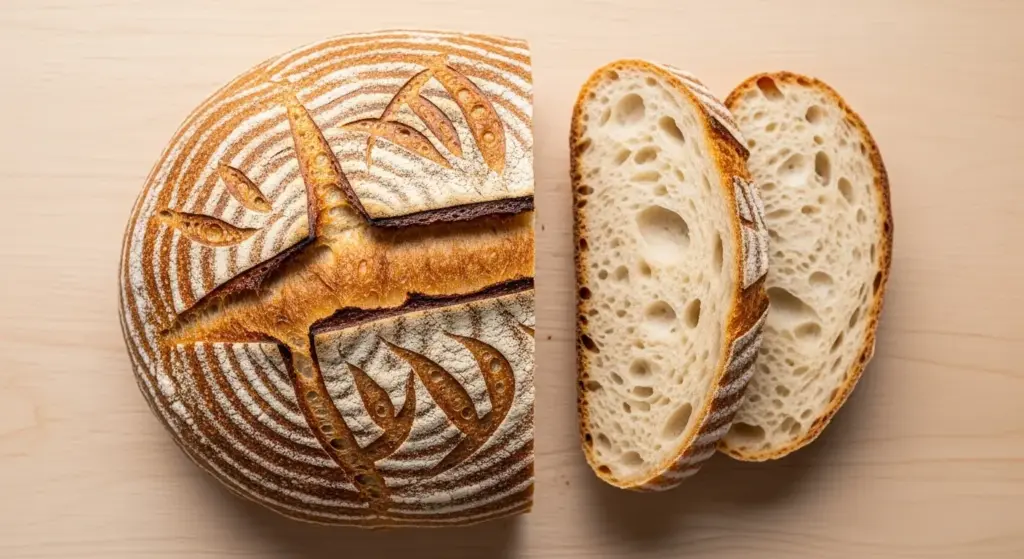
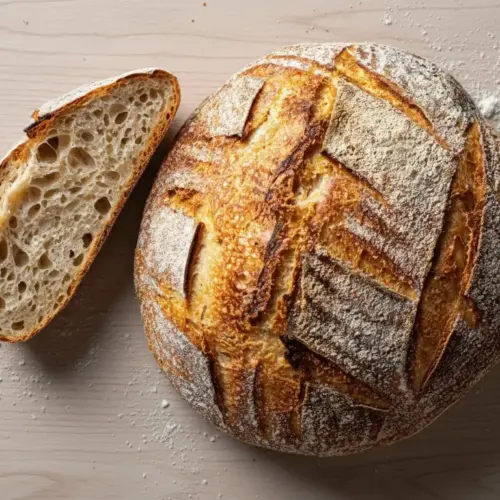
Making your own easy sourdough bread recipe at home might sound intimidating, but I’m here to show you that it’s actually one of the most rewarding baking projects you can tackle. This recipe simplifies the traditional sourdough process while still delivering that signature tangy flavor, crispy golden crust, and soft, airy interior that makes sourdough so special.
I’ve spent countless hours perfecting this method so that even complete beginners can achieve bakery-quality results. The beauty of this recipe lies in its simplicity—just four basic ingredients and a hands-off approach that fits perfectly into your daily routine.
You don’t need fancy equipment or years of baking experience. With a little patience and the right guidance, you’ll be pulling gorgeous, crackling loaves from your oven in no time.
This bread is perfect for everything from morning toast slathered with butter and jam to hearty sandwiches piled high with your favorite fillings. Once you taste the difference between homemade sourdough and store-bought bread, there’s no going back.
The fermentation process not only develops incredible depth of flavor but also makes the bread more digestible and nutritious than conventional yeast breads. Your kitchen will smell absolutely amazing while it bakes, and the satisfaction of slicing into a loaf you made yourself is truly unmatched.

Why You’ll Love This Easy Sourdough Bread Recipe
This recipe takes the mystery out of sourdough baking and makes it accessible for everyone, regardless of experience level. The hands-off nature means you can fit bread baking into even the busiest schedules.
Here’s what makes this recipe special:
- Simple ingredients: Just active sourdough starter, bread flour, water, and salt
- Minimal hands-on time: Most of the process is simply waiting for the dough to rise
- No kneading required: We use stretch and fold techniques that are much easier and less messy
- Flexible timing: Adapt the schedule to fit your lifestyle with same-day or overnight options
- Consistent results: Follow the steps and you’ll get a beautiful loaf every single time
- Incredible flavor: The long fermentation develops complex, tangy notes you can’t get from commercial yeast
- Better digestion: Sourdough fermentation breaks down gluten and phytic acid, making it easier on your stomach
- Impressive presentation: That golden, crackling crust and open crumb structure looks professional
This pairs beautifully with homemade alfredo sauce for dipping or as a side to any hearty meal.
Ingredients
This recipe requires just four core ingredients, each playing a crucial role in creating the perfect loaf. The quality of your ingredients directly impacts the final result, so choose the best you can find.
For one loaf:
- 100g (1/2 cup) active sourdough starter, bubbly and at peak fermentation
- 350g (1 1/2 cups) lukewarm water, filtered or bottled for best results
- 500g (4 cups) bread flour, preferably unbleached for optimal gluten development
- 10g (2 teaspoons) sea salt, fine or kosher
Notes on ingredients:
The sourdough starter should pass the float test—when a small spoonful is dropped into water, it should float, indicating it’s active and ready to leaven your bread. Bread flour has higher protein content than all-purpose flour, which creates better gluten structure and gives you that chewy texture sourdough is famous for.
The water temperature should be around 75-80°F (24-27°C)—too hot and you’ll kill the wild yeast, too cold and fermentation will be sluggish. Salt not only enhances flavor but also strengthens the gluten network and controls fermentation speed.
Another favorite: Sweet Sourdough Bread Recipe
Kitchen Equipment Needed
Having the right tools makes the sourdough process much smoother and helps you achieve professional results. While you don’t need everything on this list, these items will set you up for success.
Essential equipment:
- Large mixing bowl, glass or ceramic works best
- Digital kitchen scale for accurate measurements
- Dough scraper or bench knife for handling sticky dough
- Banneton proofing basket or a bowl lined with a clean kitchen towel
- Dutch oven (5-6 quart capacity) with a lid
- Parchment paper for easy transfer
- Bread lame or sharp razor blade for scoring
- Kitchen thermometer for checking dough temperature
- Clean kitchen towels or plastic wrap for covering dough
Optional but helpful:
A spray bottle for adding steam, oven mitts rated for high heat, and a wire cooling rack. The digital scale is particularly important because cup measurements can vary significantly and lead to inconsistent results in bread baking.
Read Also: Same Day Sourdough Bread Recipe
Recommended Products for This Recipe
These carefully selected products will elevate your sourdough baking experience and make the process easier and more enjoyable. I’ve tested countless tools and ingredients, and these are the ones that consistently deliver the best results.
1. King Arthur Bread Flour
This premium bread flour has a perfect protein content of 12.7%, which creates superior gluten structure for that beautiful open crumb and chewy texture. It’s consistently milled and unbleached, giving you reliable results every single time you bake.
2. Lodge Enameled Cast Iron Dutch Oven
This 5.5-quart Dutch oven traps steam perfectly during baking, creating that signature crispy, crackly crust while keeping the interior soft and airy. The heavy construction distributes heat evenly, preventing hot spots that can burn your bread.
3. Round Banneton Proofing Basket
A proper banneton basket supports your dough during its final rise while creating those beautiful spiral patterns on the crust. The natural rattan wicks away moisture, preventing a soggy bottom and helping develop the perfect crust texture.
4. Escali Digital Kitchen Scale
Precision matters in bread baking, and this digital scale measures in 1-gram increments up to 11 pounds. The tare function lets you easily measure multiple ingredients in the same bowl, and the large display is easy to read even in dim lighting.
5. UFO Bread Lame with Replaceable Blades
This professional-grade bread lame features a curved blade that creates beautiful expansion scores on your loaf. The ergonomic handle gives you excellent control, and the replaceable blades ensure you always have a sharp edge for clean cuts.
You might also enjoy: Einkorn Bread Recipe
Step-by-Step Instructions
Follow these detailed instructions carefully for foolproof sourdough bread. Each step builds on the previous one, developing the gluten structure and flavor that make sourdough special.
1. Mix the Dough (Morning, 8:00 AM)
- Add 350g lukewarm water to your large mixing bowl first
- Spoon in 100g of your active, bubbly sourdough starter and whisk it into the water until completely dissolved—no lumps should remain
- Add 500g bread flour to the bowl and use a sturdy spoon or your hands to mix until all the flour is incorporated and you have a shaggy, sticky mass
- The dough will look rough and uneven at this stage, which is completely normal
- Don’t add the salt yet—we’ll incorporate it during the first stretch and fold
2. Autolyse Rest (30 Minutes)
- Cover the bowl with a damp kitchen towel or plastic wrap to prevent the surface from drying out
- Let the dough rest at room temperature for 30 minutes to 1 hour
- During this autolyse period, the flour absorbs the water and gluten strands begin forming naturally without any kneading
- This rest makes the dough easier to work with and develops better texture in the final bread
- The dough should look slightly smoother and more cohesive after this rest
3. Add Salt and Perform First Stretch and Fold (8:30 AM)
- Sprinkle 10g of salt evenly over the top of the dough
- Wet your hands to prevent sticking, then grab one edge of the dough
- Stretch it up about 12 inches and fold it over onto itself toward the center
- Rotate the bowl 90 degrees and repeat this stretch and fold motion
- Continue rotating and folding until you’ve gone around the bowl 4-6 times and the salt is fully incorporated
- The dough should start feeling slightly more elastic and less sticky
4. Bulk Fermentation with Additional Stretch and Folds (8:30 AM – 4:30 PM)
- Cover the bowl again and let it rest for 30 minutes at room temperature (about 75-78°F works best)
- After 30 minutes, perform another set of stretch and folds using the same technique as before—wet hands, grab edge, stretch up, fold over, rotate, repeat 4-6 times
- Cover and rest for another 30 minutes
- Perform a third set of stretch and folds (you should feel the dough getting stronger and smoother with each set)
- Cover and let the dough bulk ferment for 6-8 hours total until it has doubled in size
- You’ll see bubbles on the surface and around the sides of the bowl when it’s ready
- The dough should feel airy and jiggly when you gently shake the bowl
5. Pre-Shape the Dough (4:30 PM)
- Lightly flour your clean work surface
- Use your dough scraper to gently turn the dough out onto the counter—try not to deflate it too much
- Using floured hands and your dough scraper, gently pull the edges of the dough toward the center to create tension on the surface
- Flip the dough over so the smooth side is facing up
- Use your scraper and hands to gently push the dough in a circular motion, creating a round ball shape
- Let the shaped dough rest uncovered on the counter for 20-30 minutes while you prepare your banneton
6. Final Shaping (5:00 PM)
- Generously dust your banneton basket with rice flour or all-purpose flour (rice flour prevents sticking better)
- Lightly flour the top of your rested dough round
- Flip the dough over so the floured side is down and the sticky side faces up
- Fold the bottom third up toward the center, pressing gently to seal
- Fold the top third down toward the center, overlapping the first fold
- Starting from the top, roll the dough toward you tightly, creating tension on the surface
- Pinch the seam closed with your fingertips
- Use both hands to gently cup the dough and roll it in a circular motion to create even more surface tension
- Carefully place the dough seam-side up into your prepared banneton
7. Cold Proof in Refrigerator (Overnight, 12-48 Hours)
- Cover your banneton with a clean kitchen towel or place it in a large plastic bag
- Transfer to the refrigerator and let it proof for at least 12 hours, though 24-48 hours develops even better flavor
- The cold fermentation slows down the yeast activity while allowing the beneficial bacteria to develop complex flavors
- The dough will rise slightly in the fridge but won’t double in size
- Cold dough is also much easier to score before baking
8. Preheat Dutch Oven (Next Morning, 8:00 AM)
- Place your Dutch oven with the lid on in your cold oven
- Set the temperature to 500°F (260°C) and let it preheat for a full hour
- This extended preheat ensures the pot is thoroughly heated, which is crucial for maximum oven spring
- Never put cold dough into a cold pot—you need that intense initial heat
9. Score and Bake (9:00 AM)
- Remove your dough from the refrigerator right when the oven finishes preheating
- Cut a piece of parchment paper large enough to lift the dough
- Carefully invert the banneton over the parchment so the dough releases seam-side down
- If desired, lightly dust the top with flour for a more pronounced scoring pattern
- Using your bread lame or a sharp razor held at a 45-degree angle, make one deep score (about 1/2 inch) across the top of the loaf
- You can add decorative smaller scores as well, but one main expansion score is essential
- Very carefully remove the screaming-hot Dutch oven from your oven using oven mitts
- Grab the corners of the parchment paper and lower the dough into the pot (be extremely careful not to touch the sides)
- Immediately cover with the lid and place back in the oven
- Bake covered for 20 minutes at 500°F to trap steam and create oven spring
- After 20 minutes, remove the lid and reduce temperature to 450°F (230°C)
- Continue baking uncovered for 25-30 minutes until the crust is deep golden brown
- For extra color, you can bake an additional 5 minutes
10. Cool Completely (10:00 AM)
- Carefully remove the Dutch oven and use the parchment to lift the bread out onto a wire cooling rack
- The bread will make crackling sounds as it cools—this is the crust contracting and is perfectly normal
- Resist the urge to cut into it for at least 1 hour, preferably 2-3 hours
- The interior continues cooking from residual heat during this time, and cutting too early will result in a gummy texture
- Once completely cool, slice with a sharp serrated knife using a gentle sawing motion
For a lighter option, try: Fresh Milled Flour Bread Recipe
Tips for Success
These proven tips will help you troubleshoot common issues and consistently produce beautiful loaves. Pay attention to these details for the best results.
Expert sourdough tips:
- Use the float test: Before making your dough, drop a small spoonful of starter into a glass of water—if it floats, it’s ready to use; if it sinks, feed it again and wait
- Temperature matters: Keep your dough between 75-78°F during bulk fermentation for consistent timing; warmer kitchens will ferment faster, cooler ones slower
- Don’t rush the process: Sourdough can’t be hurried—give your starter enough time to become active and your dough enough time to ferment properly
- Hydration affects handling: This recipe uses moderate hydration (70%) which is easier for beginners; as you gain confidence, you can increase water for a more open crumb
- Gentle handling: After bulk fermentation, treat the dough gently to preserve all those beautiful air bubbles you’ve worked so hard to develop
- Sharp blade is crucial: A dull blade will drag and deflate your dough instead of cutting cleanly; use a fresh razor blade or very sharp lame
- Score with confidence: Make one decisive, deep cut at a 45-degree angle; hesitation leads to jagged, uneven scores
- Steam creates crust: The Dutch oven traps moisture which creates steam, allowing the bread to expand fully before the crust sets
- Trust the process: Your first few loaves might not be perfect, but each bake teaches you something about how the dough should look and feel
Read Also: Manna Bread Recipe
Serving Suggestions
This versatile sourdough bread shines in countless serving scenarios, from simple preparations to elaborate meals. Here are some of my favorite ways to enjoy it.
The thick, crispy crust and chewy interior make this bread perfect for both sweet and savory applications. Its tangy flavor pairs beautifully with rich, creamy spreads and sharp cheeses.
Delicious serving ideas:
- Classic breakfast: Toast thick slices and spread with salted butter, honey, or your favorite jam
- Avocado toast: Top with mashed avocado, flaky sea salt, red pepper flakes, and a drizzle of olive oil
- Soup companion: Serve alongside Cream of Mushroom Soup or Roasted Carrot Soup for dipping
- Grilled cheese: The sturdy structure holds up perfectly to butter and heat, creating the ultimate grilled cheese sandwich
- Bruschetta base: Top toasted slices with Classic Bruschetta or Strawberry Bruschetta
- French toast: Day-old sourdough makes incredible French toast with its firm texture that soaks up custard without falling apart
- Sandwiches: Build hearty sandwiches with deli meats, cheese, and crisp vegetables
- Cheese board: Slice and serve alongside an assortment of cheeses, cured meats, and olives
- Bread pudding: Transform stale sourdough into a decadent dessert bread pudding
- Panzanella salad: Cube day-old bread for a traditional Italian bread salad with tomatoes and fresh basil
This technique works wonderfully in Sweet Potato Bread as well.
Variations to Try
Once you’ve mastered the basic recipe, these creative variations will keep your sourdough baking exciting and delicious. Each adds unique flavors while maintaining the core sourdough technique.
Flavor and texture variations:
- Whole wheat sourdough: Replace up to 100g of bread flour with whole wheat flour for a nuttier flavor and heartier texture
- Seeded sourdough: Mix in 50g of seeds (sunflower, pumpkin, sesame, or a combination) after the first stretch and fold
- Olive and rosemary: Fold in 75g chopped kalamata olives and 1 tablespoon fresh chopped rosemary during the second stretch and fold
- Cinnamon raisin: Add 100g raisins and 1 tablespoon cinnamon to create a sweet breakfast loaf
- Everything bagel: Sprinkle the top with everything bagel seasoning before scoring for a savory twist
- Jalapeño cheddar: Incorporate 75g shredded sharp cheddar and 2 diced jalapeños for a spicy, cheesy variation
- Garlic herb: Mix in 3 minced garlic cloves, 1 tablespoon Italian herbs, and 50g grated Parmesan
- Cranberry walnut: Fold in 75g dried cranberries and 50g chopped walnuts for a festive loaf
- Dark chocolate cherry: Add 75g dark chocolate chunks and 50g dried cherries for an indulgent treat
For another bread variation, try: Seeded Miso Sweet Potato Bread Recipe
Storage and Reheating
Proper storage keeps your sourdough fresh and delicious for days, while the right reheating techniques restore that just-baked quality. Follow these methods to enjoy your bread at its best.
How to store and reheat:
- Room temperature (2-3 days): Store cut-side down on a cutting board or in a paper bag at room temperature—never plastic, which makes the crust soft and soggy
- Bread box storage: A bread box maintains ideal humidity while allowing air circulation, keeping the crust crispy for up to 4 days
- Freezing (up to 3 months): Slice the entire loaf, wrap tightly in plastic wrap, then aluminum foil, and freeze; pull out individual slices as needed
- Refrigeration: Avoid storing bread in the refrigerator as it accelerates staling and makes the texture dry and crumbly
- Refresh the crust: Spritz the entire loaf with water and bake at 350°F for 10 minutes to restore crispiness
- Toast from frozen: Pop frozen slices directly into the toaster—no thawing needed
- Microwave method: Wrap a slice in a damp paper towel and microwave for 10-15 seconds for soft, warm bread
- Stale bread uses: Transform old sourdough into croutons, breadcrumbs, French Toast Casserole, or bread pudding
Read Also: Pineapple Quick Bread Recipe
Nutritional Facts
Per slice (based on 12 slices per loaf):
- Calories: 155
- Total Fat: 1g
- Saturated Fat: 0.1g
- Cholesterol: 0mg
- Sodium: 325mg
- Total Carbohydrates: 31g
- Dietary Fiber: 1g
- Sugars: 0.1g
- Protein: 5g
- Iron: 0.4mg
This pairs beautifully with Classic Hummus for a protein-rich snack.
Health Benefits of Key Ingredients
Sourdough bread offers impressive nutritional advantages over commercially yeasted bread thanks to the long fermentation process. Understanding these benefits helps you appreciate what makes sourdough a healthier choice.
The wild yeast and beneficial bacteria in sourdough starter work together during fermentation to transform the bread in remarkable ways. This ancient process creates a more nutritious and digestible final product.
Nutritional highlights:
- Improved digestibility: The long fermentation breaks down complex proteins and gluten, making sourdough easier on your digestive system than regular bread
- Lower glycemic index: Sourdough causes a slower, more gradual rise in blood sugar compared to commercial bread, helping maintain stable energy levels
- Increased mineral absorption: Fermentation reduces phytic acid, which normally binds to minerals like iron, zinc, and magnesium, making these nutrients more bioavailable
- Prebiotic properties: The lactic acid bacteria create prebiotics that feed beneficial gut bacteria and support digestive health
- Natural preservatives: The acidity from fermentation acts as a natural preservative, keeping the bread fresh longer without artificial additives
- B vitamin production: The fermentation process actually increases B vitamins, particularly folate and thiamin
- Complete protein source: Bread flour provides all essential amino acids needed for muscle repair and maintenance
- Sustained energy: The complex carbohydrates in bread flour provide lasting energy without the crash associated with refined sugars
- No added sugars: Unlike most commercial breads, traditional sourdough contains no added sweeteners
Another favorite: Chocolate Chip Bread Recipe
Frequently Asked Questions
1. Why didn’t my sourdough bread rise properly?
The most common culprit is inactive or weak starter. Your starter must be bubbly, doubled in size, and pass the float test before using it in bread.
If your starter is active but your dough still didn’t rise, check your kitchen temperature—dough needs warmth (75-78°F) to ferment properly. Cold environments slow fermentation dramatically.
2. How do I know when bulk fermentation is complete?
Your dough should have doubled in size, feel airy and jiggly when you shake the bowl, and show visible bubbles on the surface and sides. It should also have a slightly domed top.
The poke test helps too—gently press your finger into the dough about half an inch deep; if the indentation slowly springs back halfway, it’s ready to shape.
3. Can I use all-purpose flour instead of bread flour?
Yes, but reduce the water to 325g since all-purpose flour absorbs less liquid. Your bread will have a slightly softer texture and less chewy crumb.
Bread flour’s higher protein content (12-14%) creates more gluten development, which gives sourdough its characteristic chew and open crumb structure.
4. What if I don’t have a Dutch oven?
You can bake sourdough on a baking stone or sheet pan, but you’ll need to create steam another way. Place a metal pan on the bottom oven rack and add boiling water right when you put the bread in.
Alternatively, spray the oven walls and the loaf with water several times during the first 10 minutes of baking to create steam.
5. Why is my sourdough too sour or not sour enough?
Sourness depends on fermentation time and temperature. Longer, cooler fermentation (like overnight in the fridge) develops more sour flavors.
If your bread is too sour, reduce the bulk fermentation time or use your starter when it’s freshly fed rather than at peak. For more sourness, extend the cold proof in the refrigerator up to 48 hours.
You might also enjoy: Blackberry Bread Recipe
Easy Sourdough Bread
Equipment
- Large mixing bowl - Glass or ceramic works best
- Digital kitchen scale - For accurate measurements
- Dough scraper or bench knife
- Banneton proofing basket - Or a bowl lined with a clean kitchen towel
- Dutch oven - 5-6 quart capacity with a lid
- Parchment paper - For easy transfer
- Bread lame or sharp razor blade - For scoring
- Kitchen thermometer - For checking dough temperature
- Clean kitchen towels or plastic wrap - For covering dough
- Spray bottle (optional) - For adding steam
- Wire cooling rack (optional)
Ingredients
- 100 g active sourdough starter - 1/2 cup, bubbly and at peak fermentation
- 350 g lukewarm water - 1 1/2 cups, filtered or bottled, 75-80°F (24-27°C)
- 500 g bread flour - 4 cups, preferably unbleached
- 10 g sea salt - 2 teaspoons, fine or kosher
For Dusting (Optional)
- rice flour - Or all-purpose flour, for dusting banneton
Instructions
- Whisk the active sourdough starter into lukewarm water until dissolved. Add bread flour and mix until you have a shaggy, sticky mass.
- Cover the bowl and let the dough rest at room temperature for 30 minutes to 1 hour.
- Sprinkle the salt over the dough. Wet your hands, then perform 4-6 stretch and folds by grabbing one edge, stretching it up, and folding it toward the center.
- Cover the bowl and rest for 30 minutes. Perform another set of stretch and folds. Repeat for a third set. Then bulk ferment for 6-8 hours until doubled in size with bubbles on the surface.
- Turn the dough onto a lightly floured surface. Pull the edges toward the center to create tension, then flip and form into a round ball. Rest uncovered for 20-30 minutes.
- Dust your banneton with flour. Flip the dough, fold the bottom third up and top third down, then roll tightly from top to bottom. Pinch the seam closed and place seam-side up in the banneton.
- Cover the banneton and refrigerate for at least 12 hours, preferably 24-48 hours for better flavor.
- Place your Dutch oven with lid on in a cold oven. Preheat to 500°F (260°C) for a full hour.
- Turn the dough out onto a parchment paper. Dust with flour if desired. Make one deep score across the top with a bread lame at a 45-degree angle. Transfer dough to the hot Dutch oven using the parchment. Cover and bake at 500°F for 20 minutes. Remove lid, reduce heat to 450°F (230°C), and bake for 25-30 minutes more until deep golden brown.
- Lift the bread onto a wire cooling rack using the parchment. Cool completely for at least 1-2 hours before slicing.
Notes
- Starter readiness: Always use the float test before making dough. Drop a small spoonful of starter into water; if it floats, it’s ready. If it sinks, feed it again and wait.
- Temperature control: Keep your dough between 75-78°F during bulk fermentation. Warmer kitchens ferment faster, cooler ones slower.
- All-purpose flour substitute: Reduce water to 325g (1 3/8 cups) when using all-purpose flour. The bread will have a softer texture.
- No Dutch oven alternative: Bake on a baking stone or sheet pan. Place a metal pan on the bottom rack and add boiling water when you put the bread in to create steam.
- Adjusting sourness: For more tang, extend cold proof to 48 hours. For less sourness, reduce bulk fermentation time or use starter when freshly fed.
- Storage: Store cut-side down at room temperature in a paper bag or bread box for 2-3 days. Never store in plastic which softens the crust.
- Freezing: Slice the entire loaf, wrap tightly in plastic wrap then foil, and freeze for up to 3 months. Toast slices directly from frozen.
- Reheating: Spritz a whole loaf with water and bake at 350°F for 10 minutes to restore crispiness.
- Make-ahead timeline: Mix dough in the morning (8:00 AM), perform stretch and folds until 11:00 AM, bulk ferment until 4:30 PM, shape and refrigerate overnight, bake the next morning.
Final Thoughts
Baking your own easy sourdough bread recipe is truly one of the most satisfying kitchen accomplishments you can achieve. That moment when you slice into a loaf you made from scratch and see the beautiful open crumb and crispy crust makes all the waiting worthwhile.
Don’t be discouraged if your first loaf isn’t perfect—sourdough baking is as much an art as it is a science, and every bake teaches you something new about how the dough should look, feel, and behave. With practice, you’ll develop an intuitive sense for when your starter is ready, when bulk fermentation is complete, and how to shape for the best results.
I encourage you to try this recipe and make it your own. Experiment with different flours, add your favorite mix-ins, and find the timing that works best for your schedule.
Once you experience the incredible flavor and texture of homemade sourdough, you’ll wonder why you ever bought bread from the store. Happy baking, and I’d love to hear how your loaves turn out in the comments below!
Recommended:
- Amish Banana Bread Recipe
- Paula Deen Banana Bread Recipe
- Starbucks Banana Bread Recipe
- Old Fashioned Pumpkin Bread Recipe
- Jiffy Spoon Bread Recipe
- Gluten Free Dairy Free Bread Recipe
- Cracklin Bread Recipe
- Vasilopita Bread Recipe
- Cunettos Garlic Cheese Bread Recipe
- Macaroni Grill Bread Recipe


