Fall baking doesn’t get much better than warm, bubbling easy apple crisp recipe straight from the oven. This classic dessert brings together tender cinnamon apples and a buttery oat topping that gets perfectly golden and crispy.
I’ve been making this apple crisp for years, and it never fails to fill my kitchen with the most incredible aroma. The beauty of this dessert lies in its simplicity and forgiving nature.
Unlike traditional apple pie, which requires rolling out dough and perfecting crimped edges, apple crisp comes together in minutes with pantry staples. You just toss sliced apples with warm spices, scatter on a crumbly topping, and let the oven work its magic.
The result is a dessert that tastes like it took hours but actually takes less than one. The apples soften and release their natural juices, creating a luscious filling that bubbles up around the edges.
Meanwhile, the topping transforms into a crispy, golden crown with bits of buttery oats that add incredible texture. Every spoonful delivers that perfect contrast between soft fruit and crunchy topping.
This recipe works beautifully for weeknight desserts, holiday gatherings, or anytime you need something comforting and delicious. The best part is how adaptable it is to your preferences and what you have on hand.

Why You’ll Love This Easy Apple Crisp Recipe
This dessert hits all the right notes without requiring advanced baking skills or specialty ingredients.
Here’s what makes this apple crisp so special:
- Simple ingredients: Everything you need is probably already in your kitchen. No hunting down unusual items or making special trips to the store.
- Minimal prep time: Unlike pie, there’s no dough to make, chill, or roll out. Just slice apples, mix toppings, and bake.
- Foolproof technique: This recipe is incredibly forgiving and turns out perfectly every time, even for beginners.
- Customizable sweetness: Adjust the sugar levels based on your apples and personal taste preferences without compromising results.
- Make-ahead friendly: Assemble it hours before baking, or prepare components separately and combine when ready.
- Crowd-pleaser: Everyone loves the combination of warm spiced apples and crispy oat topping, making it perfect for gatherings.
- Versatile serving: Delicious on its own, heavenly with vanilla ice cream, or wonderful alongside whipped cream.
Ingredients
The magic of this easy apple crisp recipe comes from high-quality, simple ingredients that work together to create incredible flavor and texture.
For the Apple Filling:
- 6-7 medium apples (about 2.5 lbs / 1.1 kg), peeled and sliced
- 2 tablespoons (15g) all-purpose flour
- 3 tablespoons (38g) granulated sugar
- 1/4 cup (50g) packed brown sugar
- 1 teaspoon (5ml) vanilla extract
- 1 1/2 teaspoons ground cinnamon
- 1/4 teaspoon ground nutmeg
- Pinch of salt
For the Crisp Topping:
- 1 cup (90g) old-fashioned rolled oats
- 3/4 cup (94g) all-purpose flour
- 3/4 cup (150g) packed brown sugar
- 1/2 teaspoon ground cinnamon
- 1/4 teaspoon salt
- 1/2 cup (113g) unsalted butter, cold and cut into small cubes
Ingredient Notes:
Choose firm, crisp apples that hold their shape when baked. Granny Smith apples provide tartness that balances the sweet topping beautifully, while Honeycrisp or Fuji add natural sweetness.
Many bakers prefer a mix of apple varieties for complex flavor. The flour in the filling helps absorb the juices released by the apples as they bake, preventing a watery crisp.
Brown sugar adds deeper caramel notes compared to white sugar alone. Cold butter is essential for achieving that perfect crumbly topping texture rather than a paste.
Old-fashioned oats create better texture than quick oats, which can become mushy. The combination of cinnamon and nutmeg provides warm, cozy spice notes that complement the apples perfectly.
For the best results, consider picking up Granny Smith apples for their reliable texture and tartness.
Kitchen Equipment Needed
Having the right tools makes assembling this apple crisp effortless and ensures even baking.
Essential Equipment:
- 9×13-inch baking dish (or 9×9-inch for a thicker crisp)
- Large mixing bowl
- Medium mixing bowl
- Sharp knife or apple peeler
- Cutting board
- Measuring cups and spoons
- Pastry cutter or fork
- Wooden spoon or spatula
Optional But Helpful:
- Apple peeler/corer/slicer for faster prep
- Microplane or zester for fresh nutmeg
The baking dish size affects the depth and ratio of fruit to topping. A 9×13-inch dish creates a thinner layer that bakes faster, while a 9×9-inch dish yields a deeper crisp with more generous topping in each serving.
Glass or ceramic dishes distribute heat evenly, though metal pans work well too. A pastry cutter makes incorporating cold butter into the topping much easier than using a fork, creating those perfect crumbly bits.
If you peel a lot of apples, an apple peeler/corer/slicer tool speeds up prep considerably.
Recommended Products for This Recipe
These carefully selected products will help you create the best possible apple crisp with professional results every time.
1. Le Creuset Stoneware Baking Dish
This ceramic baking dish distributes heat evenly throughout baking, ensuring your apple crisp cooks uniformly without burnt edges or undercooked centers. The beautiful enamel finish transitions seamlessly from oven to table for serving, and cleanup is remarkably easy even with baked-on sugar.
2. OXO Good Grips Swivel Peeler
Peeling six or seven apples can be tedious with a dull peeler. This sharp, comfortable peeler glides effortlessly over apple skin, saving time and reducing hand fatigue during prep.
3. Bob’s Red Mill Old Fashioned Rolled Oats
Quality oats make a noticeable difference in the topping’s texture and flavor. These premium whole grain oats stay crisp after baking and provide that authentic, hearty crunch that defines a great apple crisp.
4. Pastry Cutter with Comfortable Grip
A quality pastry cutter makes incorporating cold butter into the flour mixture incredibly easy, creating perfect pea-sized crumbles that bake into the ideal crispy texture. This tool is worth having for any baker who makes crisps, crumbles, or pie crusts regularly.
This pairs wonderfully with other fall desserts like pumpkin bread for a complete seasonal spread.
Step-by-Step Instructions
Follow these detailed steps to create perfect apple crisp every single time, even if you’re a complete beginner.
1. Preheat and Prepare
- Preheat your oven to 350°F (175°C) and position a rack in the center
- Lightly grease your 9×13-inch baking dish with butter or cooking spray
- Set the prepared dish aside while you work on the filling
Starting with a properly preheated oven ensures even baking from the moment the crisp goes in. Greasing the dish prevents sticking and makes serving easier later.
2. Prepare the Apples
- Peel all 6-7 apples using a vegetable peeler or paring knife
- Cut each apple into quarters and remove the core
- Slice each quarter into 1/4-inch thick slices, or cut into 1/2-inch chunks if you prefer
- Place all sliced apples in a large mixing bowl
Uniform apple pieces ensure even cooking throughout the dish. Thinner slices will soften more quickly, while chunks provide more substantial bites of fruit.
3. Make the Apple Filling
- Add the 2 tablespoons of flour to the bowl with the apples
- Add 3 tablespoons granulated sugar and 1/4 cup brown sugar
- Pour in the 1 teaspoon vanilla extract
- Sprinkle in 1 1/2 teaspoons cinnamon, 1/4 teaspoon nutmeg, and a pinch of salt
- Toss everything together with a wooden spoon or your hands until apples are evenly coated
- Transfer the apple mixture to your prepared baking dish and spread into an even layer
The flour coating helps thicken the juices that release during baking, preventing a watery bottom. Make sure every apple piece gets coated with the spice mixture for consistent flavor.
4. Create the Crisp Topping
- In a medium bowl, combine 1 cup oats, 3/4 cup flour, 3/4 cup brown sugar, 1/2 teaspoon cinnamon, and 1/4 teaspoon salt
- Whisk the dry ingredients together until well mixed
- Add the 1/2 cup cold butter cubes to the bowl
- Using a pastry cutter or fork, cut the butter into the dry mixture
- Work the butter in until the mixture resembles coarse crumbs with pea-sized pieces of butter throughout
- The mixture should hold together when squeezed but still be crumbly
Cold butter is crucial here because it creates pockets of steam during baking that result in a crispy, flaky topping. Don’t overmix or the topping will become paste-like.
5. Assemble the Crisp
- Scatter the crumb topping evenly over the apple filling
- Gently press down slightly to help it adhere
- Make sure to spread topping all the way to the edges for complete coverage
Even distribution ensures every serving gets that perfect ratio of crispy topping to tender apples.
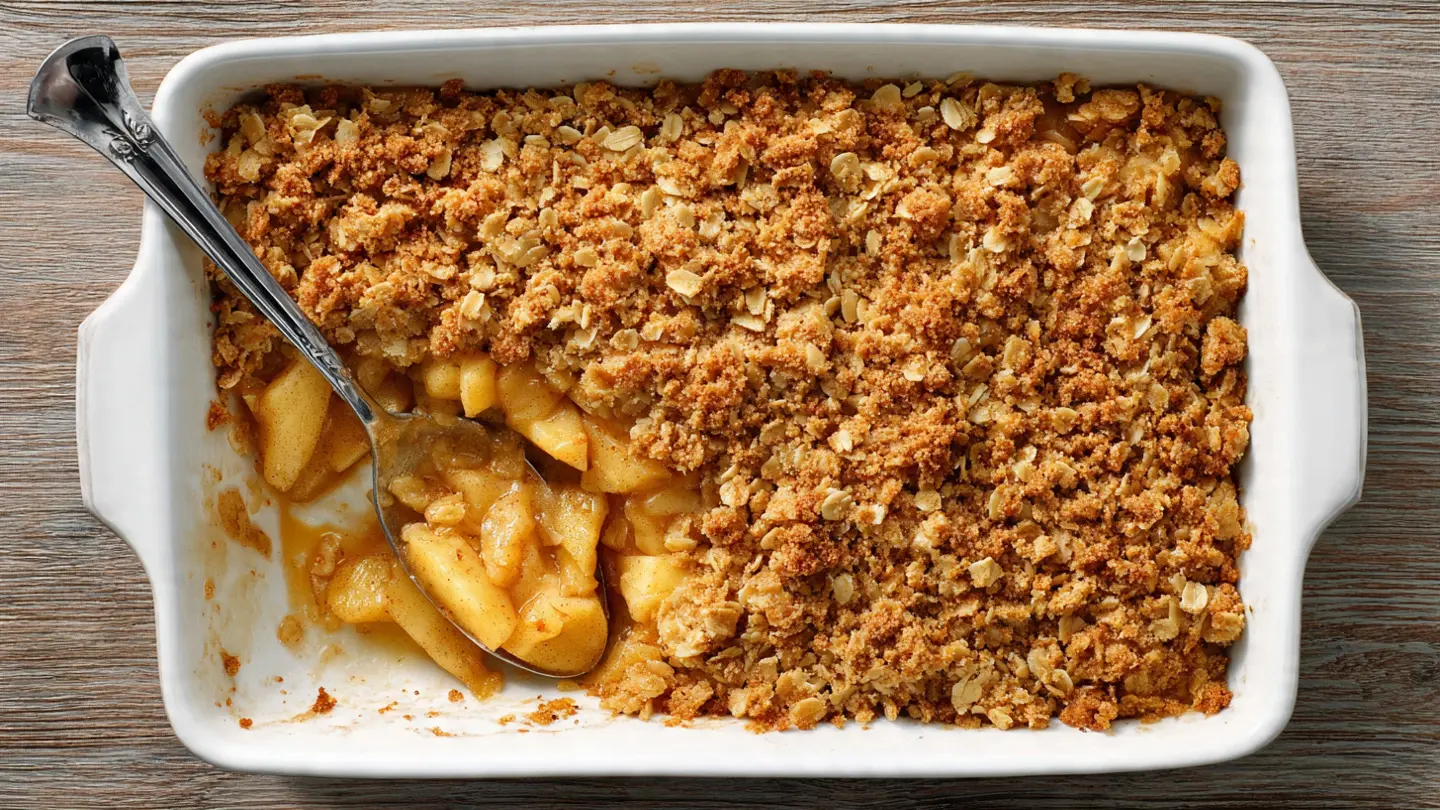
6. Bake to Perfection
- Place the baking dish on the center oven rack
- Bake for 45-50 minutes until the topping is golden brown and you can see the filling bubbling around the edges
- If the topping browns too quickly, tent loosely with aluminum foil for the remaining baking time
- The apples should be tender when pierced with a knife
The bubbling around the edges indicates the apples have released their juices and the filling has thickened properly.
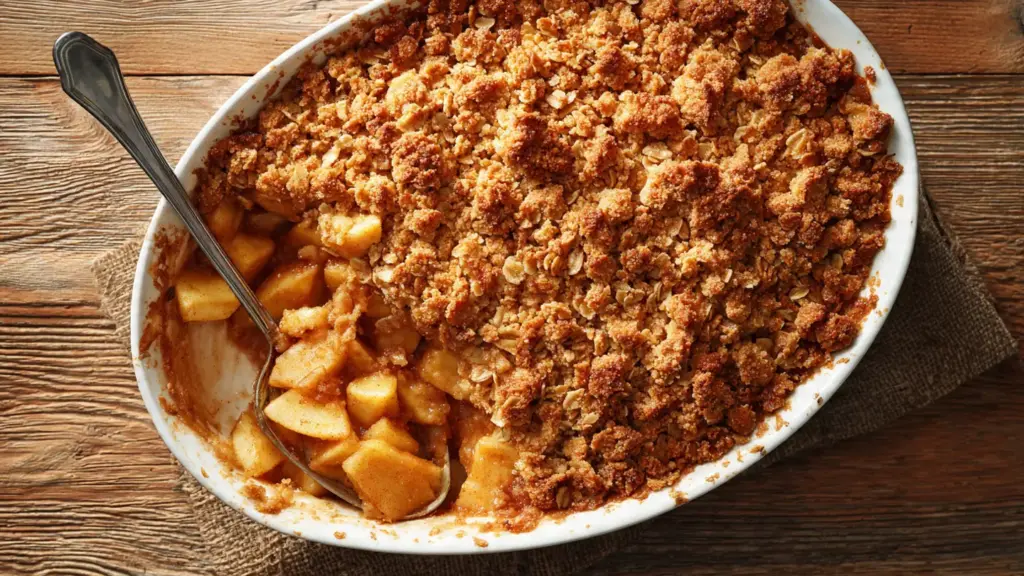
7. Cool and Serve
- Remove the apple crisp from the oven and place on a wire rack
- Let it cool for at least 15-20 minutes before serving
- Serve warm with vanilla ice cream, whipped cream, or enjoy it plain
Cooling slightly allows the filling to set up a bit, making it easier to serve while still being wonderfully warm and comforting.
You might also enjoy pairing this with vanilla ice cream for the ultimate dessert experience.
Tips for Success
These expert tips will help you avoid common pitfalls and create the best apple crisp possible.
Apple Selection and Preparation:
- Mix apple varieties for complex flavor (try 3 Granny Smith + 3 Honeycrisp)
- Slice apples uniformly so they cook at the same rate
- Don’t skip peeling unless you specifically prefer the texture of apple skins
- Toss apples with lemon juice if preparing ahead to prevent browning
Topping Techniques:
- Keep butter cold until you’re ready to mix it in
- Don’t overmix the topping or it will become dense instead of crumbly
- For extra crunch, add 1/2 cup chopped pecans or walnuts to the topping
- Press topping lightly to help it adhere but don’t pack it down
Baking Guidelines:
- Check at 40 minutes and cover with foil if browning too quickly
- The crisp is done when filling bubbles vigorously and topping is deep golden brown
- Use a glass dish to easily see when filling is bubbling underneath
- Place a baking sheet under the dish to catch any drips
Make-Ahead Strategies:
- Prepare the topping up to 2 days ahead and refrigerate
- Slice apples and toss with a little lemon juice, store covered for up to 4 hours
- Assemble completely and refrigerate unbaked for up to 6 hours before baking
- Add 5-10 minutes to baking time if starting from cold
This technique also works beautifully in other fruit desserts like peach cobbler.
Serving Suggestions
Transform your apple crisp from simple dessert to show-stopping finale with these creative serving ideas.
The classic pairing of warm apple crisp with cold vanilla ice cream creates an irresistible temperature and texture contrast that’s hard to beat. As the ice cream melts into the warm filling, it creates a creamy sauce that mingles with the cinnamon-spiced apples.
Perfect Pairings:
- Vanilla ice cream (the traditional choice that never disappoints)
- Whipped cream (lighter alternative with a cloud-like texture)
- Caramel sauce drizzle (adds extra richness and sweetness)
- Cinnamon ice cream (doubles down on the warm spice flavors)
- Greek yogurt (for a tangy, protein-rich breakfast option)
- Heavy cream poured over each serving (ultra-indulgent and luxurious)
- Sharp cheddar cheese (surprisingly delicious sweet-savory combination)
Read Also: Dutch Apple Pie Recipe
Variations to Try
Once you’ve mastered the basic recipe, these creative variations will keep things interesting and help you use whatever fruit is in season.
Fruit Combinations:
- Apple-pear crisp (use 3 apples + 3 pears for a mellower flavor)
- Apple-cranberry crisp (add 1 cup fresh cranberries for tartness)
- Apple-blueberry crisp (fold in 1 cup blueberries for color and flavor)
- Caramel apple crisp (drizzle caramel sauce over apples before adding topping)
Topping Variations:
- Add 1/2 cup chopped pecans or walnuts to the topping for extra crunch
- Replace half the oats with granola for additional texture and flavor
- Mix in 1/4 cup shredded coconut for tropical notes
- Use maple sugar instead of brown sugar for deeper flavor
- Add 1 teaspoon cardamom or ginger to the topping spices
Dietary Adaptations:
- Gluten-free: use certified gluten-free oats and flour blend
- Vegan: substitute coconut oil or vegan butter for regular butter
- Reduced sugar: cut sugar amounts by one-third to one-half
- Paleo: use almond flour and coconut sugar
Another favorite variation is adding the warm spices from pumpkin spice blend for extra fall flavor.
Storage and Reheating
Proper storage keeps your apple crisp delicious for days, while the right reheating method restores that fresh-from-the-oven quality.
Room Temperature:
- Cool completely to room temperature before covering
- Cover tightly with aluminum foil or plastic wrap
- Store at room temperature for up to 2 days
- Note that topping will gradually soften at room temperature
Refrigerator Storage:
- Let the apple crisp cool completely
- Cover the baking dish tightly with foil or transfer portions to airtight containers
- Refrigerate for up to 5 days
- The cold will firm up the topping and thicken the filling
Freezer Storage:
- Freeze unbaked assembled crisp for up to 3 months (bake from frozen, adding 15-20 minutes)
- Freeze baked crisp after cooling completely for up to 3 months
- Wrap tightly in plastic wrap, then aluminum foil
- Thaw overnight in refrigerator before reheating
Reheating Instructions:
- Oven method: reheat at 350°F for 15-20 minutes until warmed through and topping crisps up
- Microwave: heat individual portions for 30-60 seconds (topping won’t be as crispy)
- Cover with foil if edges start browning too much during reheating
- For best results, always reheat in the oven to restore the crispy topping texture
Read Also: Apple Cinnamon Muffins Recipe
Nutritional Facts
Per serving (based on 12 servings):
- Calories: 245
- Total Fat: 8g
- Saturated Fat: 5g
- Cholesterol: 20mg
- Sodium: 85mg
- Total Carbohydrates: 43g
- Dietary Fiber: 3g
- Sugars: 28g
- Protein: 2g
- Vitamin C: 6% DV
- Calcium: 2% DV
- Iron: 6% DV
Note: Nutritional information is approximate and will vary based on specific ingredients used and portion sizes. These calculations do not include optional toppings like ice cream or whipped cream.
If you’re looking for other desserts with fruit, try this berry crisp recipe next.
Health Benefits of Key Ingredients
While apple crisp is certainly a treat, several ingredients provide nutritional value alongside the delicious flavors.
Apples are the star ingredient and pack impressive nutritional benefits. They’re rich in dietary fiber, particularly pectin, which supports digestive health and helps maintain steady blood sugar levels.
Key Health Benefits:
- Apples: High in fiber (4g per medium apple), vitamin C, and antioxidants like quercetin that support heart health
- Cinnamon: Contains powerful anti-inflammatory compounds and may help regulate blood sugar levels
- Oats: Provide soluble fiber (beta-glucan) that supports heart health and promotes satiety
- Nutmeg: Contains antioxidants and compounds that may support digestive health
- Butter: Provides fat-soluble vitamins A, D, E, and K when used in moderation
The combination of fiber from apples and oats helps slow sugar absorption, making this dessert more satisfying than many other sweet treats. Cinnamon adds flavor without calories while potentially offering metabolic benefits.
Read Also: Healthy Apple Recipes
Frequently Asked Questions
1. Can I make apple crisp without peeling the apples?
Yes, you can leave the peels on if you prefer. The skins add extra fiber and nutrients, though they do change the texture slightly.
Some apple varieties have thicker, tougher skins that become more noticeable when baked. If leaving peels on, wash apples thoroughly and consider choosing varieties with thinner skins like Honeycrisp or Gala.
2. Why is my apple crisp watery?
Watery apple crisp usually results from skipping the flour in the filling or using apples with very high water content. The flour helps absorb and thicken the natural juices released during baking.
Make sure to measure flour accurately and toss it thoroughly with the apples. If you consistently have issues, try increasing flour to 3 tablespoons or draining excess liquid before adding topping.
3. Can I use quick oats instead of old-fashioned oats?
You can substitute quick oats in a pinch, but the texture will be slightly different. Quick oats are thinner and more processed, so they absorb moisture more readily and create a softer, less distinct topping.
For best results, stick with old-fashioned rolled oats for that classic crispy texture. If using quick oats, the topping may be more crumbly and less crunchy.
4. How do I know when apple crisp is done baking?
The crisp is properly done when the topping is deep golden brown and you can see the filling actively bubbling around the edges of the pan. The apples should be tender when pierced with a knife but not mushy.
If the topping browns before the filling bubbles, cover loosely with foil and continue baking. The bubbling is important because it indicates the juices have thickened properly.
5. What’s the difference between apple crisp and apple crumble?
The terms are often used interchangeably, but traditionally apple crisp contains oats in the topping while apple crumble does not. Apple crisp has a lighter, crispier texture thanks to the oats, while crumble has a denser, sandier topping made primarily from flour, butter, and sugar.
Both are delicious, and the choice comes down to personal preference. This recipe is a true crisp with its generous amount of oats creating that signature crunchy texture.
Read Also: Apple Crumble Recipe

Easy Apple Crisp
Equipment
- 9×13-inch baking dish - or 9×9-inch for a thicker crisp
- Large mixing bowl
- Medium mixing bowl
- Sharp knife
- Apple peeler
- Cutting board
- Measuring cups
- Measuring spoons
- Pastry cutter - or fork
- Wooden spoon - or spatula
- Apple peeler/corer/slicer - optional, for faster prep
- Microplane - or zester for fresh nutmeg (optional)
Ingredients
For the Apple Filling
- 7 medium apples - about 2.5 lbs or 1.1 kg, peeled and sliced (Granny Smith, Honeycrisp, or Fuji)
- 2 tablespoons all-purpose flour - 15g
- 3 tablespoons granulated sugar - 38g
- 0.25 cup brown sugar - 50g, packed
- 1 teaspoon vanilla extract - 5ml
- 1.5 teaspoons ground cinnamon
- 0.25 teaspoon ground nutmeg
- salt - pinch
For the Crisp Topping
- 1 cup old-fashioned rolled oats - 90g
- 0.75 cup all-purpose flour - 94g
- 0.75 cup brown sugar - 150g, packed
- 0.5 teaspoon ground cinnamon
- 0.25 teaspoon salt
- 0.5 cup unsalted butter - 113g, cold and cut into small cubes
For Serving (Optional)
- vanilla ice cream - for serving
- whipped cream - for serving
- caramel sauce - for drizzling (optional)
Instructions
- Preheat oven to 350°F (175°C) with rack in center. Lightly grease a 9×13-inch baking dish with butter or cooking spray.
- Peel all apples, cut into quarters, remove the core, and slice into 1/4-inch thick slices or 1/2-inch chunks.
- In a large bowl, combine sliced apples with flour, granulated sugar, brown sugar, vanilla, cinnamon, nutmeg, and salt. Toss until evenly coated.
- Transfer apple mixture to prepared baking dish and spread into an even layer.
- In a medium bowl, combine oats, flour, brown sugar, cinnamon, and salt. Whisk dry ingredients together until well mixed.
- Add cold butter cubes to the dry mixture. Using a pastry cutter or fork, cut the butter into the mixture until it resembles coarse crumbs with pea-sized butter pieces.
- Scatter the crumb topping evenly over the apple filling, pressing down slightly to help it adhere. Spread topping all the way to the edges.
- Place baking dish on center oven rack. Bake for 45-50 minutes until topping is golden brown and filling is bubbling around the edges. Tent with foil if browning too quickly.
- Remove from oven and let cool on wire rack for 15-20 minutes before serving. Serve warm with vanilla ice cream, whipped cream, or caramel sauce if desired.
Notes
- Apple selection: Mix apple varieties for complex flavor (try 3 Granny Smith + 3 Honeycrisp). Slice apples uniformly so they cook at the same rate.
- Keep butter cold: Cold butter is crucial for a crumbly topping. Don’t overmix the topping or it will become dense instead of crumbly.
- Extra crunch: Add 1/2 cup chopped pecans or walnuts to the topping for additional texture and flavor.
- Make-ahead: Prepare topping up to 2 days ahead and refrigerate. Slice apples and toss with a little lemon juice, store covered for up to 4 hours. Assemble completely and refrigerate unbaked for up to 6 hours before baking (add 5-10 minutes to baking time).
- Storage: Store covered at room temperature for up to 2 days or refrigerate for up to 5 days. For longer storage, freeze unbaked or baked crisp for up to 3 months.
- Reheating: For best results, reheat in 350°F oven for 15-20 minutes to restore crispy topping texture. Microwave works for individual portions but topping won’t be as crispy.
- Prevent watery crisp: Don’t skip the flour in the filling – it thickens the apple juices during baking. If using very juicy apples, increase flour to 3 tablespoons.
- Fruit variations: Try apple-pear (3 apples + 3 pears), apple-cranberry (add 1 cup fresh cranberries), or apple-blueberry (fold in 1 cup blueberries). Drizzle caramel sauce over apples before adding topping for caramel apple crisp.
- Dietary adaptations: For gluten-free use certified gluten-free oats and flour blend. For vegan substitute coconut oil or vegan butter. Reduce sugar amounts by one-third to one-half if desired.
- Serving suggestion: The classic pairing of warm apple crisp with cold vanilla ice cream creates an irresistible temperature and texture contrast.
Final Thoughts
This easy apple crisp recipe proves that the best desserts don’t have to be complicated. With just a handful of ingredients and straightforward steps, you can create something truly special that fills your home with the most wonderful aroma.
I hope this recipe becomes a favorite in your kitchen, just as it has in mine. Try it this week and discover how simple it is to make something this delicious from scratch.
Have you made this easy apple crisp recipe? I’d love to hear how it turned out! Leave a comment below sharing your experience, any variations you tried, or questions you might have.
Recommended:
- Classic Apple Pie Recipe
- Cinnamon Baked Apples Recipe
- Apple Cinnamon Oatmeal Recipe
- Caramel Apple Cheesecake Recipe
- Apple Fritter Recipe
- Apple Cider Recipe
- Fried Apples Recipe
- Apple Butter Recipe
- Apple Dumplings Recipe
- Pumpkin Bread Recipe


