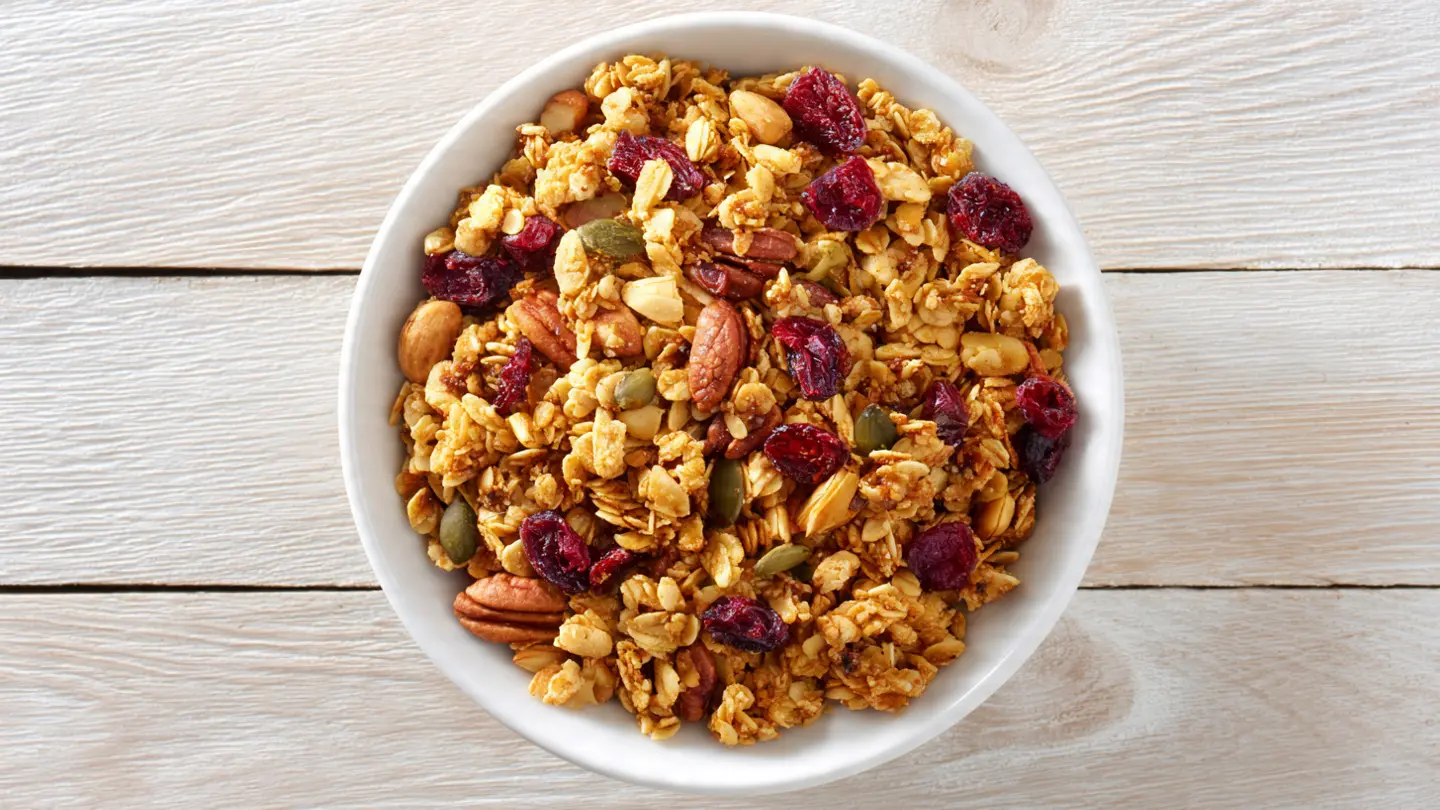
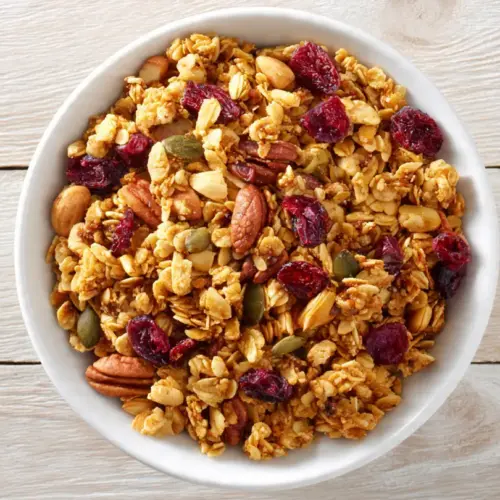
Making your own homemade granola recipe is one of the simplest ways to transform your breakfast routine. Fresh from the oven, with big crunchy clusters and the warm scent of cinnamon and toasted oats filling your kitchen, it beats any store-bought version hands down.
I started making granola at home about five years ago when I realized how much sugar and preservatives were hiding in the bags I was buying. The difference was night and day. Homemade granola lets you control exactly what goes into your bowl, from the type of sweetener to the mix of nuts and seeds you prefer.
The basic formula is surprisingly forgiving. You need rolled oats as your base, a bit of oil to help everything crisp up, a sweetener like maple syrup or honey, and your choice of nuts or seeds. From there, you can customize endlessly.
What I love most is how the granola bakes into those perfect golden clusters. The trick is using just enough sweetener to bind the oats together without making them soggy, and baking at the right temperature so everything toasts evenly. You’ll want to stir it halfway through, then let it cool completely on the pan. That’s when the magic happens and those clusters really firm up.
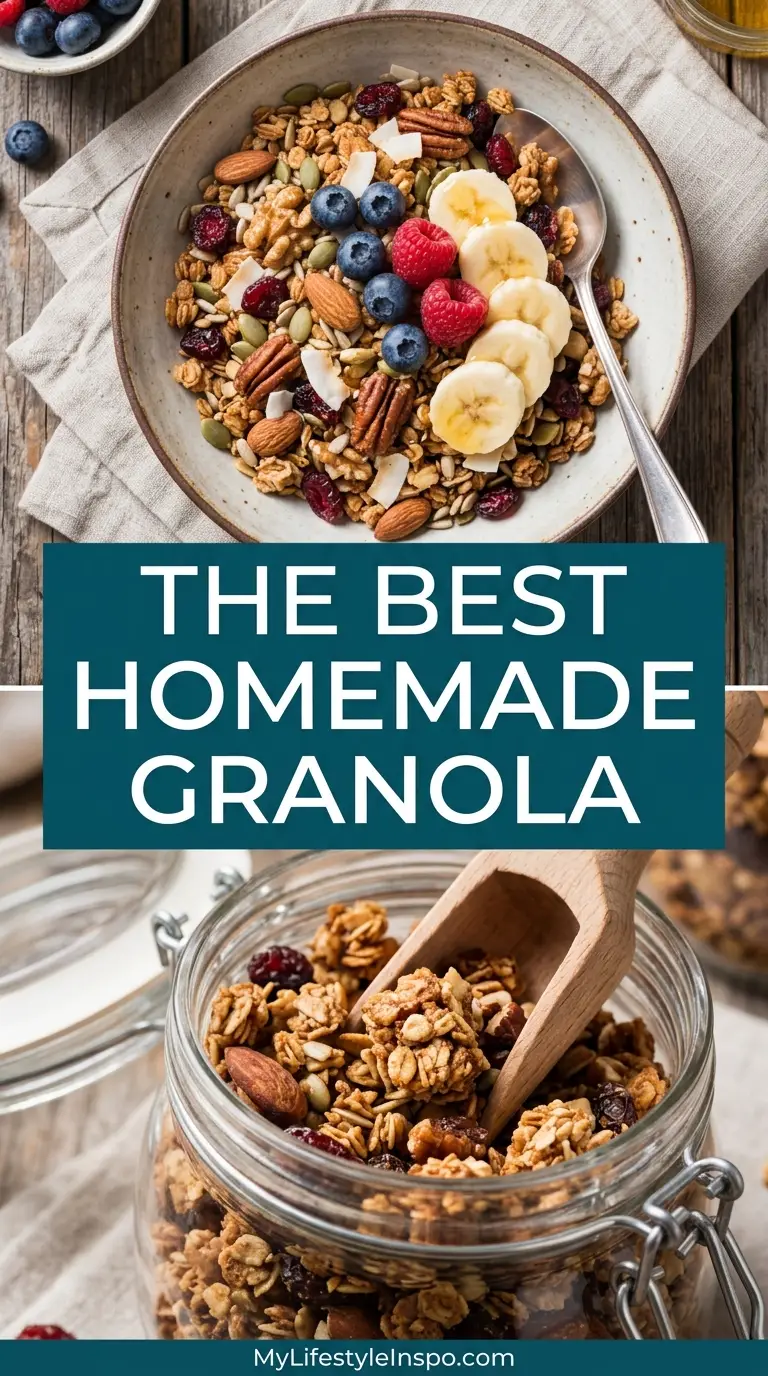
This recipe gives you about 6 cups of granola, which sounds like a lot but disappears quickly in my house. I use it on yogurt, stir it into smoothie bowls, pack it for hiking snacks, or honestly just eat it by the handful. Once you taste the difference between homemade and store-bought, there’s no going back.
Looking for a hearty breakfast companion? This pairs beautifully with classic egg salad for a protein-packed morning.
Why You’ll Love This Homemade Granola Recipe
This homemade granola recipe delivers everything you want in a great breakfast: crunch, flavor, and wholesome ingredients you can actually pronounce. Unlike store-bought versions loaded with refined sugars and preservatives, you’re in complete control here.
The clusters are the real star. By using the right ratio of wet to dry ingredients and pressing the mixture down during baking, you get those big, crunchy clumps that make granola so satisfying. Each bite has texture and substance, not just loose oats that turn to dust at the bottom of the bag.
Here’s what makes this recipe a keeper:
- Budget-friendly: Making granola at home costs a fraction of buying premium brands, and you can make a big batch that lasts weeks
- Customizable: Swap nuts, change up the dried fruit, adjust the sweetness, it all works with this flexible base recipe
- Healthier: You choose natural sweeteners and healthy fats, with no weird additives or excessive sugar
- Makes your kitchen smell amazing: The scent of toasting oats, nuts, and cinnamon is worth making this for that alone
- Perfect texture: Crispy, crunchy clusters with just the right amount of chew from the oats
- Stays fresh: Properly stored, this granola keeps its crunch for up to a month
You might also enjoy: Easy Granola Recipe
Ingredients
The beauty of homemade granola is how simple the ingredient list is. You probably have most of these in your pantry already, and the few specialty items are easy to find at any grocery store.
- 4 cups old-fashioned rolled oats: Not quick oats or steel-cut, rolled oats give the best texture and toast perfectly
- 1 cup mixed nuts: I use 1/2 cup sliced almonds and 1/2 cup chopped pecans, but walnuts or cashews work great too
- 1/2 cup coconut oil: Melted, or use a neutral oil like grapeseed or sunflower if you prefer
- 1/2 cup pure maple syrup: Or honey, both work wonderfully
- 1/4 cup light brown sugar: Adds caramel-like depth and helps create clusters
- 1 teaspoon ground cinnamon: Warm, sweet spice that’s essential for classic granola
- 1/2 teaspoon salt: Balances the sweetness and enhances all the other flavors
- 1 teaspoon vanilla extract: Rounds out the flavor profile
- 1/2 cup unsweetened coconut flakes: Optional, but adds wonderful texture
- 1/4 cup sunflower seeds or pumpkin seeds: Optional, for extra crunch and nutrition
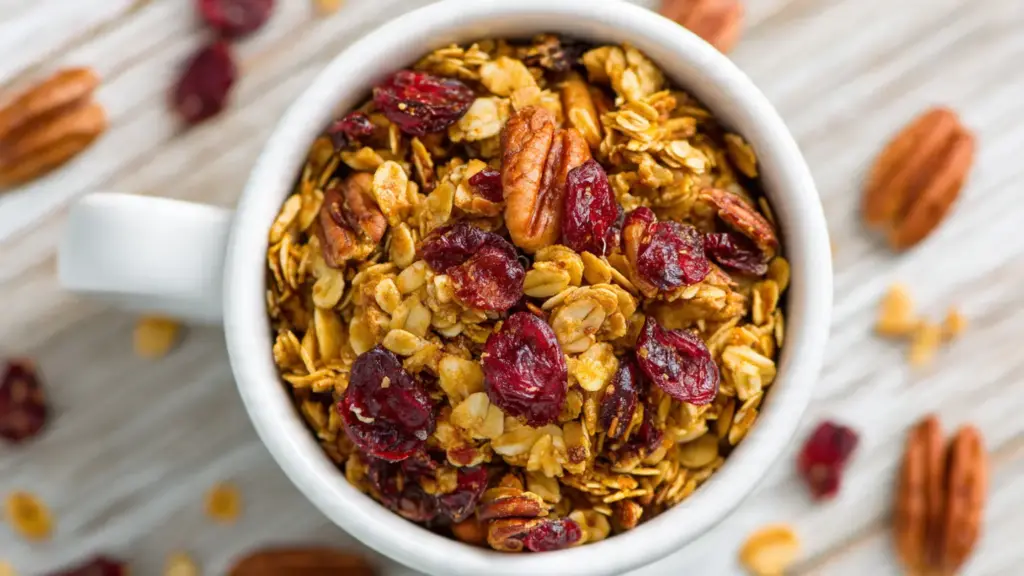
- 1 cup dried fruit: Such as raisins, cranberries, or chopped apricots, added after baking
Kitchen Equipment Needed
You don’t need any fancy equipment to make excellent granola. Just a few basic kitchen tools you likely already own will get you perfect results every time.
- Large mixing bowl: For combining all your dry and wet ingredients
- Rimmed baking sheet: A standard half-sheet pan (13×18 inches) is perfect, the rim keeps granola from sliding off when you stir
- Parchment paper: Prevents sticking and makes cleanup a breeze
- Small saucepan: For melting the coconut oil and sweetener together
- Wooden spoon or spatula: For stirring and pressing down the granola
- Wire cooling rack: Optional but helpful for cooling the granola evenly
Read Also: Breakfast Casserole Recipe
Recommended Products for This Recipe
After making countless batches of granola over the years, I’ve found that a few key products really do make a difference in both the process and the final result.
1. USA Pan Half Sheet Baking Pan
The quality of your baking sheet matters more than you’d think. This commercial-grade pan distributes heat evenly, so your granola toasts uniformly without hot spots that can burn the edges. The 1-inch rim is perfect for stirring without spilling, and it won’t warp in the oven. I’ve had mine for years and it still looks new.
2. Organic Raw Pecans
Pecans add a buttery richness that almonds alone can’t match. Fresh, raw pecans toast beautifully in the oven alongside the oats, developing a deep, caramelized flavor. The difference between stale nuts and fresh ones is dramatic, especially when you’re relying on them for so much of the granola’s flavor.
3. Grade A Dark Amber Maple Syrup
Not all maple syrup is created equal. Grade A Dark Amber has a robust flavor that stands up to baking and doesn’t get lost among the other ingredients. It’s less expensive than the lighter grades but has more depth, making it ideal for granola. The natural minerals in real maple syrup also help the clusters form better than generic pancake syrup ever could.
4. Premium Virgin Coconut Oil
Good coconut oil makes granola crispy without being greasy. Virgin coconut oil adds a subtle coconut flavor that complements the nuts and sweetener perfectly. It also stays solid at room temperature, which helps those clusters hold together once the granola cools.
5. OXO Good Grips Silicone Spatula
You need a sturdy spatula to press down the granola mixture during baking. This silicone spatula can handle the heat and gives you the leverage to really pack the granola into an even layer, which is key for getting those big clusters everyone loves. The angled head gets into corners, and it’s comfortable to hold even when you’re working with a hot pan.
Another favorite: French Toast Casserole Recipe
Step-by-Step Instructions
Making granola is straightforward, but following these steps carefully ensures you get those perfect crunchy clusters every time. Take your time with each stage and don’t rush the cooling process.
1. Preheat the Oven and Prepare Your Pan
- Preheat your oven to 325°F (163°C), this moderate temperature toasts the oats and nuts evenly without burning the sugars
- Line a large rimmed baking sheet with parchment paper, making sure it lies flat with no wrinkles that could create uneven cooking
- Set the prepared pan aside while you mix your ingredients
2. Combine the Dry Ingredients
- In your large mixing bowl, add the 4 cups of old-fashioned rolled oats
- Add your mixed nuts (1/2 cup sliced almonds and 1/2 cup chopped pecans)
- If using coconut flakes and seeds, add 1/2 cup coconut flakes and 1/4 cup sunflower or pumpkin seeds now
- Sprinkle in 1 teaspoon of ground cinnamon and 1/2 teaspoon of salt
- Use a large spoon to toss everything together until the oats, nuts, and spices are evenly distributed throughout
- This ensures every bite of your finished granola has balanced flavor
3. Prepare the Wet Mixture
- In a small saucepan over medium heat, combine 1/2 cup melted coconut oil, 1/2 cup maple syrup, and 1/4 cup brown sugar
- Stir the mixture constantly as it heats, you want the brown sugar to dissolve completely into the liquid
- This should take about 3 to 5 minutes, the mixture will become smooth and slightly bubbly around the edges
- Remove from heat and stir in 1 teaspoon of vanilla extract
- The vanilla needs to go in after you remove the pan from heat to preserve its flavor
4. Combine Wet and Dry Ingredients
- Pour the warm sweetener mixture over your bowl of dry ingredients
- Using a sturdy spatula or wooden spoon, stir everything together thoroughly
- Keep stirring until every oat, nut, and seed is coated with the liquid mixture
- The goal is complete coverage, you shouldn’t see any dry spots or pools of liquid at the bottom of the bowl
- This coating is what creates those delicious clusters as the granola bakes
5. Spread and Shape the Granola
- Pour the entire mixture onto your prepared baking sheet
- Use your spatula to spread it into an even layer about 1/2 inch thick across the pan
- Here’s the cluster secret: use the back of your spatula to firmly press down on the granola, compacting it into a solid layer
- The more you press, the bigger your clusters will be after baking
- Make sure the edges are pressed down too, not just the center
6. First Baking Session
- Place the baking sheet on the center rack of your preheated oven
- Bake for 15 minutes without opening the oven door
- The granola will start to smell amazing and turn light golden around the edges
- Don’t stir yet, you want to give those clusters time to start forming
7. Stir and Continue Baking
- After 15 minutes, remove the pan from the oven
- Use your spatula to gently stir the granola, breaking up some sections while leaving others intact
- This brings the edges toward the center for even browning
- Press down on the granola again with the back of your spatula to re-compact it
- Return to the oven and bake for another 10 to 15 minutes
- Watch carefully during this second baking period, you want a deep golden brown color
- The granola will continue to darken slightly as it cools, so pull it out when it’s a shade lighter than you want the final result
8. Cool Completely
- Remove the baking sheet from the oven when the granola is golden brown
- Let it cool completely on the pan for at least 30 minutes, resist the urge to stir or break it up
- As the granola cools, the sugars crystallize and the clusters harden
- This cooling period is crucial for achieving that perfect crunchy texture
- Once completely cool, use your hands to break the granola into clusters of your desired size
9. Add Dried Fruit
- After the granola has cooled completely, add 1 cup of your chosen dried fruit
- Dried cranberries, raisins, chopped apricots, or dried cherries all work beautifully
- Gently mix the fruit in with your hands or a spoon
- Don’t add fruit before or during baking, it will burn and turn tough
10. Store Properly
- Transfer your finished granola to an airtight container or jar
- Store at room temperature in a cool, dry place
- Properly stored, it will stay crispy for 3 to 4 weeks
- For longer storage, you can freeze granola in freezer bags for up to 3 months
For a complete breakfast spread, serve this alongside classic French toast.
Tips for Success
These tips come from years of granola-making experience. Following them will help you avoid common pitfalls and ensure your granola turns out perfect every single time.
Small adjustments make a big difference in granola. Here’s what I’ve learned through trial and error:
- Press it down: The single most important tip for clusters is pressing the granola firmly into the pan before and during baking, don’t be gentle
- Don’t over-stir: Stir only once during baking, too much stirring breaks up clusters before they have a chance to form
- Watch the color: Granola goes from perfect to burnt quickly near the end, stay close to the oven during the last 5 minutes
- Let it cool completely: Warm granola is soft and crumbly, it needs to cool on the pan undisturbed to crisp up properly
- Adjust sweetness: If you prefer less sweet granola, reduce the maple syrup and brown sugar by up to half, you’ll still get decent clusters
- Toast nuts separately: If you’re using larger nut pieces, consider toasting them separately for 5 minutes before adding them to prevent over-browning
- Use fresh ingredients: Stale oats and rancid nuts will ruin your granola, make sure everything smells fresh before you start
- Line with parchment: Never skip the parchment paper, it prevents sticking and makes cleanup effortless
- Rotate the pan: If your oven has hot spots, rotate the pan 180 degrees when you stir at the halfway point
- Add salt: Don’t skip the salt, it balances the sweetness and makes all the flavors pop
Read Also: Easy French Toast Recipe
Serving Suggestions
Homemade granola is incredibly versatile. While it’s fantastic on its own as a crunchy snack, there are countless ways to enjoy it throughout the day.
The most classic way to serve granola is over Greek yogurt with fresh berries. The contrast between creamy yogurt, juicy fruit, and crunchy granola is unbeatable. I like to layer it parfait-style in a glass for a breakfast that looks as good as it tastes.
Pour cold milk over a bowl of granola for a simple cereal breakfast. The granola stays crunchy much longer than commercial cereal, giving you plenty of time to enjoy each spoonful. Almond milk, oat milk, or regular dairy milk all work beautifully.
- Sprinkle over smoothie bowls for added texture and nutrition
- Mix into muffin or pancake batter for bursts of nutty crunch
- Top ice cream or frozen yogurt for a healthy-ish dessert
- Layer with cottage cheese and sliced peaches for a protein-packed breakfast
- Pack in small containers for hiking or road trip snacks
- Fold into homemade trail mix with dark chocolate chips and extra dried fruit
- Use as a crunchy topping for baked apples or fruit crisps
- Add to overnight oats for extra texture in the morning
- Mix with classic hummus and fresh vegetables for a unique snack board
- Crumble over easy pesto pasta salads for an unexpected twist
Variations to Try
Once you’ve mastered the basic recipe, experimenting with different flavor combinations keeps things interesting. The base formula stays the same, but small changes create entirely different granolas.
This recipe is endlessly adaptable to your taste preferences and dietary needs. Here are some of my favorite variations:
- Chocolate Lover’s Granola: Add 1/2 cup cocoa powder to the dry ingredients and stir in 1/2 cup dark chocolate chips after the granola cools
- Tropical Granola: Replace pecans with macadamia nuts, add extra coconut flakes, and use dried pineapple and mango instead of raisins
- Pumpkin Spice Granola: Add 1/4 cup pumpkin puree to the wet ingredients, replace cinnamon with pumpkin pie spice, and use pepitas instead of sunflower seeds
- Nut-Free Version: Omit all nuts and double up on seeds, use sunflower seeds, pumpkin seeds, and sesame seeds for plenty of crunch and protein
- Maple Pecan: Use all pecans, increase the maple syrup to 3/4 cup, and add a pinch of nutmeg alongside the cinnamon
- Savory Granola: Reduce sweetener to 2 tablespoons, omit cinnamon, add 1 teaspoon rosemary, 1/2 teaspoon garlic powder, and serve over salads
- Protein-Packed: Stir in 1/2 cup of your favorite protein powder with the dry ingredients and add an extra 2 tablespoons of oil to compensate
- Gingerbread Granola: Add 1 teaspoon ground ginger, 1/2 teaspoon ground nutmeg, and 1/4 teaspoon ground cloves to the spice mix
- Berry Almond: Use all almonds, add dried blueberries and strawberries, and replace vanilla with almond extract
- Chai Spiced: Replace cinnamon with 1 teaspoon cardamom, 1/2 teaspoon ginger, 1/4 teaspoon cloves, and a pinch of black pepper
You might also enjoy: Belgian Waffle Recipe
Storage and Reheating
Proper storage keeps your homemade granola fresh and crunchy for weeks. The enemy of granola is moisture, so airtight containers are essential.
Store your completely cooled granola in an airtight container, glass jar, or resealable plastic bag. Keep it in a cool, dry place away from direct sunlight and heat sources like the stove or dishwasher.
- Room temperature: Properly stored granola stays fresh and crunchy for 3 to 4 weeks at room temperature
- Refrigerator: Not recommended, refrigerator moisture can make granola soggy and soft
- Freezer: For long-term storage, freeze granola in freezer-safe bags for up to 3 months, remove as much air as possible before sealing
- Thawing: Let frozen granola thaw at room temperature for 30 minutes before eating, it will regain its crunch as it comes to temperature
- Refresh soggy granola: If your granola loses its crunch, spread it on a baking sheet and toast at 300°F for 5 to 10 minutes
- Portion control: Store granola in smaller containers to minimize how often you open the main container and expose it to air
- Avoid adding fruit too early: If making granola ahead, wait to add dried fruit until right before eating to maintain maximum crunch
Another favorite: Buttermilk Pancake Recipe
Nutritional Facts
Per serving (about 1/2 cup):
- Calories: 280
- Total Fat: 14g
- Saturated Fat: 6g
- Cholesterol: 0mg
- Sodium: 100mg
- Total Carbohydrates: 35g
- Dietary Fiber: 4g
- Sugars: 14g
- Protein: 6g
These values are approximate and will vary based on the specific ingredients you use. Using different nuts, reducing the sweetener, or adding more seeds will change the nutritional profile.
This granola provides a good balance of complex carbohydrates from the oats, healthy fats from nuts and coconut oil, and plant-based protein. The fiber content helps keep you full and satisfied through the morning.
For a protein-rich pairing, try serving this with healthy chicken salad for lunch.
Health Benefits of Key Ingredients
The ingredients in homemade granola aren’t just delicious, they provide significant nutritional benefits that support overall health and wellness.
Rolled oats form the foundation of this recipe and for good reason. They’re packed with soluble fiber, particularly beta-glucan, which helps lower cholesterol and stabilize blood sugar levels. Oats provide sustained energy without the crash that comes from refined cereals.
Nuts and seeds deliver heart-healthy fats, particularly omega-3 fatty acids when you use walnuts or flax seeds. These healthy fats support brain function, reduce inflammation, and help your body absorb fat-soluble vitamins from other foods you eat with the granola.
- Almonds: Rich in vitamin E, magnesium, and protein that supports muscle health and energy production
- Pecans: Loaded with antioxidants that fight free radicals and reduce oxidative stress in the body
- Coconut oil: Contains medium-chain triglycerides (MCTs) that provide quick energy and may support metabolism
- Cinnamon: Helps regulate blood sugar levels and has powerful anti-inflammatory properties
- Maple syrup: Provides minerals like manganese and zinc, plus antioxidants not found in refined sugar
- Sunflower seeds: Excellent source of vitamin E and selenium, both important for immune function
- Pumpkin seeds: High in magnesium, zinc, and omega-3s, supporting bone health and heart health
- Dried fruit: Concentrated source of fiber, potassium, and antioxidants that support digestive health
Read Also: Old Fashioned Pancake Recipe
Frequently Asked Questions
1. Can I use quick oats instead of old-fashioned oats?
Quick oats aren’t ideal for granola because they’re too thin and tend to turn mushy rather than crispy. They also burn more easily at the temperature needed to toast old-fashioned oats properly. Stick with old-fashioned rolled oats for the best texture and those signature crunchy clusters.
2. How do I make really big clusters?
The key to big clusters is pressing the granola mixture firmly into the pan before baking, then stirring only once during baking. After you stir, press down hard again with your spatula. When the granola comes out of the oven, press down one more time while it’s still warm, then leave it completely undisturbed as it cools.
3. Can I make this granola oil-free?
You can substitute the oil with applesauce or nut butter, though the texture will be slightly different. Use the same amount of unsweetened applesauce or 1/3 cup of almond or peanut butter. The granola won’t be quite as crispy, but it will still have good flavor and decent clusters.
4. Why is my granola burnt on the edges but undercooked in the middle?
This happens when the granola isn’t spread evenly or when oven temperature runs hot. Make sure you spread the granola in an even layer across the pan, with the edges the same thickness as the center. An oven thermometer helps verify your actual oven temperature matches the dial.
5. Can I add chocolate chips to the granola while it bakes?
Never add chocolate chips during baking, they’ll melt and burn. Always add chocolate chips, if you want them, after the granola has cooled completely. The residual warmth from freshly cooled granola might soften them slightly, which actually creates a nice texture.
For more breakfast inspiration, check out Easy Waffle Recipe.
Homemade Granola
Equipment
- Large mixing bowl
- Rimmed Baking Sheet - Standard half-sheet pan, 13×18 inches
- Parchment paper
- Small saucepan
- Wooden spoon or spatula
- Wire cooling rack - (optional)
Ingredients
- 4 cups old-fashioned rolled oats - not quick oats or steel-cut
- 1/2 cup sliced almonds
- 1/2 cup chopped pecans - walnuts or cashews work too
- 1/2 cup coconut oil - melted, or use grapeseed or sunflower oil
- 1/2 cup pure maple syrup - or honey
- 1/4 cup light brown sugar - adds caramel-like depth
- 1 teaspoon ground cinnamon
- 1/2 teaspoon salt
- 1 teaspoon vanilla extract
Optional Add-ins
- 1/2 cup unsweetened coconut flakes - optional, adds wonderful texture
- 1/4 cup sunflower seeds - or pumpkin seeds, optional
- 1 cup dried fruit - raisins, cranberries, or chopped apricots, added after baking
Instructions
- Preheat oven to 325°F (163°C). Line a large rimmed baking sheet with parchment paper.
- In a large bowl, combine rolled oats, almonds, pecans, and optional coconut flakes and seeds. Add cinnamon and salt, toss to distribute evenly.
- In a small saucepan over medium heat, combine melted coconut oil, maple syrup, and brown sugar. Stir constantly for 3-5 minutes until sugar dissolves. Remove from heat and stir in vanilla extract.
- Pour warm sweetener mixture over dry ingredients and stir thoroughly until every oat and nut is coated.
- Spread mixture evenly onto prepared baking sheet. Use spatula to press down firmly, compacting into a solid layer about 1/2 inch thick.
- Bake for 15 minutes without opening the oven door. Remove pan, gently stir, then press down again with spatula. Return to oven and bake another 10-15 minutes until deep golden brown.
- Remove pan from oven and let granola cool completely on the pan for at least 30 minutes without stirring. As it cools, clusters will harden.
- Once completely cool, break into clusters. Add dried fruit and mix gently. Store in an airtight container at room temperature for up to 4 weeks.
Notes
- Pressing is key: Press the granola firmly into the pan before and during baking to get big clusters.
- Don’t over-stir: Stir only once during baking to allow clusters to form properly.
- Watch the color: Granola continues to darken as it cools, so remove from oven when a shade lighter than desired.
- Cool completely: Warm granola is soft and crumbly; cooling on the pan is essential for crispy texture.
- Make it nut-free: Omit nuts and double the seeds (pumpkin, sunflower, sesame) for crunch.
- Storage: Keep in airtight container at room temperature for 3-4 weeks, or freeze for up to 3 months.
- Refresh soggy granola: Spread on baking sheet and toast at 300°F for 5-10 minutes.
- Add chocolate after baking: Never add chocolate chips during baking – stir them in after the granola has cooled completely.
Final Thoughts
Homemade granola transforms an ordinary breakfast into something special. The combination of crunchy clusters, toasted nuts, and warm spices creates a satisfying start to any day.
What I love most about this recipe is how it makes my kitchen smell amazing and how much better it tastes than anything from a store. You can adjust it endlessly to match your preferences, making it as sweet or as nutty as you like.
Give this homemade granola recipe a try this week. I’d love to hear how it turns out for you and what variations you create. Drop a comment below with your favorite mix-ins or let me know if you have any questions.
Recommended:
- Breakfast Potatoes Recipe
- Easy Egg Salad Recipe
- Classic Egg Salad Recipe
- Classic French Toast Recipe
- Easy French Toast Recipe
- Belgian Waffle Recipe
- Easy Waffle Recipe
- Buttermilk Pancake Recipe
- Old Fashioned Pancake Recipe
- French Toast Casserole Recipe


