Finding a delicious easy scone recipe that turns out perfectly every single time can feel like searching for a hidden treasure. But once you master the art of making tender, buttery scones at home, you’ll wonder why you ever bought them from a bakery.
These homemade scones are incredibly simple to make with just a handful of basic ingredients you probably already have in your kitchen. The secret lies in keeping your butter cold and handling the dough gently to create those beautifully flaky layers that make scones so irresistible.
The beauty of this recipe is its versatility. You can enjoy these scones plain with a pat of butter, or dress them up with jam and clotted cream for an authentic afternoon tea experience. They’re equally delightful served warm from the oven at breakfast or as a sweet treat with your afternoon coffee.
What makes this particular recipe so foolproof is the straightforward method that eliminates all the guesswork. By freezing your butter and grating it into the flour, you ensure that every bite has those coveted pockets of buttery goodness that create the perfect crumbly texture. The dough comes together quickly, requiring minimal handling to prevent overworking.
Why You’ll Love This Easy Scone Recipe
This recipe delivers bakery-quality scones without any of the fuss or intimidation factor that often comes with baking. The ingredients are simple, the method is straightforward, and the results are consistently impressive.
- Quick and Simple: From start to finish, these scones take less than 30 minutes to make, perfect for busy mornings or last-minute entertaining.
- Minimal Ingredients: You only need 7 basic pantry staples to create these delicious treats.
- Perfectly Tender: The combination of cold butter and gentle handling creates scones that are tender inside with slightly crispy, golden tops.
- Customizable: This recipe serves as a blank canvas for endless flavor variations, from berries to chocolate chips to savory add-ins.
- Make-Ahead Friendly: Shape the scones and freeze them unbaked, then pop them straight into the oven whenever a craving strikes.
- Impressive Results: These scones look and taste like they came from an upscale bakery, making them perfect for special occasions or gifts.
For another delightful breakfast treat, try this Easy Waffle Recipe.
Ingredients
Creating perfect scones starts with gathering the right ingredients. Each component plays a crucial role in achieving that ideal tender, flaky texture.
- 2 cups (250g) all-purpose flour, plus extra for dusting
- 1/2 cup (100g) granulated sugar
- 1 tablespoon baking powder
- 1/2 teaspoon salt
- 1/2 cup (113g) unsalted butter, frozen
- 1/2 cup (120ml) heavy cream, cold, plus extra for brushing
- 1 large egg, cold
- 1 teaspoon vanilla extract
- Coarse sugar for topping (optional)
Kitchen Equipment Needed
Having the right tools makes the scone-making process even easier and ensures consistent results every time you bake.
- Large mixing bowl
- Box grater or pastry cutter
- Whisk
- Small mixing bowl
- Baking sheet
- Parchment paper or silicone baking mat
- Sharp knife or bench scraper
- Pastry brush
- Wire cooling rack
Another breakfast favorite you might enjoy is the Belgian Waffle Recipe.
Recommended Products for This Recipe
Finding quality ingredients and equipment can elevate your scone-making experience from good to exceptional. These carefully selected products have proven to make a real difference in achieving bakery-worthy results.
1. Frozen Butter Grater
This specialty grater is designed specifically for grating frozen butter, making it effortless to incorporate cold butter into your dry ingredients. The ergonomic handle prevents hand fatigue, and the sharp grating surface works through frozen butter like magic. This tool is a total time-saver and ensures your butter stays perfectly cold throughout the mixing process.
2. Professional Grade Baking Sheet
A heavy-duty aluminum baking sheet distributes heat evenly, preventing burnt bottoms while ensuring your scones bake to golden perfection. The reinforced rims prevent warping at high temperatures, and the generous size allows you to space scones properly for even baking. This is an investment that will serve you well for years of baking.
3. European-Style Cultured Butter
Premium cultured butter has a higher fat content and richer flavor than standard butter, which translates directly to more flavorful, tender scones. The cultured aspect adds a subtle tangy complexity that elevates the entire recipe. Once you bake with quality butter, you’ll never go back.
4. Pure Vanilla Extract
High-quality Madagascar vanilla extract adds depth and warmth to your scones without overpowering them. The pure extract contains real vanilla bean flavor compounds that artificial versions simply cannot replicate. A little goes a long way in creating scones with exceptional flavor.
5. Belgian Pearl Sugar
Belgian pearl sugar creates a delightful crunchy topping that stays crystalline even after baking. These large sugar crystals add both texture and sparkle to your scones, giving them that professional bakery appearance. The slight caramelization during baking adds an extra layer of flavor.
Step-by-Step Instructions
Follow these detailed instructions carefully for perfect scones every single time. Each step builds on the previous one to create the ideal texture and flavor.
1. Prepare Your Oven and Baking Sheet
- Preheat your oven to 400°F (200°C).
- Line a baking sheet with parchment paper or a silicone baking mat to prevent sticking and ensure easy cleanup.
- Make sure your oven rack is positioned in the center of the oven for even heat distribution.
- If your oven tends to run hot or cold, use an oven thermometer to verify the actual temperature.
2. Mix the Dry Ingredients
- In a large mixing bowl, whisk together the 2 cups of all-purpose flour, 1/2 cup granulated sugar, 1 tablespoon baking powder, and 1/2 teaspoon salt.
- Whisk thoroughly for about 30 seconds to ensure all ingredients are evenly distributed throughout the flour.
- This whisking step also aerates the flour, which contributes to lighter, fluffier scones.
- Set this bowl aside while you prepare the butter.
3. Grate the Frozen Butter
- Remove the 1/2 cup of butter from the freezer (it should be completely frozen solid).
- Using the large holes of a box grater, grate the frozen butter directly into the bowl with your dry ingredients.
- Work quickly to prevent the butter from warming up and becoming sticky.
- After grating, use your fingers or a pastry cutter to toss the butter shreds through the flour mixture, coating each piece with flour.
- The mixture should resemble coarse breadcrumbs with visible pieces of butter throughout.
- Place this bowl in the refrigerator while you prepare the wet ingredients to keep everything cold.
4. Combine the Wet Ingredients
- In a small mixing bowl, whisk together the 1/2 cup cold heavy cream, 1 large egg, and 1 teaspoon vanilla extract.
- Whisk vigorously until the mixture is completely smooth and the egg is fully incorporated, about 30 seconds.
- The mixture should be pale yellow and slightly frothy.
5. Bring the Dough Together
- Remove the bowl of flour and butter from the refrigerator.
- Make a well in the center of the dry ingredients.
- Pour the wet ingredient mixture into the well.
- Using a rubber spatula or wooden spoon, gently stir the mixture, working from the center outward.
- Continue stirring just until the dough begins to come together and most of the dry flour is incorporated.
- The dough will look shaggy and slightly rough at this point, which is exactly what you want.
6. Knead the Dough Gently
- Turn the shaggy dough out onto a lightly floured work surface.
- Using your hands, gently knead the dough 4 to 5 times, just until it comes together into a cohesive mass.
- Do not overwork the dough or knead it more than necessary, as this will develop the gluten and make your scones tough.
- If the dough feels very sticky, dust your hands and the surface with a tiny bit more flour.
- The dough should be slightly sticky but manageable.
7. Shape the Dough
- Pat the dough into a circle about 7 inches (18 cm) in diameter and roughly 1 inch (2.5 cm) thick.
- Use your hands to smooth the top and even out the thickness.
- Make sure the circle is as uniform as possible so all scones bake evenly.
- If any cracks appear around the edges, gently press them together with your fingers.
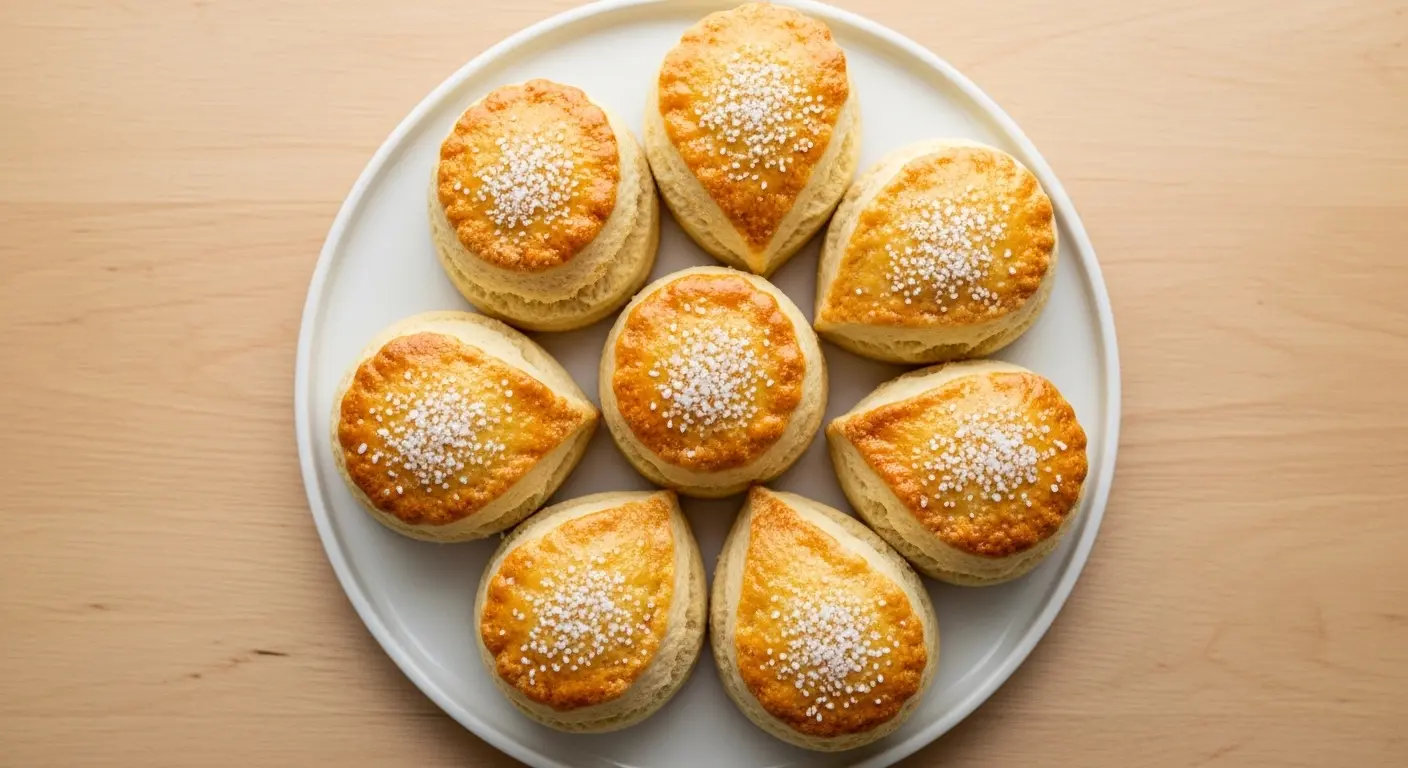
8. Cut the Scones
- Using a sharp knife or bench scraper, cut the circle into 8 equal wedges, like cutting a pizza.
- Press straight down rather than sawing back and forth to maintain clean edges.
- Carefully transfer each wedge to your prepared baking sheet, spacing them about 2 inches (5 cm) apart.
- If desired, you can place the baking sheet with the unbaked scones in the freezer for 10-15 minutes to ensure the butter stays cold.
9. Apply the Finishing Touches
- Pour about 2 tablespoons of heavy cream into a small bowl.
- Using a pastry brush, gently brush the top of each scone with the cream.
- Make sure to coat the entire top surface for even browning.
- If using coarse sugar, sprinkle a generous pinch over each scone immediately after brushing with cream.
- The sugar will stick to the cream and create a beautiful sparkly, crunchy topping.
10. Bake to Golden Perfection
- Place the baking sheet in the preheated 400°F (200°C) oven.
- Bake for 18 to 22 minutes, until the scones are golden brown on top and lightly browned on the bottom edges.
- The scones should have risen noticeably and developed a beautiful golden color.
- To check for doneness, gently lift one scone and look at the bottom – it should be lightly golden, not pale.
- If the tops are browning too quickly but the scones aren’t fully baked, loosely tent them with aluminum foil for the remaining baking time.
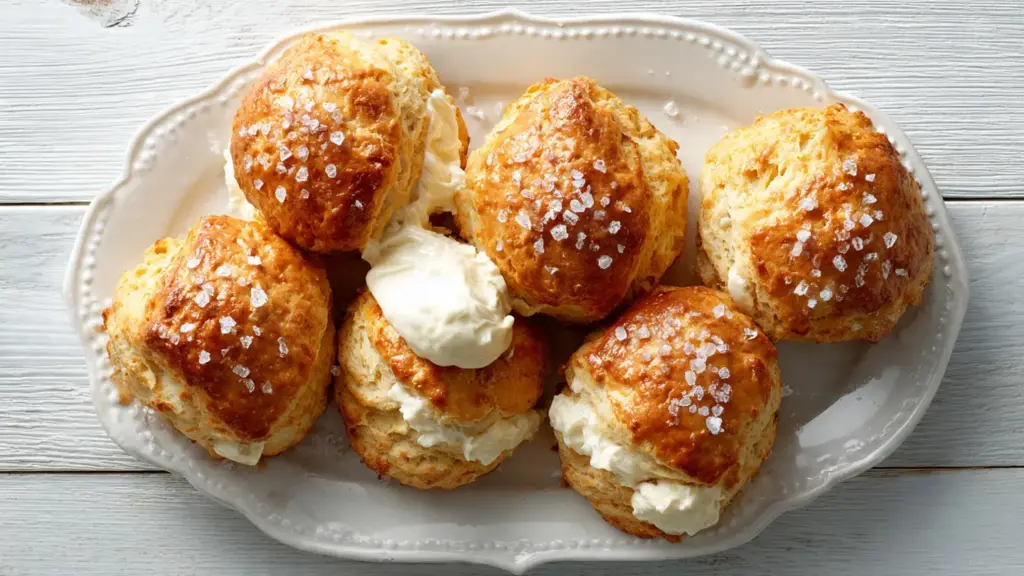
11. Cool and Serve
- Remove the baking sheet from the oven and let the scones cool on the pan for 2 to 3 minutes.
- Using a spatula, transfer the scones to a wire cooling rack.
- Let them cool for at least 5 minutes before serving, though they’re absolutely delicious served warm.
- Scones are best enjoyed the day they’re made, but can be stored for later enjoyment.
You might also love this Classic French Toast Recipe for your breakfast rotation.
Tips for Success
These professional tips will help you troubleshoot common issues and achieve perfect scones every single time you bake.
- Keep Everything Cold: The colder your ingredients, especially the butter and cream, the flakier your scones will be. Consider chilling your mixing bowl and even the flour for extra insurance.
- Don’t Overmix: Stop mixing as soon as the dough comes together. Overmixing develops gluten, which leads to tough, dense scones instead of tender, crumbly ones.
- Work Quickly: The faster you work, the less time the butter has to warm up. Have all your ingredients and tools ready before you start.
- Use Fresh Baking Powder: Old baking powder loses its leavening power. Check the expiration date and test it by adding a teaspoon to hot water – it should bubble vigorously.
- Freeze for Extra Flakiness: Placing shaped, unbrushed scones in the freezer for 15 minutes before brushing and baking ensures the butter stays cold and creates more distinct layers.
- Cut Cleanly: Use a sharp knife or bench scraper and press straight down without twisting. Twisting seals the edges and prevents the scones from rising properly.
- Space Them Out: Leave at least 2 inches between scones on the baking sheet. They will expand during baking and need room to develop crispy edges.
- Brush Generously: Don’t skimp on the cream wash. It creates that beautiful golden crust and helps the sugar topping adhere.
- Watch Closely: Every oven is different. Start checking at 18 minutes and adjust the baking time as needed to prevent over-browning.
- Serve Fresh: Scones are at their absolute best within hours of baking. The texture changes as they sit, becoming drier and less tender.
Read Also: Easy French Toast Recipe
Serving Suggestions
Scones are wonderfully versatile and pair beautifully with both sweet and savory accompaniments. Here are some delicious ways to enjoy your homemade scones.
- Classic Cream Tea: Split warm scones in half and slather them with clotted cream and your favorite jam. The traditional method is cream first, then jam, but feel free to reverse the order based on your preference.
- Simple Butter: Sometimes the best approach is the simplest. Serve warm scones with high-quality salted butter that melts into all those nooks and crannies.
- Lemon Curd: The bright, tangy flavor of lemon curd provides a beautiful contrast to the rich, buttery scones. This combination is especially lovely for spring and summer gatherings.
- Fresh Berries and Whipped Cream: Top split scones with fresh strawberries, blueberries, or raspberries and a dollop of freshly whipped cream for an elegant dessert.
- Honey and Greek Yogurt: For a lighter option, serve scones with a drizzle of honey and a spoonful of thick Greek yogurt. This combination adds protein while keeping things delicious.
- Afternoon Tea Service: Arrange scones on a tiered stand alongside finger sandwiches and petit fours for an authentic afternoon tea experience.
- Coffee Pairing: These scones are perfect with your morning coffee or espresso. The buttery richness complements the robust coffee flavors beautifully.
- Brunch Spread: Include scones as part of a larger brunch spread alongside Breakfast Casserole and fresh fruit.
This pairs wonderfully with Homemade Granola for a complete breakfast spread.
Variations to Try
Once you’ve mastered the basic recipe, these creative variations will keep your scone game exciting and delicious.
- Blueberry Scones: Gently fold 3/4 cup fresh or frozen blueberries into the dough just before shaping. If using frozen berries, don’t thaw them first to prevent bleeding.
- Chocolate Chip Scones: Mix in 3/4 cup chocolate chips for a sweeter treat. Use dark, milk, or white chocolate chips depending on your preference.
- Lemon Poppy Seed: Add 2 tablespoons lemon zest and 1 tablespoon poppy seeds to the dry ingredients. Replace vanilla extract with lemon extract.
- Cranberry Orange: Fold in 2/3 cup dried cranberries and 1 tablespoon orange zest. Brush with orange juice instead of cream before baking.
- Cinnamon Sugar: Mix 3 tablespoons sugar with 1 teaspoon cinnamon and sprinkle generously over the cream-brushed scones before baking.
- Savory Cheddar Herb: Reduce sugar to 2 tablespoons and add 3/4 cup shredded sharp cheddar cheese, 2 tablespoons chopped fresh herbs, and 1/4 teaspoon garlic powder.
- Maple Pecan: Replace 2 tablespoons of the cream with pure maple syrup and fold in 1/2 cup chopped toasted pecans.
- Almond Cherry: Add 1/2 teaspoon almond extract to the wet ingredients and fold in 2/3 cup chopped dried cherries and 1/3 cup sliced almonds.
- Pumpkin Spice: Reduce cream to 1/3 cup, add 1/3 cup pumpkin puree, and mix 1 teaspoon pumpkin pie spice into the dry ingredients.
- White Chocolate Raspberry: Fold in 1/2 cup white chocolate chips and 1/2 cup freeze-dried raspberries for a bakery-style treat.
For another breakfast variation, explore this Buttermilk Pancake Recipe.
Storage and Reheating
Proper storage ensures your scones stay as fresh and delicious as possible, though they’re truly best enjoyed the day they’re made.
- Room Temperature: Store completely cooled scones in an airtight container at room temperature for up to 2 days. Place a piece of paper towel in the container to absorb excess moisture.
- Refrigeration: Scones can be refrigerated in an airtight container for up to 5 days. The texture will become slightly drier, but they’ll still taste delicious when reheated.
- Freezing Baked Scones: Wrap cooled scones individually in plastic wrap, then place them in a freezer-safe bag. Freeze for up to 3 months. Thaw at room temperature and reheat before serving.
- Freezing Unbaked Scones: This is the best option for fresh-baked scones anytime. Shape and cut the scones, place them on a baking sheet, and freeze until solid. Transfer to a freezer bag and freeze for up to 3 months. Bake from frozen, adding 2 to 3 minutes to the baking time.
- Reheating in the Oven: Preheat oven to 350°F (175°C). Place scones on a baking sheet and warm for 5 to 7 minutes until heated through. This method restores some of the crispy exterior.
- Reheating in the Microwave: Place a scone on a microwave-safe plate and heat on 50% power for 10 to 15 seconds. Be careful not to overheat, as this will make scones tough.
- Toasting: Split leftover scones in half and toast them lightly for a delicious twist. The cut sides become crispy and golden while the interior stays soft.
Another make-ahead breakfast option is this French Toast Casserole Recipe.
Nutritional Facts
Per serving (1 scone, recipe makes 8 scones):
- Calories: 287
- Total Fat: 15g
- Saturated Fat: 9g
- Cholesterol: 65mg
- Sodium: 285mg
- Total Carbohydrates: 34g
- Dietary Fiber: 1g
- Sugars: 13g
- Protein: 4g
Note: Nutritional values are approximate and will vary based on specific ingredients used and portion sizes.
Read Also: Easy Banana Bread Recipe With Self Rising Flour
Health Benefits of Key Ingredients
While scones are undeniably an indulgent treat, the ingredients do offer some nutritional value worth noting.
All-Purpose Flour: Provides carbohydrates for energy and contains small amounts of protein, iron, and B vitamins. While not as nutrient-dense as whole wheat flour, it creates the tender texture that defines a perfect scone.
- Source of Energy: Carbohydrates from flour provide quick energy to fuel your morning or afternoon.
- Iron Content: Enriched all-purpose flour contains iron, which is essential for healthy blood and oxygen transport.
- B Vitamins: Enriched flour provides B vitamins including thiamin, riboflavin, and niacin, which support metabolism and nervous system function.
- Protein: Flour contributes some protein to the recipe, which helps with satiety and muscle maintenance.
Heavy Cream: While high in fat and calories, cream provides fat-soluble vitamins A, D, E, and K, along with calcium for bone health.
- Vitamin A: Important for eye health, immune function, and skin health.
- Calcium: Essential for strong bones and teeth, as well as proper muscle and nerve function.
- Conjugated Linoleic Acid: Dairy fat contains CLA, which may have anti-inflammatory properties.
Eggs: A nutritional powerhouse providing high-quality protein, choline for brain health, and vitamins B12 and D.
- Complete Protein: Eggs contain all nine essential amino acids in the right proportions.
- Choline: Important for brain development and function, particularly memory.
- Lutein and Zeaxanthin: Antioxidants that support eye health and may reduce the risk of cataracts.
Butter: Contains fat-soluble vitamins, particularly vitamin A, and provides butyrate, a short-chain fatty acid that supports gut health.
- Vitamin K2: Important for bone health and cardiovascular health.
- Butyric Acid: May support digestive health and reduce inflammation.
- CLA: Grass-fed butter contains higher levels of conjugated linoleic acid.
This pairs nicely with Classic Egg Salad for a protein-rich brunch.
Frequently Asked Questions
1. Why are my scones tough and dense instead of tender and flaky?
The most common cause of tough scones is overmixing the dough. When you mix or knead the dough too much, you develop the gluten in the flour, which creates a tough, chewy texture instead of a tender, crumbly one. Mix the dough just until it comes together, and handle it as little as possible.
Another reason could be that your butter wasn’t cold enough. When the butter melts before baking, it gets absorbed into the dough instead of creating those lovely flaky layers.
2. Can I make scones without heavy cream?
Yes, you can substitute whole milk, half-and-half, or buttermilk for the heavy cream. Keep in mind that heavy cream creates the richest, most tender scones because of its higher fat content. If using milk or buttermilk, your scones will still be delicious but slightly less rich and may have a different texture.
For a dairy-free option, use full-fat coconut milk or your favorite non-dairy cream alternative.
3. How do I know when my scones are done baking?
Perfectly baked scones should be golden brown on top and lightly browned on the bottom edges. They should feel firm to the touch but not hard, and a toothpick inserted into the center should come out clean or with just a few moist crumbs.
If you lift a scone gently with a spatula, the bottom should be lightly golden rather than pale or deeply browned.
4. Can I freeze unbaked scones?
Absolutely! Freezing unbaked scones is actually the best way to have fresh-baked scones whenever you want them. Shape and cut the scones, place them on a baking sheet, and freeze until solid (about 2 hours). Then transfer them to a freezer-safe bag or container.
When ready to bake, place frozen scones on a lined baking sheet, brush with cream, sprinkle with sugar, and bake from frozen, adding 2 to 3 minutes to the original baking time.
5. Why did my scones spread instead of rising?
Scones that spread instead of rising usually indicate that the butter was too warm when the dough went into the oven. Make sure your butter is truly frozen when you grate it, and work quickly to keep everything cold. You can also place the shaped, unbaked scones in the freezer for 15 minutes before baking.
Another cause could be old or expired baking powder that has lost its leavening power. Test your baking powder by adding a teaspoon to hot water – it should bubble vigorously if it’s still active.
You might also enjoy this Starbucks Banana Bread Recipe.
Final Thoughts
Making homemade scones is one of those beautiful baking experiences that seems complicated but is actually wonderfully simple once you understand the basics. This easy scone recipe strips away all the mystery and delivers consistently perfect results.
The joy of biting into a warm, freshly baked scone with its golden, slightly crisp exterior and tender, buttery interior is something every home baker should experience. Once you make these scones, you’ll find yourself creating batches for weekend brunches, afternoon tea parties, or simply as a special treat to brighten an ordinary day.
I’d love to hear how your scones turned out! Share your baking adventures in the comments below, and let me know which variation you tried first. Happy baking!
Recommended:
- Old Fashioned Pancake Recipe
- German Pancake Recipe
- Kodiak Pancake Recipe
- Gluten Free Pancake Recipe
- Pancake Recipe Without Milk
- IHOP Pancake Recipe
- Betty Crocker Pancake Recipe
- Sweet Cornbread Recipe
- Skillet Cornbread Recipe
- Easy Granola Recipe


