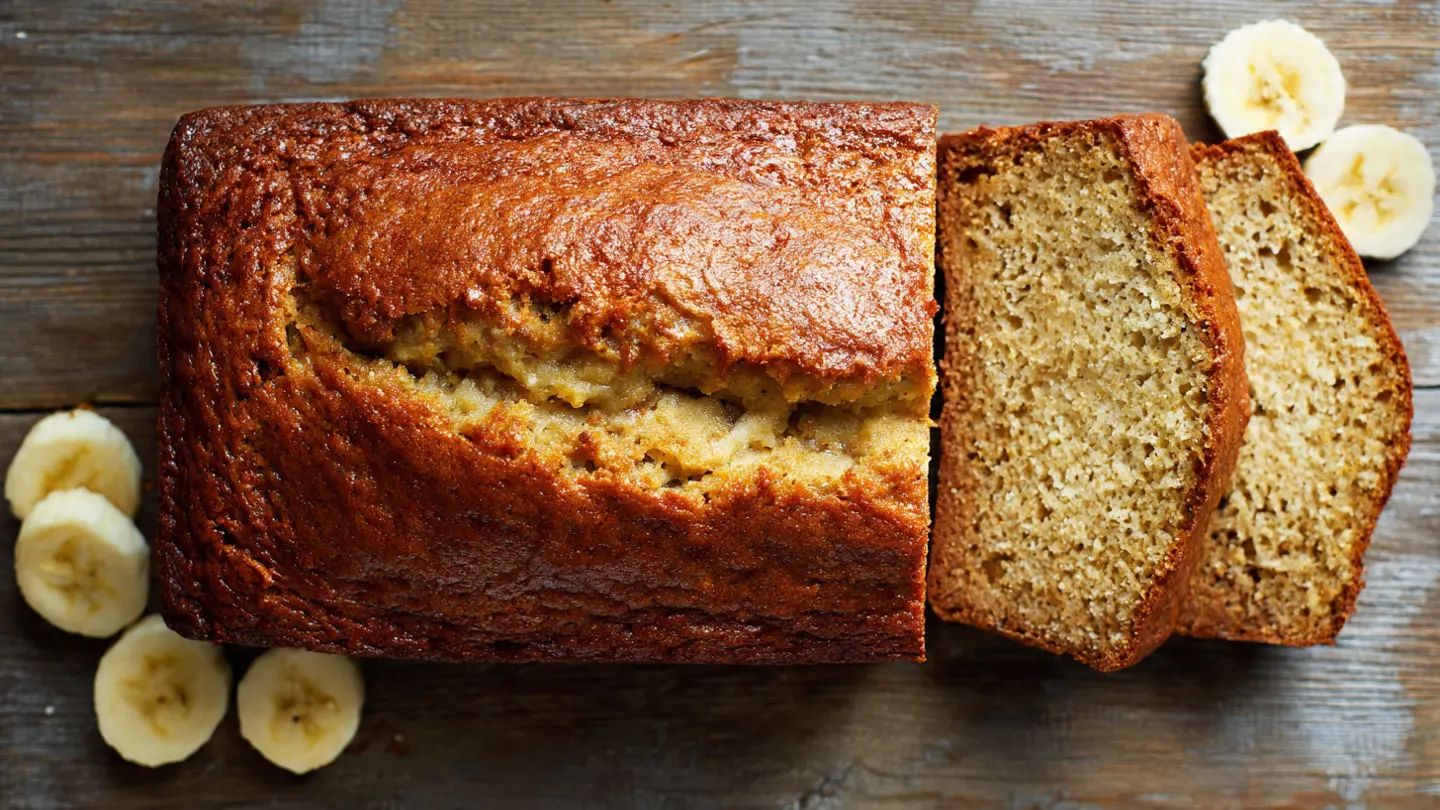
Nothing beats the aroma of fresh banana bread baking in your oven. This easy banana bread recipe with self rising flour simplifies the classic quick bread by using just one type of flour instead of juggling multiple leavening agents.
You’ll love how this recipe transforms those overripe bananas sitting on your counter into a moist, tender loaf bursting with natural sweetness. The beauty of using self-rising flour is that it already contains the perfect blend of baking powder and salt, which means fewer ingredients to measure and less room for error.
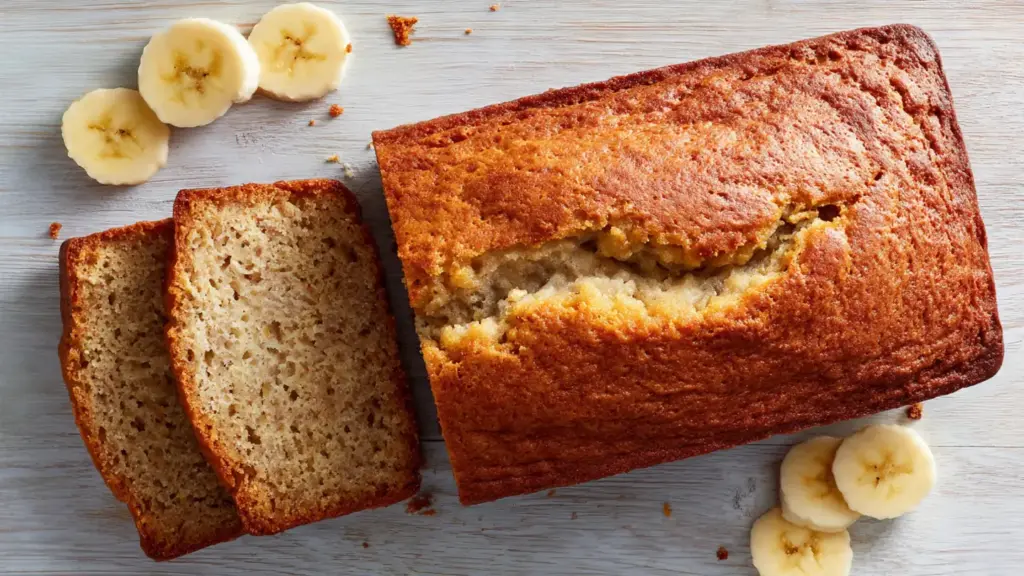
This straightforward approach creates a banana bread that tastes more like a tender cake than the dense texture of traditional recipes. The soft, fluffy crumb practically melts in your mouth while still maintaining enough structure to slice cleanly.
What makes this recipe truly special is how forgiving it is for beginners. You don’t need fancy equipment or professional baking skills.
Just two bowls, a fork for mashing, and a whisk for mixing. The batter comes together in minutes, and before you know it, your kitchen will smell like a bakery.
For more delicious quick bread variations, check out this Starbucks Banana Bread Recipe.
Why You’ll Love This Easy Banana Bread Recipe with Self Rising Flour
This recipe stands out because it takes a traditional favorite and makes it even easier to prepare. Using self-rising flour eliminates three separate ingredients from your shopping list and measuring process.
The resulting texture is softer and more cake-like than standard banana bread recipes. This lighter crumb appeals to those who find traditional banana bread too dense or heavy.
Here’s what makes this recipe a winner:
- Minimal ingredients: Just six basic pantry staples create an incredible loaf
- Quick preparation: Mix the batter in under 10 minutes with just two bowls
- Consistent results: Self-rising flour provides reliable rise and texture every time
- Budget-friendly: Uses overripe bananas that might otherwise go to waste
- Versatile base: Easily customize with nuts, chocolate chips, or spices
- Perfect moisture: The combination of mashed bananas and oil keeps the bread moist for days
- Beginner-friendly: No complicated techniques or special equipment required
- Great for gifting: Makes a thoughtful homemade present that everyone appreciates
Ingredients
This simple recipe requires just a handful of ingredients you likely already have in your kitchen. The key is using very ripe bananas with plenty of brown spots for maximum sweetness and banana flavor.
Wet Ingredients:
- 3 large overripe bananas, mashed (about 1 1/2 cups / 340g)
- 1/2 cup (120ml) vegetable oil or melted butter
- 2 large eggs, room temperature
- 1 cup (200g) granulated sugar
- 2 teaspoons vanilla extract
Dry Ingredients:
- 2 cups (240g) self-rising flour
- 1/2 teaspoon ground cinnamon (optional)
Optional Add-Ins:
- 1/2 cup (60g) chopped walnuts or pecans
- 1/2 cup (85g) chocolate chips
- 1/4 cup (30g) dried cranberries
Another favorite: Amish Banana Bread Recipe
Kitchen Equipment Needed
You won’t need any specialized baking equipment for this recipe. Most home kitchens will already have everything required to make perfect banana bread.
Essential Tools:
- 9×5 inch (23×13 cm) loaf pan
- Large mixing bowl
- Medium mixing bowl
- Fork or potato masher for bananas
- Whisk or electric hand mixer
- Rubber spatula for scraping
- Measuring cups and spoons
- Toothpick or cake tester for doneness
- Wire cooling rack
- Cooking spray or butter for greasing
Recommended Products for This Recipe
After testing banana bread recipes countless times, I’ve found that a few quality products genuinely improve your results and make the baking process more enjoyable.
1. USA Pan Bakeware Aluminized Steel Loaf Pan
This professional-grade loaf pan distributes heat evenly, preventing burnt edges while ensuring your banana bread bakes through perfectly. The aluminized steel construction provides superior heat conduction and the nonstick coating releases your bread cleanly every time. It’s durable enough to last for years of regular baking.
2. King Arthur Baking Company Self-Rising Flour
This premium self-rising flour contains the ideal ratio of leavening agents for perfect rise and texture. King Arthur uses high-quality wheat and precisely measured baking powder to ensure consistent results. The finer grind creates a softer, more tender crumb in quick breads.
3. OXO Good Grips 3-Piece Stainless Steel Mixing Bowl Set
These mixing bowls feature non-slip bases that stay put while you mix, and the high sides prevent splatter. The stainless steel construction is lightweight yet durable, and the bowls nest inside each other for compact storage. They’re also dishwasher safe for easy cleanup.
4. Premium Madagascar Vanilla Extract
High-quality vanilla extract elevates the flavor profile of your banana bread significantly. Madagascar vanilla provides rich, sweet, and creamy notes that complement the banana flavor beautifully. A little goes a long way in enhancing the overall taste.
Read Also: Paula Deen Banana Bread Recipe
Step-by-Step Instructions
Follow these detailed steps for perfect banana bread every time. The process is straightforward, but attention to detail during mixing and baking ensures the best texture and flavor.
1. Prepare Your Oven and Pan
- Preheat your oven to 350°F (175°C) and position the rack in the center of the oven for even heat distribution
- Grease your 9×5 inch loaf pan thoroughly with cooking spray or softened butter, making sure to coat the bottom and all sides
- For extra insurance against sticking, you can also line the bottom with parchment paper cut to fit
- Set the prepared pan aside while you mix the batter
2. Mash the Bananas
- Peel your overripe bananas and place them in a large mixing bowl
- Use a fork or potato masher to mash the bananas until mostly smooth with just a few small lumps remaining
- You should have approximately 1 1/2 cups (340g) of mashed banana
- The riper and more spotted the bananas, the sweeter and more flavorful your bread will be
- Brown or even black bananas work best for this recipe
3. Combine the Wet Ingredients
- Add the vegetable oil (or melted butter if using) to the bowl with mashed bananas and mix well
- Crack in the eggs one at a time, whisking after each addition until fully incorporated
- Pour in the granulated sugar and mix vigorously for about 1 minute until the mixture becomes slightly lighter in color
- Add the vanilla extract and stir until everything is well combined
- The mixture should look smooth and creamy at this point
4. Add the Dry Ingredients
- In a separate medium bowl, whisk together the self-rising flour and cinnamon (if using) to ensure even distribution
- Pour the dry ingredients into the wet ingredients all at once
- Use a rubber spatula or wooden spoon to gently fold the flour into the wet mixture
- Stir only until you no longer see dry flour streaks, being careful not to overmix
- The batter should be thick and slightly lumpy, which is exactly what you want
- If adding nuts or chocolate chips, fold them in now with just a few gentle strokes
5. Transfer to Pan and Bake
- Pour the batter into your prepared loaf pan and spread it evenly with a spatula
- Gently tap the pan on the counter 2-3 times to release any air bubbles
- Optional: Use a knife to draw a shallow line down the center of the batter to encourage an attractive crack as it bakes
- Place the pan on the center rack of your preheated oven
- Bake for 50-60 minutes, or until a toothpick inserted into the center comes out clean or with just a few moist crumbs
- Start checking for doneness at the 45-minute mark to prevent overbaking
- The top should be golden brown and spring back lightly when touched
6. Cool and Serve
- Remove the pan from the oven and place it on a wire cooling rack
- Let the banana bread cool in the pan for 10-15 minutes to set the structure
- Run a knife around the edges to loosen, then carefully turn the loaf out onto the cooling rack
- Allow the bread to cool completely before slicing for the cleanest cuts, or enjoy it warm if you prefer
- Slice with a sharp serrated knife using a gentle sawing motion
You might also enjoy: Banana and Apple Bread Recipe
Tips for Success
These expert tips will help you achieve bakery-quality banana bread every single time you bake this recipe.
Pro Baking Tips:
- Use very ripe bananas: The browner and spottier, the better. Bananas with completely brown peels provide the most intense flavor and natural sweetness.
- Don’t overmix the batter: Stir just until the flour disappears. Overmixing develops gluten and creates tough, rubbery bread instead of tender crumb.
- Room temperature eggs: Cold eggs don’t incorporate as smoothly. Let them sit at room temperature for 20-30 minutes before using.
- Check self-rising flour freshness: Self-rising flour loses potency over time. Check the expiration date and perform a freshness test if unsure.
- Proper oven temperature: Use an oven thermometer to verify accuracy. Ovens often run hotter or cooler than their settings indicate.
- Avoid opening the oven: Resist the urge to peek during the first 40 minutes. Opening the door causes temperature fluctuations that affect rising.
- Test for doneness properly: Insert a toothpick into the center. It should come out clean or with a few moist crumbs, never wet batter.
- Cool before slicing: Warm bread is fragile and crumbles easily. Patience pays off with clean, beautiful slices.
- Freeze ripe bananas: When bananas get too ripe, peel and freeze them in airtight bags for up to 3 months for future baking.
- Make your own self-rising flour: If needed, combine 2 cups all-purpose flour with 3 teaspoons baking powder and 1/2 teaspoon salt.
Serving Suggestions
This versatile banana bread works beautifully for breakfast, snacks, or even dessert. The mild sweetness pairs wonderfully with both sweet and savory accompaniments.
Serve slices warm with a generous pat of butter melting into the soft crumb. The simple combination allows the banana flavor to shine through while adding richness.
Toasting slices brings out deeper caramel notes and creates appealing crispy edges. Spread with peanut butter, almond butter, or cream cheese for extra protein and flavor.
Delicious Serving Ideas:
- Top with fresh berries and a dollop of Greek yogurt for a protein-packed breakfast
- Drizzle with honey or maple syrup and sprinkle with chopped nuts for added texture
- Serve alongside your morning coffee or tea as a satisfying mid-morning snack
- Pair with vanilla ice cream for an indulgent dessert
- Make French toast by dipping slices in egg mixture and pan-frying until golden
- Create a breakfast sandwich with bacon and scrambled eggs
- Serve with Easy Egg Salad for a unique brunch combination
- Top with Classic Deviled Eggs for an interesting sweet and savory pairing
Read Also: Keto Banana Bread Recipe
Variations to Try
Once you’ve mastered the basic recipe, experiment with these delicious variations to keep things interesting and customize the bread to your taste preferences.
Popular Flavor Variations:
- Chocolate Chip: Fold in 1/2 to 3/4 cup semi-sweet or dark chocolate chips for a dessert-like treat
- Banana Nut: Add 1/2 cup chopped walnuts, pecans, or a combination for nutty crunch and flavor
- Cinnamon Swirl: Reserve 2 tablespoons sugar mixed with 1 teaspoon cinnamon, swirl into batter before baking
- Blueberry: Gently fold in 3/4 cup fresh or frozen blueberries for fruity bursts throughout
- Peanut Butter: Swirl 1/3 cup creamy peanut butter through the batter for protein-rich richness
- Coconut: Add 1/2 cup shredded coconut and 1/2 teaspoon coconut extract for tropical flair
- Cream Cheese: Drop dollops of sweetened cream cheese into batter and swirl with a knife
- Espresso: Add 1 tablespoon instant espresso powder to enhance and deepen the banana flavor
- Streusel Topping: Combine 1/4 cup flour, 1/4 cup brown sugar, 2 tablespoons cold butter, and sprinkle on top before baking
- Maple Glaze: Whisk together powdered sugar and maple syrup, drizzle over cooled bread
Storage and Reheating
Proper storage keeps your banana bread moist and delicious for days, while freezing extends its life for future enjoyment.
Storage Instructions:
- Room Temperature: Wrap cooled bread tightly in plastic wrap or aluminum foil and store at room temperature for up to 3 days. The bread will stay moist and tender.
- Refrigerator: For longer storage, refrigerate wrapped bread for up to 1 week. Note that refrigeration can dry out the bread slightly.
- Freezer: Wrap individual slices or the whole loaf in plastic wrap, then place in a freezer-safe bag. Freeze for up to 3 months for best quality.
- Freezing Tip: Place parchment paper between slices before freezing so you can easily remove individual portions.
Reheating Methods:
- Microwave: Heat individual slices for 15-20 seconds on high power for a quick warm-up
- Oven: Wrap the whole loaf in foil and warm at 300°F (150°C) for 10-15 minutes
- Toaster: Toast slices directly from frozen for crispy edges and warm centers
- Air Fryer: Heat slices at 320°F (160°C) for 2-3 minutes for perfectly warmed bread with slightly crispy edges
Another favorite: Eggless Banana Bread Recipe
Nutritional Facts
Per Slice (1/12 of loaf):
- Calories: 210
- Total Fat: 10g
- Saturated Fat: 1.5g
- Cholesterol: 30mg
- Sodium: 180mg
- Total Carbohydrates: 28g
- Dietary Fiber: 1g
- Sugars: 15g
- Protein: 3g
- Vitamin A: 2% DV
- Vitamin C: 3% DV
- Calcium: 4% DV
- Iron: 6% DV
Note: Nutritional values are approximate and may vary based on specific ingredients used and portion sizes. Add-ins like nuts or chocolate chips will alter the nutritional content.
Health Benefits of Key Ingredients
While banana bread is definitely a treat, it does contain some nutritious ingredients that offer health benefits when enjoyed as part of a balanced diet.
Bananas provide natural sweetness along with essential nutrients. They’re rich in potassium, which supports heart health and helps regulate blood pressure, and they contain vitamin B6, important for brain development and immune function.
The fiber in bananas aids digestion and promotes feelings of fullness. Bananas also offer quick energy from natural sugars, making banana bread a decent pre-workout snack option.
Nutritional Highlights:
- Potassium: Bananas contain about 422mg per medium banana, supporting heart and muscle function
- Vitamin B6: Essential for metabolism and brain health, with one banana providing about 20% of daily needs
- Fiber: Helps maintain digestive health and supports stable blood sugar levels
- Antioxidants: Bananas contain dopamine and catechins that may reduce inflammation
- Eggs: Provide high-quality protein and essential amino acids for muscle maintenance
- Healthy Fats: Oil contributes vitamin E and supports nutrient absorption
- Energy: Natural banana sugars offer quick energy without artificial additives
- Mood Support: Bananas contain tryptophan, which converts to serotonin in the body
You might also enjoy: Banana Bread Recipe with Walnuts and Chocolate Chips
Frequently Asked Questions
1. Can I use regular all-purpose flour instead of self-rising flour?
Yes, you can substitute all-purpose flour, but you’ll need to add leavening agents. For every 2 cups of all-purpose flour, add 3 teaspoons of baking powder and 1/2 teaspoon of salt. Mix these dry ingredients together before adding to the wet ingredients to ensure even distribution throughout the batter.
2. Why is my banana bread dense and heavy?
Dense banana bread usually results from overmixing the batter, which develops too much gluten in the flour. It can also happen if you use flour that’s too old or expired, as the leavening agents lose potency over time. Make sure to stir just until the flour disappears and check your self-rising flour’s expiration date before using.
3. Can I reduce the sugar in this recipe?
You can reduce the sugar by up to 1/4 cup without dramatically affecting the texture. Keep in mind that the banana flavor will be less sweet, and the bread may brown less in the oven. The sugar also contributes to moisture retention, so reducing it too much may result in drier bread that doesn’t keep as long.
4. How do I know when the banana bread is fully baked?
Insert a toothpick or cake tester into the center of the loaf. It should come out clean or with just a few moist crumbs clinging to it, but no wet batter. The top should be golden brown and spring back lightly when touched gently with your finger.
5. Can I make this recipe into muffins instead?
Absolutely! This batter works perfectly for muffins. Fill muffin cups about 2/3 full and bake at 350°F (175°C) for 18-22 minutes, or until a toothpick inserted in the center comes out clean. You’ll get approximately 12 standard-sized muffins from this recipe.
Read Also: Maui Banana Bread Recipe
Final Thoughts
This easy banana bread recipe with self rising flour proves that simple ingredients and straightforward methods can produce exceptional results. The tender, moist crumb and rich banana flavor make it a go-to recipe you’ll return to again and again.
The beauty of this recipe lies in its versatility and reliability. Once you’ve mastered the basic version, you can customize it endlessly with your favorite add-ins and variations while still achieving consistent, delicious results every time.
I’d love to hear how your banana bread turns out! Drop a comment below with your favorite variation or any questions you have. Don’t forget to share this recipe with friends and family who appreciate a good homemade treat.
Recommended:
- Snickerdoodle Banana Bread Recipe
- Banana Nut Bread Recipe with Pecans
- Chocolate Chip Bread Recipe
- Sweet Potato Bread Recipe
- Old Fashioned Pumpkin Bread Recipe
- Blackberry Bread Recipe
- Pineapple Quick Bread Recipe
- Easy Waffle Recipe
- French Toast Casserole Recipe
- Best Carrot Cake Recipe


