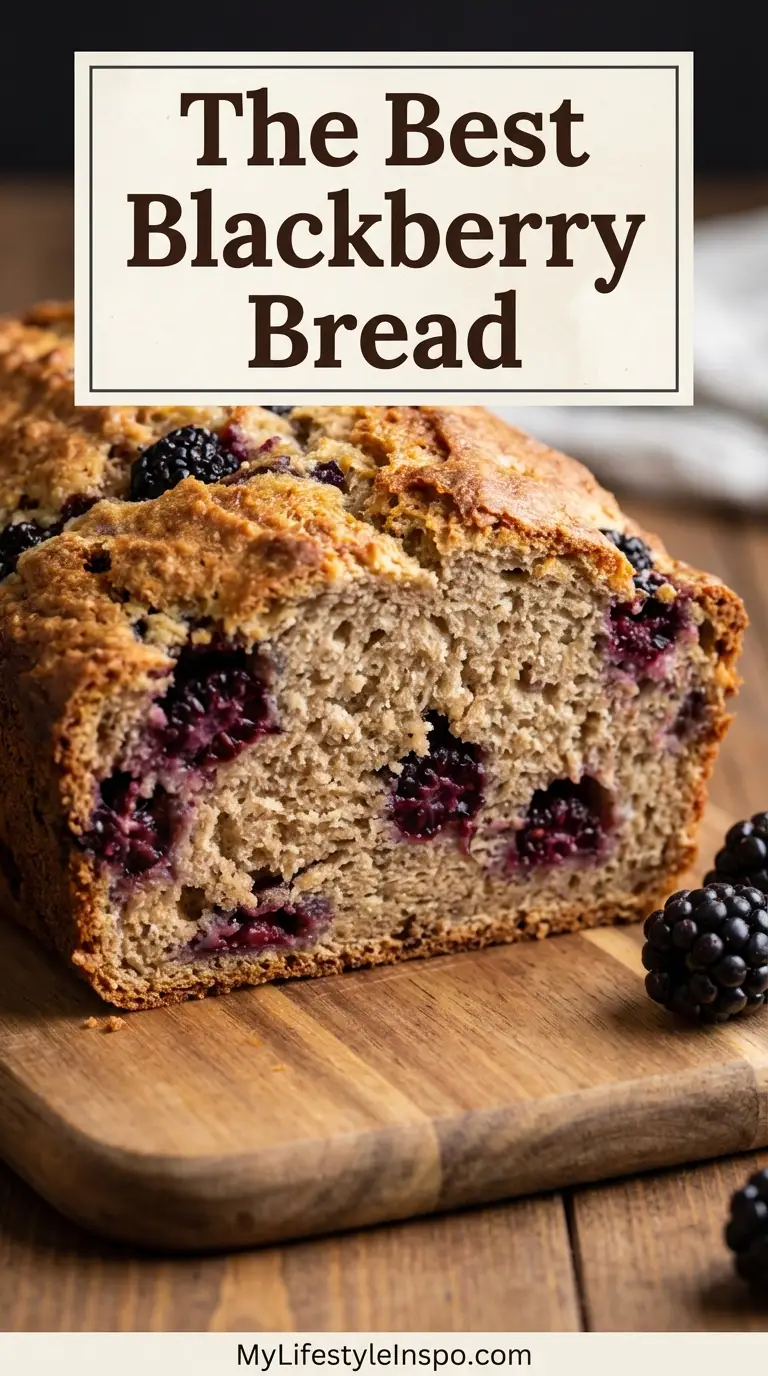
If you’ve ever wondered what to do with all those beautiful blackberries sitting in your fridge, this blackberry bread recipe is your answer. This moist, tender quick bread transforms fresh or frozen blackberries into a stunning purple-hued loaf that’s perfect for breakfast, snacks, or dessert.
The beauty of this recipe lies in its simplicity. Unlike yeast breads that require hours of rising, this quick bread comes together in just minutes. The blackberries release their gorgeous natural color throughout the batter, creating those beautiful purple swirls that make every slice look like a work of art.
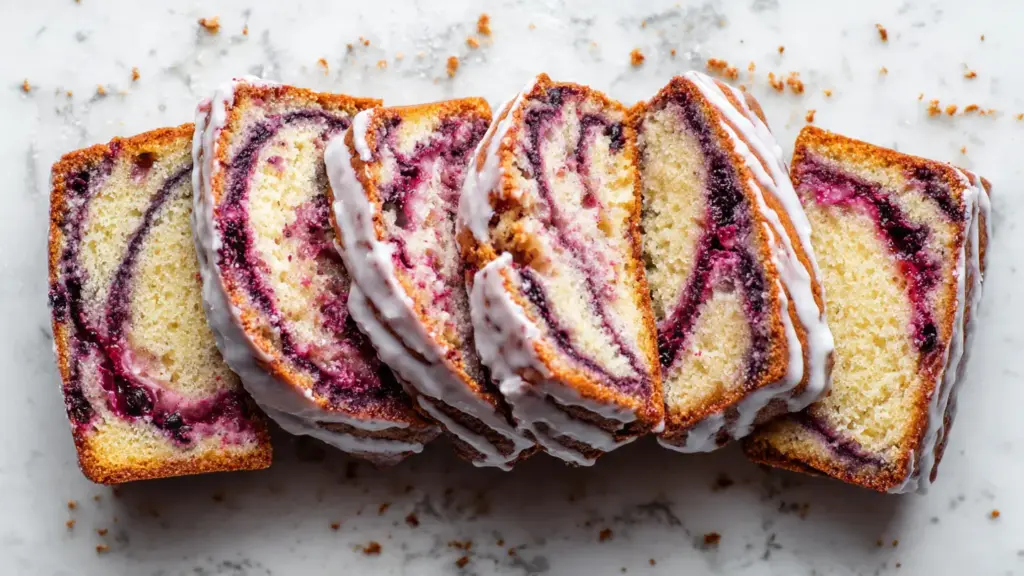
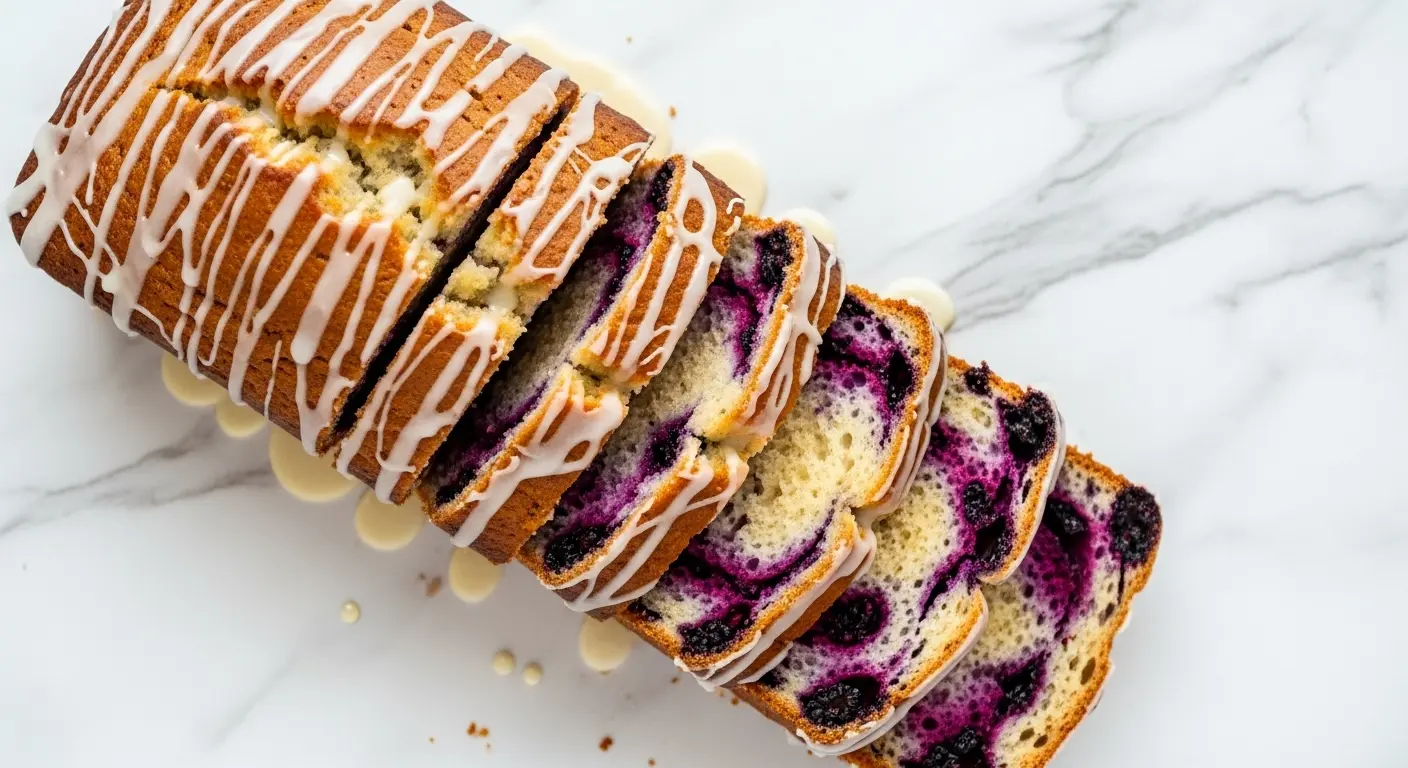
What makes this blackberry bread truly special is how the berries’ natural tartness balances perfectly with the sweet, buttery crumb. Each bite delivers bursts of fresh berry flavor, and the optional vanilla glaze on top adds just the right touch of sweetness.
This recipe works beautifully with both fresh blackberries from the farmers market or wild berries you’ve foraged yourself. Frozen blackberries work just as well, making this a year-round treat when fresh berries aren’t in season.
For more delicious breakfast breads, you might also enjoy Amish Banana Bread.
Why You’ll Love This Blackberry Bread Recipe
This blackberry bread has everything you want in a quick bread and more. The texture is incredibly moist thanks to the buttermilk, and the flavor is pure blackberry bliss in every single bite.
You don’t need any special equipment or advanced baking skills to make this recipe. Just two bowls, a whisk, and a loaf pan are all that stand between you and a gorgeous homemade bread.
- Naturally beautiful color – The blackberries create stunning purple swirls throughout the bread without any artificial coloring
- Flexible berry options – Works perfectly with fresh or frozen blackberries, so you can make it any time of year
- Simple one-bowl method – No mixer required, just whisk and fold for an easy baking experience
- Perfectly moist texture – The buttermilk keeps this bread tender and moist for days
- Great for any meal – Enjoy it for breakfast, as an afternoon snack, or as a light dessert
- Freezer-friendly – Make extra loaves and freeze them for up to 3 months
Ingredients
This blackberry bread uses simple pantry staples combined with fresh blackberries. The buttermilk is key to achieving that tender, moist crumb, while the vegetable oil keeps the bread soft for days. Using room temperature ingredients helps everything blend together smoothly without overmixing.
- 3 cups (375g) all-purpose flour, spooned and leveled
- 1½ cups (300g) granulated sugar
- 1 teaspoon baking soda
- 1 teaspoon salt
- 1 teaspoon ground cinnamon
- 1 cup (240ml) buttermilk, room temperature
- 2 large eggs, room temperature
- ½ cup (120ml) vegetable oil
- 2 teaspoons pure vanilla extract
- 2 cups (300g) fresh or frozen blackberries
For the Vanilla Glaze:
- 1 cup (120g) powdered sugar
- 1 teaspoon pure vanilla extract
- 2-3 tablespoons milk
Kitchen Equipment Needed
Having the right tools makes this recipe come together effortlessly. A 9×5-inch loaf pan is essential for getting the perfect rise and shape. Parchment paper makes removing the finished bread a breeze, and room temperature ingredients blend more smoothly than cold ones straight from the fridge.
- 9×5-inch (23x13cm) loaf pan
- Parchment paper
- Two large mixing bowls
- Whisk
- Rubber spatula
- Measuring cups and spoons
- Wire cooling rack
- Toothpick for testing doneness
Recommended Products for This Recipe
These carefully selected products will help you achieve bakery-quality results with your blackberry bread. Each recommendation is based on performance and quality to make your baking experience easier and more enjoyable.
1. USA Pan Bakeware Aluminized Steel Loaf Pan
This professional-grade loaf pan distributes heat evenly, ensuring your blackberry bread bakes perfectly without burnt edges or undercooked centers. The nonstick coating releases the bread easily, and the durable construction means it will last for years of baking.
2. Organic Valley Buttermilk
Quality buttermilk makes a noticeable difference in the texture and tang of your bread. This organic buttermilk has the perfect consistency and acidity to create that tender, moist crumb that makes this bread so special.
3. OXO Good Grips Silicone Spatula Set
A good silicone spatula is essential for gently folding in the blackberries without crushing them. These spatulas have flexible edges that scrape every bit of batter from the bowl while being gentle enough not to break the delicate berries.
4. Premium Vanilla Extract
Pure vanilla extract elevates the flavor of this bread significantly. The complex vanilla notes complement the blackberries beautifully, adding depth and warmth to every slice.
You might also enjoy: Sweet Potato Bread
Step-by-Step Instructions
Follow these detailed instructions to create the perfect blackberry bread. Taking your time with each step ensures the best texture and flavor in your finished loaf.
1. Prepare Your Pan and Preheat the Oven
- Preheat your oven to 350°F (175°C).
- Generously grease a 9×5-inch loaf pan with nonstick cooking spray or butter.
- Cut a strip of parchment paper long enough to cover the bottom and reach up two opposite sides of the pan, with a few inches of overhang on each side (this creates handles for easy removal later).
- Press the parchment into the greased pan, making sure it adheres to the bottom and sides.
- Lightly spray the parchment with cooking spray as well.
- Set the prepared pan aside while you make the batter.
2. Mix the Dry Ingredients
- In a large mixing bowl, whisk together 3 cups all-purpose flour, 1½ cups granulated sugar, 1 teaspoon baking soda, 1 teaspoon salt, and 1 teaspoon ground cinnamon.
- Whisk for about 30 seconds to ensure all the dry ingredients are evenly distributed.
- The cinnamon adds a subtle warmth that complements the blackberries without overpowering them.
- Set this bowl aside while you prepare the wet ingredients.
3. Combine the Wet Ingredients
- In a medium bowl, whisk together 1 cup buttermilk, 2 eggs, ½ cup vegetable oil, and 2 teaspoons vanilla extract.
- Whisk vigorously for about 1 minute until the mixture is smooth and the eggs are fully incorporated.
- The mixture should look slightly frothy and uniform in color.
- Make sure all ingredients are at room temperature so they emulsify properly and create a smooth batter.
4. Mix Wet and Dry Ingredients
- Pour the wet ingredient mixture into the bowl with the dry ingredients.
- Using a rubber spatula or wooden spoon, gently stir the mixture together.
- Mix just until you no longer see dry flour streaks, about 15-20 gentle strokes.
- The batter should look slightly lumpy and thick – this is perfect. Overmixing will create a tough, dense bread instead of a tender one.
- Stop mixing as soon as the flour is incorporated, even if there are a few small lumps remaining.
5. Fold in the Blackberries
- If using frozen blackberries, do not thaw them first – add them frozen directly to the batter.
- If using fresh blackberries, gently rinse them and pat completely dry with paper towels.
- Add all 2 cups of blackberries to the batter.
- Using your spatula, gently fold the berries into the batter with just 5-8 careful strokes.
- Try to keep the berries as whole as possible, though some will naturally break and release their beautiful purple juice.
- The juice will create gorgeous purple swirls throughout the batter – this is exactly what you want.
- Don’t worry if the batter looks streaky or unevenly colored at this point.
6. Transfer Batter to Pan and Bake
- Pour the batter into your prepared loaf pan.
- Use the spatula to spread the batter evenly, making sure it reaches all corners of the pan.
- Gently tap the pan on the counter 2-3 times to release any air bubbles.
- Place the pan on the center rack of your preheated oven.
- Bake for 60-70 minutes, checking at the 55-minute mark.
- The bread is done when the top is golden brown and a toothpick inserted into the center comes out with just a few moist crumbs (not wet batter).
- If the top is browning too quickly but the center isn’t done, tent the pan loosely with aluminum foil for the last 15-20 minutes of baking.
7. Cool the Bread
- Remove the pan from the oven and place it on a wire cooling rack.
- Let the bread cool in the pan for exactly 15 minutes – this allows it to set properly without becoming soggy.
- After 15 minutes, use the parchment paper handles to lift the bread out of the pan.
- Place the bread (still on the parchment) on the wire rack.
- Let it cool for another 30-45 minutes before glazing or slicing.
- Cooling completely ensures cleaner slices and prevents the glaze from melting into the bread.
8. Make and Apply the Glaze (Optional)
- In a small bowl, whisk together 1 cup powdered sugar, 1 teaspoon vanilla extract, and 2 tablespoons milk.
- Add more milk, 1 teaspoon at a time, until the glaze reaches your desired consistency – it should be thick enough to coat the back of a spoon but thin enough to drizzle.
- For a thicker glaze that sits on top, use less milk. For a thinner glaze that soaks in slightly, use the full 3 tablespoons.
- Use a spoon to drizzle the glaze back and forth over the top of the bread.
- Let the glaze set for about 10-15 minutes before slicing.
- You can glaze the bread while it’s still slightly warm (for a glaze that soaks in a bit) or completely cool (for a glaze that stays on top).
This technique also works wonderfully in Pineapple Quick Bread.
Tips for Success
These expert tips will help you avoid common pitfalls and ensure perfect blackberry bread every time. Small details make a big difference in the final result.
Don’t Overmix the Batter
- Stop mixing as soon as you no longer see dry flour – the batter should still look slightly lumpy.
- Overmixing develops the gluten in the flour, creating a tough, dense bread instead of a tender one.
- When folding in the blackberries, use gentle folding motions rather than vigorous stirring.
Use Room Temperature Ingredients
- Room temperature eggs and buttermilk blend more easily into the batter and create a better texture.
- Take eggs and buttermilk out of the fridge about 30 minutes before baking.
- If you’re in a hurry, place the eggs in a bowl of warm (not hot) water for 5-10 minutes.
Frozen vs. Fresh Blackberries
- Frozen blackberries actually work better than fresh in many cases because they’re less likely to break apart and release too much juice during mixing.
- Never thaw frozen berries before adding them – use them straight from the freezer.
- Fresh berries should be completely dry before adding to prevent excess moisture in the batter.
- If your berries are particularly large, you can cut them in half for more even distribution.
Check Doneness Carefully
- Start checking the bread at 55 minutes to prevent overbaking.
- The toothpick test is essential – it should come out with a few moist crumbs, not wet batter or completely clean.
- The top should be golden brown and spring back lightly when touched.
- If you have an instant-read thermometer, the internal temperature should be 200-205°F (93-96°C).
Prevent Sticking
- Using both parchment paper and greasing ensures the bread releases perfectly every time.
- Don’t skip the parchment paper overhang – these handles make removal so much easier.
- Let the bread cool in the pan for the full 15 minutes before removing to prevent it from breaking apart.
Serving Suggestions
Blackberry bread is incredibly versatile and delicious served many different ways. Here are some of my favorite ways to enjoy it.
This bread tastes amazing simply sliced and served at room temperature, allowing the blackberry flavor to shine through. The natural sweetness and moist crumb need no embellishment.
- Breakfast spread – Serve warm slices with softened butter, cream cheese, or Easy Pesto for a savory twist
- Afternoon tea – Pair with a cup of Earl Grey tea or coffee for a perfect mid-afternoon treat
- Dessert plate – Top with a dollop of whipped cream or vanilla ice cream and fresh berries
- Brunch buffet – Slice and arrange on a platter alongside French Toast Casserole and fresh fruit
- Gift giving – Wrap a cooled loaf in cellophane and tie with a ribbon for a homemade gift that friends and family will love
- Toasted treat – Toast slices in a toaster or under the broiler and top with butter for a crispy exterior and warm, soft interior
Read Also: Chocolate Chip Bread
Variations to Try
Once you’ve mastered the basic recipe, these variations add exciting new flavors and textures to your blackberry bread. Each one brings something special to the table.
Lemon Blackberry Bread
- Add 1 tablespoon lemon zest to the batter with the dry ingredients
- Add 2 tablespoons fresh lemon juice to the wet ingredients (reduce buttermilk to ⅞ cup)
- Make a lemon glaze using lemon juice instead of milk
- The citrus brightens the blackberry flavor beautifully
Mixed Berry Bread
- Use 1 cup blackberries and 1 cup blueberries, raspberries, or strawberries (chopped)
- This creates a beautiful multi-colored swirl pattern throughout the bread
- Each bite offers different berry flavors for a complex taste
Blackberry Walnut Bread
- Fold in ½ cup chopped walnuts or pecans along with the blackberries
- Toast the nuts first for enhanced flavor
- The nuts add a lovely crunch that contrasts with the soft berries
Blackberry Cream Cheese Bread
- Beat 4 oz softened cream cheese with ¼ cup sugar
- After pouring half the batter into the pan, drop spoonfuls of the cream cheese mixture on top
- Add remaining batter and swirl with a knife for a beautiful marbled effect
Spiced Blackberry Bread
- Add ½ teaspoon nutmeg and ¼ teaspoon cardamom along with the cinnamon
- These warm spices complement the berries and add depth to the flavor profile
Chocolate Blackberry Bread
- Fold in ½ cup mini chocolate chips along with the blackberries
- The chocolate and blackberry combination is absolutely divine
Another favorite: Old Fashioned Pumpkin Bread
Storage and Reheating
Proper storage keeps this blackberry bread fresh and delicious for days. Here’s how to store it for maximum freshness and quality.
Room Temperature Storage
- Let the bread cool completely before storing – any residual warmth creates condensation and makes the bread soggy.
- Wrap tightly in plastic wrap or aluminum foil, making sure there are no gaps.
- Store at room temperature for up to 3 days in a cool, dry place away from direct sunlight.
- The bread actually tastes even better on day two as the flavors meld together.
Refrigerator Storage
- Wrap the bread tightly in plastic wrap, then place in an airtight container or zip-top bag.
- Store in the refrigerator for up to 1 week.
- Bring to room temperature before serving, or warm slightly in the microwave for 10-15 seconds per slice.
- Refrigeration can dry out the bread slightly, so room temperature storage is preferred if you’ll eat it within 3 days.
Freezer Storage
- Wrap the completely cooled bread (without glaze) tightly in plastic wrap, then wrap again in aluminum foil.
- Place in a freezer-safe zip-top bag, removing as much air as possible.
- Label with the date and freeze for up to 3 months.
- To thaw, leave wrapped at room temperature for 3-4 hours or overnight in the refrigerator.
- Once thawed, apply the glaze if desired.
- You can also freeze individual slices wrapped separately for quick single servings.
Reheating Instructions
- Microwave: Heat individual slices for 10-15 seconds on high power until just warm.
- Oven: Wrap the whole loaf in foil and warm at 300°F (150°C) for 10-15 minutes.
- Toaster: Toast slices until lightly golden and warmed through, then spread with butter.
- Air Fryer: Heat slices at 320°F (160°C) for 2-3 minutes for a crispy exterior.
Nutritional Facts
This nutritional information is calculated per slice, assuming the recipe yields 12 slices. Keep in mind that these values are approximate and can vary based on specific ingredients used.
Per Slice (without glaze):
- Calories: 285
- Total Fat: 11g
- Saturated Fat: 1.5g
- Cholesterol: 35mg
- Sodium: 285mg
- Total Carbohydrates: 43g
- Dietary Fiber: 2g
- Sugars: 25g
- Protein: 4g
- Vitamin C: 8% DV
- Calcium: 4% DV
- Iron: 8% DV
The blackberries contribute antioxidants, fiber, and vitamin C to this treat. While this is a sweet bread, the fruit provides beneficial nutrients alongside the indulgence.
For more breakfast bread ideas, check out Easy Banana Bread with Self Rising Flour.
Health Benefits of Key Ingredients
Beyond the delicious flavor, the ingredients in this blackberry bread offer several nutritional benefits. Understanding these can help you feel good about enjoying this homemade treat.
The blackberries are the star when it comes to nutrition in this recipe. These berries are packed with antioxidants called anthocyanins, which give them their deep purple color and may help reduce inflammation in the body.
- Blackberries – Excellent source of vitamin C, vitamin K, and manganese; high in fiber for digestive health; loaded with antioxidants that support overall wellness; may help improve brain function and memory
- Eggs – Provide complete protein with all essential amino acids; rich in choline for brain health; contain lutein and zeaxanthin for eye health; supply vitamin D and B vitamins for energy
- Buttermilk – Easier to digest than regular milk due to its probiotics; good source of calcium for bone health; provides protein and B vitamins; lower in fat than whole milk
- Cinnamon – May help regulate blood sugar levels; contains anti-inflammatory properties; rich in antioxidants; may support heart health and improve insulin sensitivity
Frequently Asked Questions
1. Can I Use Frozen Blackberries Instead of Fresh?
Absolutely! Frozen blackberries work perfectly in this recipe and sometimes even better than fresh. Use them straight from the freezer without thawing – frozen berries are less likely to break apart during mixing, which helps maintain their shape and prevents the batter from becoming too purple and streaky. The baking time remains the same whether you use fresh or frozen berries.
2. Why Is My Blackberry Bread Dense and Heavy?
Dense bread usually results from overmixing the batter, which develops too much gluten in the flour. Mix the wet and dry ingredients just until combined – the batter should look slightly lumpy. Another cause can be measuring flour incorrectly – always spoon flour into your measuring cup and level it off rather than scooping directly from the bag, which packs the flour and adds too much.
3. Can I Reduce the Sugar in This Recipe?
You can reduce the sugar by up to ¼ cup (50g) without dramatically affecting the texture, though the bread will be less sweet. Keep in mind that sugar doesn’t just add sweetness – it also contributes to moisture and tenderness in baked goods. If you reduce it too much, the bread may be drier and less tender than intended.
4. How Do I Know When the Bread Is Fully Baked?
The bread is done when a toothpick inserted into the center comes out with just a few moist crumbs but no wet batter. The top should be golden brown and spring back lightly when touched. An instant-read thermometer should register 200-205°F (93-96°C) in the center.
5. Why Did My Blackberries Sink to the Bottom?
Berries can sink if the batter is too thin or if they’re too wet. Make sure to pat fresh berries completely dry before adding them. If using frozen berries, add them straight from the freezer – the cold temperature helps them stay suspended in the batter as it bakes.
Read Also: Starbucks Banana Bread
Blackberry Bread
Equipment
- 9×5-inch loaf pan - 23x13cm
- Parchment paper - For easy bread removal
- Large mixing bowl - For dry ingredients
- Medium mixing bowl - For wet ingredients
- Whisk
- Rubber spatula - For folding in berries without crushing them
- Measuring cups and spoons
- Wire cooling rack
- Toothpick - For testing doneness
- Instant-read thermometer - (optional) Internal temp should reach 200-205°F (93-96°C)
- Aluminum foil - (optional) For tenting if top browns too quickly
Ingredients
Blackberry Bread
- 3 cups all-purpose flour - 375g, spooned and leveled
- 1.5 cups granulated sugar - 300g
- 1 tsp baking soda
- 1 tsp salt
- 1 tsp ground cinnamon
- 1 cup buttermilk - 240ml, room temperature
- 2 large eggs - room temperature
- 0.5 cup vegetable oil - 120ml
- 2 tsp pure vanilla extract
- 2 cups blackberries - 300g, fresh or frozen; do not thaw if frozen
Vanilla Glaze (Optional)
- 1 cup powdered sugar - 120g
- 1 tsp pure vanilla extract
- 2-3 tbsp milk - Add one teaspoon at a time to reach desired consistency
Instructions
- Preheat oven to 350°F (175°C). Grease a 9×5-inch loaf pan, line with parchment paper leaving overhang on two sides, and lightly spray the parchment.
- In a large bowl, whisk together the flour, sugar, baking soda, salt, and cinnamon for about 30 seconds until evenly combined.
- In a medium bowl, whisk together the buttermilk, eggs, vegetable oil, and vanilla extract for about 1 minute until smooth and slightly frothy.
- Pour the wet ingredients into the dry ingredients and gently stir with a spatula just until no dry flour streaks remain, about 15–20 strokes; the batter should still look slightly lumpy.
- Add blackberries (frozen berries go in straight from the freezer; fresh berries should be completely dry) and gently fold into the batter with 5–8 strokes, keeping berries as whole as possible.
- Pour batter into the prepared pan, smooth the top, tap the pan on the counter 2–3 times, and bake on the center rack for 60–70 minutes, tenting with foil if the top browns too quickly, until a toothpick inserted in the center comes out with just a few moist crumbs.
- Cool in the pan on a wire rack for 15 minutes, then use the parchment handles to lift the bread out and cool for another 30–45 minutes before glazing or slicing.
- Whisk together powdered sugar, vanilla, and 2–3 tablespoons of milk until smooth and drizzleable, then spoon over the cooled bread and let set for 10–15 minutes before slicing.
Notes
- Do not overmix the batter — stop as soon as flour streaks disappear to keep the bread tender, not tough.
- Use room temperature eggs and buttermilk for a smoother batter; warm cold eggs quickly in a bowl of warm water for 5–10 minutes.
- Add frozen blackberries straight from the freezer without thawing — they hold their shape better and help prevent the batter from turning too purple.
- Always spoon flour into the measuring cup and level it off; scooping directly packs in too much flour and yields dense bread.
- Start checking for doneness at 55 minutes. The bread is done when a toothpick comes out with a few moist crumbs or an instant-read thermometer reads 200–205°F (93–96°C).
- If the top browns too quickly before the center is set, tent loosely with aluminum foil for the last 15–20 minutes of baking.
- Store wrapped at room temperature for up to 3 days, in the refrigerator for up to 1 week, or freeze (without glaze) for up to 3 months.
- For a lemon variation, add 1 tablespoon lemon zest to the dry ingredients and 2 tablespoons lemon juice to the wet ingredients (reduce buttermilk to ⅞ cup), and use lemon juice in the glaze.
- Stir in ½ cup chopped toasted walnuts or pecans along with the berries for added crunch.
- The bread actually tastes even better on day two as the flavors meld together.
Final Thoughts
This blackberry bread recipe delivers everything you want in a homemade quick bread – beautiful color, incredible moisture, and that perfect balance of sweet and tart. The simple ingredient list and straightforward method make it accessible for bakers of all skill levels.
The natural beauty of this bread never fails to impress. Those gorgeous purple swirls make every slice look like something from a bakery, yet the recipe requires nothing more than basic pantry ingredients and a handful of fresh berries.
I hope you love this blackberry bread as much as my family does! Give it a try and let me know how it turns out in the comments below. Share your photos and any creative variations you come up with – I’d love to see your beautiful loaves!
Recommended:
- Keto Banana Bread
- Eggless Banana Bread
- Banana and Apple Bread
- Paula Deen Banana Bread
- Banana Bread with Walnuts and Chocolate Chips
- Maui Banana Bread
- Banana Nut Bread with Pecans
- Snickerdoodle Banana Bread
- Sweet Sourdough Bread
- Cracklin Bread


