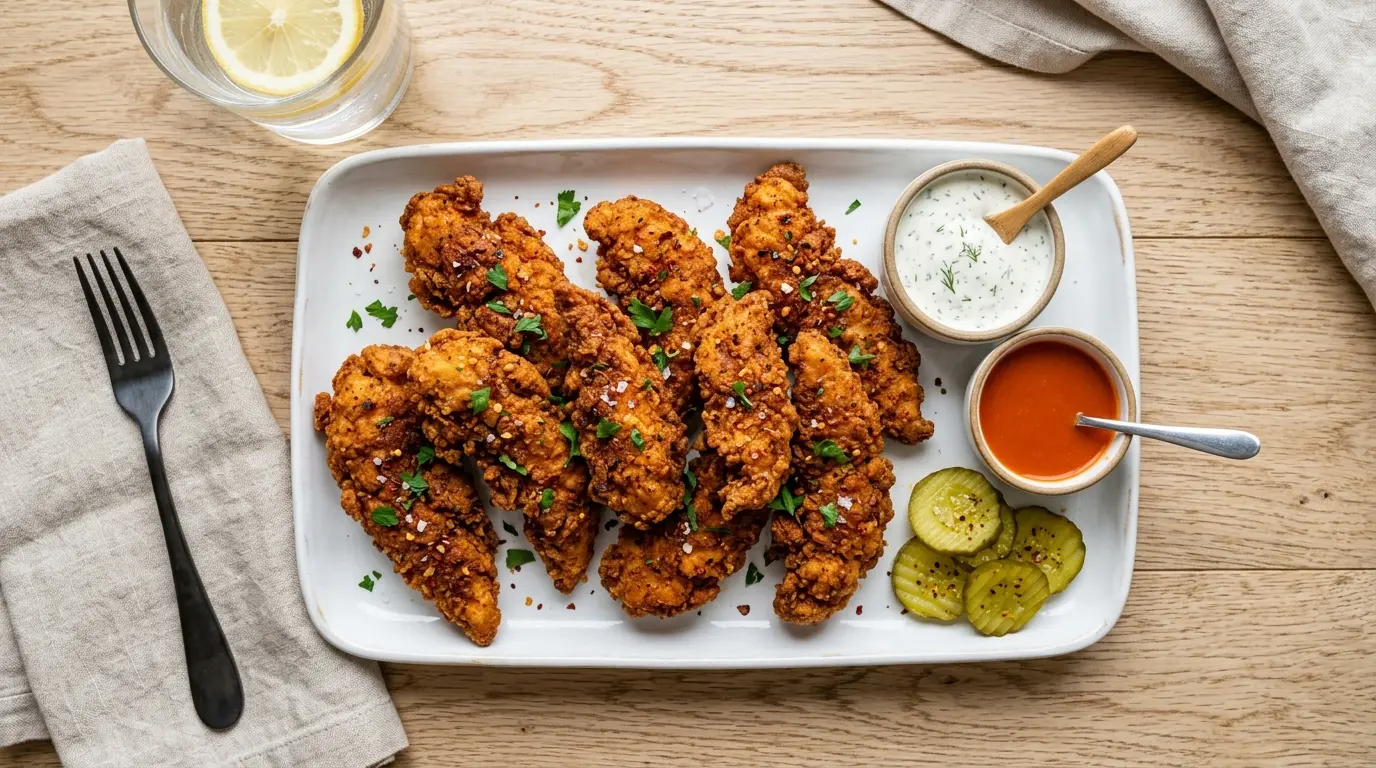
If you’ve been searching for the perfect spicy chicken tenders recipe, you’re in the right place. These tenders have everything you want: a shatteringly crispy golden crust, juicy and tender chicken inside, and a bold, fiery seasoning that hits every single time.
The secret is a buttermilk and hot sauce marinade. Buttermilk is slightly acidic, which works to break down the proteins in the chicken and lock in moisture. The hot sauce adds a layer of heat that soaks all the way through, so the flavor isn’t just on the surface.
This recipe uses a double-dredge technique, which is the same method behind the crunchiest fried chicken you’ve ever had. The chicken goes through seasoned flour, back into the buttermilk mixture, and then into the flour one more time for an extra-thick, ultra-crispy shell.
It’s a recipe that works for weeknight dinners, game day spreads, or any time you need a crowd-pleasing bite.
Love spicy chicken? You’ll also want to check out this Spicy Chicken Sandwich Recipe for another bold and crunchy option.

Why You’ll Love This Spicy Chicken Tenders Recipe
This isn’t a one-note recipe. Every component works together to create something that’s hard to put down.
The buttermilk marinade is what separates good chicken tenders from great ones. It tenderizes the meat so that even after frying, you’re biting into something juicy and soft on the inside.
The seasoning blend hits multiple flavor notes at once. Cayenne brings the heat, smoked paprika adds depth, garlic and onion powder round out the savory base, and a pinch of black pepper ties it all together.
The double-dredge coating creates a thick, rugged crust that clings to the chicken and stays crispy even after plating. No soggy tenders here.
These tenders are also incredibly versatile. Serve them plain, toss them in buffalo sauce, slice them into a salad, or pile them onto a sandwich.
- Big, bold flavor from a seasoned buttermilk marinade
- Incredibly crispy exterior from a double-dredge flour coating
- Juicy, tender meat every single time
- Ready in under 45 minutes (plus marinating time)
- Perfect for dipping, snacking, or plating as a main dish
- Easy to adjust the heat level up or down
For another crispy chicken fix, try this Air Fryer Chicken Tenders Recipe for a lighter version with the same satisfying crunch.
Ingredients
You’ll find most of these ingredients already in your kitchen. The star of the show is real hot sauce, which works in both the marinade and adds a base layer of heat that cayenne alone can’t replicate.
- 2 lbs (900g) chicken tenders (or chicken breasts sliced into 1/2-inch strips)
- 1 cup (240ml) buttermilk
- 2 tablespoons hot sauce (such as Frank’s RedHot or Tabasco)
- 1 teaspoon salt (for the marinade)
- 1/2 teaspoon white pepper (for the marinade)
- 1 1/2 cups (190g) all-purpose flour
- 1/4 cup (30g) cornstarch
- 1 1/2 teaspoons salt (for the dredge)
- 1 teaspoon cayenne pepper
- 1 teaspoon smoked paprika
- 1 teaspoon garlic powder
- 1 teaspoon onion powder
- 1/2 teaspoon black pepper
- 1/2 teaspoon baking powder
- Vegetable oil or neutral frying oil, for frying (about 2-3 cups / 480-720ml)
Another great chicken dish you’ll love is this Chicken Tenders Recipe for the classic non-spicy version.
Kitchen Equipment Needed
You don’t need anything fancy here. The key tool is a heavy-bottomed pot or Dutch oven to maintain a consistent frying temperature, which is what gives you that even, golden crust.
- Large mixing bowl (for the marinade)
- Two shallow bowls or dishes (for the flour dredge and buttermilk)
- Heavy-bottomed Dutch oven or deep pot (for frying)
- Instant-read thermometer (to check oil temp and chicken doneness)
- Wire rack set over a baking sheet (for draining fried tenders)
- Tongs or a spider strainer
- Paper towels
- Measuring cups and spoons
- Plastic wrap or a lid (to cover the marinating chicken)
Read Also: Easy Fried Chicken Recipe
Recommended Products for This Recipe
These are products selected for quality and performance that will make a real difference when making this spicy chicken tenders recipe.
1. Frank’s RedHot Original Cayenne Pepper Sauce
Frank’s RedHot is the gold-standard hot sauce for fried chicken marinades. Its vinegar base adds tanginess that balances the richness of the buttermilk, and it has the right level of heat without overpowering the other spices. A bottle goes a long way and is essential in this recipe.
2. Lodge Enameled Cast Iron Dutch Oven
A cast iron Dutch oven holds heat steadily, which is exactly what you need for frying. Uneven oil temperature leads to greasy, unevenly cooked chicken. This pot keeps things consistent from the first batch to the last.
3. ThermoPro Instant Read Meat Thermometer
Guessing the oil temperature is one of the most common frying mistakes. This thermometer lets you monitor the oil precisely at 350°F (175°C) and also confirms the chicken reaches a safe internal temperature of 165°F (74°C). It removes all the guesswork.
4. Cooling Rack and Half-Sheet Baking Pan Set
Resting fried chicken on paper towels traps steam and leads to soft spots. A wire rack lets air circulate under the tenders so they stay crispy all around. This set is a simple upgrade that makes a noticeable difference.
You might also enjoy: Spicy Chicken Ramen Recipe

Step-by-Step Instructions
Step 1: Prepare the Chicken
- If using whole chicken tenders, pat them completely dry with paper towels. Excess moisture prevents the marinade from adhering properly.
- If using chicken breasts, slice each breast lengthwise into strips about 1/2 inch (1.25 cm) thick. Aim to keep them roughly the same size so they cook evenly.
- Optionally, place the strips between two sheets of plastic wrap and gently pound them to an even thickness of about 1/4 to 1/2 inch (0.6 to 1.25 cm). Thinner pieces cook faster and have more surface area for the crust.
Step 2: Make the Buttermilk Marinade
- In a large mixing bowl, combine 1 cup (240ml) of buttermilk, 2 tablespoons of hot sauce, 1 teaspoon of salt, and 1/2 teaspoon of white pepper.
- Whisk everything together until fully combined. The mixture should be smooth and slightly pink from the hot sauce.
- Add the chicken pieces to the bowl and toss to coat thoroughly. Every piece should be coated in the marinade.
- Cover the bowl with plastic wrap or a lid and refrigerate for a minimum of 2 hours. For the best results, marinate overnight (up to 12 hours). The longer the soak, the more tender and flavorful your tenders will be.
Step 3: Mix the Seasoned Flour Dredge
- In a shallow bowl or dish, combine 1 1/2 cups (190g) of all-purpose flour, 1/4 cup (30g) of cornstarch, 1 1/2 teaspoons of salt, 1 teaspoon of cayenne pepper, 1 teaspoon of smoked paprika, 1 teaspoon of garlic powder, 1 teaspoon of onion powder, 1/2 teaspoon of black pepper, and 1/2 teaspoon of baking powder.
- Whisk the dry ingredients together until everything is evenly distributed. The baking powder helps create extra lightness and crunch in the crust.
- In a second shallow bowl, add the remaining buttermilk marinade (from the marinating bowl). You can also use fresh buttermilk mixed with another tablespoon of hot sauce for this second dip.
Step 4: Double-Dredge the Chicken
- Remove a chicken tender from the marinade and let any excess drip off briefly. Do not shake it completely dry; a little coating helps the flour stick.
- Dredge the tender in the seasoned flour mixture, pressing firmly so the flour adheres to all sides and the crevices of the chicken. Shake off the excess lightly.
- Dip the flour-coated tender back into the buttermilk mixture, fully coating it again.
- Return the tender to the flour mixture for a second coat, pressing firmly once more. This double-dredge builds up the thick, craggily crust that makes these tenders so satisfying.
- Place the dredged tenders on a clean baking sheet or wire rack. Let them rest for 10 to 15 minutes before frying. This resting time allows the coating to set and helps it stay on during frying.
- Repeat with all remaining chicken pieces.
Step 5: Heat the Oil
- Add enough vegetable oil to a heavy-bottomed Dutch oven or deep pot so that it comes about 2 to 3 inches (5 to 7.5 cm) up the sides. This is enough depth to submerge the tenders without needing a full pot of oil.
- Heat the oil over medium-high heat until it reaches 350°F (175°C). Use an instant-read thermometer to check the temperature accurately.
- If the oil is too cool, the chicken will absorb too much oil and turn out greasy. If the oil is too hot, the outside will burn before the inside cooks through. 350°F (175°C) is the sweet spot.
Step 6: Fry the Chicken Tenders
- Using tongs, carefully lower 3 to 4 tenders into the hot oil. Do not overcrowd the pot. Adding too many pieces at once drops the oil temperature and leads to uneven cooking.
- Fry the tenders for 5 to 7 minutes, turning once halfway through, until they are deep golden brown on the outside.
- Confirm doneness by inserting an instant-read thermometer into the thickest part of a tender. It should read at least 165°F (74°C).
- Use tongs or a spider strainer to remove the cooked tenders from the oil. Let any excess oil drip off briefly.
- Transfer the tenders to a wire rack set over a baking sheet, not paper towels. The rack allows steam to escape from underneath, keeping the bottoms crispy.
- Allow the oil to return to 350°F (175°C) between batches before adding the next round of chicken.
Step 7: Season Immediately and Serve
- As soon as each batch comes out of the oil, sprinkle lightly with a pinch of fine salt. Seasoning right away, while the surface is still hot and slightly oily, ensures the salt sticks and enhances the final flavor.
- Arrange the finished tenders on the rack or a platter and serve immediately with your chosen dipping sauces.
Read Also: Southern Fried Chicken Recipe
Tips for Success
A few simple adjustments can take these tenders from good to outstanding. These are the details that matter most.
- Let the tenders rest after dredging. That 10 to 15 minute rest on the rack before frying is not optional. It helps the coating bond to the chicken so it doesn’t slide off in the oil.
- Monitor oil temperature throughout. Between batches, the oil temperature drops. Always wait for it to return to 350°F (175°C) before adding the next batch.
- Don’t skip the cornstarch. Cornstarch in the dredge is what creates a glass-like crunch. All-flour coatings tend to be denser. The combination of the two gives you the best of both worlds.
- Drizzle a small amount of buttermilk marinade into the dry flour before dredging. This creates small, shaggy clumps in the flour that fry up into extra-crunchy bits on the surface of the tenders.
- Pat the chicken dry before marinating. Wet chicken leads to a watery marinade that doesn’t cling well. Patting dry first sets you up for better results.
- Adjust the cayenne to your heat preference. One teaspoon gives a solid kick. Reduce to 1/2 teaspoon for mild heat, or increase to 1 1/2 to 2 teaspoons for serious heat.
Another great pairing: this Comeback Sauce Recipe is one of the best dips for fried chicken tenders.
Serving Suggestions

Spicy chicken tenders are endlessly versatile and pair well with everything from classic sides to fresh, cooling accompaniments that balance the heat.
A creamy dipping sauce is almost mandatory. Classic ranch, honey mustard, and blue cheese dressing are the most popular choices. For extra heat, buffalo sauce turns these into something even more intense.
On the side, cooling and crunchy options work best. The richness of fried chicken calls for contrast.
- Creamy Coleslaw as a cool, crunchy contrast to the heat
- Crispy French Fries for a classic pairing
- Mexican Street Corn for a bold, smoky side
- Baked Beans for a hearty Southern spread
- Cilantro Lime Rice for a fresh, zesty base
- Pickles and sliced white bread, Nashville-style
- A simple green salad to lighten the meal
Variations to Try
Once you have the base recipe down, there are a lot of fun directions you can take it. Each variation changes the flavor profile while keeping the crispy technique intact.
- Nashville Hot Style. After frying, whisk together melted butter, cayenne pepper, brown sugar, garlic powder, and smoked paprika. Brush the warm tenders generously with this spicy glaze and serve over white bread with pickle slices.
- Honey Sriracha Tenders. Toss the hot tenders in a mixture of honey and sriracha for a sweet-spicy finish that’s completely addictive.
- Korean Gochujang Tenders. Add 1 tablespoon of gochujang paste to the buttermilk marinade. Finish with a drizzle of sesame oil and a sprinkle of sesame seeds.
- Extra Crispy Air Fryer Version. Skip the deep fry and cook in a preheated air fryer at 400°F (200°C) for 10 to 12 minutes, flipping halfway through. Spray generously with cooking spray before and during cooking.
- Gluten-Free Option. Substitute the all-purpose flour with a 1:1 gluten-free flour blend and ensure your hot sauce is certified gluten-free.
- Baked Spicy Tenders. Preheat the oven to 425°F (220°C). Place dredged tenders on a well-oiled preheated baking sheet and bake for 15 minutes per side, or until golden and crispy.
For something equally bold and satisfying, try this Spicy Chicken Chipotle Pasta Recipe.
Storage and Reheating
These tenders taste best fresh out of the oil, but they store well and reheat beautifully with the right method.
- Refrigerator. Store cooled tenders in an airtight container for up to 3 to 4 days.
- Freezer. Lay cooked tenders in a single layer on a baking sheet and freeze until solid. Transfer to a freezer-safe bag and store for up to 2 months.
- Reheating in the oven (best method). Preheat the oven to 400°F (200°C). Place tenders on a wire rack over a baking sheet and heat for 10 to 12 minutes until hot and re-crisped. This method restores most of the original crunch.
- Reheating in the air fryer. Set the air fryer to 375°F (190°C) and reheat tenders for 5 to 6 minutes, flipping once. This is the fastest way to restore crispiness.
- Avoid the microwave. Microwaving steams the coating and makes the tenders soft and rubbery. It works in a pinch for flavor but sacrifices texture.
Read Also: Spicy Chicken Nuggets Recipe
Nutritional Facts
The following estimates are based on one serving of approximately 3 to 4 tenders (roughly 1/4 of the total recipe), assuming a typical amount of oil absorption during frying.
| Nutrient | Per Serving |
|---|---|
| Calories | 420 kcal |
| Protein | 38g |
| Total Fat | 18g |
| Saturated Fat | 3g |
| Carbohydrates | 24g |
| Fiber | 1g |
| Sugar | 2g |
| Sodium | 850mg |
| Cholesterol | 115mg |
Note: Nutritional values are estimates and will vary based on the exact size of the chicken pieces, the amount of oil absorbed during frying, and specific brands of ingredients used. For precise dietary tracking, use a nutritional calculator with the exact ingredients and quantities from your preparation.
For a lighter chicken dish, try this Grilled Lemon Pepper Chicken Recipe.
Health Benefits of Key Ingredients
While these are an indulgent fried food, several ingredients in this recipe do offer genuine nutritional value.
Chicken tenders are an excellent source of lean protein, which is essential for muscle repair, immune function, and keeping you feeling full. A serving provides over 35 grams of protein.
Buttermilk is lower in fat than regular milk and contains probiotics that support gut health. It also provides calcium, phosphorus, and B vitamins.
Here are some key health highlights from this recipe:
- Chicken breast/tenders. High in lean protein, low in saturated fat, and a good source of niacin and selenium.
- Cayenne pepper. Contains capsaicin, a compound shown to support metabolism and reduce inflammation.
- Smoked paprika. Rich in antioxidants including vitamin A and carotenoids.
- Garlic powder. Derived from real garlic, which has well-documented antimicrobial and heart-supportive properties.
- Buttermilk. Provides calcium, vitamin B12, and beneficial bacteria that support digestive health.
Read Also: Blackened Ranch Pan Fried Chicken Thighs Recipe
Frequently Asked Questions
1. Can I use chicken breasts instead of chicken tenders?
Yes, absolutely. Slice boneless, skinless chicken breasts lengthwise into strips that are about 1/2 inch (1.25 cm) thick. They work just as well. The only difference is that chicken tenders have a naturally more tender texture because they come from a less-worked muscle. If using breast strips, the buttermilk marinade becomes even more important for achieving that same tenderness.
2. How long should I marinate the chicken?
A minimum of 2 hours is required for the buttermilk to tenderize the chicken and infuse the hot sauce flavor. Overnight (8 to 12 hours) delivers the best results. The chicken will not become mushy from extended marinating, thanks to the relatively mild acidity of buttermilk. Avoid marinating longer than 24 hours, as the texture can start to break down too much.
3. Can I make these in an air fryer instead of deep frying?
Yes, and they turn out surprisingly good. Preheat the air fryer to 400°F (200°C). Place the dredged tenders in a single layer and spray generously with cooking spray. Cook for 10 to 12 minutes, flipping halfway through. They won’t be quite as crispy as deep-fried, but the difference is minimal with a good spray of oil and adequate preheating.
4. How do I keep the coating from falling off?
Three steps are critical. First, pat the chicken completely dry before marinating so the buttermilk can cling properly. Second, let the dredged tenders rest on a rack for at least 10 to 15 minutes before frying, which allows the coating to set. Third, do not move the tenders around excessively in the oil. Let them fry undisturbed for the first 3 minutes before flipping.
5. What dipping sauces work best with spicy chicken tenders?
Ranch dressing and blue cheese are the most popular choices because their cool, creamy texture balances the heat. Honey mustard adds sweetness that plays well against the spice. For heat lovers, buffalo sauce or a sriracha mayo takes the flavor up another notch. A simple garlic aioli (mayonnaise with minced garlic and lemon juice) is also an excellent, easy option.
For more bold chicken inspiration, try this Spicy Chicken Sandwich Recipe.
Spicy Chicken Tenders
Equipment
- Large mixing bowl - For the marinade
- Two shallow bowls or dishes - For the flour dredge and buttermilk
- Heavy-bottomed Dutch oven or deep pot - For frying
- Instant-read thermometer - To check oil temp and chicken doneness
- Wire rack set over a baking sheet - For draining fried tenders
- Tongs or a spider strainer
- Paper towels
- Measuring cups and spoons
- Plastic wrap or a lid - To cover the marinating chicken
Ingredients
- 2 lbs chicken tenders - 900g, or chicken breasts sliced into 1/2-inch strips
- 1 cup buttermilk - 240ml
- 2 tablespoons hot sauce - such as Frank’s RedHot or Tabasco
- 1 teaspoon salt - for the marinade
- 1/2 teaspoon white pepper - for the marinade
- 1 1/2 cups all-purpose flour - 190g
- 1/4 cup cornstarch - 30g
- 1 1/2 teaspoons salt - for the dredge
- 1 teaspoon cayenne pepper
- 1 teaspoon smoked paprika
- 1 teaspoon garlic powder
- 1 teaspoon onion powder
- 1/2 teaspoon black pepper
- 1/2 teaspoon baking powder
- 2-3 cups vegetable oil - 480-720ml, or neutral frying oil
- Fine salt - for sprinkling after frying
Instructions
- Pat chicken completely dry with paper towels. If using chicken breasts, slice lengthwise into 1/2-inch thick strips.
- Whisk together buttermilk, hot sauce, salt, and white pepper in a large bowl. Add chicken and coat thoroughly. Cover and refrigerate for at least 2 hours or up to 12 hours.
- In a shallow bowl, whisk together flour, cornstarch, salt, cayenne, smoked paprika, garlic powder, onion powder, black pepper, and baking powder. Place the remaining buttermilk marinade in a second bowl.
- Remove chicken from marinade, letting excess drip off. Dredge in flour mixture, pressing firmly. Dip back into buttermilk, then dredge in flour again. Place on a wire rack and rest for 10-15 minutes.
- Heat oil in a Dutch oven to 350°F (175°C). Using tongs, fry 3-4 tenders at a time for 5-7 minutes, turning once, until golden brown and internal temperature reaches 165°F (74°C).
- Transfer cooked tenders to a wire rack to drain. Sprinkle with fine salt immediately. Allow oil to return to temperature between batches. Serve hot with your favorite dipping sauces.
Notes
- Let tenders rest for 10-15 minutes after dredging before frying. This allows the coating to set and prevents it from sliding off in the oil.
- Monitor oil temperature carefully between batches. Always wait for it to return to 350°F (175°C) before adding more chicken.
- Don’t skip the cornstarch in the dredge. It creates a lighter, glass-like crunch that all-flour coatings can’t achieve.
- Drizzle a small amount of buttermilk marinade into the dry flour before dredging to create shaggy clumps that fry into extra-crunchy bits.
- Adjust cayenne pepper to your heat preference: 1/2 teaspoon for mild, 1 teaspoon for medium, 1 1/2 to 2 teaspoons for serious heat.
- For Nashville Hot style, whisk melted butter with cayenne, brown sugar, garlic powder, and smoked paprika. Brush on warm tenders and serve with pickles.
- For a lighter version, air fry at 400°F (200°C) for 10-12 minutes, flipping halfway and spraying with cooking spray.
- Store cooled tenders in an airtight container in the refrigerator for up to 4 days. Reheat in the oven at 400°F for 10-12 minutes to restore crispiness.
- Freeze cooked tenders in a single layer on a baking sheet, then transfer to a freezer-safe bag for up to 2 months.
- Avoid microwaving leftovers, as it makes the coating soft and rubbery. The oven or air fryer are best for reheating.
Final Thoughts
This spicy chicken tenders recipe checks every box. The buttermilk marinade keeps the chicken juicy, the double-dredge builds a thick and crunchy crust, and the seasoning blend delivers real, well-rounded heat.
Once you try these, it’s hard to go back to store-bought. The technique isn’t complicated, and the results speak for themselves.
Give this recipe a try and let me know how it goes in the comments below. Did you go full heat or dial it back? Did you try the Nashville hot glaze version? Share your experience and tag a friend who needs these tenders in their life.
Recommended:
- Air Fryer Chicken Nuggets Recipe
- Chicken Fajita Recipe
- Buffalo Chicken Dip Recipe
- Bang Bang Sauce Recipe
- Chicken Tacos Recipe
- Fried Pickles Recipe
- Onion Rings Recipe
- Chipotle Chicken Recipe
- Crack Chicken Recipe
- Chicken Lettuce Wraps Recipe


