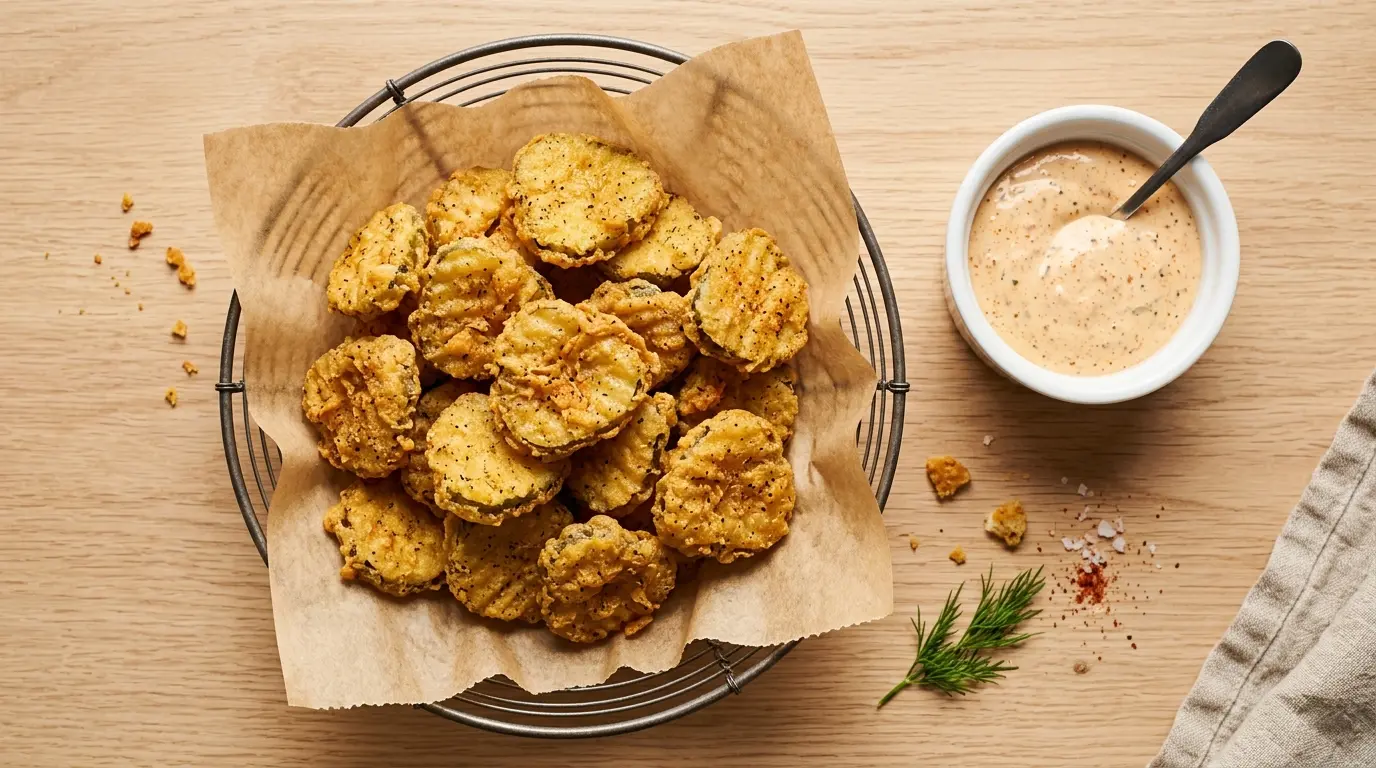
If you have ever bitten into a perfectly golden fried pickles recipe at a Southern diner or state fair, you already know the magic. That satisfying crunch on the outside, the tangy punch of dill on the inside, and the way the seasoned coating holds everything together — it is one of those snacks that genuinely stops conversation at the table.
The good news? You can make them at home in under 30 minutes, and they come out just as crispy as the restaurant version (maybe better).
The secret lies in two things: drying your pickle slices thoroughly before battering and keeping your oil at a consistent temperature throughout the fry. Skip either step and you risk soggy, batter-sliding disasters. Follow both and you get golden, crunchy perfection every single time.
This recipe uses a seasoned flour-and-cornmeal dredge — a classic Southern approach that creates a lighter, crispier coating than a heavy wet batter. The cornmeal adds a subtle texture that pure flour alone cannot deliver, and the blend of garlic powder, paprika, and cayenne gives every bite just the right amount of savory heat.
Serve them as a game day appetizer, a party snack, or a fun side dish alongside a backyard cookout spread. One thing is certain: once you set out a plate of these, they will not last long.
If you love crispy, golden appetizers as much as we do, you will also want to check out this Onion Rings Recipe — it uses a similar technique and is just as addictive.
Why You’ll Love This Fried Pickles Recipe
This recipe earns a permanent spot in your appetizer rotation for reasons that go well beyond just great flavor.
It is remarkably beginner-friendly. If you can set up a simple dredging station and maintain an oil temperature, you can nail these on your very first try.
The texture combination is genuinely hard to beat. You get that crunch from the seasoned coating and then the soft, briny pickle inside — it is a contrast that keeps you reaching for just one more.
The ingredients are pantry staples. You likely already have flour, cornmeal, garlic powder, paprika, and an egg sitting in your kitchen right now.
These are also incredibly fast. From start to finish, you are looking at about 25 minutes, which makes them a great last-minute appetizer when unexpected guests show up.
- The seasoned cornmeal-flour coating creates a noticeably crispier exterior than flour alone
- Dill pickle chips deliver the right amount of brine and tang in every bite
- The recipe is easily doubled or tripled for large gatherings
- They pair with almost any dipping sauce — ranch, comeback sauce, spicy mayo, or remoulade
- There is no deep fryer required — a heavy-bottomed pot or deep skillet works perfectly
- They are ready in about 25 minutes, making them one of the fastest crowd-pleasing appetizers around
Another favorite that disappears just as fast: Easy Nachos Recipe
Ingredients
This recipe uses a short list of simple, easy-to-find ingredients. The key players are the dill pickles (briny and tangy), the cornmeal (for crispiness), and the spice blend (for that Southern-style flavor that sets these apart from plain fried pickle recipes).
- 2 cups (about 200 g) dill pickle chips, well-drained
- 1 cup (125 g) all-purpose flour, divided
- ½ cup (80 g) yellow cornmeal
- 1 teaspoon garlic powder
- 1 teaspoon onion powder
- ½ teaspoon smoked paprika
- ½ teaspoon cayenne pepper (reduce to ¼ tsp for milder flavor)
- ½ teaspoon fine sea salt
- ½ teaspoon black pepper
- 1 large egg
- ½ cup (120 ml) buttermilk (or whole milk with 1 tsp white vinegar, let sit 5 minutes)
- 1 teaspoon hot sauce (such as Frank’s RedHot or Tabasco), optional
- 2 to 3 cups (480–720 ml) vegetable oil or another neutral high-heat oil, for frying
For the dipping sauce (optional but highly recommended):
- ½ cup (120 ml) mayonnaise
- 2 tablespoons ketchup
- 1 tablespoon prepared horseradish
- ½ teaspoon Cajun seasoning
You might also enjoy: Comeback Sauce Recipe
Kitchen Equipment Needed
You do not need any specialized equipment to make these at home. A heavy-bottomed pot and a reliable thermometer are the two most important tools — they give you control over the oil temperature, which is what makes or breaks the crispiness.
- Large heavy-bottomed pot or deep skillet (at least 3 quarts / 2.8 liters capacity)
- Deep-fry thermometer or instant-read thermometer
- 2 to 3 shallow bowls or rimmed plates for dredging
- Wire rack set over a baking sheet (for draining)
- Paper towels
- Slotted spoon or spider strainer
- Tongs
- Baking sheet lined with parchment paper
Read Also: Easy Pigs in a Blanket Recipe
Recommended Products for This Recipe
These are products that will genuinely improve your results — selected based on quality, performance, and how well they fit this specific recipe.
1. Lodge Cast Iron Deep Skillet
Cast iron retains heat exceptionally well, which means your oil temperature recovers quickly between batches instead of dropping and leaving your pickles greasy. It is also naturally non-stick once seasoned, making cleanup simpler. This is one of the most useful pieces of kitchen equipment you can own.
2. ThermoPro Digital Instant-Read Thermometer
Maintaining oil between 350°F and 375°F (175°C–190°C) is the single most important factor in crispy, non-greasy fried pickles. This thermometer gives you an accurate read in seconds so you can adjust your burner as needed and never guess. A clip-on version that attaches to the pot rim is especially convenient.
3. Bob’s Red Mill Fine Yellow Cornmeal
The cornmeal in this recipe is what gives the coating its signature crispness and a slightly earthy flavor that pure flour cannot replicate. A finely ground, quality cornmeal integrates smoothly into the dredge without creating a gritty texture. Bob’s Red Mill is a consistently reliable brand.
4. Vlasic Dill Pickle Chips
The pickle you choose matters more than people realize. A firm, briny dill pickle chip holds up better during frying than a softer variety, and it delivers that classic tangy flavor the coating is designed to complement. Vlasic dill chips are a widely available, consistently crunchy option that works beautifully in this recipe.
For another easy appetizer idea, this Seven Layer Dip Recipe is always a hit at parties.
Step-by-Step Instructions
1. Drain and Dry the Pickles
- Open your jar of dill pickle chips and pour the entire contents into a colander set over the sink.
- Allow the pickles to drain for at least 2 to 3 minutes, gently shaking the colander to help release excess liquid.
- Lay several layers of paper towels on a clean baking sheet or cutting board.
- Spread the drained pickle chips out in a single layer on the paper towels.
- Lay additional paper towels on top and press down gently but firmly to absorb as much moisture as possible.
- Let the pickles sit and continue drying for at least 5 to 10 minutes. The drier your pickles are, the better the coating will stick and the crispier the result will be. This is the most commonly skipped step and the most important one.
2. Heat the Oil
- Pour 2 to 3 cups (480–720 ml) of vegetable oil into your heavy-bottomed pot or deep skillet. The oil should come up about 2 inches (5 cm) in depth — enough to fully submerge the pickle chips.
- Clip your thermometer to the side of the pot, making sure the probe sits in the middle of the oil and does not touch the bottom or sides.
- Heat the oil over medium-high heat. This typically takes 5 to 8 minutes depending on your stove and pot.
- Target temperature is 350°F to 375°F (175°C to 190°C). Do not start frying until the oil reaches this range.
- While the oil heats, move on to preparing your dredging stations — this way no time is wasted.
3. Make the Dipping Sauce (Optional)
- In a small bowl, combine ½ cup (120 ml) mayonnaise, 2 tablespoons ketchup, 1 tablespoon prepared horseradish, and ½ teaspoon Cajun seasoning.
- Stir everything together until fully combined and smooth.
- Taste and adjust — add more horseradish for heat, more ketchup for sweetness, or more Cajun seasoning for depth.
- Cover and refrigerate until ready to serve. The sauce can be made up to 3 days in advance.
4. Set Up Your Dredging Stations
- In a wide, shallow bowl (Bowl #1), combine ½ cup (62 g) of the all-purpose flour with the cornmeal, garlic powder, onion powder, smoked paprika, cayenne pepper, salt, and black pepper. Whisk together until fully blended and no lumps remain.
- In a second shallow bowl (Bowl #2), whisk together the egg, buttermilk, and hot sauce (if using) until smooth and fully combined.
- Place the remaining ½ cup (62 g) of plain all-purpose flour in a third shallow bowl (Bowl #3). This first flour dip is the “anchor” coat that helps the wet mixture cling to the pickle.
- Arrange your bowls in this order: plain flour (Bowl #3) → egg-buttermilk mixture (Bowl #2) → seasoned cornmeal-flour blend (Bowl #1).
- Set a parchment-lined baking sheet at the end of the dredging line to hold the coated pickles before frying.
5. Dredge the Pickles
- Take a dried pickle chip and dip it first into the plain flour (Bowl #3). Press gently to coat both sides, then shake off any excess — you want a very light dusting.
- Next, dip the flour-coated pickle into the egg-buttermilk mixture (Bowl #2). Let the excess drip off for a second or two.
- Finally, press the pickle firmly into the seasoned cornmeal-flour blend (Bowl #1). Use your fingers to press the coating onto both sides and the edges. Shake off any loose excess.
- Place the coated pickle on the parchment-lined baking sheet. Repeat with the remaining pickles.
- Work in batches — coat only as many pickles as you can fry in one batch (about 10 to 12 chips, depending on the size of your pot).
- Tip: Use one hand for the wet dip and the other hand for the dry coats. This keeps your fingers from getting clumped with thick layers of batter.
6. Fry the Pickles
- Once your oil reaches 350°F to 375°F (175°C–190°C), carefully lower 8 to 12 pickle chips into the oil using your slotted spoon or spider strainer. Do not drop them in from a height — lower them gently to avoid oil splatter.
- Do not overcrowd the pot. Overcrowding drops the oil temperature rapidly and causes steaming instead of frying, which leads to soggy, greasy pickles. If your pot is smaller, fry in smaller batches of 6 to 8.
- Fry for 1 to 2 minutes per batch, flipping the pickles once halfway through with your slotted spoon or tongs. The pickles will float, so make sure both sides get equal time in the oil.
- Watch for a deep golden-brown color on both sides. The coating should look crisp and fully set — not pale or wet in any spot.
- Monitor the thermometer between batches. The oil temperature will drop each time you add pickles. Allow it to return to 350°F to 375°F (175°C–190°C) before starting the next batch.
7. Drain and Serve
- Remove the fried pickles using your slotted spoon and transfer them to a wire rack set over a baking sheet. A wire rack keeps air circulating beneath them so the bottoms stay crispy — paper towels alone trap steam and can soften the coating.
- If you do not have a wire rack, a paper towel-lined plate works as a second option, but move the pickles quickly to serving and do not let them sit.
- Season lightly with a pinch of salt immediately after removing from the oil, while they are still hot.
- Serve right away with the dipping sauce, ranch dressing, or your favorite condiment. Fried pickles are best eaten within a few minutes of frying while the coating is still at peak crispiness.
For another crispy crowd-pleaser, check out this Easy Fried Chicken Recipe
Tips for Success
These practical tips address the most common mistakes and give you the best shot at perfectly crispy pickles on your first attempt.
- Dry the pickles thoroughly. This is not optional. Any moisture left on the pickle surface will cause the coating to slide off during frying and create steam pockets in the oil. A full 5 to 10 minutes of patting dry makes a real difference.
- Use a thermometer. Oil temperature is everything. Too low and the pickles absorb oil and turn greasy. Too high and the coating burns before the inside heats through. Keep it between 350°F and 375°F (175°C–190°C) at all times.
- Do not skip the first plain flour dip. That initial light dusting of flour helps the wet egg-buttermilk layer cling to the pickle surface, which gives the final seasoned coating something to grip. Without it, the batter tends to peel off.
- Fry in small batches. Crowding the pot is the fastest way to ruin fried pickles. It drops the oil temperature, traps steam, and results in pale, soft, oily chips instead of golden and crispy ones.
- Let the oil recover between batches. Give the oil a full minute or two to come back up to temperature before adding the next batch. Check the thermometer every time.
- Serve immediately. Fried pickles are at their absolute best within 5 minutes of coming out of the oil. Plan accordingly — have your dipping sauces ready and your guests at the table before you start frying the last batch.
Read Also: Homemade Tortilla Chips Recipe
Serving Suggestions
Fried pickles are endlessly versatile — they work just as well as a casual snack as they do as a proper appetizer course. The key is pairing them with dipping sauces and sides that complement the tangy, salty flavor of the pickles.
Classic pairings include ranch dressing (the most popular choice), the spicy Cajun sauce in this recipe, a Comeback Sauce, or a creamy garlic aioli. Any sauce with creaminess and a little acid works beautifully against the crispy coating.
- Serve alongside Southern Fried Chicken for a full Southern-style spread
- Add them to a burger platter as a crispy side in place of traditional fries
- Pair with Classic Deviled Eggs and Loaded Nachos for a game day appetizer table
- Set them out alongside a Cheese Ball for party spreads and holiday gatherings
- Serve as a side dish next to Shrimp and Grits for a Southern comfort food dinner
- Arrange on a platter with ranch, spicy mayo, and the Cajun dipping sauce to let guests mix and match
Variations to Try
Once you have the classic version down, these variations are a natural next step. Each one builds on the same base technique while introducing a different flavor profile.
- Spicy fried pickles: Increase the cayenne to 1 full teaspoon and add ½ teaspoon of chili powder to the dredge. Serve with a cool ranch or blue cheese dip to balance the heat.
- Bread and butter pickle chips: Swap dill pickle chips for bread and butter pickles for a sweeter, milder flavor that pairs especially well with spicy dipping sauces.
- Panko-coated: Replace the cornmeal with an equal amount of panko breadcrumbs for an even crunchier, more textured exterior — a popular restaurant-style variation.
- Pickle spears: Use whole dill pickle spears instead of chips for a heartier, fork-friendly version. Increase the frying time to 2 to 3 minutes and flip halfway through.
- Air fryer version: Coat the pickles using the same dredge, spray generously with cooking spray, and air fry at 400°F (200°C) for 8 to 10 minutes, flipping once at the 4-minute mark. The texture is different but still satisfying.
- Buttermilk batter: For a thicker, pub-style coating, skip the dry first dip and dredge only in buttermilk followed by the seasoned flour-cornmeal blend. Let the coated pickles rest for 5 minutes before frying to allow the batter to set.
Another fun appetizer variation you might love: Air Fryer Egg Rolls Recipe
Storage and Reheating
Fried pickles are genuinely at their best fresh from the oil. That said, leftovers can be revived with the right reheating method — avoid the microwave at all costs.
- Refrigerating: Allow leftover fried pickles to cool completely, then transfer to an airtight container lined with paper towels. Store in the refrigerator for up to 2 days.
- Freezing: Not recommended. The high moisture content of pickles causes the coating to become soggy and separate after freezing and thawing.
- Reheating in the oven: Spread the cold fried pickles in a single layer on a wire rack set over a baking sheet. Bake at 400°F (200°C) for 8 to 10 minutes until the coating is hot and crispy again.
- Reheating in the air fryer: Place cold pickles in a single layer in the air fryer basket. Air fry at 375°F (190°C) for 4 to 6 minutes, flipping once halfway through. This is the best method for restoring crispiness.
- Avoid stacking: Whether storing or reheating, always keep the pickles in a single layer. Stacking traps moisture and speeds up sogginess significantly.
For another crispy snack that stores and reheats beautifully, try this Air Fryer French Fries Recipe
Nutritional Facts
The following values are estimates based on a serving size of approximately 8 to 10 fried pickle chips (one quarter of this recipe). Actual values will vary depending on the specific brands of ingredients used, how much oil the pickles absorb during frying, and your exact dipping sauce portions.
| Nutrient | Per Serving (approx.) |
|---|---|
| Calories | 280–320 kcal |
| Total Carbohydrates | 32 g |
| Protein | 6 g |
| Total Fat | 14–16 g |
| Saturated Fat | 2 g |
| Cholesterol | 45 mg |
| Sodium | 850–1,100 mg (primarily from the pickles themselves) |
| Dietary Fiber | 2 g |
| Sugar | 1 g |
| Vitamin A | 4% DV |
| Calcium | 6% DV |
| Iron | 10% DV |
The sodium content in this dish comes largely from the pickles themselves rather than added salt in the coating, which is worth keeping in mind if you are monitoring sodium intake. Choosing a lower-sodium pickle variety can significantly reduce the overall sodium count.
You might also enjoy: Broccoli Salad Recipe
Health Benefits of Key Ingredients
While fried pickles are an indulgent treat rather than a health food, a couple of the key ingredients do bring some genuine nutritional value to the table.
Dill pickles are low in calories and contain small amounts of Vitamin K, which plays a role in blood clotting and bone metabolism. They also provide electrolytes like sodium and potassium, which is part of why pickle juice has gained popularity as a post-workout recovery drink among athletes.
The egg in the dredge supplies complete protein along with essential B vitamins, choline, and fat-soluble vitamins A and D, all packed into a single ingredient that does triple duty here as a coating binder.
- Dill: The herb used to flavor dill pickles contains antioxidant compounds and has traditionally been used to support digestive health
- Garlic powder: Derived from real garlic, which contains allicin — a compound widely studied for its potential antimicrobial and cardiovascular support properties
- Paprika: A good source of Vitamin A and contains capsaicin compounds, which have been researched for their potential anti-inflammatory effects
- Cornmeal: Provides a modest amount of B vitamins, iron, and dietary fiber compared to refined white flour alone
- Egg: Supplies all nine essential amino acids, making it a complete protein source, along with choline for brain and liver health
Read Also: Potato Salad Recipe
Frequently Asked Questions
1. What kind of pickles are best for fried pickles?
Dill pickle chips (pre-sliced rounds) are the classic and most widely used option for a fried pickles recipe. They have the right balance of brine, tanginess, and firmness to hold up during frying without becoming mushy. Bread and butter pickles can also be used for a sweeter flavor profile, though they pair best with spicy coatings or sauces that offset the sweetness.
2. Why are my fried pickles soggy?
The two most common culprits are excess moisture and oil temperature. Pickles that have not been thoroughly dried before dredging release steam into the coating during frying, which prevents crisping and causes the batter to separate. Oil that is too cool (below 350°F / 175°C) absorbs into the coating rather than immediately crisping it. Always dry thoroughly and use a thermometer.
3. Can I make fried pickles in the air fryer?
Yes, with a few adjustments. Use the same seasoned dredge, but spray the coated pickles generously with cooking spray on both sides before placing them in the air fryer basket. Air fry at 400°F (200°C) for 8 to 10 minutes, flipping once at the halfway point. The texture will be slightly different from deep-fried — crispier on the raised edges and a little softer in the center — but still very satisfying.
4. How do I keep fried pickles from getting soggy after frying?
Transfer them immediately to a wire rack rather than a paper towel-lined plate. Wire racks allow air to circulate underneath so the bottoms stay crispy instead of steaming against a flat surface. Serve them quickly — fried pickles start to lose their crunch after about 10 minutes.
5. Can I prepare any part of this recipe ahead of time?
Yes, the dipping sauce can be made up to 3 days in advance and refrigerated in a covered container. The dry dredge mixture can also be combined and stored in an airtight container for up to a week. However, the pickles themselves should always be coated and fried fresh — pre-battering and refrigerating leads to a wet, gummy coating that will not crisp properly.
For another quick and easy appetizer that can be partially prepped ahead, this Classic Bruschetta Recipe is a great option.
Final Thoughts
Fried pickles are one of those recipes that seem more complicated than they actually are. Once you understand the two core principles — dry pickles and consistent oil temperature — the rest comes together fast.
This classic Southern-style version with its seasoned cornmeal-flour coating is the standard that most people are familiar with and love for good reason. It delivers maximum crunch, bold flavor, and that unmistakable tangy bite in every single chip.
Give this fried pickles recipe a try at your next gathering, and do not be surprised when the plate is empty before you even sit down.
If you make these, leave a comment below and let us know how they turned out. We would love to hear which dipping sauce you went with, and of course, any fun variations you tried!
Recommended:
- Southern Fried Chicken Recipe
- Onion Rings Recipe
- Buffalo Chicken Dip Recipe
- Classic Deviled Eggs Recipe
- Easy Guacamole Recipe
- Cheese Ball Recipe
- Loaded Nachos Recipe
- Chicken Tenders Recipe
- Bang Bang Sauce Recipe
- Sausage Balls Recipe


