A great cucumber raita recipe is one of those things that transforms an entire meal. It’s creamy, herby, faintly spiced, and bracingly cool, making it the perfect foil for anything hot, rich, or heavily spiced on the plate.
Raita is a classic Indian yogurt-based condiment that has been served alongside curries, biryanis, and grilled meats for centuries. The cucumber version is arguably the most popular, and for good reason: the freshness of the grated cucumber combined with tangy yogurt, a pinch of cumin, and fresh herbs creates something that feels both humble and incredibly satisfying.
What makes this version stand out is the technique. Salting and squeezing out the cucumber before adding it to the yogurt means your raita stays thick and creamy rather than watery. That one small step makes all the difference, and most recipes skip it entirely.
This is a no-cook recipe that comes together in under 15 minutes, making it ideal for busy weeknights when you need something fresh and cooling fast.
If you love Indian-inspired sides, you might also enjoy this Jeera Rice Recipe that pairs beautifully with virtually every curry on the table.
Why You’ll Love This Cucumber Raita Recipe
This cucumber raita recipe earns a permanent spot in your recipe rotation for so many reasons.
It takes less than 15 minutes to make and requires zero cooking. All you need is a bowl, a grater, and a few pantry staples that you likely already have on hand.
It is naturally gluten-free, vegetarian, and low in calories, making it a great option for a wide variety of dietary needs. Unlike heavy cream-based sauces, raita feels light and refreshing even when you eat a generous scoop.
The cooling effect of yogurt and cucumber on spicy food is genuinely functional. Yogurt contains casein proteins that help neutralize capsaicin, which is the compound that makes chiles hot.
It is incredibly versatile. While raita is traditionally served with Indian food, it doubles as a dip for vegetables, a sauce for grilled chicken, or even a dressing for a simple salad.
The flavors improve as it sits, so you can make it ahead of time without worrying about quality loss. In fact, a raita made an hour before serving is almost always better than one made right before the meal.
Here is why readers keep coming back to this recipe:
- Quick and easy: Ready in 15 minutes with no cooking required
- Naturally cooling: Yogurt and cucumber work together to tame heat
- Versatile: Works as a dip, condiment, sauce, or dressing
- Make-ahead friendly: Tastes even better after resting in the fridge
- Minimal ingredients: Just a handful of fresh, simple components
- Crowd-pleasing: Loved by kids and adults alike
For another creamy, herbaceous dip perfect for entertaining, try this Easy Hummus Recipe alongside your raita spread.
Ingredients
This cucumber raita recipe uses simple, fresh ingredients that work together seamlessly. The most important element is the yogurt: use full-fat plain yogurt for the creamiest, most satisfying result. Greek yogurt works well and gives a thicker consistency, while regular whole-milk yogurt delivers a slightly looser, more traditional texture. Avoid low-fat versions, which can taste bland and watery.
- 1 large cucumber (about 300g / 10.5 oz), peeled and grated
- 1/2 tsp (2.5g) fine salt, divided (for salting cucumber and seasoning)
- 2 cups (480g) full-fat plain yogurt (Greek or regular)
- 1 clove garlic, finely minced or grated
- 2 tbsp (8g) fresh cilantro, finely chopped
- 2 tbsp (8g) fresh mint leaves, finely chopped
- 1/2 tsp (1.2g) ground cumin
- 1/4 tsp (0.6g) ground coriander (optional but recommended)
- 1/4 tsp (0.5g) black pepper, freshly ground
- 1/4 tsp (0.6g) chaat masala (optional, for an extra tangy kick)
- Pinch of cayenne pepper or red chili powder (optional, for heat)
- Fresh mint sprigs and a dusting of cumin or paprika, for garnish
Also needed for serving: A drizzle of cold-pressed extra virgin olive oil (optional but adds richness)
This pairs wonderfully alongside a bowl of Basmati Rice for a complete and satisfying Indian-inspired spread.
Kitchen Equipment Needed
You do not need any special equipment to make this cucumber raita recipe. A standard box grater will work perfectly for the cucumber, though a food processor with a grating attachment makes quick work of it if you are making a larger batch. A cheesecloth or clean kitchen towel is ideal for squeezing out the cucumber moisture, but you can also use your hands with a clean towel.
- Box grater or food processor with grating disc
- Large mixing bowl
- Fine mesh strainer or cheesecloth for draining cucumber
- Sharp knife and cutting board
- Measuring spoons
- Silicone spatula or large spoon for mixing
- Small serving bowl
- Garlic press or microplane (optional, for mincing garlic finely)
Read Also: Tzatziki Sauce Recipe
Recommended Products for This Recipe
These are products I genuinely recommend based on quality and how much of a difference they make in the final result. Each one solves a real problem or elevates the dish in a meaningful way.
1. Full-Fat Organic Plain Yogurt
The yogurt is the backbone of this recipe, so the quality matters more than almost anything else. A high-quality full-fat yogurt will be richer, creamier, and have a better tang that makes the raita taste restaurant-worthy.
2. Stainless Steel Box Grater with Non-Slip Base
A sturdy, sharp grater makes grating cucumber fast and safe. Look for one with a non-slip base so it stays put on the counter, and multiple grating surfaces so you can choose between fine and coarse textures depending on your preference.
3. Chaat Masala Spice Blend
This tangy, earthy spice blend is the secret weapon in an elevated raita. It adds a slightly sour, savory depth that takes the flavors from good to exceptional. A small pinch goes a long way.
4. Organic Whole Cumin Seeds (for Toasting)
Toasting whole cumin seeds and using them as a garnish adds a nutty, aromatic dimension that pre-ground cumin simply cannot match. Keep a jar on hand: you will find endless uses for them.
5. Elegant Ceramic Serving Bowl Set
Raita deserves a beautiful presentation. A set of small, elegant ceramic bowls makes serving easy and makes the dish look polished and intentional on the table.
You might also enjoy: Chicken Tikka Masala Recipe
Step-by-Step Instructions
Step 1: Prepare the Cucumber
- Wash the cucumber thoroughly under cold running water and pat it dry with a clean towel.
- Using a vegetable peeler, remove the skin from the cucumber entirely. The skin can add a slightly bitter note and an unpleasant texture in raita, so removing it gives a cleaner, milder flavor.
- Cut the peeled cucumber in half lengthwise. Use a small spoon or melon baller to scoop out the seeds and watery pulp from the center of each half. Removing the seeds reduces excess moisture significantly and helps keep your raita thick and creamy rather than watery.
- Using the large holes of a box grater, grate both cucumber halves into a bowl. You should end up with approximately 1 cup (about 150g) of grated cucumber.
- Transfer the grated cucumber to a fine mesh strainer or a piece of cheesecloth set over a bowl. Sprinkle 1/4 tsp of the fine salt over the cucumber and toss gently to coat. Let the cucumber sit and drain for 10 full minutes. The salt draws out the moisture through osmosis.
- After 10 minutes, gather the cheesecloth or press the cucumber firmly into the strainer with the back of a spoon to squeeze out as much liquid as possible. You may be surprised how much water comes out. Discard the liquid. The squeezed cucumber should feel almost dry to the touch.
Step 2: Prepare the Aromatics and Herbs
- Peel one clove of garlic and mince it as finely as possible, or use a microplane grater to grate it directly into the yogurt bowl. Finely grated garlic blends more smoothly into the raita and distributes flavor evenly without any harsh chunks.
- Rinse the fresh cilantro and fresh mint under cold water and shake off the excess moisture. Pat dry with a paper towel.
- Stack the mint leaves and roll them tightly into a cigar shape, then slice thinly crosswise to create thin ribbons. This technique, called chiffonade, keeps the mint from bruising and turning dark. Then chop the ribbons once or twice more until you have finely chopped mint.
- Finely chop the cilantro, including the tender upper stems, which contain just as much flavor as the leaves.
- Measure out 2 tablespoons of each herb and set aside.
Step 3: Toast the Cumin (Optional but Recommended)
- Heat a small dry skillet over medium heat. Do not add any oil.
- Add 1/2 tsp of ground cumin to the dry pan and stir constantly with a spatula or wooden spoon for about 30 to 45 seconds, until the cumin smells fragrant and slightly nutty. Watch carefully: ground cumin can go from perfectly toasted to burned in seconds.
- Remove from heat immediately and transfer the toasted cumin to a small bowl to cool. Toasting activates and intensifies the flavor compounds in the spice, giving your raita a far more complex, aromatic profile than simply using cumin straight from the jar.
Step 4: Mix the Yogurt Base
- Spoon 2 cups (480g) of full-fat plain yogurt into a large mixing bowl. If you are using Greek yogurt and want a slightly looser consistency, you can thin it with 1 to 2 tablespoons of cold water or whole milk and stir until smooth.
- Add the finely minced or grated garlic to the yogurt.
- Add the toasted ground cumin, ground coriander, freshly ground black pepper, and the remaining 1/4 tsp of fine salt.
- If using, add a pinch of cayenne pepper or red chili powder for a gentle heat, and the chaat masala for tanginess.
- Stir all the seasonings into the yogurt thoroughly using a silicone spatula or large spoon, mixing until the yogurt is uniformly spiced. Taste the seasoned yogurt base at this point and adjust salt or spices as needed.
Step 5: Combine Everything
- Add the drained, squeezed cucumber to the seasoned yogurt mixture.
- Add the chopped cilantro and chopped mint.
- Fold everything together gently with a spatula. Avoid overmixing, which can break down the yogurt and make it thin. You want to just bring all the ingredients together with gentle folds.
- Taste the raita and adjust seasoning: add more salt if it tastes flat, more cumin if it needs depth, or a tiny pinch of cayenne if you want more warmth.
Step 6: Rest and Garnish
- Cover the bowl with plastic wrap or transfer the raita to a lidded container. Refrigerate for at least 15 to 20 minutes before serving. This resting period is important: it allows the flavors to meld and the herbs and spices to infuse throughout the yogurt, resulting in a more cohesive, rounded flavor.
- Just before serving, give the raita a gentle stir.
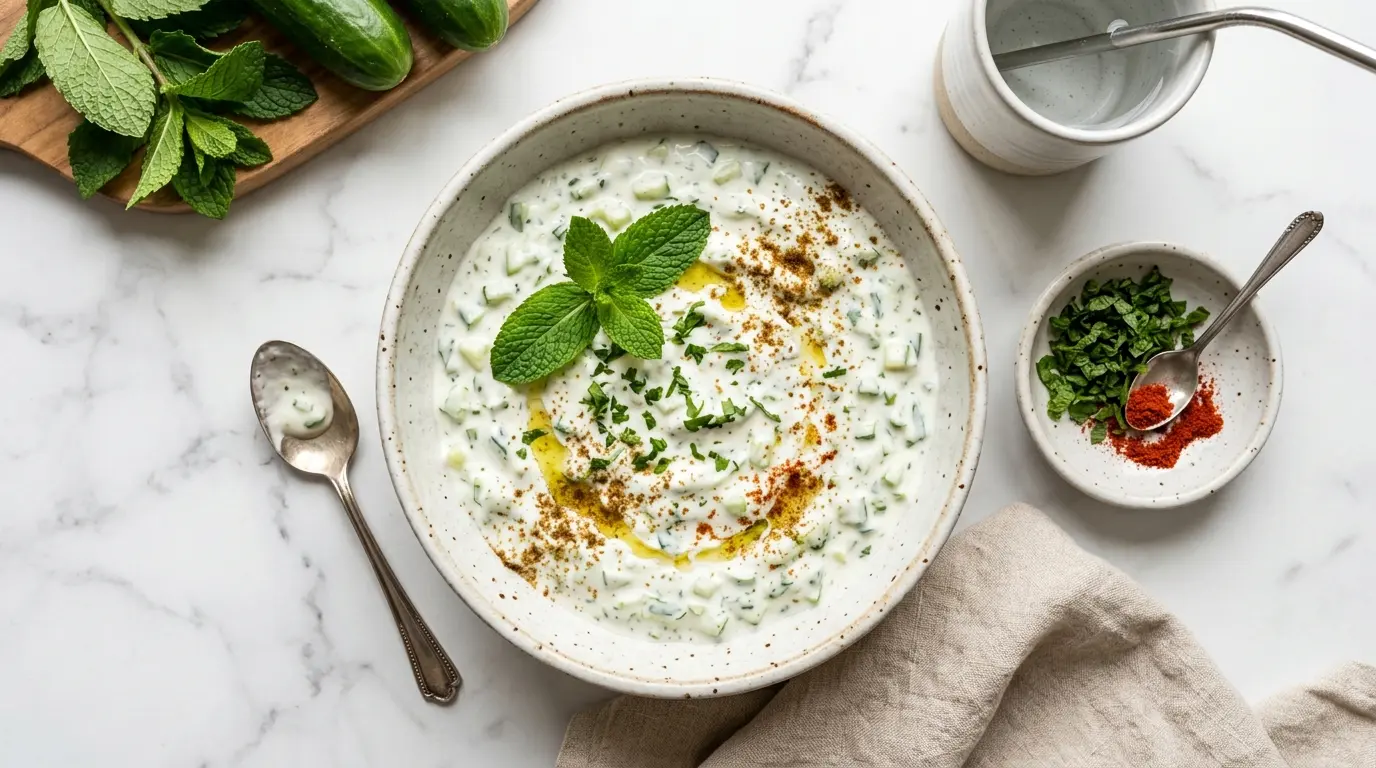
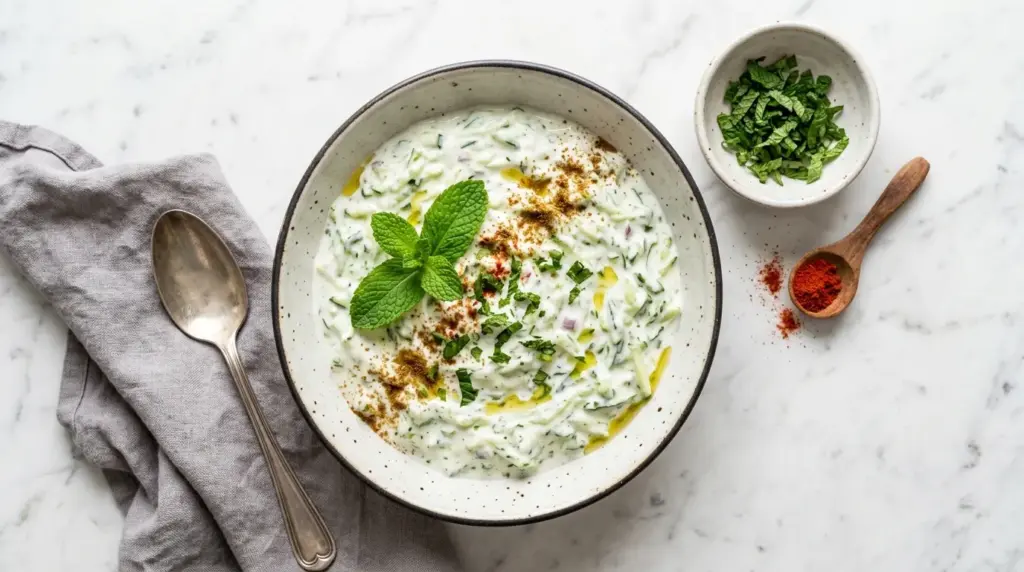
- Transfer to a clean serving bowl. Garnish with a sprig or two of fresh mint, a light dusting of ground cumin or paprika for color, and optionally a very light drizzle of olive oil for a glossy finish.
- Serve immediately, chilled.
Read Also: Chicken Korma Recipe
Tips for Success
These small but important details will take your cucumber raita recipe from good to genuinely great every single time. The most impactful one is without a doubt the salting and draining step: skipping it is the number one reason raita turns out watery and disappointing.
- Always salt and drain the cucumber. Grated cucumber contains a remarkable amount of water. Even five minutes of salting and squeezing will make a visible difference in the thickness of your raita.
- Use full-fat yogurt. Low-fat or fat-free yogurt lacks the richness and body to carry the flavors properly. Full-fat yogurt also holds its texture much better after mixing.
- Toast your cumin. This step takes less than a minute and elevates the flavor significantly. It is one of those small techniques that makes a big difference.
- Grate the garlic, do not chop it. A finely grated clove distributes evenly and eliminates any risk of biting into a sharp raw garlic chunk.
- Rest before serving. At least 15 minutes in the fridge allows the flavors to bloom and merge. Overnight raita, in the right conditions, is exceptional.
- Adjust the herbs to your taste. Some people love more mint; others prefer all cilantro. The recipe is forgiving, so adjust freely based on personal preference.
- Keep it cold. Raita is at its best when served very cold. Keep it in the fridge right up until serving time.
This technique also works beautifully in the Cucumber Gazpacho Recipe, which uses a similar idea of maximizing cucumber freshness.
Serving Suggestions
Cucumber raita is one of the most versatile condiments you can have in the fridge. Its cool, creamy character makes it a natural companion to anything rich, spicy, or smoky, and it works just as well at a casual weeknight dinner as it does at a dinner party spread.
Raita is the traditional accompaniment to Indian curries, biryanis, and pilafs, where it acts as a cooling counterpoint to the heat of the main dish. But it travels beautifully beyond Indian cuisine.
Here are some excellent ways to serve it:
- Alongside Chicken Curry or Authentic Butter Chicken as a classic, traditional pairing
- Served next to Tandoori Chicken to balance the smoky, charred flavors
- As a dipping sauce with warm Garlic Naan Bread or pita
- Spooned over a bowl of Jeera Rice for a simple, satisfying vegetarian meal
- As a fresh dip alongside crudites, pita chips, or crackers at a party
- Drizzled over grilled lamb chops or kebabs
- Used as a cooling sauce in wraps and flatbreads with roasted vegetables
- Paired with spiced lentils or chickpea dishes
The key to serving raita well is temperature: always serve it cold, straight from the fridge, right before the meal.
Another great cooling companion on a warm day is this Yogurt Smoothie Recipe, which uses similar creamy yogurt as its base.
Variations to Try
The classic cucumber version is the most popular raita, but once you understand the basic formula, you can adapt it endlessly. The structure is the same in every version: seasoned yogurt, a fresh vegetable or fruit, herbs, and warm spices. Below are some of the most beloved regional and creative variations to explore.
- Boondi Raita: Replace the cucumber with boondi, which are tiny crispy fried chickpea flour balls. Let them soak in the yogurt for a few minutes to soften slightly before serving.
- Onion Raita: Swap the cucumber for finely diced red onion, which adds a sharper, more assertive flavor. A few fresh green chiles make this version especially bold.
- Mint Raita (Pudina Raita): Skip the cucumber entirely and blend the yogurt with a generous handful of fresh mint, a squeeze of lime, and cumin. This version is incredibly refreshing.
- Tomato Raita: Use seeded, finely diced ripe tomato in place of cucumber. Add a pinch of chaat masala and a green chili for a tangy, lively variation.
- Beetroot Raita: Stir in finely grated roasted or boiled beet for a vibrantly colored, slightly earthy raita with a stunning deep pink hue.
- Pineapple or Mango Raita: Fold in small pieces of fresh pineapple or ripe mango for a sweet-savory version that pairs especially well with spiced rice dishes.
- Spinach Raita (Palak Raita): Blanch and finely chop fresh spinach, squeeze out all moisture, and fold into seasoned yogurt. Earthy, nutritious, and deeply green.
Read Also: Mulligatawny Soup Recipe
Storage and Reheating
Cucumber raita is a fresh, chilled condiment and should always be stored properly to maintain its texture and food safety. Thankfully, it stores well and is one of the better make-ahead components in an Indian spread.
Keep these storage guidelines in mind:
- Refrigerator: Store raita in an airtight container in the refrigerator for up to 2 to 3 days. After the first day, it may become slightly more liquid as the cucumber continues to release moisture. Give it a good stir before serving, and drain off any pooled liquid if necessary.
- Do not freeze: Freezing raita is not recommended. Yogurt separates and becomes grainy when frozen and thawed, and the cucumber becomes watery and soft. Always make raita fresh or within a few days of serving.
- Make ahead: You can prepare raita up to 24 hours in advance and store it covered in the fridge. The flavors will deepen and improve with a longer rest.
- No reheating needed: Raita is always served cold. Do not microwave or heat it; the yogurt will curdle.
- Tip: If you know you are making it a day ahead, store the drained cucumber separately and fold it into the seasoned yogurt within an hour or two of serving to keep the texture at its best.
This Fruit Salad Recipe is another great make-ahead dish that stays fresh and vibrant when properly stored, just like this raita.
Nutritional Facts
The following nutritional information is an estimate per serving (approximately 1/2 cup / 120g), based on the use of full-fat plain yogurt. Values may vary depending on the specific yogurt brand and any optional additions.
| Nutrient | Per Serving (approx.) |
|---|---|
| Calories | 80 kcal |
| Total Fat | 4g |
| Saturated Fat | 2.5g |
| Cholesterol | 15mg |
| Sodium | 180mg |
| Total Carbohydrates | 6g |
| Dietary Fiber | 0.5g |
| Total Sugars | 5g |
| Protein | 5g |
| Calcium | 150mg |
| Potassium | 220mg |
This recipe serves approximately 4 to 6 people as a side condiment, depending on how generously it is portioned. Caloric content is kept low by the high water content of cucumber and the natural lightness of yogurt.
For another lean, nutrient-rich dish to build a healthy meal around, try this Chicken Curry Recipe for a complete, balanced plate.
Health Benefits of Key Ingredients
Cucumber raita is not just delicious; it is genuinely good for you. The core ingredients each contribute meaningful nutritional benefits that make this condiment a smart addition to your diet on a regular basis.
Here is a look at what the key ingredients bring to the table:
- Plain yogurt is rich in calcium, protein, and probiotics. The live and active cultures in yogurt support gut health, aid digestion, and contribute to a stronger immune system. The casein proteins in dairy yogurt also actively help neutralize the capsaicin in spicy food, which is why raita works so well alongside hot curries.
- Cucumber is over 95% water, making it one of the most hydrating foods available. It contains vitamin K for bone health, potassium for heart health, and antioxidants including flavonoids and tannins that help reduce inflammation.
- Garlic contains allicin, a sulfur compound with well-documented antimicrobial and cardiovascular benefits. Even a small amount of raw garlic adds meaningful functional nutrition to a dish.
- Cumin is a powerful digestive spice. It stimulates the production of digestive enzymes, reduces bloating and gas, and has antioxidant properties. Ground cumin is also a good source of iron per gram.
- Fresh mint supports digestion and has a natural cooling effect on the body. It also contains rosmarinic acid, a compound with anti-inflammatory and antioxidant properties.
- Fresh cilantro is loaded with antioxidants and has been studied for its potential to support detoxification and reduce oxidative stress in the body.
For another dish that pairs nutrient-rich ingredients into something delicious, this Broccoli Salad Recipe is a great complement to an Indian-inspired meal.
Frequently Asked Questions
1. Can I make cucumber raita without draining the cucumber?
You can, but the result will be noticeably watery. Cucumber releases a significant amount of liquid once it is grated, especially when it sits with salt or comes in contact with the yogurt. If you skip the draining step, you may find that your raita becomes thin and soupy within 20 to 30 minutes of mixing. Draining takes just 10 minutes and is absolutely worth the effort.
2. What is the difference between raita and tzatziki?
Both are yogurt-cucumber condiments, but they differ in their spicing and culinary origins. Raita comes from South Asian cuisine and is seasoned with cumin, coriander, and often chaat masala or chili. Tzatziki is Greek and is seasoned primarily with garlic, fresh dill, lemon juice, and olive oil. Both are delicious, but they have distinctly different flavor profiles. Think of raita as earthy and warm, and tzatziki as bright and garlicky.
3. Can I use Greek yogurt instead of regular yogurt?
Absolutely. Greek yogurt is actually a very popular choice for raita because it is thicker and has a more pronounced tang. It holds its shape better after the cucumber is mixed in and produces a creamier, more luxurious result. If it feels too thick, you can thin it slightly with a tablespoon or two of cold whole milk or water before adding the cucumber and seasonings.
4. How long does cucumber raita last in the fridge?
Cucumber raita keeps well in an airtight container in the refrigerator for up to 2 to 3 days. It may become slightly more liquid over time as the cucumber continues to release moisture. Simply stir it well before serving and drain off any pooled liquid at the surface. For the freshest taste and best texture, consuming it within 24 hours is ideal.
5. Is cucumber raita suitable for vegans?
Traditional cucumber raita is made with dairy yogurt, so it is not vegan. However, you can easily make a plant-based version using a thick, unsweetened coconut yogurt or cashew yogurt as the base. The flavor will be slightly different, but the texture and cooling function remain similar. Make sure the non-dairy yogurt you choose is plain and unsweetened, as flavored varieties will drastically change the taste of the raita.
Read Also: Easy Naan Bread Recipe
Final Thoughts
This cucumber raita recipe is one of those genuinely useful recipes that you will reach for over and over again once it becomes part of your rotation.
It takes almost no time to make, uses ingredients you likely already have, and delivers something that genuinely improves whatever it sits next to on the table.
From a casual weeknight curry night to a big Indian feast for friends, raita always earns its place.
Give this recipe a try the next time you are serving something spicy or rich, and discover just how much a cool, creamy spoonful can transform the meal.
If you make this cucumber raita recipe, leave a comment below and let me know how it turned out. And if you have a favorite variation or a family secret ingredient, share it too.
Recommended:
- Chicken Tikka Masala Recipe
- Tandoori Chicken Recipe
- Authentic Butter Chicken Recipe
- Garlic Naan Bread Recipe
- Basmati Rice Recipe
- Chicken Korma Recipe
- Easy Guacamole Recipe
- Fresh Salsa Recipe
- Easy Pesto Recipe
- Tzatziki Sauce Recipe


