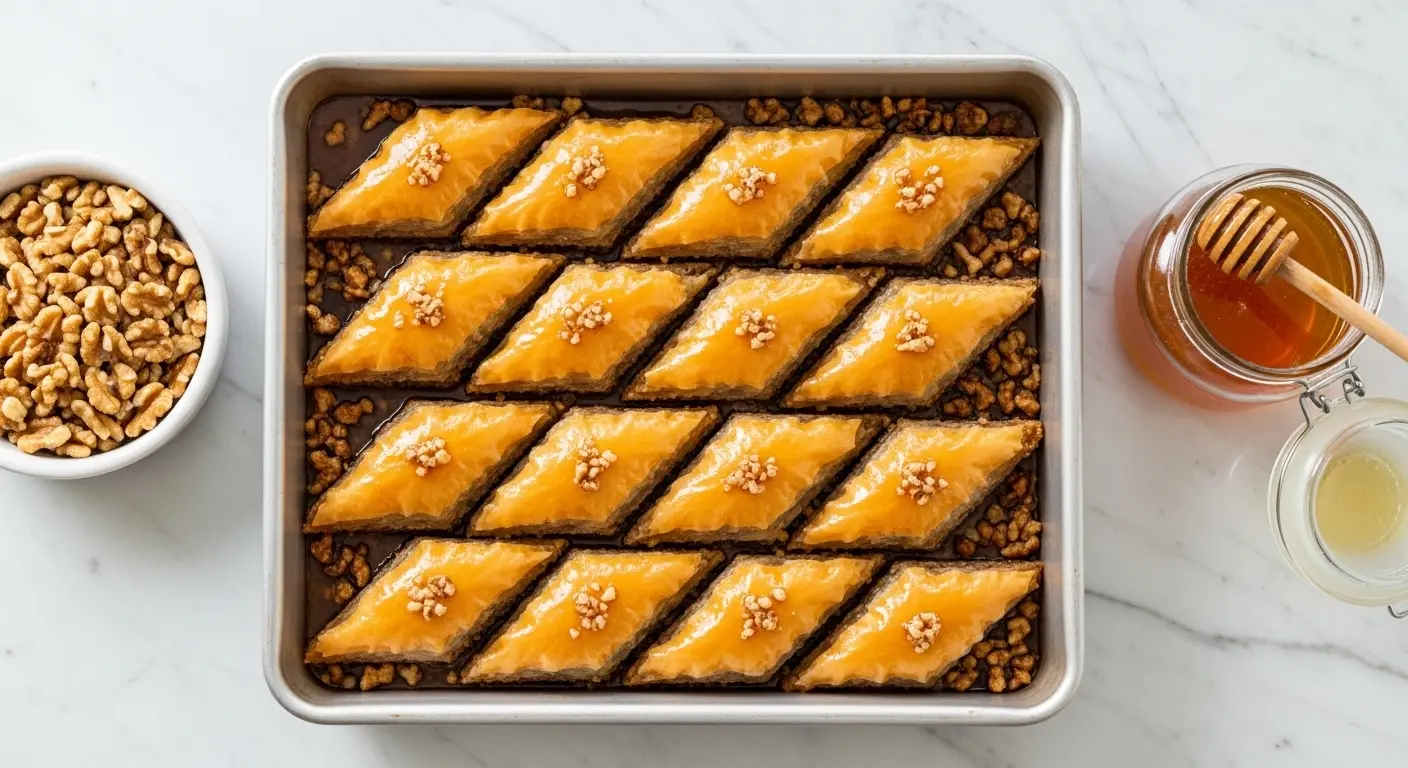
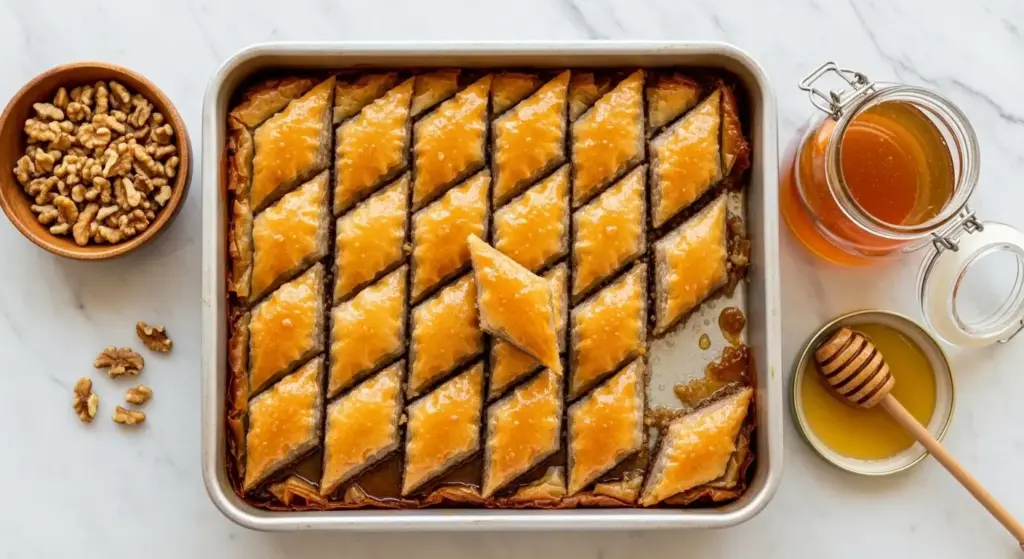
If you’ve ever bitten into a perfectly made baklava recipe, you already know the magic — that shattering crunch of buttery phyllo, the sweet warmth of cinnamon-spiced walnuts, and that golden honey syrup soaking into every single layer. It’s the kind of dessert that stops conversations and has everyone quietly reaching for a second piece.
The good news? You don’t need to be a pastry chef to pull this off at home.
This is the classic Greek-style baklava recipe most people know and love — walnut-filled, cinnamon-scented, and finished with a simple honey-lemon syrup. It takes a bit of patience with the layering, but the process is genuinely enjoyable and the results are absolutely worth it.
A few things make this recipe stand out. The phyllo layers are brushed generously with melted butter so they bake up golden and shatteringly crisp. The walnut filling gets a warm hit of cinnamon and just a pinch of cloves. And the syrup — made with honey, sugar, lemon juice, and a little water — is poured hot over the baklava right when it comes out of the oven, letting it soak all the way down to the bottom layer.
The result is baklava that’s crispy on top, chewy in the middle, and sweet-but-not-cloying throughout.
You might also enjoy the Rugelach Recipe if you love pastry-wrapped, nut-filled desserts with a similar flaky texture.
Why You’ll Love This Baklava Recipe
This is genuinely one of those recipes that earns you a reputation as a baker even though the technique is surprisingly approachable.
The ingredients are simple and easy to find — frozen phyllo dough from the grocery store works beautifully here. There’s nothing exotic or hard to source.
It’s also a stellar make-ahead dessert. The baklava actually tastes better the next day once the syrup has fully soaked in and the flavors have had time to meld.
Here’s a quick rundown of why this recipe keeps getting made again and again:
- The combination of warm cinnamon, sweet honey, and buttery pastry is simply irresistible
- It looks incredibly impressive but is totally achievable for home bakers
- The full batch makes enough to share — it’s perfect for holidays, potlucks, and gifting
- It keeps well at room temperature for up to a week
- You can customize the nut filling to your preference
- The syrup-to-pastry ratio in this recipe hits the sweet spot every time
Read Also: Toffee Recipe
Ingredients
This recipe uses pantry-friendly ingredients that come together beautifully. The most important things to get right are the phyllo dough (thawed properly) and quality honey — both make a significant difference in the final result.
- 1 lb (450g) phyllo dough, thawed according to package directions
- 1 cup (225g) unsalted butter, melted
- 4 cups (400g) raw walnuts, finely chopped
- 1 teaspoon ground cinnamon
- 1/4 teaspoon ground cloves
- 1/4 teaspoon salt
For the Honey Syrup:
- 1 cup (200g) granulated sugar
- 1/2 cup (120ml) water
- 1/2 cup (170g) pure honey
- 2 tablespoons fresh lemon juice
- 1 strip lemon peel (optional, for extra citrus flavor)
For the best flavor, use a mild, floral raw honey rather than processed honey from a squeeze bottle. The quality of the honey directly impacts the taste of the finished syrup.
This recipe fills a standard 9×13 inch (23×33 cm) baking pan and makes approximately 36 diamond-shaped pieces.
Read Also: Sticky Toffee Pudding Recipe
Kitchen Equipment Needed
Having everything organized before you start assembling makes the process smooth and enjoyable. The phyllo dries out quickly, so being prepared is key.
- 9×13 inch baking dish (metal or glass, metal is preferred for even browning)
- Pastry brush for brushing butter onto phyllo layers
- Food processor for chopping the walnuts
- Medium saucepan for making the syrup
- Sharp chef’s knife for cutting the baklava before baking
- Cutting board
- Damp kitchen towel to keep phyllo from drying out
- Measuring cups and spoons
- Small saucepan or microwave-safe bowl for melting butter
Read Also: Rice Pudding Recipe
Recommended Products for This Recipe
These are some products that can genuinely make your baklava experience better — chosen for quality and performance.
1. Raw Organic Honey
The syrup is the soul of this dessert, and the quality of your honey matters enormously. A good raw, organic honey brings floral complexity and richness that processed honey simply can’t match. It will make your baklava taste bakery-quality from the very first bite.
2. Athens Phyllo Dough Sheets
Athens is one of the most trusted brands for phyllo dough, and for good reason. Their sheets are thin, uniform, and peel apart easily — which makes layering a breeze and reduces tearing. For a beginner, having good-quality phyllo makes the whole process less stressful.
3. Nordic Ware Natural Aluminum 9×13 Cake Pan
Aluminum baking pans heat more evenly than glass or dark pans, which means more consistent browning across the entire pan of baklava. This particular pan is a favorite among serious bakers for its durability and consistent results.
4. OXO Good Grips Pastry Brush
A wide, silicone pastry brush makes the job of buttering phyllo layers so much faster and easier. The OXO version has a comfortable grip and holds butter well without dripping. It’s a small tool that makes a big difference in the assembly process.
For a similarly elegant make-ahead dessert, check out this Easy Tiramisu Recipe.
Step-by-Step Instructions
Work through each stage at a comfortable pace. The phyllo needs attention, but none of these steps are complicated — they just take time and a little focus.
Step 1: Thaw the Phyllo Dough Properly
- Remove the phyllo dough from the freezer the night before and let it thaw overnight in the refrigerator
- On the day you plan to bake, take it out of the fridge about 2 hours before you begin to bring it to room temperature
- Do not attempt to rush this process — thawing phyllo too quickly causes the sheets to become sticky and tear easily
- Once at room temperature, carefully unroll the sheets and lay them flat on a clean surface
- Cover the stack with a lightly damp kitchen towel while you work — this prevents the edges from drying out and cracking
Step 2: Prepare the Walnut Filling
- Add 4 cups (400g) of raw walnuts to the bowl of your food processor
- Pulse 10-15 times until the walnuts are finely chopped — you want small, irregular pieces, not walnut powder
- Transfer the chopped walnuts to a large mixing bowl
- Add 1 teaspoon of ground cinnamon, 1/4 teaspoon of ground cloves, and 1/4 teaspoon of salt
- Stir everything together until the spices are evenly distributed throughout the walnut mixture
- Set the filling aside — it’s ready when you need it during assembly
Step 3: Melt the Butter and Prep the Pan
- Melt 1 cup (225g) of unsalted butter in a small saucepan over low heat, or in a microwave-safe bowl in 30-second intervals, stirring between each
- Do not let the butter brown — you want it fully melted and liquid but pale in color
- Lightly brush the bottom and sides of your 9×13 inch (23×33 cm) baking dish with melted butter
- This first coating of butter prevents the phyllo from sticking to the pan
- Set your pastry brush and bowl of melted butter right next to your phyllo stack so everything is within easy reach
Step 4: Preheat the Oven
- Set your oven to 325°F (165°C)
- Allow it to fully preheat before placing the baklava inside — an oven that isn’t fully up to temperature can lead to uneven baking
- Place the rack in the center of the oven for the most even heat distribution
Step 5: Layer the Bottom Phyllo Section
- Open your stack of phyllo sheets
- Lay one sheet of phyllo flat in the bottom of the buttered pan — if the sheets are larger than the pan, fold them to fit or trim them with a sharp knife
- Brush the entire surface of the sheet with a light, even layer of melted butter using your pastry brush
- Continue adding phyllo sheets one at a time, brushing each one with butter before adding the next
- Repeat this process until you have 10 layers of buttered phyllo in the pan
- Work relatively quickly to prevent the unused sheets from drying out — keep the stack covered with the damp towel when not in use
Step 6: Add the First Walnut Layer
- Scatter approximately one-third of the walnut filling (about 1 1/3 cups / 130g) evenly over the top of the 10-layer phyllo base
- Use your fingers or the back of a spoon to spread the walnuts into an even layer all the way to the edges of the pan
- Gently press the walnuts down so they sit flat and won’t shift when you add more phyllo on top
- The filling layer should be thin and even — avoid thick clumps in the center
Step 7: Add the Middle Phyllo and Walnut Layers
- Place another sheet of phyllo over the walnut layer and brush it with butter
- Continue layering 5 sheets of phyllo on top, buttering each one
- Scatter another one-third of the walnut mixture evenly over the top
- Add 5 more sheets of buttered phyllo
- Scatter the remaining one-third of the walnut filling over the top
- Add 5 more buttered phyllo sheets on top of this last nut layer
Step 8: Finish with the Top Phyllo Section
- Add the final 10 sheets of phyllo on top of the last walnut layer, buttering each sheet generously as you go
- The top section should have at least 10 layers to ensure a sturdy, golden-brown crust
- After placing the final sheet, brush the top with a generous coat of butter, making sure to reach the corners and edges
- Press down very gently with the flat of your hand to compress everything slightly and even out any puffed sections
Step 9: Cut the Baklava Before Baking
- This is a critical step — you must cut the baklava before it goes into the oven, not after
- Using a very sharp, long knife, cut the baklava into strips from top to bottom, spacing the cuts about 1.5 inches (4 cm) apart
- Then cut diagonally across those strips to create diamond shapes — the traditional baklava shape
- Cut all the way through every layer, down to the bottom of the pan, pressing firmly but without dragging or sawing
- This pre-cutting ensures that the syrup can seep into each individual piece after baking
- If you prefer square shapes instead of diamonds, simply cut a grid pattern
Step 10: Bake the Baklava
- Place the pan in the center of your preheated 325°F (165°C) oven
- Bake for 50-60 minutes, until the top is a deep golden brown color — not pale, but a true rich golden
- The edges should look visibly crispy and the center pieces should be uniformly colored
- If the top starts browning too fast around the edges but the center is still pale, loosely tent the pan with foil for the last 15 minutes
- Remove from the oven and set aside — do not let it cool before adding the syrup
Step 11: Make the Honey Syrup
- While the baklava is baking, combine 1 cup (200g) of sugar and 1/2 cup (120ml) of water in a medium saucepan
- Add the strip of lemon peel if using
- Bring to a boil over medium-high heat, stirring until the sugar is completely dissolved
- Once boiling, reduce the heat to medium-low and stop stirring
- Allow to simmer for 4-5 minutes until very slightly thickened
- Remove from heat and stir in 1/2 cup (170g) of honey and 2 tablespoons of fresh lemon juice
- Remove the lemon peel strip
- The syrup should be used while it is still warm — do not let it cool completely before using
Step 12: Pour the Syrup Over the Hot Baklava
- Immediately after removing the baklava from the oven, ladle or slowly pour the warm honey syrup evenly over the entire surface of the hot baklava
- Work systematically from one end of the pan to the other, making sure every piece and every cut line gets covered
- You will hear a satisfying sizzle as the syrup hits the hot pastry
- The syrup needs to penetrate all the way through, so pour it gradually and allow it to absorb before adding more
- Once all the syrup has been added, do not cover the pan
- Allow the baklava to cool completely at room temperature — this takes at least 4-6 hours or ideally overnight
- The uncovered resting time is what allows the top to stay crispy rather than becoming soggy
For more tips on working with flaky pastry desserts, the Classic Tiramisu Recipe is another great make-ahead project.
Tips for Success
Getting baklava right is all about a few key techniques. Keep these in mind and you’ll avoid the most common pitfalls.
- Thaw phyllo completely. Rushing this step leads to torn, sticky sheets and a frustrating assembly. Always thaw overnight in the fridge.
- Keep phyllo covered. Use a damp (not wet) kitchen towel placed over the stack of sheets while you work. This prevents the edges from drying and cracking.
- Don’t skip the pre-cutting. Cutting the baklava after it’s baked is nearly impossible without shattering the delicate layers. Always cut first.
- Use quality honey. The honey is the star of the syrup — cheap processed honey produces a flat, overly sweet result. Raw honey adds beautiful floral depth.
- Hot baklava, warm syrup. Pour the syrup while the baklava is still piping hot and the syrup is warm. This contrast creates the best absorption without sogginess.
- Let it rest, uncovered. This is the most patience-testing step, but it’s essential. Covering the pan traps steam and makes the top layer soggy. Let it breathe.
- Don’t over-process the nuts. Pulse, don’t blend. Walnut powder makes the filling pasty — you want texture and crunch.
Read Also: Fruit Tart Recipe
Serving Suggestions
Baklava is rich, so a little goes a long way — which is part of what makes it such a great dessert for entertaining. A pan feeds a crowd beautifully.
Here are some wonderful ways to serve it:
- With a small cup of strong coffee or Turkish tea — the bitterness cuts through the sweetness perfectly
- Alongside a scoop of vanilla ice cream — the warm honey notes pair beautifully with creamy vanilla
- On a holiday dessert platter — baklava looks stunning alongside other sweets and always draws attention
- As an after-dinner treat at a dinner party — serve 2-3 pieces per person with an espresso
- With a drizzle of extra honey on the plate for presentation
- Paired with Easy Deviled Eggs as part of a wider appetizer and dessert spread at a gathering
Variations to Try
Once you’ve mastered the classic walnut baklava, there are beautiful variations worth exploring. The base technique stays exactly the same — just swap out components.
- Pistachio Baklava: Replace the walnuts entirely with finely chopped unsalted pistachios. This is the most common Turkish variation and produces a gorgeous green-flecked filling.
- Mixed Nut Baklava: Use equal parts pistachios, walnuts, and almonds. The combination of textures is phenomenal.
- Cardamom and Rosewater Version: Add 1/2 teaspoon of ground cardamom to the filling and a splash of rosewater to the finished syrup. This is common in Middle Eastern and Persian recipes.
- Orange Blossom Baklava: Stir 1 teaspoon of orange blossom water into the syrup after removing from heat. It adds a subtle, elegant floral note.
- Chocolate-Drizzled Baklava: After the baklava has cooled and the syrup has set, drizzle melted dark chocolate over the top for an indulgent twist.
- Mini Baklava Rolls: Instead of layering in a pan, roll phyllo sheets around the nut filling into cigar shapes. They’re wonderful for parties.
Read Also: Churro Recipe
Storage and Reheating
One of the best things about baklava is how well it keeps. This is genuinely a dessert that improves with time.
Here’s how to store it properly:
- Room temperature: Keep the baklava uncovered or loosely covered with a kitchen towel at room temperature for up to 1 week. This is the best storage method — refrigeration can alter the texture.
- Refrigerator: If you live in a warm or humid climate, store in an airtight container in the fridge for up to 2-3 weeks. Let it come to room temperature before serving.
- Freezer: Baklava freezes very well. Layer pieces in an airtight freezer-safe container with parchment paper between layers and freeze for up to 3 months.
- Thawing: Thaw frozen baklava at room temperature for 2-3 hours before serving. Do not microwave it — the phyllo becomes chewy and loses its crispness.
- Reheating: If you’d like to refresh the crispness, pop a few pieces in a 300°F (150°C) oven for 5-7 minutes. This is optional — most people enjoy it at room temperature.
Read Also: Peach Cobbler Recipe
Nutritional Facts
The following estimates are based on one standard diamond-shaped piece (1 of approximately 36 pieces) from a full 9×13 inch pan.
| Nutrient | Per Serving (1 piece) |
|---|---|
| Calories | 220 kcal |
| Total Fat | 14g |
| Saturated Fat | 4g |
| Cholesterol | 14mg |
| Sodium | 110mg |
| Total Carbohydrates | 23g |
| Dietary Fiber | 1g |
| Total Sugars | 13g |
| Protein | 4g |
Please note that nutritional values are estimates and will vary depending on the size of your cuts, specific brands of ingredients used, and any variations made to the recipe.
For a lighter dessert comparison, the Easy Creme Brulee Recipe is another satisfying option when you want something elegant without the extra sweetness.
Health Benefits of Key Ingredients
While baklava is definitely an indulgence, a few of its core ingredients bring some genuine nutritional value to the table.
Enjoyed in moderation, baklava can be part of a balanced diet — especially when made from scratch at home where you control the quality of every ingredient.
Here are some notable benefits from the key components:
- Walnuts are one of the most nutrient-dense nuts available, packed with omega-3 fatty acids, antioxidants, and plant-based protein. Studies suggest that regular walnut consumption supports heart health and brain function.
- Raw honey is rich in antioxidants and has antibacterial properties. It has a lower glycemic impact than refined sugar and contains trace enzymes and minerals.
- Lemon juice adds vitamin C and helps prevent the honey syrup from crystallizing, as the acidity keeps the sugar molecules from bonding.
- Cinnamon has long been studied for its anti-inflammatory properties and its potential to support healthy blood sugar levels.
- Phyllo dough is surprisingly lighter than many other pastry doughs — it’s made without fat in the dough itself, so the calorie content comes mainly from the butter used in layering.
- Unsalted butter used in moderation provides fat-soluble vitamins A, D, E, and K.
Read Also: Honey Butter Recipe
Frequently Asked Questions
1. Can I make baklava ahead of time?
Yes, and in fact it’s recommended. Baklava tastes significantly better the day after it’s made once the syrup has had time to fully soak in and the flavors have developed. You can make it up to 3 days in advance and store it at room temperature, loosely covered.
2. Why did my baklava turn out soggy instead of crispy?
Soggy baklava is almost always caused by one of two things: covering the pan before it cools completely, or using too much syrup. After pouring the syrup, leave the pan completely uncovered at room temperature. Also make sure your butter was genuinely melted and liquid when you brushed the layers — water content in the butter can cause steaming.
3. Do I have to use walnuts? Can I substitute other nuts?
Walnuts are traditional in Greek-style baklava, but pistachios, almonds, hazelnuts, or a combination work equally well. Just make sure the nuts are unsalted and finely chopped. The total volume should remain the same (4 cups / 400g) regardless of which nuts you choose.
4. How do I prevent phyllo dough from tearing?
The best prevention is proper thawing — phyllo that’s still partially frozen cracks and tears easily. Always thaw completely before using. Keep unused sheets covered with a damp towel while you work, and handle each sheet gently from the center rather than the edges. A few tears in the middle layers won’t affect the final result.
5. Can I use salted butter?
It’s best to stick with unsalted butter so you can control the salt level. That said, if salted butter is all you have, it will still work — the layers will just have a slightly saltier, richer flavor. Many people actually enjoy that contrast with the sweet honey syrup.
The Caramel Sauce Recipe is another sweet kitchen project you might enjoy tackling next.
Final Thoughts
Making baklava from scratch is one of those kitchen experiences that stays with you.
From the meditative rhythm of layering phyllo and brushing each sheet with butter, to the moment you pour the syrup over the hot pastry and hear it sizzle — the whole process is deeply satisfying.
And when you set a full pan on the table and watch people’s faces light up at the first crunch? That never gets old.
This classic recipe is forgiving, flexible, and absolutely stunning every time.
Give it a try this weekend, and don’t be shy about leaving a comment below to let me know how it turned out. Did you go traditional with walnuts, or mix things up with pistachios? I’d love to hear!
Recommended:
- Rugelach Recipe
- Yorkshire Pudding Recipe
- Malva Pudding Recipe
- Best Carrot Cake Recipe
- Moist Chocolate Cake Recipe
- Banana Pudding Recipe
- Peanut Butter Cookie Recipe
- Tres Leches Cake Recipe
- No Bake Cheesecake Recipe
- Chocolate Pudding Recipe