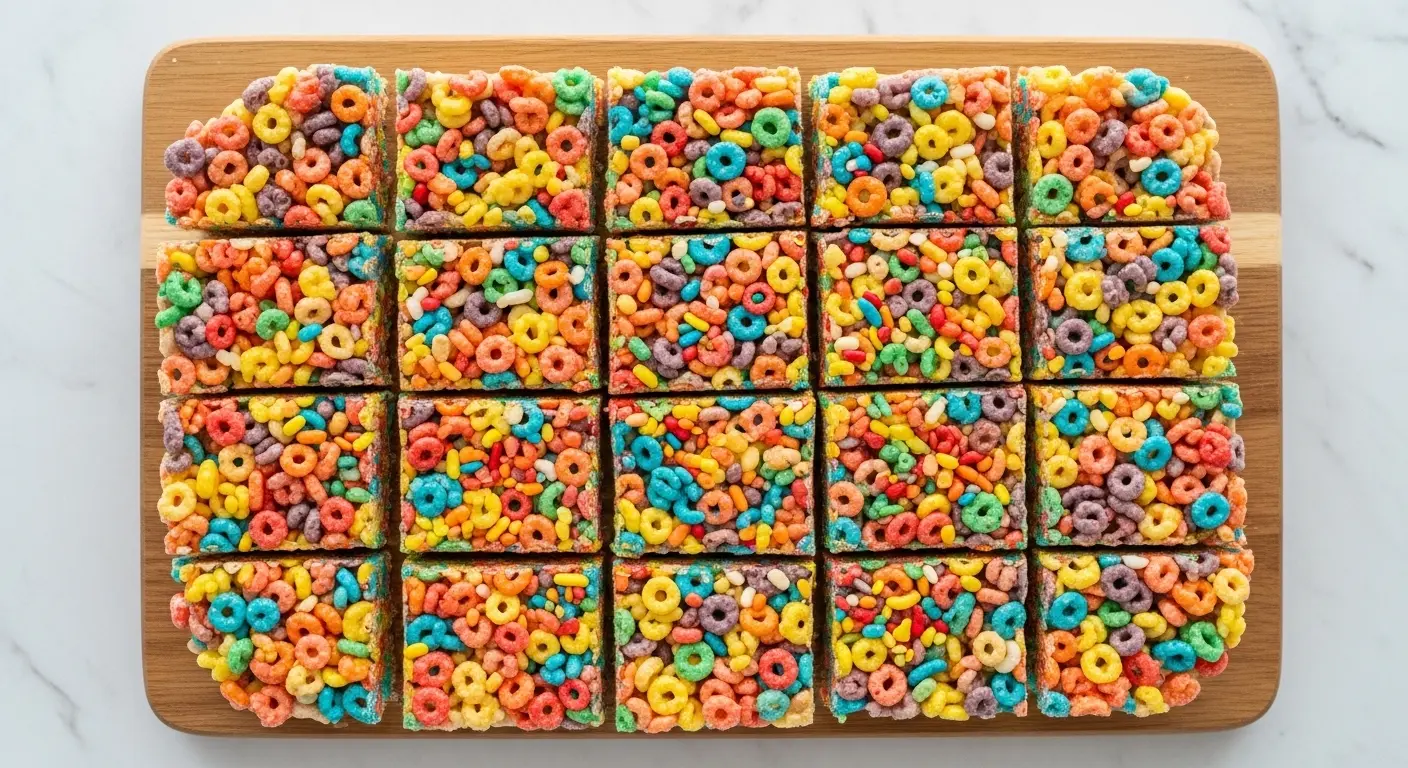
If you’ve ever wanted to make the most colorful, fun, and crowd-pleasing no-bake dessert imaginable, this fruity pebbles rice krispie treat recipe is exactly what you’ve been looking for.
These treats swap out the classic Rice Krispies for Fruity Pebbles cereal, giving you that same chewy, buttery, marshmallow-coated texture you love, but with an explosion of fruity flavor and a rainbow of color in every single bite.
The magic here is in the combination of Fruity Pebbles’ naturally fruity sweetness and the gooey marshmallow base. The cereal softens just slightly when coated in the warm marshmallow mixture, creating a texture that’s perfectly chewy without being sticky or overly dense.
These bars are a hit at birthday parties, bake sales, holiday gatherings, or any time you just need something sweet and easy with zero oven time required.
If you love no-bake cereal treats, you’ll also want to check out this Original Rice Krispie Treat Recipe for the classic version.
Why You’ll Love This Fruity Pebbles Rice Krispie Treat Recipe
This recipe checks every single box when it comes to no-bake desserts. It’s fast, fun, and requires only a handful of pantry staples.
The Fruity Pebbles bring a natural fruity sweetness that pairs beautifully with the neutral richness of butter and marshmallows. You don’t need any artificial flavoring because the cereal does all the heavy lifting.
Kids go absolutely wild for these because of the bright, rainbow colors. But adults love them just as much because the flavor is genuinely delicious, not just visually fun.
The bars come together in under 15 minutes of active time. That means you can whip up a batch on a weeknight and have them ready before bedtime.
They’re also incredibly versatile. You can press them into a pan for traditional bars, roll them into balls, or cut them into fun shapes with cookie cutters for holiday treats.
- No oven needed, just a stovetop and a baking pan
- Ready in about 30 minutes from start to finish, including cooling time
- Bright, colorful, and visually stunning for parties and gatherings
- Kid-friendly and adults love them too
- Easy to customize with mix-ins like white chocolate chips or sprinkles
- Budget-friendly ingredients that are easy to find at any grocery store
Another favorite you might enjoy is this Gooey Rice Krispie Treat Recipe for an extra-indulgent version.
Ingredients
You only need a few simple ingredients to make these bars, but the quality of each one matters. Using fresh marshmallows (not ones that have been sitting in the pantry for months) makes a noticeable difference in how gooey and stretchy the final bars turn out. Unsalted butter gives you control over the saltiness, and a small pinch of salt at the end actually enhances the sweetness.
- 6 cups (170 g) Fruity Pebbles cereal
- 4 tablespoons (57 g) unsalted butter
- 1 bag (10 oz / 283 g) mini marshmallows (about 5 cups), plus ½ cup extra for topping (optional, for extra gooeyness)
- ¼ teaspoon fine sea salt
- ½ teaspoon pure vanilla extract
- Optional: ½ cup (85 g) white chocolate chips for drizzling or mixing in
- Optional: rainbow sprinkles for topping
For a twist on the classic, also try this Peanut Butter Rice Krispie Treat Recipe if you love a nutty, salty-sweet combination.
Kitchen Equipment Needed
Having the right tools ready before you start makes the whole process smooth and stress-free. The key is to work quickly once the marshmallow mixture is ready, since it starts to set fast. A large pot, a sturdy spatula, and a properly prepared pan are all you really need to nail this recipe.
- Large heavy-bottomed saucepan or pot
- Rubber or silicone spatula (coated in cooking spray to prevent sticking)
- 9×13-inch baking pan (or 8×8-inch for thicker bars)
- Parchment paper or non-stick spray
- Large mixing bowl
- Measuring cups and spoons
- Knife and cutting board for slicing bars
Recommended Products for This Recipe
These are products chosen based on quality and performance, specifically to help you get the best results with this recipe.
1. Fruity Pebbles Cereal (Large Box)
Using a freshly opened, full-size box of Fruity Pebbles ensures you get the brightest colors and the crispiest texture in your finished bars. Stale cereal absorbs moisture unevenly and can result in a soggy, less colorful treat. A larger box also means you’ll have plenty on hand for topping the bars.
2. Jet-Puffed Mini Marshmallows
Mini marshmallows melt more evenly and faster than large ones, which means less time over the heat and a creamier, smoother marshmallow base. Jet-Puffed is widely considered the gold standard for both flavor and texture in no-bake cereal treats. Their consistent size and freshness make a real difference.
3. Silicone Baking Pan 9×13 Inch
A silicone baking pan makes removing the finished bars incredibly easy since the treats naturally release from the flexible surface. You won’t need to fight with stuck edges or broken corners. It’s also reusable, easy to clean, and doesn’t require any parchment paper lining.
4. Ghirardelli White Chocolate Melting Wafers
If you want to drizzle white chocolate over the top of your bars for that gorgeous, bakery-style finish, Ghirardelli white chocolate melting wafers are the easiest option. They melt smoothly without seizing and set up beautifully. The subtle creamy flavor pairs perfectly with the fruity sweetness of the cereal.
Read Also: Easy Rice Krispie Treat Recipe
Step-by-Step Instructions
1. Prepare Your Baking Pan
- Line a 9×13-inch baking pan with parchment paper, leaving a couple of inches of overhang on the long sides so you can easily lift the finished slab out of the pan.
- Lightly spray the parchment paper with non-stick cooking spray or brush with a thin layer of melted butter. This prevents the sticky marshmallow mixture from bonding permanently to the paper.
- Set the prepared pan on a flat, heat-safe surface near your stove so it’s ready to go the moment you need it.
2. Measure Out All Your Ingredients in Advance
- Measure 6 cups (170 g) of Fruity Pebbles cereal into a large mixing bowl and set it nearby.
- Measure out 10 oz (283 g) of mini marshmallows. If you want extra gooey bars, set aside an additional ½ cup of marshmallows to stir in at the very end before pressing into the pan.
- Have your butter, salt, and vanilla extract measured and ready at your stovetop. This recipe moves quickly once you start, so having everything prepped in advance is essential.
3. Melt the Butter
- Place a large, heavy-bottomed saucepan or pot over medium-low heat.
- Add 4 tablespoons (57 g) of unsalted butter to the pot.
- Let the butter melt slowly, swirling the pan occasionally. You want it fully melted but not browned, so keep the heat at medium-low. Browning the butter will add a nutty flavor that, while delicious on its own, can overpower the fruity brightness of this particular recipe.
4. Add the Marshmallows
- Once the butter is fully melted, add the 10 oz (283 g) of mini marshmallows to the pot.
- Stir constantly with a silicone spatula that has been lightly coated with cooking spray. This prevents the marshmallow from clinging stubbornly to the spatula.
- Keep the heat at medium-low and stir continuously. The marshmallows will begin to soften and collapse after about 2 to 3 minutes. Continue stirring until the mixture is completely smooth and no lumps of unmelted marshmallow remain.
- Remove the pot from the heat the moment the marshmallow is fully smooth. Overcooking marshmallow causes the treats to harden rather than stay soft and chewy.
5. Add Salt and Vanilla
- Immediately after removing the pot from the heat, stir in ¼ teaspoon of fine sea salt and ½ teaspoon of pure vanilla extract.
- Stir for about 10 seconds until both are evenly incorporated. The vanilla enhances the overall sweetness without tasting artificial, and the salt balances the richness of the butter and marshmallow.
6. Add the Fruity Pebbles
- Working quickly, pour the measured Fruity Pebbles cereal into the pot with the warm marshmallow mixture.
- If you want extra gooey bars, also stir in the reserved ½ cup of mini marshmallows at this stage. They won’t fully melt and will create little pockets of gooey marshmallow throughout the finished bars.
- Use your cooking spray-coated spatula to gently fold everything together. Fold rather than stir aggressively, as stirring too hard will crush the cereal and result in a denser, less airy texture.
- Keep folding until every piece of cereal is evenly coated in the marshmallow mixture and no dry cereal remains at the bottom of the pot. Work fast, as the mixture starts to set up within just a couple of minutes of being off the heat.
7. Transfer to the Pan and Press
- Immediately turn the coated cereal mixture out into your prepared pan.
- Spray your hands or the back of a flat spatula with cooking spray. This prevents the mixture from sticking to your hands as you press it into the pan.
- Gently press the mixture into an even layer across the entire pan. Do not press too hard or compact it too firmly, as this crushes the cereal and makes the bars dense and tough rather than light and chewy.
- Use just enough pressure to create a flat, even surface.
8. Optional Toppings
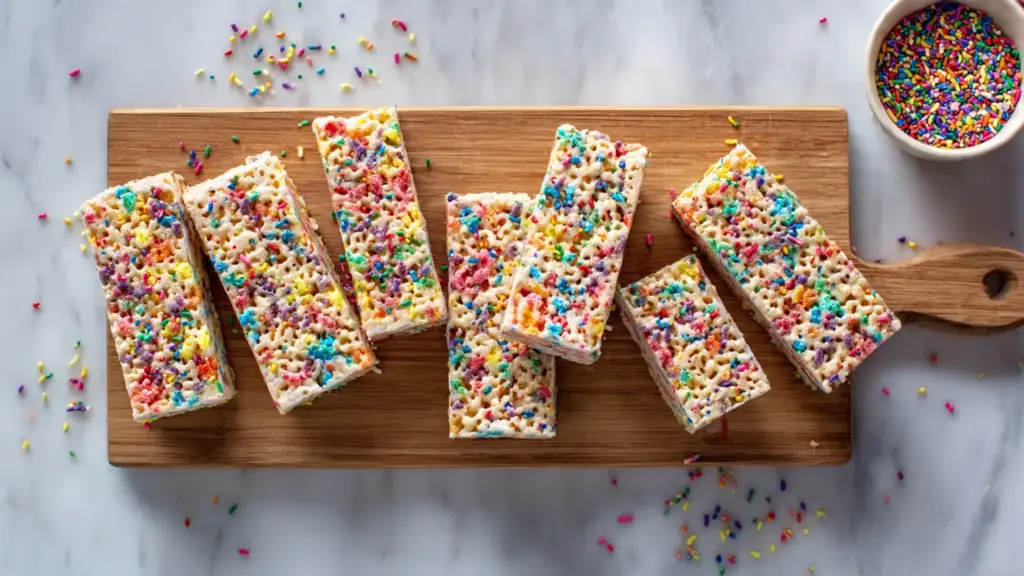
- If you want to decorate with rainbow sprinkles, scatter them over the top immediately while the surface of the mixture is still tacky and warm enough to hold them.
- If you’d like a white chocolate drizzle, allow the bars to cool completely first (about 20 minutes). Then melt ½ cup (85 g) of white chocolate chips in a microwave-safe bowl in 20-second increments, stirring between each interval, until smooth. Drizzle over the cooled bars using a spoon or a piping bag.
9. Let Cool, Then Slice
- Allow the bars to cool at room temperature for at least 20 to 30 minutes before slicing. This gives the marshmallow enough time to set so the bars hold their shape cleanly when cut.
- Use the parchment paper overhang to lift the entire slab out of the pan and onto a cutting board.
- Slice into 12 to 16 bars using a sharp knife that has been lightly coated with cooking spray. This prevents the knife from sticking and dragging through the bars.
- For cleaner cuts, wipe the knife clean between slices.
You might also enjoy these Muddy Buddies as another easy, no-bake party treat for your next gathering.
Tips for Success
Getting these bars perfectly chewy and not too hard or too soft comes down to a few key details. Low heat, fresh marshmallows, and a light hand when pressing are the three things that make or break a batch of cereal treats.
- Use fresh marshmallows. Older marshmallows contain less moisture and don’t melt as smoothly, which leads to a harder, grainier final texture.
- Keep the heat on medium-low. High heat scorches the marshmallow quickly, making the bars stiff and tough within hours of setting.
- Don’t over-press the bars. Pressing too hard compacts the mixture and squeezes out air, making the bars dense and chewy in the wrong way.
- Work quickly. The marshmallow mixture starts setting the moment it leaves the heat. Have everything prepped and within arm’s reach before you start.
- Coat everything in cooking spray. Spray your spatula, your hands, and your knife. Marshmallow is sticky, and this simple step saves a lot of frustration.
- Add extra marshmallows for gooey bars. Stirring in that extra ½ cup right before pressing creates pockets of soft, stretchy marshmallow that make each bite exceptionally gooey and satisfying.
Another easy treat worth making is the No Bake Cookie Recipe for another quick, stovetop dessert with no baking required.
Serving Suggestions
These bars are already a showstopper on their own, but a few simple presentation touches can make them look like something out of a bakery display case. Serving them at room temperature is ideal since chilling makes them harder and denser.
Pair these with other colorful, fun treats for a dessert spread at a kids’ birthday party. They look incredible next to Cake Pops, a bowl of Dirt Pudding, or a tray of frosted Sugar Cookies for a full rainbow dessert table.
- Wrap individual bars in cellophane bags tied with ribbon for party favors or bake sale packaging
- Serve alongside a glass of cold milk or a milkshake for a classic, nostalgic pairing
- Cut into smaller squares and layer them in a clear jar or tower for a fun, colorful gift
- Arrange them on a tiered stand with a white chocolate drizzle for a party-worthy dessert display
- Press the mixture into silicone molds (stars, hearts, Easter eggs) instead of a pan for a festive shaped version
Variations to Try
The beauty of this recipe is how easily it adapts. The base formula of butter plus marshmallows plus cereal is endlessly flexible, and Fruity Pebbles in particular plays well with many mix-ins and toppings.
- Chocolate Fruity Pebbles version: Melt 2 tablespoons of coconut oil with the butter, then drizzle melted milk chocolate over the top for a chocolate-fruity combo.
- Birthday cake bars: Stir 2 tablespoons of rainbow sprinkles directly into the mixture before pressing, and top with vanilla frosting and more sprinkles.
- White chocolate Fruity Pebbles bars: Melt ½ cup of white chocolate chips into the marshmallow mixture along with the butter for a richer, creamier flavor profile.
- Fruity Pebbles treat balls: Instead of pressing into a pan, roll the warm mixture into balls using your cooking spray-coated hands. Let them set on a parchment-lined baking sheet.
- Layered bars: Press half the mixture into the pan, spread with a thin layer of strawberry jam or Nutella, then press the remaining mixture on top.
- Cookie butter swirl: Drizzle 2 tablespoons of melted Biscoff cookie butter over the top before it sets for a caramel-spice contrast.
Also try the Microwave Rice Krispie Treat Recipe if you want an even faster method using just your microwave.
Storage and Reheating
Proper storage keeps these bars soft and chewy for days. The biggest enemy of a rice krispie treat is air exposure, which dries out the marshmallow and makes the bars hard and stale.
- Room temperature: Store the bars in an airtight container at room temperature for up to 3 days. Place a sheet of parchment or wax paper between layers to prevent them from sticking together.
- Refrigerator: You can refrigerate the bars, but this will make them harder and chewier in a less pleasant way. If you do refrigerate, allow them to come to room temperature for 15 to 20 minutes before serving.
- Freezer: Wrap individual bars tightly in plastic wrap, then place them in a zip-top freezer bag. They freeze well for up to 6 weeks. Thaw at room temperature for about an hour before eating.
- Do not microwave to reheat. Microwaving causes the marshmallow to re-melt and make the bars greasy and sticky rather than chewy and firm.
Read Also: Rice Krispie Treat Recipe With Marshmallow Fluff
Nutritional Facts
Based on 16 bars per 9×13-inch pan, without optional toppings.
| Nutrient | Per Bar |
|---|---|
| Calories | ~175 kcal |
| Total Fat | 4 g |
| Saturated Fat | 2.5 g |
| Cholesterol | 10 mg |
| Sodium | 110 mg |
| Total Carbohydrates | 34 g |
| Sugars | 19 g |
| Protein | 1 g |
Nutritional values are estimates and will vary based on specific brands and portion sizes.
Another fun no-bake treat to browse is the Rice Krispie Treat Recipe With Large Marshmallows for a slightly different approach using fewer, bigger marshmallows.
Health Benefits of Key Ingredients
This recipe is clearly a dessert treat, but a few of the core ingredients do offer some genuine nutritional value worth knowing about.
Fruity Pebbles cereal is fortified with several vitamins and minerals including iron and B vitamins. While it’s still a sugary cereal at its core, those added nutrients do provide some minor benefit when enjoyed in moderation.
- Butter: Provides fat-soluble vitamins A, D, E, and K, and contains butyrate, a short-chain fatty acid that supports gut health when consumed as part of a balanced diet.
- Marshmallows: Made from sugar, gelatin, and corn syrup, marshmallows are essentially a treat ingredient with minimal nutritional value, but they do contribute to the texture that makes these bars satisfying and enjoyable.
- Fruity Pebbles cereal: Fortified with essential vitamins and minerals including iron, niacin, and B vitamins like B6, B12, and folic acid, which support energy metabolism and red blood cell production.
- Vanilla extract: Contains trace amounts of antioxidants and has been studied for its potential anti-inflammatory properties in small amounts.
You might also love the Easy Granola Recipe if you’re looking for a cereal-based snack with a slightly more nutritious profile.
Frequently Asked Questions
1. Can I use Rice Krispies and Fruity Pebbles together?
Yes, and this is actually a popular variation. Using a 50/50 mix of plain Rice Krispies and Fruity Pebbles gives you a lighter, slightly less dense bar while still delivering the fruity cereal flavor and color. The plain Rice Krispies add a neutral crunch that balances the sweeter Fruity Pebbles beautifully.
2. Why did my Fruity Pebbles rice krispie treats turn out hard?
The most common reason is too much heat during the marshmallow melting stage. High heat dries out the marshmallow, making the bars stiff and almost candy-like once they cool. Always use medium-low heat and remove the pot from the burner the moment the marshmallow is fully smooth and glossy.
3. Can I make these gluten-free?
Fruity Pebbles cereal is actually gluten-free, so this recipe is naturally gluten-free as long as your butter and marshmallows are also free from gluten-containing additives. Always check the labels on your specific brands to be sure, especially with marshmallows, which can vary by manufacturer.
4. How do I make the bars extra thick?
Use an 8×8-inch pan instead of a 9×13-inch pan with the same quantity of ingredients. This concentrates the mixture into a smaller surface area, producing bars that are roughly double the thickness of standard bars. Increase the cooling time to at least 45 minutes before slicing.
5. Can I add food coloring to make the bars even more vibrant?
The Fruity Pebbles themselves provide plenty of natural color, so additional food coloring is not necessary. However, if you want a more uniformly colored batch (for example, all pink for Valentine’s Day or all green for St. Patrick’s Day), you can stir 1 to 2 drops of gel food coloring into the melted marshmallow mixture before adding the cereal. Gel food coloring works better than liquid here because it doesn’t thin the mixture.
Read Also: Vegan Rice Krispie Treat Recipe
Final Thoughts
This fruity pebbles rice krispie treat recipe is one of those recipes that delivers maximum joy for minimum effort. The bright colors, the chewy marshmallow texture, and that addictive fruity sweetness make these bars impossible to resist.
They come together so quickly that you can honestly make them on a whim whenever a craving strikes. And they’re just as impressive at a birthday party as they are as a Tuesday afternoon snack.
Give these colorful, gooey bars a try and let me know how they turned out in the comments below! I’d love to hear which optional toppings and variations you tried, and don’t forget to share a photo if you make them.
Recommended:
- Single Serve Rice Krispie Treat Recipe
- Copycat Starbucks Rice Krispie Treat Recipe
- Monster Cookie Bars Recipe
- Monster Cookie Recipe
- Pumpkin Bar Recipe
- Fudge Brownie Recipe
- No Bake Cheesecake Recipe
- Chocolate Pudding Recipe
- Toffee Recipe
- Banana Pudding Recipe


