Deviled eggs are the ultimate crowd-pleaser that never goes out of style. This easy deviled eggs recipe brings together creamy mayonnaise, tangy mustard, and perfectly cooked egg yolks to create a classic appetizer that disappears at every gathering.
Making deviled eggs from scratch is simpler than you might think. The hardest part is boiling the eggs properly, and once you master that technique, the rest comes together in minutes.
These timeless bites have been gracing party tables, holiday spreads, and potluck buffets for generations. The combination of smooth, seasoned yolk filling nestled in tender egg white halves makes them irresistible.
What makes this recipe special is its simplicity. You don’t need fancy ingredients or complicated techniques to create deviled eggs that taste like they came from your grandmother’s kitchen.
The creamy texture of the filling comes from the perfect ratio of mayo to egg yolks, while a touch of mustard adds just enough tang to balance the richness. A sprinkle of paprika on top adds a pop of color and a subtle smoky note.
This is one of those recipes you’ll reach for time and time again. They’re ideal for Easter brunches, Thanksgiving dinners, game day parties, or any time you need an appetizer that everyone loves.
Looking for more crowd-pleasing appetizers? This pairs beautifully with classic bruschetta for an elegant spread.

Why You’ll Love This Easy Deviled Eggs Recipe
Deviled eggs have stood the test of time because they deliver on every front. They’re quick to prepare, budget-friendly, and always receive rave reviews.
The beauty of this recipe lies in its versatility. You can make them ahead of time, customize the flavors to your liking, and serve them for any occasion from casual cookouts to formal holiday dinners.
Here’s why this recipe will become your go-to:
- Simple ingredients: You likely have everything you need in your kitchen already, from eggs to mayo to basic seasonings
- Make-ahead friendly: Prepare the eggs and filling up to two days in advance and assemble them just before serving
- Always a hit: Even picky eaters love these classic bites, making them perfect for mixed crowds
- Economical: A dozen eggs makes 24 deviled egg halves, feeding a crowd without breaking the bank
- Easy to customize: The basic recipe serves as a blank canvas for endless flavor variations
- Portable: They travel well to potlucks and parties, especially with a deviled egg carrier
- Protein-packed: Each egg half provides quality protein and essential nutrients
Another favorite: Classic Egg Salad Recipe
Ingredients
The beauty of deviled eggs is that they require just a handful of simple ingredients you probably already have on hand. Each component plays an important role in creating that signature creamy, tangy filling.
The eggs themselves are the star, while the mayo provides richness and helps bind everything together. Dijon mustard adds a sophisticated tang that elevates the flavor beyond what yellow mustard can provide.
- 12 large eggs
- ½ cup (120ml) mayonnaise
- 2 tablespoons Dijon mustard
- 1 teaspoon white vinegar or pickle juice
- ¼ teaspoon salt
- ¼ teaspoon black pepper
- Paprika, for garnish
- Fresh chives, optional for garnish
Read Also: Air Fryer Egg Bites Recipe
Kitchen Equipment Needed
Having the right tools makes preparing deviled eggs much easier and ensures beautiful results. While you can manage with basic kitchen items, a few specific pieces of equipment will streamline the process significantly.
A slotted spoon or skimmer is essential for safely lowering eggs into boiling water and removing them without cracking. An ice bath setup chills the eggs quickly, which not only stops the cooking process but also makes peeling much easier.
- Large pot or saucepan
- Slotted spoon or egg skimmer
- Large bowl for ice bath
- Cutting board
- Sharp knife
- Medium mixing bowl
- Fork for mashing
- Small spoon or piping bag with star tip
- Deviled egg platter (optional but helpful for serving)
You might also enjoy: Cloud Eggs Recipe
Recommended Products for This Recipe
These carefully selected products will help you create the best deviled eggs possible and make the preparation process smoother and more enjoyable.
1. Hellmann’s Real Mayonnaise
This classic mayo delivers the perfect creamy texture and rich flavor that makes deviled eggs irresistible. The consistency is ideal for mixing with egg yolks without making the filling too runny or too thick. It’s the same brand professional chefs and home cooks have trusted for decades.
2. OXO Good Grips Egg Slicer
This handy tool makes perfectly uniform cuts every time, ensuring your deviled eggs look professional and elegant. The sharp stainless steel wires slice through eggs cleanly without crushing them. It’s also great for slicing mushrooms, strawberries, and other soft foods.
3. Wilton Disposable Decorating Bags
These piping bags make filling egg whites a breeze and give you that beautiful, professional-looking swirl on top. They’re disposable, which means easy cleanup, and the 12-inch size is perfect for this recipe. Just snip the corner or add a decorative tip for stunning presentation.
4. Prepworks by Progressive Deviled Egg Carrier
This specialized carrier keeps your deviled eggs safe during transport and makes them easy to serve. It holds 24 egg halves securely in individual slots, preventing them from sliding around or tipping over. The snap-on lid keeps everything fresh and protected.
This technique works wonderfully in Air Fryer Egg Toast Recipe as well.
Step-by-Step Instructions
Follow these detailed steps for perfectly cooked eggs and smooth, creamy filling every time. Taking your time with each step ensures beautiful results that will impress your guests.
1. Prepare the Eggs for Boiling
- Fill a large pot with enough cold water to cover the eggs by about 1½ inches (4cm)
- Gently place the eggs in a single layer in the pot using a slotted spoon to prevent cracking
- Make sure the eggs are completely submerged and not crowded together
2. Boil the Eggs
- Place the pot over high heat and bring the water to a rolling boil
- Once the water reaches a full boil, immediately cover the pot with a tight-fitting lid
- Remove the pot from the heat completely and let it sit covered for 12 minutes for large eggs (adjust to 10 minutes for medium eggs or 14 minutes for extra-large eggs)
- Do not peek or remove the lid during this time as it will affect the cooking temperature
3. Prepare the Ice Bath
- While the eggs are cooking, fill a large bowl with ice water
- Make sure you have plenty of ice to keep the water very cold
- This ice bath is crucial for stopping the cooking process and making the eggs easier to peel
4. Shock and Cool the Eggs
- After the 12-minute cooking time, immediately transfer the eggs to the ice bath using your slotted spoon
- Make sure all eggs are fully submerged in the ice water
- Let them sit in the ice bath for at least 5 minutes, but 10 minutes is even better for easier peeling
- The cold water causes the egg to contract slightly from the shell, making peeling much simpler
5. Peel the Eggs
- Gently tap each egg all over on the countertop to create small cracks in the shell
- Roll the egg back and forth gently on the counter to loosen the shell
- Start peeling from the wider end where the air pocket is located, which makes it easier to get under the membrane
- Peel under cool running water if needed to help remove any stubborn bits of shell
- Pat the peeled eggs dry with paper towels
6. Cut the Eggs
- Place each peeled egg on a cutting board
- Using a sharp knife, slice each egg in half lengthwise for the most traditional presentation
- Wipe your knife clean between cuts for neat, smooth edges
- Arrange the egg white halves on a serving platter or work surface
7. Remove and Prepare the Yolks
- Gently squeeze each egg white half or use a small spoon to pop the yolk out into a medium mixing bowl
- Try to keep the egg white halves intact and undamaged for the best presentation
- Collect all the yolks in the bowl before moving to the next step
8. Mash the Yolks
- Use a fork to mash the egg yolks until they’re crumbly and broken up
- Continue mashing until you have a fine, even texture with no large chunks
- This step is important for achieving a smooth, creamy filling
9. Mix the Filling
- Add the mayonnaise, Dijon mustard, vinegar (or pickle juice), salt, and black pepper to the mashed yolks
- Stir vigorously with a fork or small whisk until the mixture is completely smooth and creamy
- The mixture should be thick but pipeable, similar to the consistency of frosting
- Taste the filling and adjust the seasonings if needed, adding more salt, pepper, or mustard to your preference
10. Fill the Egg Whites
- Spoon the yolk mixture into a piping bag or a zip-top plastic bag with one corner snipped off
- Alternatively, you can simply use a small spoon for a more rustic look
- Pipe or spoon the filling into each egg white half, creating a generous mound
- Fill each egg white evenly, dividing the mixture among all 24 halves
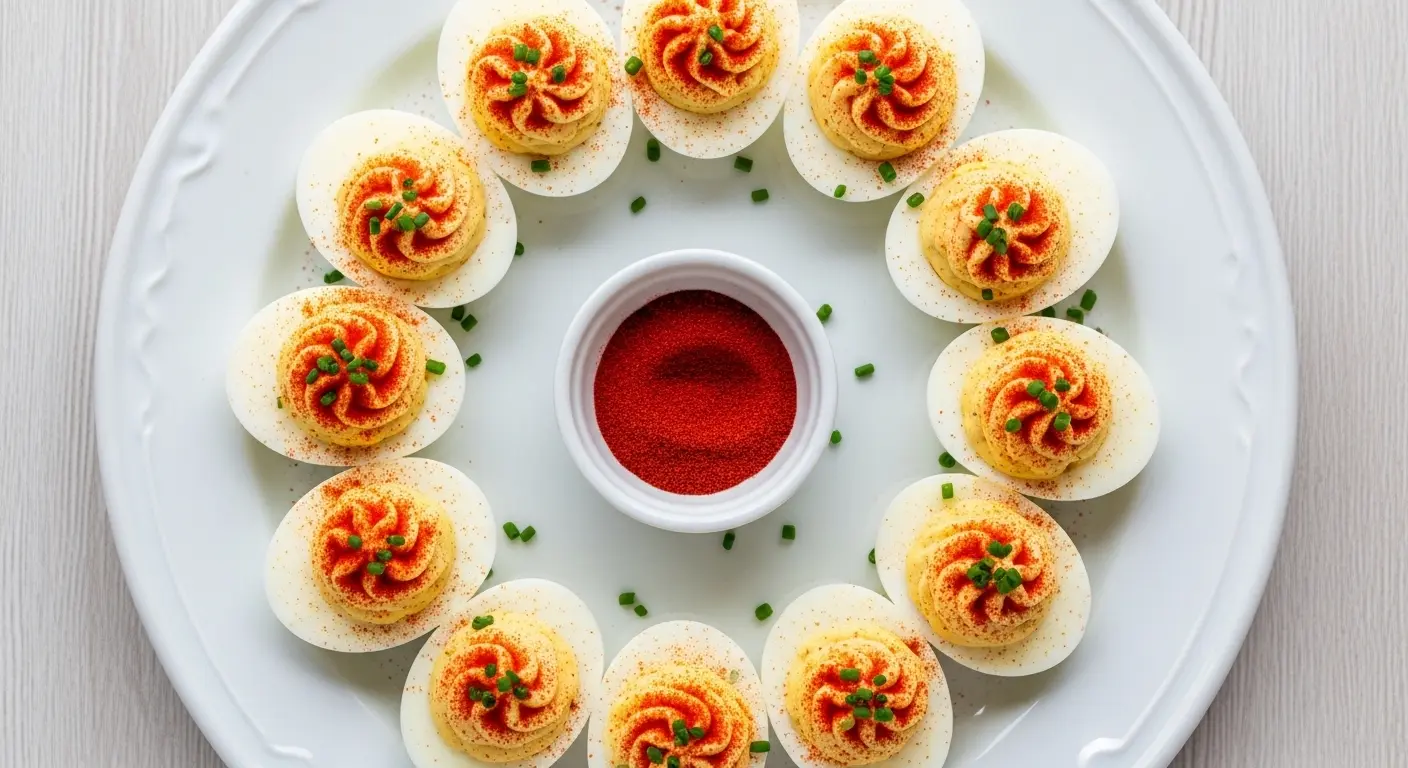
11. Garnish and Serve
- Sprinkle each deviled egg with a light dusting of paprika for color and a subtle smoky flavor
- If using fresh chives, snip them finely with scissors and sprinkle a few pieces on top of each egg
- Arrange the finished deviled eggs on your serving platter
- Cover with plastic wrap and refrigerate until ready to serve, or serve immediately
Read Also: Air Fryer Quiche Recipe
Tips for Success
These insider tips will help you avoid common pitfalls and create the best deviled eggs every time. Small details make a big difference in both appearance and taste.
Pay attention to the age of your eggs, as this significantly affects how easily they peel. Slightly older eggs (about a week old) peel much more easily than farm-fresh eggs because the pH changes over time.
- Use older eggs: Eggs that are 7-10 days old peel much more easily than very fresh eggs, so plan ahead when possible
- Perfect the ice bath: The ice water bath is not optional; it stops the cooking process immediately and prevents that green ring around the yolk that comes from overcooking
- Don’t skip the rest time: Letting the eggs sit in the covered pot for exactly 12 minutes creates perfectly cooked yolks that are creamy, not chalky
- Dry your egg whites: Before filling, pat the inside of each egg white half with a paper towel to remove any water droplets that could make the filling watery
- Adjust consistency: If your filling seems too thick, add mayo a teaspoon at a time; if too thin, add a little extra yolk from another hard-boiled egg
- Make it smooth: For an ultra-smooth filling, push the yolk mixture through a fine-mesh sieve before adding the other ingredients
- Piping bag trick: Use a piping bag with a large star tip for beautiful, professional-looking swirls that make your deviled eggs look bakery-quality
- Store properly: Keep deviled eggs refrigerated and covered until serving time, as they should not sit out for more than 2 hours
- Serve chilled: Deviled eggs taste best when served cold, so keep them in the fridge until just before your guests arrive
For a lighter option, try: Air Fryer Cloud Eggs Recipe
Serving Suggestions

Deviled eggs are incredibly versatile and can be served in countless ways. They work beautifully as a standalone appetizer or as part of a larger spread.
These classic bites pair wonderfully with both casual and elegant dishes. For a brunch spread, serve them alongside Breakfast Potatoes and fresh fruit. They’re also a natural fit for holiday tables, complementing dishes like Funeral Potatoes or Au Gratin Potatoes.
Here are some delicious serving ideas:
- Easter brunch: Arrange deviled eggs on a spring-themed platter with fresh herbs and edible flowers for a festive touch
- Thanksgiving appetizer: Serve them before the main meal alongside cheese boards and crudités to keep guests satisfied
- Summer BBQ: These are perfect for outdoor gatherings, served cold alongside grilled meats and fresh salads
- Game day spread: Arrange them on a stadium platter with wings, nachos, and other finger foods
- Potluck favorite: Transport them in a deviled egg carrier to keep them secure and beautiful during travel
- Cocktail party: Serve them on elegant trays as sophisticated passed appetizers with other small bites
- Picnic companion: Pack them in a cooler for outdoor dining, pairing them with sandwiches and fresh vegetables
You might also enjoy: Breakfast Casserole Recipe
Variations to Try
Once you’ve mastered the classic version, deviled eggs become a canvas for endless creativity. These variations add exciting new flavors while keeping the beloved creamy texture.
The basic recipe is incredibly forgiving and welcomes experimentation. You can adjust the filling ingredients, change up the garnishes, or add mix-ins to create unique flavor profiles that suit any occasion or preference.
- Bacon deviled eggs: Fold in 3-4 strips of crumbled crispy bacon to the filling and top each egg with a small piece of bacon
- Spicy deviled eggs: Add 1-2 teaspoons of sriracha or hot sauce to the filling and garnish with sliced jalapeños
- Avocado deviled eggs: Mash half an avocado into the yolk mixture for a creamy, green-hued filling with healthy fats
- Pickle relish deviled eggs: Stir in 2 tablespoons of sweet or dill pickle relish for classic Southern-style deviled eggs
- Ranch deviled eggs: Replace half the mayo with ranch dressing and garnish with fresh dill and chives
- Everything bagel deviled eggs: Top each egg with a sprinkle of everything bagel seasoning for a trendy twist
- Buffalo deviled eggs: Mix buffalo sauce into the filling and top with crumbled blue cheese and celery leaves
- Mediterranean deviled eggs: Add sun-dried tomatoes, feta cheese, and fresh basil to the filling
- Smoked salmon deviled eggs: Top each egg with a small piece of smoked salmon and a sprig of fresh dill
Another favorite: Easy Egg Salad Recipe
Storage and Reheating
Proper storage is crucial for maintaining both the quality and safety of your deviled eggs. These tips will help you keep them fresh and delicious.
Since deviled eggs contain mayonnaise and eggs, they’re perishable and require refrigeration. Following food safety guidelines ensures they remain safe to eat.
- Refrigerate promptly: Store deviled eggs in an airtight container in the refrigerator within 2 hours of preparation
- Keep them covered: Use plastic wrap or a tight-fitting lid to prevent the eggs from absorbing refrigerator odors and drying out
- Shelf life: Properly stored deviled eggs will stay fresh for up to 2 days in the refrigerator
- Make-ahead strategy: For best results, prepare hard-boiled eggs up to 3 days ahead and make the filling up to 2 days ahead, but only assemble them within 24 hours of serving
- Separate storage: If making ahead, store the egg white halves and yolk filling separately in airtight containers and fill the whites just before serving
- No freezing: Do not freeze deviled eggs as the texture becomes watery and unpleasant when thawed
- Transport safely: Use a cooler with ice packs when transporting deviled eggs to maintain proper temperature
- Room temperature rule: Never leave deviled eggs at room temperature for more than 2 hours, or 1 hour if the temperature is above 90°F (32°C)
This pairs beautifully with Air Fryer Egg Cups Recipe for a complete breakfast spread.
Nutritional Facts
Understanding the nutritional content helps you make informed choices about portion sizes and how deviled eggs fit into your overall diet.
Per Serving (2 deviled egg halves):
- Calories: 140
- Total Fat: 12g
- Saturated Fat: 3g
- Trans Fat: 0g
- Cholesterol: 187mg
- Sodium: 180mg
- Total Carbohydrates: 1g
- Dietary Fiber: 0g
- Sugars: 0.5g
- Protein: 6g
- Vitamin A: 8% DV
- Vitamin D: 6% DV
- Calcium: 3% DV
- Iron: 5% DV
- Potassium: 2% DV
Note: Nutritional information is automatically calculated and should be used as an approximation. Values may vary based on specific brands and ingredient choices.
Read Also: French Toast Casserole Recipe
Health Benefits of Key Ingredients
While deviled eggs are often considered indulgent party food, they actually offer several nutritional benefits when enjoyed in moderation. Each ingredient contributes something valuable to your diet.
Eggs are nutritional powerhouses packed with essential nutrients. The combination of healthy fats from mayo and protein from eggs creates a satisfying snack that keeps you fuller longer than many other appetizers.
Here’s what makes deviled eggs a surprisingly nutritious choice:
- High-quality protein: Eggs contain all nine essential amino acids, making them a complete protein source that supports muscle maintenance and repair
- Vitamin B12: Essential for nerve function and red blood cell formation, with one egg providing about 20% of your daily needs
- Choline: Eggs are one of the best dietary sources of choline, which supports brain health, liver function, and fetal development during pregnancy
- Vitamin D: Helps with calcium absorption and bone health, and eggs are one of the few natural food sources of this important vitamin
- Selenium: This powerful antioxidant supports thyroid function and immune health
- Lutein and zeaxanthin: These antioxidants found in egg yolks support eye health and may reduce the risk of age-related macular degeneration
- Healthy fats: The monounsaturated fats in mayonnaise and egg yolks support heart health when consumed as part of a balanced diet
- Low carbohydrate: With less than 1 gram of carbs per serving, deviled eggs are suitable for low-carb and keto diets
You might also enjoy: Cheesy Potatoes Recipe
Frequently Asked Questions
1. How do I prevent the green ring around the yolk?
The green ring forms when eggs are overcooked or not cooled quickly enough. To prevent it, remove the pot from heat after the water boils and let eggs sit for exactly 12 minutes. Then immediately transfer them to an ice bath for at least 5 minutes.
This stops the cooking process and prevents the chemical reaction that creates the greenish-gray ring. The ring is harmless but looks unappealing in deviled eggs.
2. Can I make deviled eggs the day before?
Yes, you can prepare deviled eggs up to 24 hours in advance. For best results, store the hard-boiled egg white halves and the yolk filling separately in airtight containers in the refrigerator.
Assemble them by filling the whites just a few hours before serving and add the paprika garnish right before presenting. This prevents the filling from drying out or absorbing moisture from the whites.
3. Why won’t my eggs peel easily?
Very fresh eggs are notoriously difficult to peel because the pH of the egg white is lower, causing it to bond more tightly to the shell membrane. Use eggs that are at least 7-10 days old for easier peeling.
The ice bath is also crucial as it causes the egg to contract slightly away from the shell. Gently tap and roll the egg all over before peeling, and start from the wider end where the air pocket is located.
4. How can I make my filling extra smooth?
For ultra-smooth filling, push the mashed egg yolks through a fine-mesh sieve before adding the other ingredients. You can also use a food processor to blend the yolks with the mayo and mustard until completely smooth.
Some people prefer a slightly chunky texture, so this step is optional based on personal preference. The key is to mash the yolks thoroughly with a fork before adding wet ingredients.
5. What’s the best way to fill deviled eggs neatly?
A piping bag with a large star tip gives you the most professional-looking results with beautiful swirls. If you don’t have a piping bag, use a zip-top plastic bag with one corner snipped off about ½ inch.
For a more rustic presentation, simply use two small spoons, using one to scoop the filling and the other to push it off into the egg white. This method is faster and creates a homestyle look that’s equally appealing.
This technique works wonderfully in Twice Baked Potato Recipe as well.
Easy Deviled Eggs
Equipment
- Large pot or saucepan
- Slotted spoon or egg skimmer
- Large bowl for ice bath
- Cutting board
- Sharp knife
- Medium mixing bowl
- Fork
- Small spoon or piping bag with star tip - piping bag optional but recommended for professional look
- Deviled egg platter - optional but helpful for serving
- Fine-mesh sieve - optional, for extra smooth filling
- Zip-top plastic bag - alternative to piping bag
Ingredients
- 12 large eggs - about 7-10 days old for easier peeling
- 0.5 cup mayonnaise - 120ml, preferably Hellmann’s Real Mayonnaise
- 2 tablespoons Dijon mustard
- 1 teaspoon white vinegar or pickle juice
- 0.25 teaspoon salt
- 0.25 teaspoon black pepper
- paprika - for garnish
- fresh chives - optional, for garnish
Instructions
- Fill a large pot with cold water to cover eggs by 1½ inches. Gently place eggs in a single layer using a slotted spoon.
- Bring water to a rolling boil over high heat. Once boiling, cover pot with tight-fitting lid, remove from heat, and let sit covered for 12 minutes exactly.
- While eggs cook, prepare a large bowl of ice water. After 12 minutes, immediately transfer eggs to ice bath using slotted spoon. Let sit for at least 5-10 minutes.
- Tap each egg gently all over on countertop, then roll to loosen shell. Peel starting from the wider end. Pat peeled eggs dry with paper towels.
- Slice each egg in half lengthwise with a sharp knife. Gently pop out yolks into a medium mixing bowl. Arrange egg white halves on serving platter.
- Mash egg yolks with a fork until fine and crumbly with no large chunks. Add mayonnaise, Dijon mustard, vinegar, salt, and pepper. Stir until completely smooth and creamy.
- Transfer filling to a piping bag or zip-top bag with corner snipped off. Pipe or spoon filling generously into each egg white half.
- Garnish with a light dusting of paprika and fresh chives if desired. Refrigerate until ready to serve, up to 24 hours in advance.
Notes
- Use eggs that are 7-10 days old—they peel much more easily than very fresh eggs.
- The ice bath is not optional; it stops cooking and prevents the green ring around the yolk.
- For ultra-smooth filling, push mashed yolks through a fine-mesh sieve before adding wet ingredients.
- Pat the inside of egg white halves dry before filling to prevent watery filling.
- Make ahead: Store hard-boiled egg whites and yolk mixture separately in airtight containers up to 2 days ahead. Assemble within 24 hours of serving.
- For a piping bag alternative, use a zip-top plastic bag with one corner snipped off about ½ inch.
- Never leave deviled eggs at room temperature for more than 2 hours (1 hour if above 90°F/32°C).
- Variations: Add crumbled bacon, sriracha, avocado, pickle relish, or everything bagel seasoning.
- A deviled egg carrier keeps eggs secure when traveling to potlucks or parties.
Final Thoughts
This easy deviled eggs recipe proves that the classics never go out of style for good reason. With just a few simple ingredients and straightforward techniques, you can create an appetizer that delights everyone from kids to grandparents.
The beauty of deviled eggs lies in their versatility and timeless appeal. They’re just as welcome at a casual backyard BBQ as they are at an elegant holiday dinner.
Once you master this basic recipe, you’ll find yourself making deviled eggs for every occasion. The endless variation possibilities mean you’ll never get bored, and your guests will always be impressed.
Give this recipe a try for your next gathering and watch them disappear faster than any other appetizer on the table. We’d love to hear how your deviled eggs turned out! Drop a comment below and let us know if you tried any fun variations or have your own secret tips to share.
Recommended:
- Classic Deviled Eggs Recipe
- Baked Potato Recipe
- Air Fryer Baked Potato Recipe
- Potato Casserole Recipe
- Chicken Casserole Recipe
- Tuna Noodle Casserole Recipe
- Corn Casserole Recipe
- Easy Nachos Recipe
- Loaded Nachos Recipe
- Easy Hummus Recipe


