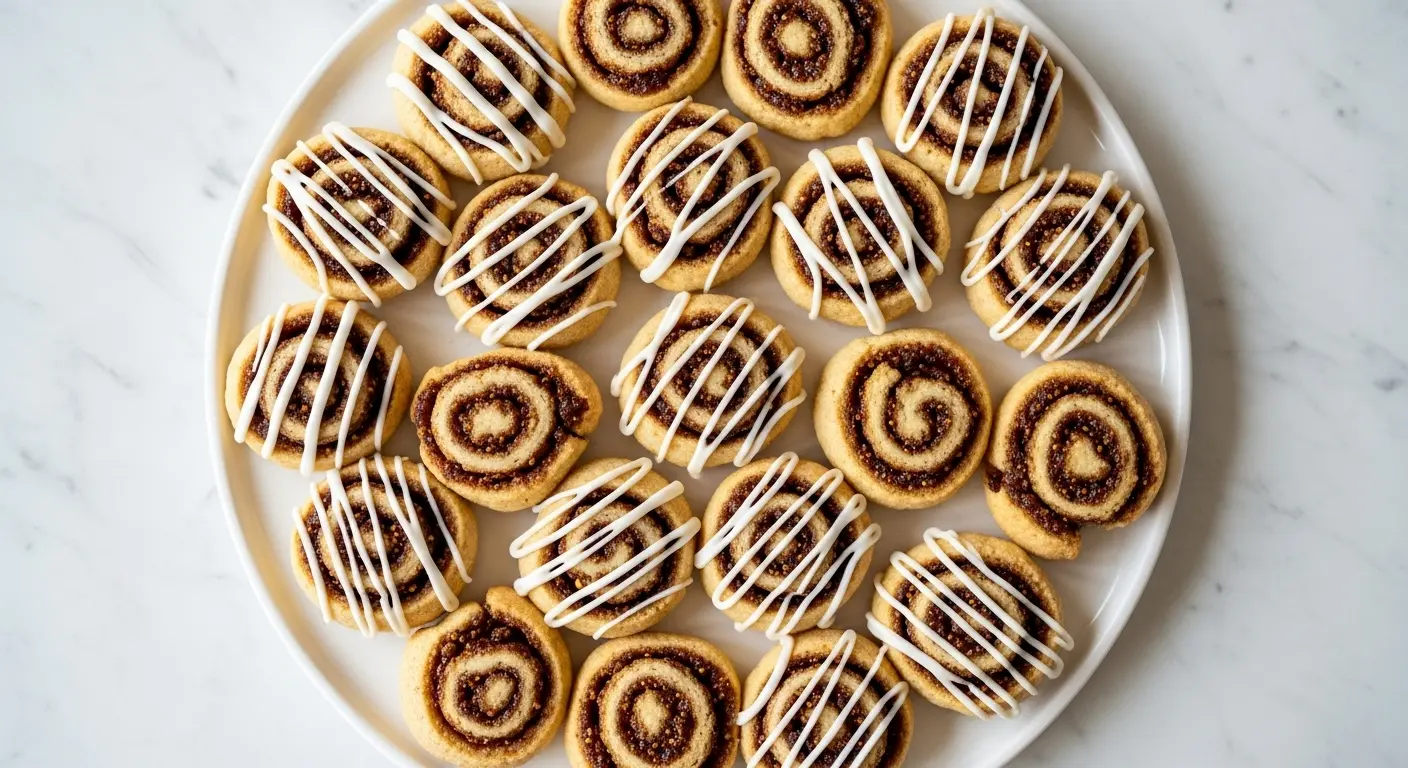
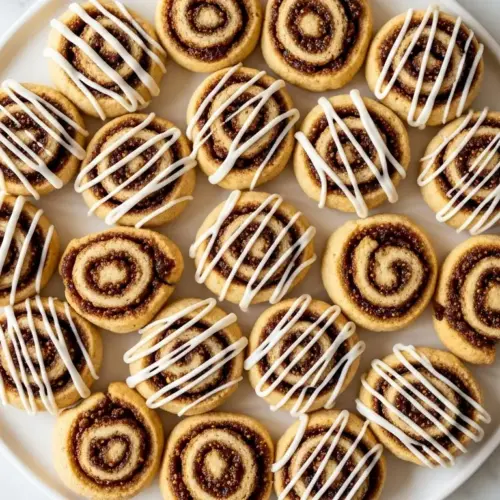
If you’ve been searching for an authentic fig cookie recipe that brings together tender, buttery pastry and a sweet, spiced fig filling, you’ve come to the right place. These Italian-style cookies, also known as Cucidati, are a timeless holiday tradition that’s been passed down through generations of Sicilian families.
The beauty of these cookies lies in their perfect balance of textures and flavors. The dough is soft and forgiving to work with, while the filling combines dried figs with dates, raisins, walnuts, and aromatic spices for a truly memorable bite.
Making fig cookies from scratch might seem intimidating at first, but the process is surprisingly straightforward. The filling comes together quickly in a food processor, and the dough requires just a few simple ingredients that you likely already have in your pantry.
These cookies are ideal for holiday baking, but they’re delicious enough to enjoy any time of year. The combination of sweet fruit filling and buttery pastry creates a sophisticated treat that’s perfect for sharing with family and friends or giving as gifts.
The recipe yields a generous batch, making it perfect for large gatherings or for freezing extras to enjoy later. Once you taste these homemade fig cookies, you’ll understand why they’ve remained a beloved tradition for so many families.
Another favorite in my collection is this Almond Macaroon Cookie Recipe, which offers a completely different texture and flavor profile.

Why You’ll Love This Fig Cookie Recipe
This fig cookie recipe stands out for its authentic flavor and texture that rivals any bakery version. The pastry-like dough has a delicate, tender crumb that practically melts in your mouth, while the fig filling provides just the right amount of sweetness and spice.
The make-ahead friendly nature of these cookies makes them perfect for busy holiday schedules. You can prepare both the dough and filling in advance, then assemble and bake when you’re ready. This flexibility means less stress during the hectic holiday season.
Here’s what makes this recipe special:
- Authentic Italian flavor with traditional ingredients like figs, dates, and walnuts
- Tender, buttery dough that’s easy to work with and doesn’t require special techniques
- Customizable filling that lets you adjust sweetness and spices to your taste
- Perfect for gifting with their beautiful appearance and impressive flavor
- Long shelf life that actually improves in flavor after a day or two
- Freezer-friendly so you can make them weeks in advance
If you enjoy cookies with dried fruit, you’ll also love this Date Filled Cookie Recipe.
Ingredients
This recipe calls for simple, accessible ingredients that combine to create something truly special. The dough uses basic pantry staples, while the filling features a blend of dried fruits and nuts that create complex flavor.
For the Dough:
- 4 cups (500g) all-purpose flour
- 1/2 cup (100g) granulated sugar
- 1 tablespoon (12g) baking powder
- 1/2 teaspoon (3g) salt
- 1 cup (227g) unsalted butter, cold and cubed
- 3 large eggs
- 1/2 cup (120ml) whole milk
- 1 teaspoon (5ml) vanilla extract
For the Fig Filling:
- 1 pound (454g) dried figs, stems removed
- 1 cup (150g) pitted dates, chopped
- 1 cup (145g) golden raisins
- 1 cup (120g) walnuts, toasted
- 1/2 cup (120ml) orange juice
- 1/4 cup (85g) honey
- Zest of 1 orange
- Zest of 1 lemon
- 2 teaspoons (5g) ground cinnamon
- 1/2 teaspoon (1g) ground nutmeg
- 1/4 teaspoon (0.5g) ground cloves
- 1/4 teaspoon (1.5g) salt
For the Glaze (Optional):
- 1 1/2 cups (180g) confectioners’ sugar
- 2-3 tablespoons (30-45ml) milk
- 1/2 teaspoon (2.5ml) vanilla extract
- Rainbow sprinkles (optional)
You might also enjoy: Sicilian Fig Cookies Recipe
Kitchen Equipment Needed
Having the right tools makes preparing these cookies much easier and ensures consistent results. Most of these items are common kitchen equipment you probably already own.
- Food processor or blender for the filling
- Large mixing bowls
- Electric mixer (stand or hand)
- Rolling pin
- Sharp knife or pizza cutter
- Baking sheets
- Parchment paper or silicone baking mats
- Pastry brush
- Wire cooling racks
- Plastic wrap for storage
Read Also: Cherry Chip Cookie Recipe
Recommended Products for This Recipe
I’ve tested various products while perfecting this fig cookie recipe, and these are the ones that truly make a difference in the final result.
1. Cuisinart Food Processor
A quality food processor makes the filling preparation effortless, breaking down the dried fruit and nuts into the perfect consistency. The powerful motor handles tough dried figs without overheating, and the large capacity means you can make the entire batch of filling at once.
2. California Dried Mission Figs
Premium dried figs make all the difference in these cookies. California Mission figs have a rich, sweet flavor and soft texture that creates the perfect filling consistency. Look for figs that are plump and pliable rather than hard and dry.
3. Nordic Ware Natural Aluminum Baking Sheets
These commercial-grade baking sheets ensure even baking without hot spots that can burn the bottoms of your cookies. The natural aluminum finish won’t warp in the oven, and the rimmed edges prevent cookies from sliding off during transfer.
4. Silpat Silicone Baking Mat
A reusable silicone mat eliminates the need for parchment paper and provides a non-stick surface that makes cookie removal effortless. These mats also promote even browning and clean up in seconds.
For another delicious cookie variation, try my Old Fashioned Chocolate Chip Cookie Recipe.
Step-by-Step Instructions
Follow these detailed instructions for perfect fig cookies every time. Each step includes helpful tips to ensure success, even if you’re new to baking.
1. Prepare the Fig Filling
- Place the dried figs in a medium saucepan and cover with water by about 1 inch (2.5cm)
- Bring to a boil over medium-high heat, then reduce to a simmer
- Cook for 10 minutes until the figs are softened and have absorbed most of the water
- Drain the figs and let them cool for 10 minutes
- Add the cooled figs to your food processor along with dates, raisins, walnuts, orange juice, honey, orange zest, lemon zest, cinnamon, nutmeg, cloves, and salt
- Pulse the mixture 15-20 times until it forms a thick paste with small chunks of nuts visible
- The texture should be spreadable but not completely smooth
- Transfer the filling to a bowl, cover with plastic wrap, and refrigerate for at least 2 hours or up to 2 days
2. Make the Cookie Dough
- In a large mixing bowl, whisk together the flour, sugar, baking powder, and salt until well combined
- Add the cold, cubed butter to the flour mixture
- Using a pastry cutter or your fingers, work the butter into the flour until the mixture resembles coarse crumbs with pea-sized pieces of butter remaining
- In a separate small bowl, whisk together the eggs, milk, and vanilla extract until smooth
- Create a well in the center of the flour mixture and pour in the wet ingredients
- Using a wooden spoon or spatula, stir the mixture until it starts to come together into a shaggy dough
- Turn the dough out onto a lightly floured surface and knead gently 5-6 times until it forms a smooth ball
- Divide the dough into 4 equal portions and flatten each into a disk
- Wrap each disk tightly in plastic wrap and refrigerate for at least 1 hour or up to 2 days
3. Preheat and Prepare
- Position oven racks in the upper and lower thirds of your oven
- Preheat the oven to 350°F (175°C)
- Line two large baking sheets with parchment paper or silicone baking mats
- Remove one portion of dough from the refrigerator (keep the rest chilled)
- Let the dough sit at room temperature for 5 minutes to make rolling easier
4. Roll Out the Dough
- Lightly flour a clean work surface and your rolling pin
- Place one disk of dough on the floured surface
- Roll the dough into a rectangle approximately 16 inches (40cm) long by 6 inches (15cm) wide
- The dough should be about 1/8 inch (3mm) thick
- If the dough becomes too soft or sticky while rolling, refrigerate it for 10 minutes
- Use a knife or bench scraper to trim the edges so they’re straight and even
5. Fill and Shape the Cookies
- Remove the fig filling from the refrigerator
- Spoon about 1 cup (240ml) of filling lengthwise down the center of the dough rectangle
- Shape the filling into a log about 1 inch (2.5cm) wide, leaving about 2 inches (5cm) of space at each end
- Fold one long edge of dough over the filling, pressing gently to adhere
- Fold the opposite long edge over the first, overlapping slightly to enclose the filling completely
- Press the seam gently to seal, making sure there are no gaps
- Pinch both short ends closed to prevent filling from leaking during baking
- Using a sharp knife or pizza cutter, cut the log diagonally into 1-inch (2.5cm) pieces
6. Bake the Cookies
- Carefully transfer the cut cookies to your prepared baking sheets, placing them seam-side down
- Space cookies about 1 inch (2.5cm) apart to allow for slight spreading
- Repeat the rolling, filling, and cutting process with remaining dough portions
- Bake for 22-25 minutes, rotating the pans halfway through baking time
- The cookies are done when the bottoms are golden brown and the tops are lightly colored
- The dough should no longer look wet or shiny
- Remove from oven and let cookies cool on the baking sheets for 5 minutes
7. Cool and Glaze (Optional)
- Transfer cookies to wire cooling racks and let them cool completely, about 30 minutes
- While cookies cool, prepare the glaze by whisking together confectioners’ sugar, 2 tablespoons of milk, and vanilla extract
- Add more milk 1 teaspoon at a time if needed to reach a thick but pourable consistency
- Once cookies are completely cool, drizzle or brush the glaze over the top of each cookie
- Add rainbow sprinkles immediately if using, before the glaze sets
- Let the glaze harden for 20-30 minutes before serving or storing
For a different type of holiday cookie, check out this Cut Out Sugar Cookie Recipe.
Tips for Success
These professional tips will help you achieve bakery-quality results with your fig cookies. Pay special attention to dough temperature and filling consistency.
- Keep the dough cold while working with it. If it becomes too soft, refrigerate for 10-15 minutes before continuing. Cold dough is much easier to roll and shape without tearing.
- Don’t overfill the cookies or the filling will leak out during baking. About 1 cup of filling per rectangle is the perfect amount for a generous but manageable filling.
- Toast the walnuts before adding them to the filling for deeper, richer flavor. Spread them on a baking sheet and toast at 350°F (175°C) for 8-10 minutes until fragrant.
- Use fresh spices for the best flavor. Ground spices lose potency over time, so check the dates on your cinnamon, nutmeg, and cloves before using.
- Soften hard dried figs by soaking them in warm water for 15-20 minutes if they seem too dry. This ensures they’ll blend smoothly in the food processor.
- Make the filling ahead and let it rest for 24-48 hours. This allows the flavors to meld together and develop complexity.
- Check for doneness by looking at the bottoms of cookies rather than just the tops. They should be golden brown, not pale.
- Cool completely before glazing to prevent the glaze from melting and becoming too thin.
- Store unglazed cookies separately from glazed ones if you’re making them ahead. Add glaze just before serving for the freshest appearance.
This technique works beautifully in Best Chocolate Chip Cookies Recipe as well.
Serving Suggestions
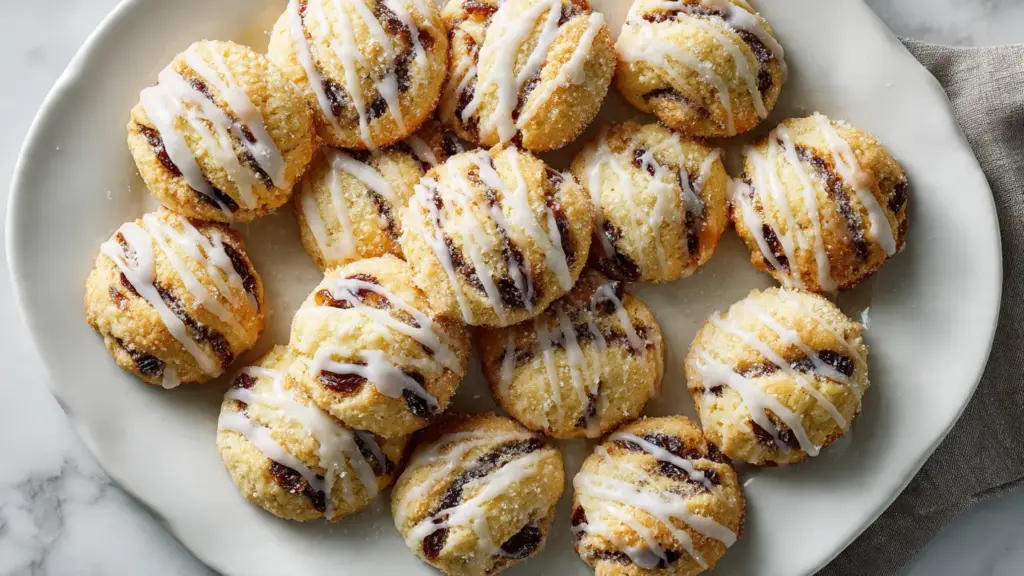
Fig cookies are incredibly versatile and can be enjoyed in many different ways throughout the day. Their not-too-sweet flavor profile makes them suitable for various occasions.
These cookies shine as part of a holiday cookie platter alongside other traditional treats. They provide a sophisticated contrast to richer chocolate cookies and pair beautifully with lighter options like shortbreads.
Serve them with:
- Hot coffee or espresso for a classic Italian-style afternoon treat
- Sweet dessert wine like Moscato or Vin Santo for an elegant after-dinner experience
- Warm spiced tea such as chai or Earl Grey
- Cold milk for a comforting, nostalgic snack
- Fresh fruit and cheese as part of a dessert board
- Vanilla gelato or ice cream for an indulgent dessert
- Hot chocolate during cold winter evenings
They pair wonderfully with Classic Tiramisu for an all-Italian dessert spread.
Variations to Try
Once you’ve mastered the basic recipe, these variations let you customize the cookies to your preferences or work with ingredients you have on hand.
- Chocolate-enhanced filling: Add 1/2 cup (85g) of finely chopped dark chocolate to the fig filling for a richer, more decadent flavor profile.
- Different nuts: Substitute pecans, almonds, or hazelnuts for the walnuts. Toast them first for maximum flavor impact.
- Citrus variations: Use all orange zest or all lemon zest instead of a combination. Try adding 1 teaspoon of orange blossom water for a floral note.
- Spice adjustments: Add 1/2 teaspoon of ground ginger or cardamom for a different warm spice profile. Reduce cloves if you find them too strong.
- Dried fruit substitutions: Use dried apricots, prunes, or dried cranberries in place of some of the dates or raisins for different flavor notes.
- Liquor addition: Replace 2 tablespoons of orange juice with brandy, rum, or amaretto for an adult version with deeper complexity.
- Smaller cookies: Cut the logs into 1/2-inch pieces for bite-sized cookies perfect for parties and cookie trays.
- Different glazes: Try a lemon glaze using lemon juice instead of milk, or skip the glaze entirely for a less sweet version.
Read Also: Chewy Chocolate Chip Cookies Recipe
Storage and Reheating
Proper storage keeps these cookies fresh and delicious for weeks, making them ideal for advance preparation during busy holiday seasons.
- Room temperature storage: Place cooled, glazed cookies in an airtight container with wax paper between layers. They’ll stay fresh for up to 5 days and actually improve in flavor after 24 hours as the filling moistens the dough slightly.
- Refrigerator storage: For longer storage, keep cookies in an airtight container in the refrigerator for up to 2 weeks. Let them come to room temperature before serving for the best texture and flavor.
- Freezer storage: Freeze unglazed cookies in a single layer on a baking sheet until solid, then transfer to freezer bags or airtight containers with wax paper between layers. They’ll keep for up to 3 months. Thaw at room temperature and add glaze before serving.
- Freezing dough: Wrap individual dough disks tightly in plastic wrap, then place in freezer bags. Freeze for up to 2 months. Thaw overnight in the refrigerator before rolling out.
- Freezing filling: Store prepared filling in an airtight container in the freezer for up to 6 months. Thaw in the refrigerator overnight before using.
For more holiday treats, consider making Easy Sugar Cookie Recipe.
Nutritional Facts
Per cookie (based on 48 cookies, without glaze):
- Calories: 112
- Total Fat: 4g
- Saturated Fat: 1.5g
- Cholesterol: 18mg
- Sodium: 45mg
- Total Carbohydrates: 18g
- Dietary Fiber: 1.5g
- Sugars: 10g
- Protein: 2g
Note: Nutritional information is approximate and will vary based on specific ingredients used and portion sizes.
Another favorite is this Single Serving Sugar Cookie Recipe.
Health Benefits of Key Ingredients
While these cookies are certainly a treat, the filling contains several ingredients that offer nutritional benefits. Understanding what makes these cookies special from a health perspective can help you feel good about enjoying them in moderation.
Figs are rich in dietary fiber, which supports digestive health and helps maintain steady blood sugar levels. They also contain potassium, calcium, and iron, making them a nutrient-dense dried fruit option compared to many other sweets.
Here are the health benefits of the main ingredients:
- Figs: Excellent source of fiber (about 3g per serving), high in antioxidants, and contain calcium for bone health
- Dates: Natural sweetener packed with fiber, potassium, and B vitamins that support energy production
- Walnuts: Rich in omega-3 fatty acids for heart health, plus protein and healthy fats that promote satiety
- Raisins: Provide iron for healthy blood cells and contain polyphenols with anti-inflammatory properties
- Orange and lemon zest: Loaded with vitamin C and flavonoids that support immune function
- Cinnamon: May help regulate blood sugar and has powerful anti-inflammatory compounds
- Honey: Contains antioxidants and antimicrobial properties, plus it’s less processed than refined sugar
- Whole eggs: Provide high-quality protein and important nutrients like choline for brain health
You might also enjoy: Easy Waffle Recipe
Frequently Asked Questions
1. Can I use fresh figs instead of dried figs?
Fresh figs won’t work well in this recipe because they contain too much moisture and won’t create the proper texture for the filling. The drying process concentrates the sugars and flavors in figs, which is essential for achieving the right consistency and taste. Stick with dried figs for authentic results that match traditional Italian fig cookies.
2. Why is my dough too crumbly or too sticky?
Dough consistency depends heavily on humidity, flour measurement, and butter temperature. If your dough is crumbly, add milk 1 tablespoon at a time until it comes together. If it’s too sticky, add flour 1 tablespoon at a time or refrigerate for 20-30 minutes to firm it up before rolling.
3. How do I prevent the filling from leaking out during baking?
Make sure to seal the edges properly by pressing firmly along the seam and pinching the ends closed. Don’t overfill the cookies, as too much filling will burst through during baking. If you notice filling starting to leak during baking, it’s okay since the cookies will still taste delicious.
4. Can I make these cookies without a food processor?
Yes, though it requires more effort. Chop all the dried fruits very finely with a sharp knife, then mash them together with the other filling ingredients using a potato masher or fork. The texture will be chunkier, but the flavor will still be excellent.
5. Do these cookies need to be refrigerated?
No, these cookies can be stored at room temperature in an airtight container for up to 5 days. However, if your kitchen is very warm or humid, refrigeration helps prevent the filling from becoming too soft. Just let them come to room temperature before serving for the best flavor and texture.
This pairs beautifully with Belgian Waffle Recipe for a complete breakfast spread.
Italian Fig Cookies (Cucidati)
Equipment
- Food processor or blender - For blending the fig filling
- Large mixing bowls
- Electric mixer - Stand or hand mixer
- Rolling Pin
- Sharp knife or pizza cutter - For cutting cookie logs
- Baking sheets - Two large sheets recommended
- Parchment paper or silicone baking mats
- Pastry brush - For applying glaze
- Wire cooling racks
- Plastic wrap - For wrapping dough disks and covering filling
Ingredients
For the Dough
- 4 cups all-purpose flour - 500g
- 1/2 cup granulated sugar - 100g
- 1 tablespoon baking powder - 12g
- 1/2 teaspoon salt - 3g
- 1 cup unsalted butter - 227g, cold and cubed
- 3 large eggs
- 1/2 cup whole milk - 120ml
- 1 teaspoon vanilla extract - 5ml
For the Fig Filling
- 1 lb dried figs - 454g, stems removed
- 1 cup pitted dates - 150g, chopped
- 1 cup golden raisins - 145g
- 1 cup walnuts - 120g, toasted
- 1/2 cup orange juice - 120ml
- 1/4 cup honey - 85g
- 1 orange, zested - zest only
- 1 lemon, zested - zest only
- 2 teaspoons ground cinnamon - 5g
- 1/2 teaspoon ground nutmeg - 1g
- 1/4 teaspoon ground cloves - 0.5g
- 1/4 teaspoon salt - 1.5g
For the Glaze (Optional)
- 1 1/2 cups confectioners’ sugar - 180g
- 2-3 tablespoons whole milk - 30–45ml, plus more as needed
- 1/2 teaspoon vanilla extract - 2.5ml
- rainbow sprinkles - optional, for decorating
Instructions
- Place dried figs in a saucepan, cover with water by 1 inch, and bring to a boil. Reduce heat and simmer for 10 minutes until softened, then drain and cool for 10 minutes.
- Add cooled figs, dates, raisins, walnuts, orange juice, honey, orange and lemon zests, cinnamon, nutmeg, cloves, and salt to a food processor. Pulse 15–20 times until a thick, spreadable paste forms with small nut pieces visible.
- Transfer the filling to a bowl, cover with plastic wrap, and refrigerate for at least 2 hours or up to 2 days to allow flavors to meld.
- Whisk together flour, sugar, baking powder, and salt in a large bowl, then cut in the cold cubed butter until the mixture resembles coarse crumbs. In a separate bowl, whisk eggs, milk, and vanilla, then stir into the flour mixture until a shaggy dough forms.
- Knead the dough gently 5–6 times on a floured surface until smooth, then divide into 4 equal disks, wrap in plastic wrap, and refrigerate for at least 1 hour or up to 2 days.
- Position oven racks in the upper and lower thirds and preheat to 350°F (175°C). Line two large baking sheets with parchment paper or silicone baking mats.
- Working with one dough disk at a time (keep others chilled), roll on a lightly floured surface into a rectangle about 16×6 inches and 1/8 inch thick. Trim edges straight with a knife or bench scraper.
- Spoon about 1 cup of filling in a 1-inch-wide log down the center of the dough, leaving 2 inches at each end. Fold one long edge over the filling, then overlap the opposite edge over it; press the seam and pinch the ends to seal.
- Using a sharp knife or pizza cutter, slice the log diagonally into 1-inch pieces. Repeat the rolling, filling, and cutting process with the remaining dough portions.
- Place cookies seam-side down on prepared baking sheets about 1 inch apart, and bake for 22–25 minutes, rotating pans halfway through, until bottoms are golden brown. Cool on the pan for 5 minutes, then transfer to wire racks.
- Once cookies are completely cool, whisk together confectioners’ sugar, 2–3 tablespoons of milk, and vanilla to a thick pourable glaze, then drizzle or brush over cookies. Add sprinkles immediately and let the glaze set for 20–30 minutes before serving.
Notes
- Keep dough cold: If the dough becomes too soft while rolling, refrigerate it for 10–15 minutes before continuing — cold dough is much easier to work with.
- Make ahead: Both the filling and dough can be made up to 2 days in advance and refrigerated. The filling actually benefits from 24–48 hours of resting time for deeper flavor.
- Toast the walnuts: Spread on a baking sheet and toast at 350°F for 8–10 minutes until fragrant before adding to the filling — this step significantly improves flavor.
- Hard dried figs: If your figs seem very dry, soak them in warm water for 15–20 minutes before cooking to ensure they blend smoothly.
- Don’t overfill: About 1 cup of filling per dough rectangle is the right amount — too much filling will cause leaking during baking.
- Check for doneness from the bottom: Look at the undersides of the cookies — they should be golden brown, not pale, before removing from the oven.
- Room temperature storage: Store glazed cookies in an airtight container with wax paper between layers for up to 5 days. Flavor improves after 24 hours as the filling gently moistens the dough.
- Freezing: Freeze unglazed cookies for up to 3 months. Thaw at room temperature and glaze before serving. Prepared filling can be frozen for up to 6 months.
- Variations: Add 1/2 cup finely chopped dark chocolate to the filling for a richer version, or replace 2 tablespoons of orange juice with brandy or amaretto for an adult twist.
- No food processor? Finely chop all dried fruits with a sharp knife and mash together with the other filling ingredients using a potato masher — the texture will be chunkier but equally delicious.
Final Thoughts
This fig cookie recipe brings together the best of Italian baking traditions with practical techniques that work in any home kitchen. The combination of buttery pastry and sweet, spiced filling creates a cookie that’s sophisticated yet comforting.
What makes these cookies truly special is how they improve with time, as the flavors meld and the filling gently moistens the pastry. Give this recipe a try, and you’ll discover why fig cookies have been cherished in Italian families for generations. I’d love to hear about your experience making these cookies, so feel free to leave a comment below with any questions or to share how they turned out for you!
Recommended:
- Best Carrot Cake Recipe
- Classic French Toast Recipe
- Easy French Toast Recipe
- Buttermilk Pancake Recipe
- Old Fashioned Pancake Recipe
- German Pancake Recipe
- Classic Apple Pie Recipe
- Dutch Apple Pie Recipe
- Carrot Cake With Cream Cheese Frosting Recipe
- Classic Pumpkin Pie Recipe


