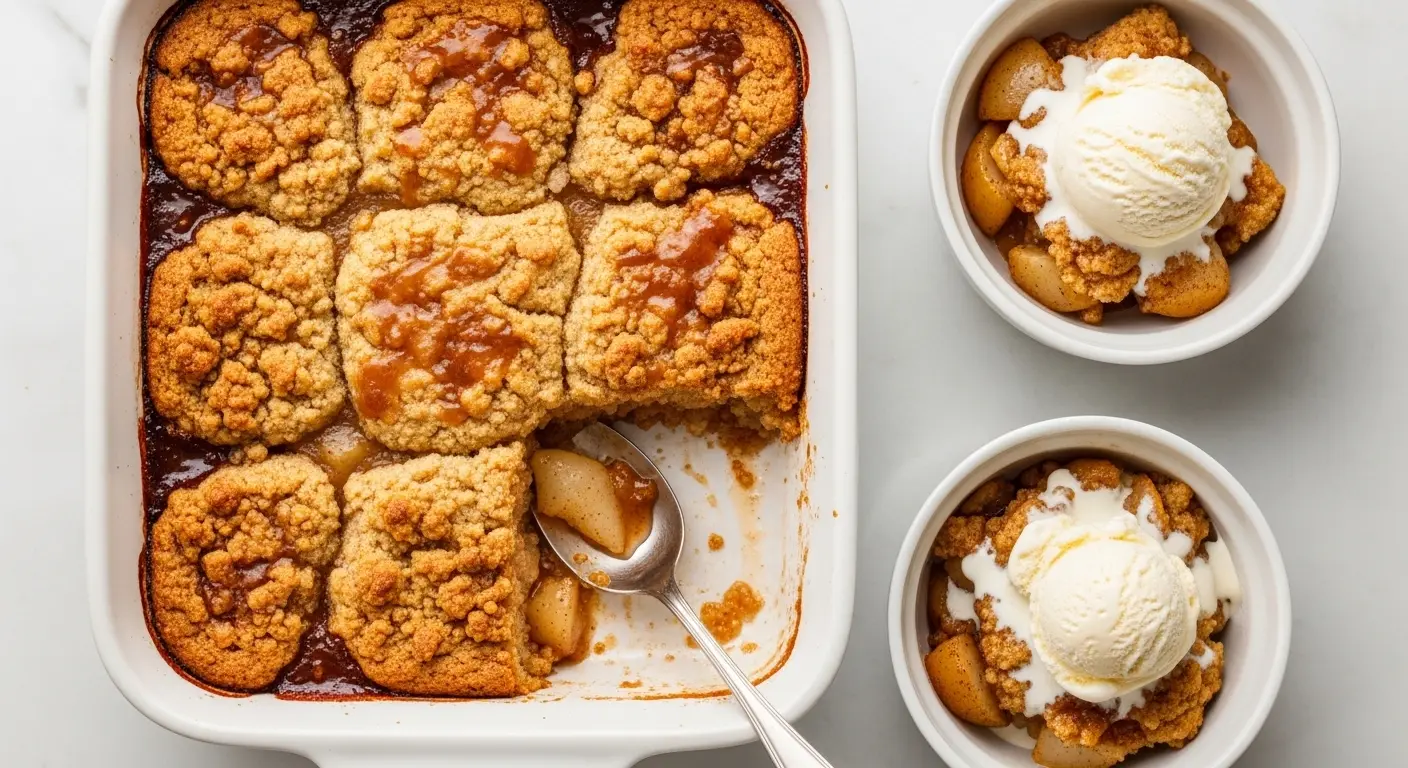
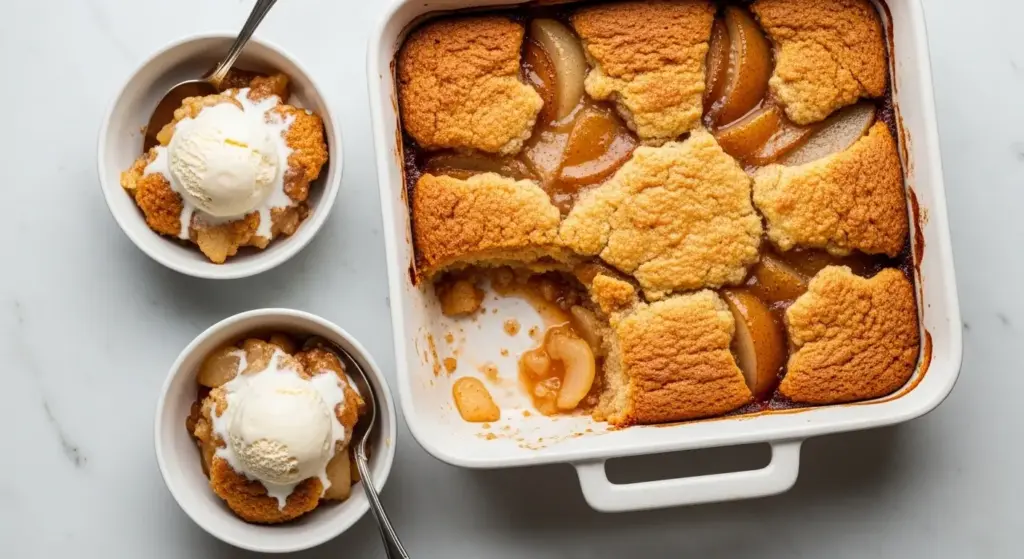
A great pear cobbler recipe is one of those desserts that sneaks up on you. You pull it from the oven, catch one whiff of cinnamon and caramelized fruit bubbling around a golden crust, and suddenly you have a line of people holding bowls and asking when dessert is ready.
This cobbler brings together ripe, juicy pears tossed in warm spices with a tender, buttery biscuit-style topping that bakes up perfectly golden and crisp on the outside while staying soft underneath. It is the kind of old-fashioned dessert that feels like a warm hug.
What makes pears work so beautifully in a cobbler is their natural sweetness and how gently they soften as they bake. Unlike harder fruits, ripe pears release just enough juice to create a luscious, thickened filling without turning watery. The trick is using pears that are just ripe but still firm so they hold their shape while becoming tender and silky in the oven.
This recipe uses a classic drop biscuit topping made with all-purpose flour, cold butter, and a touch of sugar. Cold butter is key here. When it hits the hot oven, it creates steam that gives the biscuit topping those irresistible flaky, airy layers. The result is a topping that is crisp and golden on top, soft and pillowy where it meets the fruit.
You also get warm spice in every bite. Cinnamon and nutmeg complement the gentle sweetness of pears without overpowering them, and a little lemon juice in the filling brightens everything up and keeps the fruit looking gorgeous. Cornstarch thickens the pear juices into a syrupy, glossy sauce that pools around every bite of biscuit.
Whether you are making this on a weeknight or serving it at a holiday gathering, this pear cobbler is a guaranteed crowd-pleaser that comes together in under an hour.
For another classic cobbler the whole family will love, check out this Peach Cobbler Recipe that uses the same easy technique with fresh summer peaches.
Why You’ll Love This Pear Cobbler Recipe
This pear cobbler truly earns its place in the regular dessert rotation, and once you make it, you will understand why.
It is a one-bowl situation. You mix the biscuit topping in a single bowl, toss the pears in a second, and everything goes into one baking dish. Minimal mess, maximum reward.
Pears are often overshadowed by apples and peaches in the cobbler world, but they deserve their moment. Their floral sweetness and silky texture are absolutely perfect for this style of dessert.
The biscuit topping made from scratch is genuinely better than any shortcut. Cold butter cut into the flour creates a topping with real texture and flavor, and it takes less than five minutes to pull together.
This cobbler is also wonderfully versatile. Serve it warm out of the oven with a scoop of vanilla ice cream for dessert, or enjoy a square of it with your morning coffee the next day like a very indulgent breakfast treat.
It is also forgiving for beginner bakers. There is no precision piping, no candy thermometers, and no fussy layering. Even if your topping drops are a little uneven or your pears are different sizes, the oven does all the heavy lifting.
- Ready in under an hour from start to finish, including prep time
- Simple, pantry-friendly ingredients that you likely already have on hand
- No special techniques required, making it perfect for beginner bakers
- Incredibly flexible with pear varieties and topping styles
- Made for sharing and just as wonderful the next day
You might also enjoy: Classic Apple Crisp Recipe
Ingredients
You only need a handful of wholesome ingredients to make this pear cobbler. The filling relies on fresh, ripe pears seasoned with warm spices, and the topping is a simple drop biscuit dough that you make from scratch. Here are a few notes to help you choose the best ingredients.
For the pears, Bartlett, Anjou, and Bosc are all excellent choices. Bartlett pears are the sweetest and softest when ripe. Anjou pears hold their shape beautifully and have a mild, honey-like flavor. Bosc pears are firmer with a slightly spiced, nutty taste that pairs wonderfully with cinnamon. Whichever variety you use, look for pears that yield slightly when pressed at the neck but are not mushy.
For the topping, cold butter is non-negotiable. Room temperature butter will not create the same flakiness. Cut your butter into cubes and keep it in the fridge until you are ready to use it.
For the filling:
- 3 lbs (1.36 kg) fresh pears (about 6 medium pears), peeled, cored, and sliced into 1/2-inch pieces
- 1/2 cup (100g) granulated sugar
- 2 tablespoons (16g) cornstarch
- 1 teaspoon fresh lemon juice
- 1 teaspoon ground cinnamon
- 1/4 teaspoon ground nutmeg
- 1/2 teaspoon pure vanilla extract
For the biscuit topping:
- 1 1/2 cups (190g) all-purpose flour
- 1/4 cup (50g) granulated sugar
- 1 1/2 teaspoons baking powder
- 1/4 teaspoon fine sea salt
- 6 tablespoons (85g) cold unsalted butter, cut into small cubes
- 1/2 cup (120ml) cold whole milk or buttermilk
- 1 tablespoon demerara sugar or coarse sugar, for sprinkling on top
For the pan:
- 1 tablespoon unsalted butter, for greasing the baking dish
Read Also: Peach Cobbler Recipe with Cake Mix
Kitchen Equipment Needed
You do not need any fancy tools to make this pear cobbler. Most of these items are standard kitchen equipment you probably already own. A few of them are worth investing in if you bake regularly, and I have noted those below.
A good 9×13 inch baking dish is the most important piece of equipment for this recipe. Glass or ceramic both work well and allow you to see the bubbling filling so you can gauge doneness. A metal pan works too but will cook the edges a little faster.
- 9×13 inch baking dish (ceramic, glass, or metal)
- Large mixing bowl for the pear filling
- Medium mixing bowl for the biscuit topping
- Pastry cutter or a box grater (for cutting in cold butter)
- Vegetable peeler and sharp knife for prepping the pears
- Cutting board
- Measuring cups and spoons
- Wooden spoon or rubber spatula
- Rimmed baking sheet (to place under the dish in case of overflow)
- Wire cooling rack
The biscuit topping pairs wonderfully with cobblers, crisps, and other baked fruit desserts, much like the ones used in this Cherry Cobbler Recipe with Cake Mix.
Recommended Products for This Recipe
These are products I genuinely recommend based on quality and performance for making the best pear cobbler possible.
1. Le Creuset Enameled Cast Iron Baking Dish
A high-quality baking dish distributes heat more evenly than a standard pan, which means a more consistent golden crust and no undercooked pockets of filling. The enameled interior releases the cobbler cleanly and cleans up in minutes. It is a long-term investment that will serve you for every cobbler, crisp, and casserole you ever make.
2. OXO Good Grips 3-Piece Peeler Set
A sharp, comfortable peeler makes prepping six pears feel effortless rather than tedious. OXO peelers are ergonomic, durable, and easy to control, which is exactly what you want when working with ripe, sometimes slippery fruit.
3. Nielsen-Massey Pure Vanilla Extract
The flavor of quality vanilla extract in a dessert like this is genuinely noticeable. Nielsen-Massey is made from hand-selected vanilla beans and has a rich, complex flavor that elevates everything from cobbler filling to cake batter. A little goes a long way.
4. USA Pan Bakeware Half Sheet Pan
Placing your cobbler dish on a rimmed baking sheet catches any overflow before it hits the oven floor. The USA Pan version is commercial-grade, warp-resistant, and has a corrugated surface that promotes even airflow. It doubles as a cookie sheet for everything else you bake.
5. Bob’s Red Mill All-Purpose Flour
The biscuit topping in this recipe benefits from a consistent, finely milled flour. Bob’s Red Mill unbleached all-purpose flour delivers reliable results every time and works perfectly for the drop biscuit topping that makes this cobbler so special.
This cobbler is excellent served alongside a warm slice of Bread Pudding for a full dessert spread at holiday gatherings.
Step-by-Step Instructions
1. Preheat the Oven and Prepare the Baking Dish
- Preheat your oven to 375°F (190°C) and position a rack in the center of the oven.
- Lightly grease your 9×13 inch baking dish with 1 tablespoon of softened or melted butter, making sure to coat the sides as well as the bottom. This prevents sticking and adds a little extra richness to the edges of the cobbler.
- Place a rimmed baking sheet on the rack below the center rack. This catches any juice or batter that bubbles over and will save you a messy oven cleanup.
2. Prepare the Pear Filling
- Wash your pears thoroughly under cold running water.
- Using a vegetable peeler, peel all 6 pears from the stem to the base, working in long downward strokes.
- Halve each pear lengthwise and use a small spoon or melon baller to scoop out the core and seeds.
- Slice each pear half into 1/2-inch thick slices. You want the pieces thick enough to hold their shape after baking, not so thin that they dissolve into mush.
- Place all the sliced pears into a large mixing bowl.
- Add 1/2 cup (100g) of granulated sugar, 2 tablespoons (16g) of cornstarch, 1 teaspoon of fresh lemon juice, 1 teaspoon of ground cinnamon, 1/4 teaspoon of ground nutmeg, and 1/2 teaspoon of pure vanilla extract.
- Gently toss everything together with a rubber spatula or your hands until every pear slice is evenly coated. The sugar and cornstarch will begin dissolving into the pear juices almost immediately.
- Pour the pear mixture into your prepared baking dish and spread it into an even layer. Set the dish aside while you make the topping.
3. Make the Biscuit Topping
- In a medium mixing bowl, whisk together 1 1/2 cups (190g) of all-purpose flour, 1/4 cup (50g) of granulated sugar, 1 1/2 teaspoons of baking powder, and 1/4 teaspoon of fine sea salt until well combined. This even distribution of the dry ingredients ensures the baking powder activates uniformly and the topping rises evenly.
- Remove your 6 tablespoons (85g) of cold unsalted butter from the refrigerator. Working quickly so the butter stays cold, use a pastry cutter to cut the butter into the flour mixture. If you do not have a pastry cutter, grate the cold butter directly on a box grater over the bowl, which is a fast, effective shortcut.
- Continue cutting in the butter until the mixture resembles coarse, shaggy crumbs with some pea-sized butter pieces remaining. Those visible chunks of butter are exactly what you want. They create steam in the oven that gives the topping its flaky texture.
- Pour in 1/2 cup (120ml) of cold whole milk or buttermilk. Stir with a fork or rubber spatula just until the dough comes together. It will look shaggy and a little rough, and that is perfect. Overmixing develops gluten and makes the topping tough and dense, so stop as soon as there are no dry flour streaks.
4. Assemble the Cobbler
- Using a large spoon or small ice cream scoop, drop the biscuit topping over the pear filling in rough, uneven mounds. Do not spread the topping into a flat, even layer. The uneven drops create texture and allow some of the pear filling to peek through and bubble up as it bakes, which is part of what makes a cobbler so beautiful and delicious.
- Aim to cover roughly 75 to 80 percent of the surface, leaving some small gaps for the fruit to show through.
- Once you have used all of the topping, sprinkle 1 tablespoon of demerara sugar or coarse sugar evenly over the biscuit mounds. This creates a satisfying crunch on the finished crust that is one of the best parts of homemade cobbler.
5. Bake the Cobbler
- Carefully transfer the baking dish to the center rack of your preheated oven.
- Bake for 35 to 40 minutes, until the biscuit topping is deeply golden brown and the pear filling is visibly bubbling around the edges and through any gaps in the topping.
- At the 25-minute mark, check the topping. If it is browning too quickly on top before the filling is fully bubbling, loosely tent the dish with aluminum foil for the remainder of the bake time.
- To test doneness, insert a toothpick or skewer into the center of a biscuit drop. It should come out clean with no wet doughy batter clinging to it. The pear juices should appear thick and syrupy, not watery.
6. Cool and Serve
- Remove the cobbler from the oven and allow it to cool on a wire rack for at least 15 to 20 minutes before serving. This resting time is important. The filling continues to thicken as it cools, and cutting into it too early will result in a runny, pooling filling rather than a nicely set syrupy one.
- Serve warm directly from the baking dish. Scoop generous portions into bowls or onto plates, making sure each serving gets a good amount of biscuit topping and pear filling.
- Top with a scoop of vanilla ice cream or a dollop of freshly whipped cream for the full experience.
Read Also: Easy Apple Crisp Recipe
Tips for Success
A few simple techniques can make the difference between a good cobbler and a truly memorable one. Keep these in mind the first time you make this recipe and every time after.
- Use firm-ripe pears. Pears that are too soft will break down too much and make the filling mushy. You want pears that give slightly when pressed near the stem but still have some structure. Soft, overripe pears will fall apart completely during baking.
- Keep the butter cold. This is the most important tip for the biscuit topping. If your kitchen is warm, cube the butter and return it to the fridge for 10 minutes before using it. Cold butter creates flakiness. Warm butter creates a dense, greasy topping.
- Do not overmix the topping. Stir just until combined. A few rough, shaggy spots in the dough are fine. Overmixing develops the gluten in the flour and produces a tough, bread-like topping instead of a tender biscuit one.
- Taste your pears before adding sugar. Some pears are very sweet on their own and may need less added sugar. If your pears are particularly ripe and sweet, reduce the sugar in the filling by 2 tablespoons.
- Dissolve the cornstarch properly. Cornstarch must be tossed evenly with the fruit before baking. Clumps of undissolved cornstarch will result in chalky, pasty spots in the filling. Tossing it thoroughly with the sugar and pears before baking ensures it distributes and thickens the juices evenly.
- Let it rest before serving. Serving the cobbler straight from the oven means the filling will be loose and runny. Give it at least 15 minutes to let the thickened juices settle and set.
Another favorite: Dutch Apple Pie Recipe
Serving Suggestions
This pear cobbler is wonderful on its own, but a few additions and pairings take it to another level. Think about texture and temperature contrast when serving.
Warm cobbler paired with something cold and creamy is the classic combination for a reason. The heat of the fruit filling against the chill of ice cream creates an experience that is hard to beat, and the richness of the topping balances beautifully against lighter, fresher accompaniments.
- Vanilla ice cream is the classic pairing. A generous scoop placed directly on the warm cobbler melts into the filling slightly, creating a creamy sauce that is absolutely delicious.
- Freshly whipped cream is lighter than ice cream and lets the pear flavor shine more clearly. Whip it with a little sugar and a splash of vanilla for the best result.
- Caramel sauce drizzled over the top adds a deep, buttery sweetness that plays perfectly off the cinnamon-spiced pears. Try our homemade Caramel Sauce for an easy and impressive finishing touch.
- A dusting of powdered sugar is the simplest option for a lighter, more elegant presentation.
- Cinnamon whipped cream adds a cozy, spiced note that reinforces the warm spices already in the filling.
- A hot cup of coffee or tea alongside a bowl of cobbler makes a perfect afternoon treat or a relaxed dessert after a dinner party.
- Vanilla yogurt in the morning turns leftover cobbler into a very acceptable breakfast situation.
Variations to Try
Once you have mastered the classic version, there are so many delicious directions you can take this pear cobbler. Each variation changes the flavor profile slightly while keeping the same simple technique.
The most popular variations swap in a different fruit alongside the pears or adjust the topping style. Pears are incredibly good-natured when it comes to pairing with other fruits, and a small adjustment to the spices can completely change the personality of the dessert.
- Apple Pear Cobbler: Replace half the pears with peeled and sliced Honeycrisp or Granny Smith apples for a cobbler with more structure and a pleasant tartness that balances the sweetness of the pears beautifully.
- Ginger Pear Cobbler: Add 1/2 teaspoon of ground ginger or 1 tablespoon of freshly grated ginger to the pear filling. Ginger brings a sharp, warming heat that makes the flavors more complex and sophisticated.
- Cranberry Pear Cobbler: Stir 1 cup of fresh or frozen cranberries into the pear filling for a gorgeous ruby-colored cobbler with a tart, jewel-bright contrast. This variation is particularly beautiful and delicious around the holidays.
- Cardamom Pear Cobbler: Swap out the nutmeg for 1/4 teaspoon of ground cardamom for a floral, slightly citrusy twist that gives the cobbler a more exotic, Scandinavian-inspired flavor profile.
- Oat Crumble Topping: Replace the biscuit topping with a mixture of rolled oats, flour, brown sugar, cold butter, and cinnamon for a crispier, crunchier result. This is a great option if you prefer a cobbler-crisp hybrid style.
- Canned Pear Cobbler: Fresh pears are ideal, but well-drained canned pears in juice (not syrup) work in a pinch. Reduce the sugar in the filling by half since canned pears are already sweetened.
- Bourbon Pear Cobbler: Add 1 to 2 tablespoons of bourbon to the pear filling for a subtle caramel and vanilla depth. The alcohol bakes off completely, leaving behind only the warm, woody flavor.
Read Also: Fruit Tart Recipe
Storage and Reheating
Proper storage ensures your leftover pear cobbler stays delicious for several days, and reheating it correctly brings back all the warmth and texture of the freshly baked original.
This cobbler stores well at room temperature for one day and in the refrigerator for up to five days. Freezing baked cobbler is possible but the biscuit topping tends to become soggy after thawing, so it is better to enjoy it fresh within the first few days.
- Room temperature: Cover the baking dish tightly with plastic wrap or aluminum foil. The cobbler will keep at room temperature for up to 1 day, provided your kitchen is not too warm.
- Refrigerator: Transfer leftovers to an airtight container or cover the baking dish tightly and refrigerate for up to 5 days. Cold cobbler from the fridge is actually wonderful eaten straight from the dish for breakfast the next morning.
- Freezer: Allow the cobbler to cool completely, then wrap tightly in two layers of plastic wrap followed by a layer of aluminum foil. Freeze for up to 3 months. Thaw overnight in the refrigerator before reheating.
- Reheating in the oven: Preheat your oven to 325°F (163°C). Cover the dish loosely with foil and bake for 15 to 20 minutes until warmed through. Remove the foil for the last 5 minutes to help crisp the topping back up.
- Reheating individual portions: Place a serving in a microwave-safe bowl and heat on medium power for 60 to 90 seconds. The microwave is faster but will not restore the crunch to the biscuit topping the way the oven does.
This Sticky Toffee Pudding Recipe stores and reheats beautifully using the same oven method and is another cozy dessert worth having in your collection.
Nutritional Facts
The following nutrition information is calculated per serving, based on 8 servings from a standard 9×13 inch baking dish. These values are approximate and will vary slightly based on the exact size and sweetness of your pears and any toppings added.
| Nutrient | Per Serving |
|---|---|
| Calories | ~385 kcal |
| Carbohydrates | ~63g |
| Protein | ~4g |
| Total Fat | ~13g |
| Saturated Fat | ~8g |
| Cholesterol | ~35mg |
| Sodium | ~190mg |
| Dietary Fiber | ~4g |
| Total Sugars | ~38g |
| Vitamin C | ~6mg |
| Calcium | ~70mg |
| Potassium | ~230mg |
Note: Nutrition values do not include ice cream, whipped cream, or caramel sauce, which will add additional calories and fat.
For a lighter dessert option, try this Fruit Salad Recipe that lets the natural sweetness of seasonal fruit shine with no baking required.
Health Benefits of Key Ingredients
While this is certainly a dessert and not a health food, several of the main ingredients in pear cobbler do offer genuine nutritional value. It is nice to know that something this delicious comes with a few real benefits.
Eating whole fruit like pears even in a baked dessert means you are getting real fiber, vitamins, and antioxidants alongside the indulgence. That is worth acknowledging.
- Pears are an excellent source of dietary fiber, particularly pectin, a soluble fiber linked to improved digestive health and a feeling of satiety. One medium pear contains about 5.5g of fiber, nearly 20 percent of the daily recommended intake.
- Pears are rich in Vitamin C, which supports immune function and acts as an antioxidant in the body. A single pear provides about 12 percent of the daily recommended intake of Vitamin C.
- Pears contain copper, a mineral that plays a role in immune defense, bone strength, and the production of red blood cells. Most people do not get enough copper from their diet, and pears are a surprisingly good source.
- Cinnamon has powerful anti-inflammatory properties and has been widely studied for its potential to help regulate blood sugar levels. Even a small amount, like the teaspoon used in this recipe, contributes meaningful antioxidant activity.
- Nutmeg contains anti-inflammatory compounds and has traditionally been used to support digestion. In the small quantities used for baking, it adds flavor complexity as well as trace health benefits.
- Lemon juice provides Vitamin C and helps preserve the color of the pear filling while also enhancing the brightness of the overall flavor.
Read Also: Baked Oatmeal Recipe
Frequently Asked Questions
1. What are the best pears to use for pear cobbler?
Bartlett pears are the most popular choice for cobbler because they are sweet, juicy, and soften beautifully during baking. Anjou pears are a great second option, offering a milder flavor and a slightly firmer texture that holds its shape well. Bosc pears, with their dense, spiced flavor, are excellent if you prefer a cobbler with more structure and a less sweet, more complex taste. Whichever variety you choose, make sure the pears are just ripe but still firm enough to slice cleanly.
2. Can I use canned pears instead of fresh?
Yes, canned pears work as a substitute when fresh pears are unavailable. Use pears packed in juice rather than heavy syrup, and drain them very thoroughly before using them. Since canned pears are already sweetened, reduce the sugar in the filling by half to avoid an overly sweet result. The texture will be slightly softer than fresh pears, but the cobbler will still be delicious.
3. Why is my cobbler topping doughy or undercooked?
A doughy topping usually means the cobbler needed more time in the oven or that the biscuit drops were placed too thickly. Make sure you are dropping the topping in uneven mounds rather than spreading it into a thick, flat layer, since the thinner and more scattered the drops, the more evenly they cook through. Always test doneness with a toothpick inserted into the center of the largest biscuit drop before pulling the dish from the oven.
4. Can I make pear cobbler ahead of time?
You can prepare the pear filling up to 24 hours in advance and store it covered in the refrigerator. The biscuit topping is best made fresh, just before baking. For the absolute best texture and flavor, bake the cobbler on the same day you plan to serve it. If you do need to make it fully ahead, bake it, let it cool completely, refrigerate it, and then reheat it in a 325°F (163°C) oven before serving.
5. How do I know when the cobbler is done baking?
The cobbler is done when the biscuit topping is a deep golden brown, a toothpick inserted into the center of a biscuit drop comes out clean with no raw doughy batter on it, and the pear filling is visibly bubbling around the edges and through any gaps in the topping. The bubbling filling is particularly important because it indicates the cornstarch has fully activated and the juices are properly thickened. If the topping looks golden but the filling is not yet bubbling, give it another 5 to 7 minutes.
This Homemade Biscuit Recipe uses very similar techniques and is a great way to practice making biscuit dough from scratch before tackling a cobbler.
Final Thoughts
This pear cobbler recipe is the kind of dessert that makes you slow down and appreciate the simple things: ripe seasonal fruit, good butter, a little patience, and an oven doing its thing while your kitchen fills with warmth and the smell of cinnamon.
It is approachable enough for a weeknight and special enough for a holiday table. Once you make it, you will find yourself reaching for it again and again every time pear season rolls around.
Give this pear cobbler a try the next time you spot beautiful pears at the market or find yourself with a fruit bowl that needs some attention. Serve it warm with a generous scoop of vanilla ice cream and watch it disappear.
If you make it, I would love to hear how it turned out! Drop a comment below and let me know what pear variety you used, any fun variations you tried, or how your family reacted when you set this on the table.
Recommended:
- Peach Cobbler Recipe
- Cherry Cobbler Recipe with Cake Mix
- Classic Apple Pie Recipe
- Blueberry Pie Recipe
- Rice Pudding Recipe
- Banana Pudding Recipe
- Easy Pecan Pie Dump Cake Recipe
- Cranberry Sauce Recipe
- Pumpkin Roll Recipe
- Vanilla Pudding Recipe


