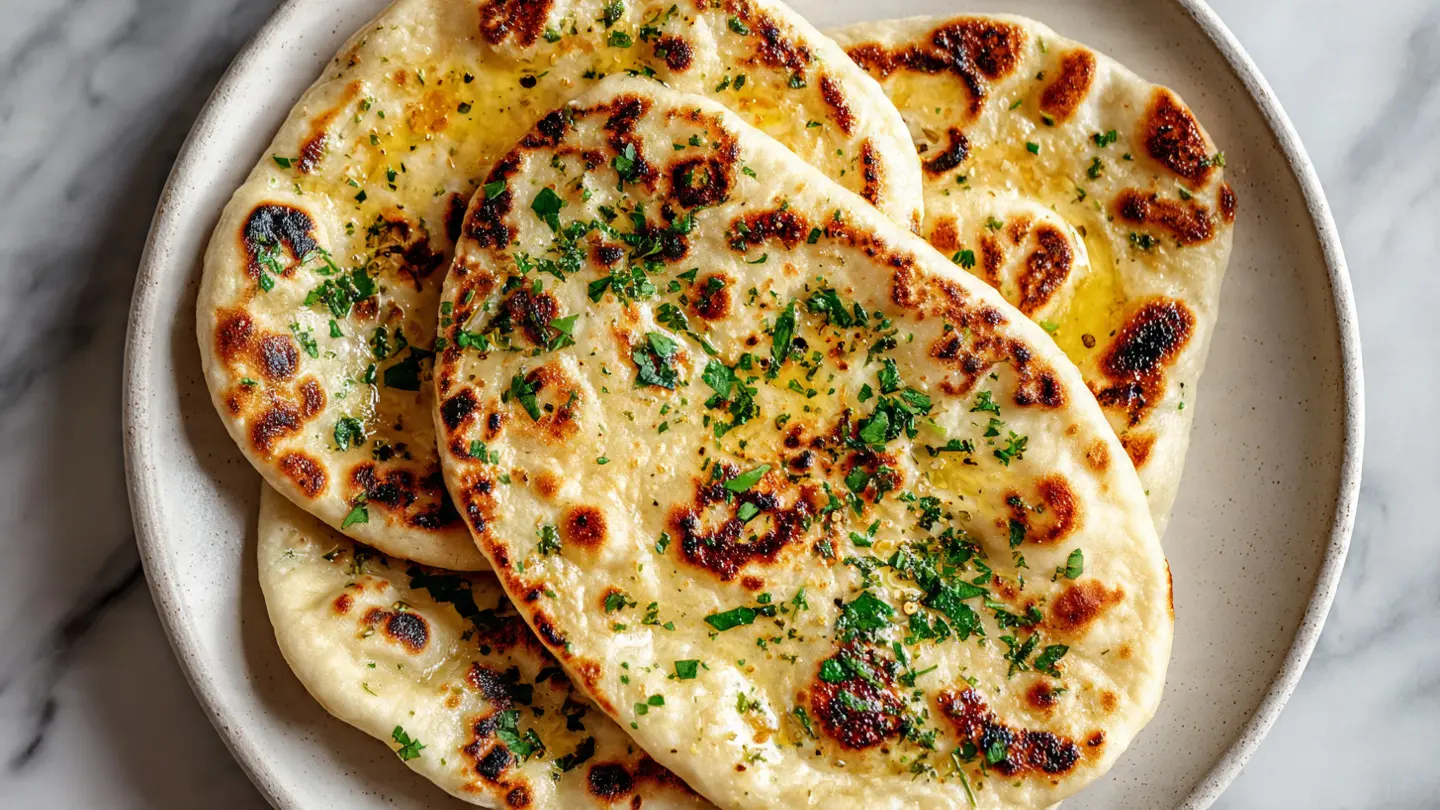
Nothing compares to the aroma of freshly made garlic naan bread wafting through your kitchen. This soft, pillowy flatbread with its signature garlic flavor has been a staple in Indian cuisine for centuries, and making it at home is far easier than you might think. This garlic naan bread recipe creates restaurant-quality results right in your own kitchen, with a tender, chewy texture and irresistible garlicky butter brushed generously on top.
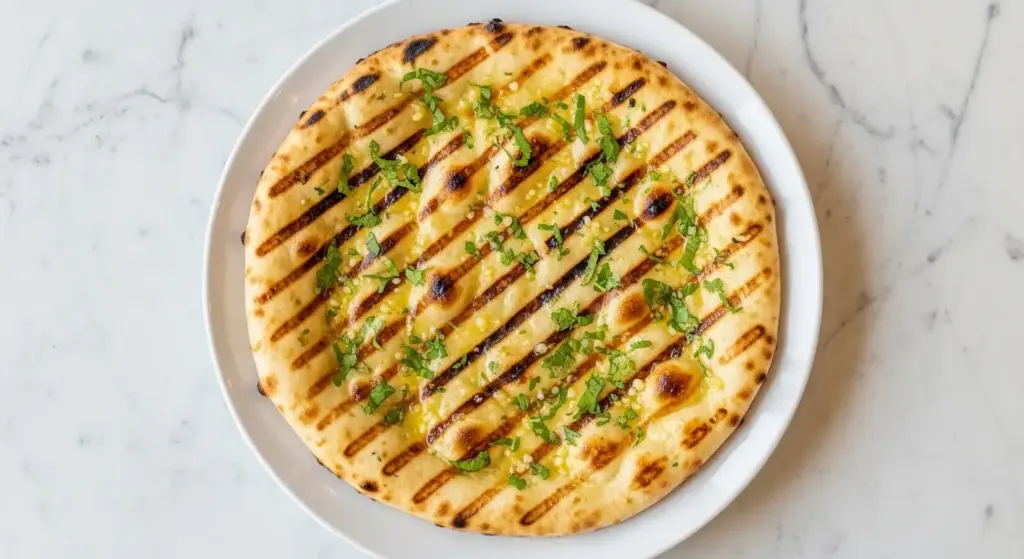
Traditional naan is baked in a tandoor oven at extremely high temperatures, but this recipe has been adapted for stovetop cooking using a cast iron skillet or heavy-bottomed pan. The secret to achieving that characteristic bubbled surface and slight char lies in getting your pan really hot before cooking.
The dough itself is enriched with plain yogurt and a touch of oil, creating an incredibly soft texture that stays fresh for days. Fresh garlic is incorporated both into the dough and the butter that’s brushed on after cooking, giving you a double dose of that beloved garlic flavor.
What makes this recipe particularly special is its versatility. Serve it alongside your favorite curry, use it to scoop up creamy dips, or transform it into a quick pizza base. The possibilities are endless, and once you master this simple technique, you’ll find yourself making garlic naan for every occasion.
The process begins with activating the yeast in warm water with a pinch of sugar. This step is essential for achieving the light, airy texture that makes naan so special. As the dough rises, the yeast creates those beautiful air pockets that will puff up dramatically when the bread hits the hot skillet.
Why You’ll Love This Garlic Naan Bread Recipe
This homemade garlic naan bread delivers restaurant-quality results without requiring any special equipment or hard-to-find ingredients. The combination of simple pantry staples transforms into something truly extraordinary.
Restaurant Quality at Home: Skip the takeout and create authentic-tasting naan that rivals your favorite Indian restaurant. The soft, pillowy texture and golden-brown spots are exactly what you’d expect from professionally made naan.
Quick Rising Time: Unlike many bread recipes that require hours of rising, this dough only needs about one hour to double in size. This makes it perfect for weeknight dinners when you want fresh bread without the long wait.
Incredibly Soft Texture: The addition of yogurt and the right ratio of ingredients creates naan that stays soft for days. Even when reheated, it maintains that tender, chewy texture that makes it so addictive.
Double Garlic Flavor: Garlic is incorporated both into the dough and brushed on top with melted butter, giving you layers of flavor in every bite. The cooked garlic in the dough provides a mellow, sweet flavor while the fresh garlic butter adds a punch.
No Tandoor Required: Traditional naan requires a tandoor oven reaching temperatures over 900°F, but this recipe achieves similar results using a simple cast iron skillet on your stovetop. The high, dry heat mimics the tandoor environment perfectly.
Freezer Friendly: Make a double batch and freeze extras for later. The dough freezes beautifully, and cooked naan reheats perfectly, making meal prep a breeze.
Customizable: Once you master the basic recipe, you can easily adapt it with different herbs, spices, or toppings to suit your preferences.
If you love homemade bread, you’ll also want to try this Sweet Sourdough Bread Recipe for a different take on artisan bread making.
Ingredients
This garlic naan bread comes together with simple ingredients you likely already have in your kitchen. The key is using quality ingredients, especially fresh garlic and good yogurt, to achieve the best flavor.
For the Dough:
- 1 cup (240 ml) warm water, between 105-110°F (40-43°C)
- 2 teaspoons (7 g) active dry yeast
- 2 tablespoons (25 g) granulated sugar
- 3 to 3½ cups (360-420 g) all-purpose flour, plus more for dusting
- ½ cup (120 ml) plain whole milk yogurt, at room temperature
- ¼ cup (60 ml) vegetable oil or melted ghee
- 4 cloves garlic, minced
- 1½ teaspoons (9 g) salt
- 1 teaspoon (4 g) baking powder
For the Garlic Butter:
- 4 tablespoons (60 g) unsalted butter, melted
- 3 cloves garlic, minced
- 2 tablespoons fresh cilantro or parsley, finely chopped
- ¼ teaspoon salt
- Oil for cooking (vegetable or ghee)
The warm water temperature is critical for yeast activation. Too hot and it kills the yeast, too cold and it won’t activate properly. The yogurt adds tanginess and creates a tender crumb, while the oil keeps the bread soft and pliable. Fresh garlic gives the most vibrant flavor, though garlic powder can work in a pinch.
This pairs beautifully with Chicken Tikka Masala Recipe for an authentic Indian meal.
Kitchen Equipment Needed
Having the right tools makes the naan-making process smooth and enjoyable. While you don’t need specialized equipment, a few key items will help you achieve the best results.
- Cast iron skillet or heavy-bottomed pan (10-12 inches): Essential for achieving the high, even heat needed to create those characteristic bubbles and char marks
- Large mixing bowl: For combining and rising the dough
- Kitchen towel: To cover the dough while it rises
- Rolling pin: For shaping the naan into traditional oval or teardrop shapes
- Pastry brush: For applying the garlic butter
- Small bowl: For mixing the garlic butter
- Measuring cups and spoons: For accurate ingredient measurements
- Instant-read thermometer (optional): To check water temperature for yeast activation
Recommended Products for This Recipe
Quality tools and ingredients make a real difference when creating restaurant-style garlic naan at home. These recommendations are based on what consistently produces the best results.
1. Lodge Cast Iron Skillet
A good cast iron skillet is the secret to achieving those beautiful charred spots without burning the naan. Cast iron heats evenly and retains heat exceptionally well, mimicking the intense environment of a traditional tandoor oven. Once seasoned, it also prevents sticking and adds subtle flavor depth to your bread.
2. King Arthur All-Purpose Flour
Using high-quality flour makes a noticeable difference in texture and flavor. King Arthur flour has consistent protein content, which helps develop the perfect chewy texture while maintaining softness. The uniformity of grind ensures your naan turns out perfectly every time.
3. Organic Pure Ghee
Traditional Indian naan often incorporates ghee for its rich, nutty flavor. Using ghee instead of regular oil or butter adds authentic taste and creates an incredibly tender crumb. It also has a higher smoke point, making it ideal for the high-heat cooking method.
4. Fresh Garlic Press
Fresh minced garlic is essential for the best flavor, and a quality garlic press makes the job quick and easy. It ensures uniform pieces that distribute evenly throughout the dough and garlic butter, giving you consistent flavor in every bite.
You might also enjoy: Homemade Alfredo Sauce Recipe
Step-by-Step Instructions
Follow these detailed steps to create perfect garlic naan bread with a soft, pillowy texture and delicious garlic flavor. Take your time with each step for the best results.
1. Activate the Yeast
- Combine the warm water (105-110°F/40-43°C), active dry yeast, and sugar in a small bowl
- Stir gently to dissolve the yeast and sugar completely
- Let the mixture sit undisturbed for 5-10 minutes until it becomes foamy and bubbly on top
- If the mixture doesn’t foam, your yeast may be dead or the water was too hot; start over with fresh yeast
2. Mix the Dough
- In a large mixing bowl, whisk together 3 cups of flour, salt, and baking powder
- Create a well in the center of the dry ingredients
- Pour the activated yeast mixture into the well
- Add the yogurt, oil, and minced garlic to the well
- Using a wooden spoon or your hands, mix everything together until a shaggy dough forms
- If the dough is too sticky, add the remaining ½ cup flour gradually, a tablespoon at a time
- Continue mixing until the dough starts to come together and pulls away from the bowl
3. Knead the Dough
- Turn the dough out onto a lightly floured surface
- Knead the dough for 8-10 minutes using the heel of your hand, pushing away and folding back
- The dough should become smooth, elastic, and slightly tacky but not sticky
- If the dough sticks to your hands, dust with a small amount of flour
- Proper kneading develops the gluten, which gives naan its characteristic chewy texture
- The dough is ready when it springs back when poked and feels soft and pliable
4. Let the Dough Rise
- Lightly oil a clean large bowl with about 1 teaspoon of oil
- Place the kneaded dough in the bowl and turn it to coat all sides with oil
- Cover the bowl with a damp kitchen towel or plastic wrap
- Place in a warm, draft-free location for 1 to 1½ hours
- The dough should double in size during this time
- A warm oven with just the light on makes an ideal rising environment
5. Prepare the Garlic Butter
- While the dough is rising, prepare the garlic butter
- Melt the butter in a small microwave-safe bowl
- Add the minced garlic to the melted butter
- Microwave for an additional 15-20 seconds to infuse the garlic flavor
- Stir in the chopped cilantro or parsley and salt
- Let the mixture sit at room temperature so the garlic flavor develops
- The garlic will mellow slightly as it sits in the warm butter
6. Divide and Shape the Dough
- Once the dough has doubled, punch it down gently to release excess air
- Turn the dough out onto a lightly floured surface
- Divide the dough into 8-10 equal portions using a bench scraper or knife
- Roll each portion between your palms to form smooth balls
- Cover the dough balls with a damp towel and let them rest for 10 minutes
- This rest period relaxes the gluten, making the dough easier to roll out
7. Roll Out the Naan
- Working with one dough ball at a time, keep the others covered
- Lightly flour your work surface and rolling pin
- Roll each ball into an oval or teardrop shape about ¼ inch (6 mm) thick and 6-8 inches (15-20 cm) long
- The dough should be thin but not transparent
- If the dough springs back, let it rest for a few more minutes
- Don’t worry about perfect shapes; rustic, irregular shapes are authentic
- Lightly brush one side with water or oil (this helps it adhere to the pan)
8. Heat the Skillet
- Place your cast iron skillet or heavy-bottomed pan over medium-high heat
- Let it preheat for at least 5 minutes until very hot
- Test the heat by flicking a few drops of water onto the surface; they should sizzle immediately
- Do not add any oil or butter to the pan; it should be completely dry
- The high, dry heat is essential for creating the signature bubbles and char
9. Cook the First Side
- Carefully place one rolled naan onto the hot, dry skillet
- Cook for 1-2 minutes without moving it
- Watch for bubbles to form on the surface of the naan
- The bottom should develop golden-brown spots and char marks
- If the naan is browning too quickly, reduce the heat slightly
- Use a spatula to gently press down any large bubbles if needed
10. Flip and Cook the Second Side
- Using tongs or a spatula, flip the naan over
- Press gently with the spatula to ensure even contact with the pan
- Cook for another 1-2 minutes until golden spots appear on the second side
- The naan may puff up dramatically when flipped; this is perfect
- If you have a gas stove, you can briefly place the naan directly over the flame using tongs for extra char
11. Brush with Garlic Butter
- Remove the cooked naan from the skillet immediately
- Place it on a plate and generously brush the top with the prepared garlic butter
- Make sure to get some of the minced garlic pieces onto the naan
- The butter will absorb into the hot bread, creating incredible flavor
- Stack the finished naan and cover with a kitchen towel to keep warm
12. Repeat and Serve
- Repeat the rolling and cooking process with the remaining dough balls
- Stack the finished naan as you go, keeping them covered with a towel
- The steam created under the towel keeps the naan soft and pliable
- Serve immediately while still warm for the best texture and flavor
- Any leftovers can be stored once completely cooled
For another delicious Indian-inspired dish, try this Butter Chicken Recipe.
Tips for Success
These proven tips will help you achieve perfect garlic naan every time, avoiding common pitfalls and ensuring restaurant-quality results.
Water Temperature Matters: Use an instant-read thermometer to ensure your water is between 105-110°F (40-43°C). Water that’s too hot will kill the yeast, while water that’s too cold won’t activate it properly. If you don’t have a thermometer, the water should feel warm to the touch but not hot.
Don’t Skip the Yeast Proofing: Always check that your yeast mixture foams after 5-10 minutes. This confirms the yeast is active and will make your dough rise properly. Dead yeast results in dense, flat naan.
Flour Adjustments: Different brands and types of flour absorb liquid differently. Start with 3 cups and add more gradually until the dough is tacky but not sticky. Humidity also affects flour absorption, so be flexible.
Proper Kneading: Knead the dough for the full 8-10 minutes. This develops gluten strands that create the chewy texture and helps the naan puff up when cooking. Under-kneaded dough will produce tough naan.
Rising Environment: The ideal temperature for rising dough is around 75-80°F (24-27°C). A turned-off oven with just the light on works perfectly. Avoid cold or drafty locations.
Rest the Dough Balls: Don’t skip the 10-minute rest after dividing the dough. This allows the gluten to relax, making rolling much easier and preventing the dough from shrinking back.
Roll Evenly: Aim for even thickness throughout each naan. Thinner areas will cook faster and may burn, while thicker spots might remain doughy.
Hot, Dry Pan: The skillet must be very hot and completely dry. This high heat creates those beautiful bubbles and char marks that define naan. Adding oil will prevent proper browning.
Press Out Air Bubbles: If large air pockets form while cooking, gently press them down with a spatula. This ensures the entire surface cooks evenly.
Work Quickly: Once your pan is hot, work efficiently to keep up a steady pace. Have all your dough balls rolled and ready to go.
Brush Immediately: Apply the garlic butter as soon as each naan comes off the heat. The hot bread absorbs the butter better, creating more flavor.
Keep Warm: Stack finished naan under a kitchen towel. The trapped steam keeps them soft and prevents them from drying out.
Garlic Intensity: For milder garlic flavor, use roasted garlic instead of raw in the butter. For more intense flavor, add extra garlic to both the dough and the butter.
Avoid Overcrowding: Cook one naan at a time for best results. Trying to cook multiple pieces at once lowers the pan temperature and prevents proper bubbling.
Practice Makes Perfect: Your first naan might not be perfect, and that’s okay. The technique improves quickly with each one you make.
Read Also: Classic Bruschetta Recipe
Serving Suggestions
Garlic naan bread is incredibly versatile and pairs beautifully with a wide range of dishes beyond traditional Indian cuisine.
Traditional Indian Pairings: Serve alongside classic curries like Chicken Tikka Masala, Butter Chicken, or dal for an authentic experience. The soft texture is perfect for scooping up rich, creamy sauces.
Dips and Spreads: Use naan as a vehicle for Classic Hummus, baba ganoush, or tzatziki sauce. The garlic flavor complements Mediterranean dips exceptionally well.
Soup Companion: Tear warm naan and dunk it into hearty soups like Mediterranean Lentil Soup, tomato soup, or Cream of Mushroom Soup.
Pizza Base: Transform leftover naan into quick personal pizzas. Top with sauce, cheese, and your favorite toppings, then broil until bubbly.
Sandwich Wraps: Use naan as a wrap for grilled chicken, falafel, or kebabs. The pliable texture holds fillings better than regular flatbread.
Breakfast Option: Top warm naan with scrambled Cloud Eggs, avocado, or cream cheese for a satisfying breakfast.
Garlic Bread Alternative: Brush with extra butter and herbs to serve alongside pasta dishes or salads.
Snack on Its Own: Fresh, warm naan straight from the pan needs nothing else. The garlic butter makes it delicious enough to eat plain.
Appetizer Platter: Cut into triangles and serve with assorted dips for an impressive appetizer spread.
Leftover Makeover: Toast day-old naan and top with cheese for quick garlic cheese toast.
Another favorite: Baked Ziti Recipe
Variations to Try
Once you’ve mastered the basic garlic naan, experiment with these delicious variations to keep things exciting.
Cheese Naan: Roll out the dough, place shredded mozzarella or paneer in the center, seal the edges, and roll again carefully. Cook as directed for gooey, cheesy naan.
Herb Naan: Add 2 tablespoons of chopped fresh herbs (basil, rosemary, or oregano) to the dough for an Italian twist.
Onion Naan: Sprinkle finely diced onions and nigella seeds on top of the rolled dough before cooking for added flavor and texture.
Spicy Naan: Mix ½ teaspoon red chili flakes or cayenne pepper into the dough for heat, or add to the garlic butter.
Whole Wheat Naan: Replace half the all-purpose flour with whole wheat flour for a nuttier, healthier version.
Peshwari Naan: Add a filling of ground almonds, coconut, and raisins for a sweet variation that pairs wonderfully with spicy curries.
Keema Naan: Fill with spiced ground lamb or beef for a hearty, meal-in-one option.
Sesame Naan: Brush with water and sprinkle sesame seeds on one side before cooking for extra crunch and flavor.
Butter Naan: Skip the garlic in the dough and butter for a simpler, versatile option.
Chili Cheese Naan: Add minced green chilies to the dough and stuff with cheese for a spicy, indulgent treat.
You might also enjoy: Easy Pizza Dough Recipe
Storage and Reheating
Proper storage keeps your garlic naan fresh and delicious for days, while the right reheating method restores that just-made texture.
Room Temperature Storage: Store completely cooled naan in an airtight container or resealable plastic bag at room temperature for up to 2 days. Separate layers with parchment paper to prevent sticking.
Refrigerator Storage: For longer storage, refrigerate naan in an airtight container for up to 5 days. Bring to room temperature before reheating for best results.
Freezer Storage: Freeze naan for up to 3 months. Stack with parchment paper between each piece, place in a freezer bag, and remove as much air as possible. Label with the date.
Reheating in Skillet: The best method for restoring texture. Heat a dry skillet over medium heat, add naan, and warm for 30-60 seconds per side until heated through and slightly crispy.
Reheating in Oven: Wrap naan in foil and heat at 350°F (175°C) for 10 minutes. For crispy edges, unwrap for the last 2 minutes.
Microwave Method: Quick but makes naan slightly chewy. Wrap in a damp paper towel and microwave for 15-20 seconds. Not ideal for best texture.
Air Fryer: Heat at 350°F (175°C) for 2-3 minutes for a crispy exterior while keeping the inside soft.
Toaster: Small pieces can be toasted lightly for a crispy texture, perfect for making garlic toast.
Freezer to Table: Thaw frozen naan at room temperature for 30 minutes, or reheat directly from frozen using the oven method, adding 5 extra minutes.
Refresh with Butter: Brush reheated naan with additional garlic butter to restore moisture and enhance flavor.
For another great make-ahead bread option, try this Easy Waffle Recipe.
Nutritional Facts
Per serving (1 naan, based on 8 servings):
- Calories: 245
- Total Fat: 9g
- Saturated Fat: 4g
- Trans Fat: 0g
- Cholesterol: 15mg
- Sodium: 485mg
- Total Carbohydrates: 35g
- Dietary Fiber: 1g
- Sugars: 4g
- Protein: 6g
- Vitamin A: 4% DV
- Vitamin C: 2% DV
- Calcium: 6% DV
- Iron: 12% DV
Note: Nutritional information is approximate and may vary based on specific ingredients used and portion sizes. This calculation is based on making 8 naans from the recipe.
You might also enjoy: Buttermilk Pancake Recipe
Health Benefits of Key Ingredients
While garlic naan is certainly an indulgence, several key ingredients offer surprising health benefits that make this bread a better choice than many store-bought alternatives.
Garlic: This pungent bulb is a nutritional powerhouse. It contains allicin, a compound with powerful antibacterial and antiviral properties that support immune function. Garlic has been shown to help reduce blood pressure and cholesterol levels, promoting cardiovascular health. It’s also rich in antioxidants that protect cells from oxidative damage and may reduce the risk of Alzheimer’s disease. The anti-inflammatory properties of garlic can help reduce the severity of colds and flu.
Yogurt: The yogurt in this recipe provides beneficial probiotics that support digestive health and strengthen the gut microbiome. It’s an excellent source of calcium, essential for bone health, and protein, which helps keep you satisfied. Yogurt also contains B vitamins that support energy production and nervous system function. The lactic acid in yogurt helps break down gluten proteins, making the bread easier to digest.
Whole Wheat Flour (if using variation): Substituting part of the all-purpose flour with whole wheat adds fiber, which aids digestion and helps maintain stable blood sugar levels. Whole wheat is rich in B vitamins, particularly B6, which supports brain health. It also contains minerals like iron, magnesium, and zinc that are essential for various bodily functions.
Active Dry Yeast: Beyond making the bread rise, yeast is a good source of B vitamins, particularly B12, which is important for nerve function and red blood cell formation. It contains protein and minerals like selenium, which acts as an antioxidant. Yeast also provides chromium, which helps regulate blood sugar levels.
Cilantro: This herb is more than just a garnish. Cilantro is rich in vitamins A, C, and K, and contains antioxidants that may protect against chronic diseases. It has natural detoxifying properties and may help remove heavy metals from the body. Some studies suggest cilantro may help lower blood sugar levels.
While this bread should be enjoyed as part of a balanced diet, these nutritional benefits make homemade garlic naan a healthier choice than heavily processed bread alternatives.
Read Also: Classic French Toast Recipe
Frequently Asked Questions
1. Can I make garlic naan without yeast?
Yes, you can make a yeast-free version using baking powder and baking soda as leavening agents. However, the texture will be more like a flatbread than traditional naan, lacking that characteristic chewiness and air pockets that yeast creates. Mix 2 cups flour, 1 teaspoon baking powder, ½ teaspoon baking soda, ½ teaspoon salt, ¾ cup yogurt, and 2 tablespoons oil, then let the dough rest for just 10-15 minutes before rolling and cooking.
2. Why didn’t my naan puff up while cooking?
Several factors can prevent naan from puffing. The most common is that your pan wasn’t hot enough; the dough needs intense heat to create steam quickly. You may have rolled the dough too thin, leaving no room for expansion, or the gluten wasn’t developed enough from kneading. Make sure your yeast was active and the dough rose properly before cooking.
3. Can I use a different type of flour?
All-purpose flour works best for traditional naan texture, but you can experiment with alternatives. Bread flour creates a chewier texture due to higher protein content. Whole wheat flour makes a denser, nuttier naan; start by replacing just half the all-purpose flour. Gluten-free flour blends can work but will produce different results; look for blends designed for bread making.
4. How do I know when the naan is fully cooked?
Properly cooked naan should have golden-brown spots on both sides, with some darker char marks. The bread should feel firm but still have some give when pressed, not doughy. If you tap the surface, it should sound slightly hollow. The edges may puff up and char slightly, which is perfectly normal and desirable.
5. Can I make the dough ahead of time?
Absolutely! Prepared dough can be refrigerated for up to 24 hours, which actually enhances the flavor as it slowly ferments. After the first rise, punch down the dough, cover tightly, and refrigerate. Bring it to room temperature (about 30-45 minutes) before dividing and rolling. You can also freeze shaped dough balls for up to 3 months; thaw overnight in the refrigerator before using.
For more bread recipes, check out this Belgian Waffle Recipe.
Final Thoughts
Making homemade garlic naan bread is a truly rewarding experience that brings the authentic flavors of Indian cuisine into your kitchen. The soft, pillowy texture combined with the rich garlic butter creates an irresistible bread that transforms any meal into something special.
Don’t be intimidated by working with yeast or cooking on a hot skillet. This recipe is designed to be beginner-friendly, and with each batch you make, you’ll gain confidence and develop your technique. The beauty of homemade naan lies not just in its superior taste compared to store-bought versions, but in the satisfaction of creating something from scratch.
Try this garlic naan bread recipe tonight and experience the joy of pulling hot, buttery bread off the skillet. Serve it alongside your favorite curry, use it to scoop up creamy dips, or simply enjoy it warm from the pan.
I’d love to hear how your naan turns out! Share your results in the comments below, let me know which variations you tried, or post your creation on social media and tag us. Your feedback helps other home cooks and inspires me to keep sharing recipes you’ll love.
Recommended:
- Chicken Tikka Masala Recipe
- Butter Chicken Recipe
- Classic Hummus Recipe
- Mediterranean Lentil Soup Recipe
- Homemade Alfredo Sauce Recipe
- Easy Pizza Dough Recipe
- Baked Ziti Recipe
- Sweet Sourdough Bread Recipe
- Classic Bruschetta Recipe
- Cloud Eggs Recipe


