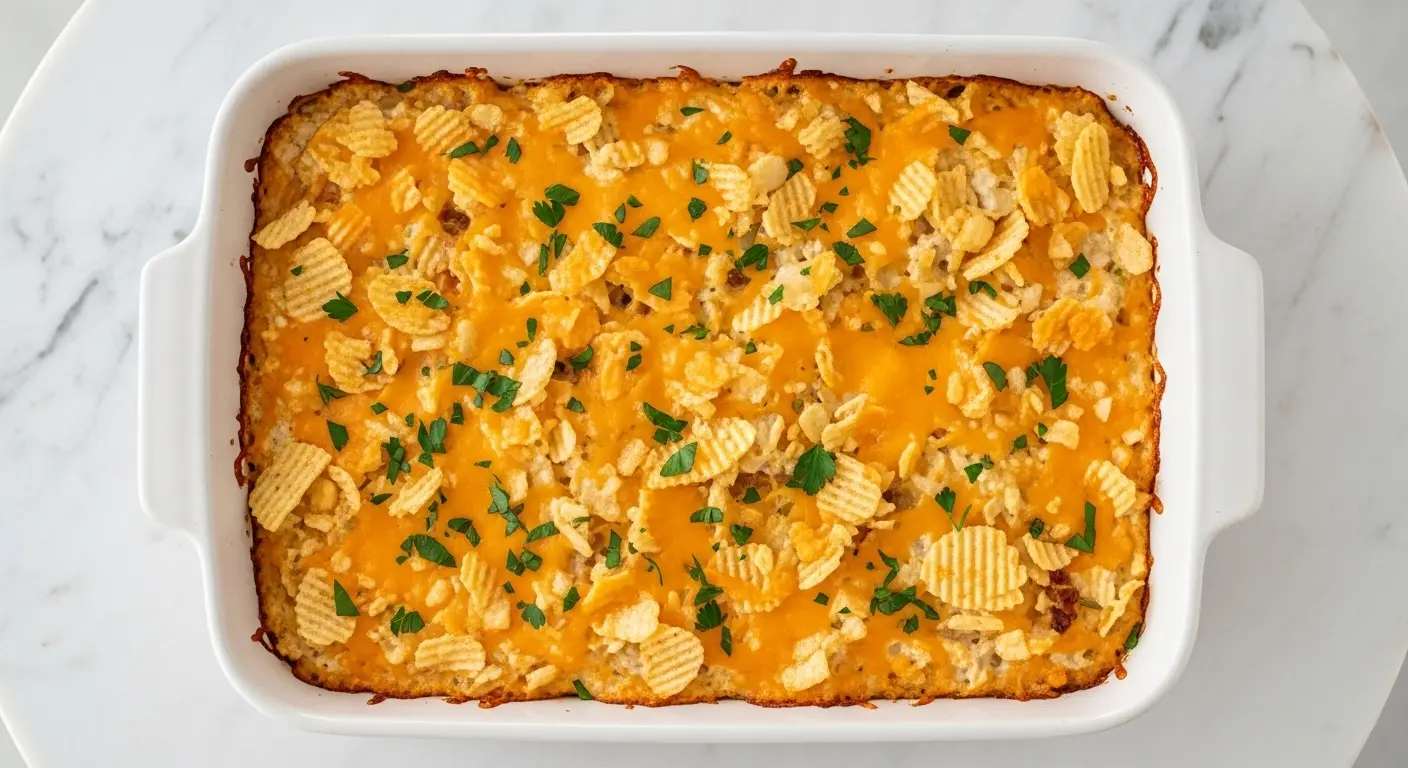
If you’ve never tried a hot chicken salad recipe, you are in for a serious treat. This Southern classic takes all the beloved flavors of traditional cold chicken salad and transforms them into a warm, bubbling casserole that’s loaded with creamy mayonnaise, tender chicken, crunchy celery, sliced almonds, and a golden, cheesy topping. It’s the kind of dish that feels like a warm hug on a cold day.
What makes this recipe so special is the way it bridges two worlds. It has all the familiar, comforting ingredients of a classic chicken salad — mayo, lemon juice, celery — but once it goes into the oven, something magical happens. The filling gets bubbly and rich, the cheese melts into every corner, and the potato chip topping turns perfectly golden and crispy.
This recipe has been passed down through Southern families for generations, and for good reason. It comes together in minutes, uses simple pantry-friendly ingredients, and is completely make-ahead friendly. Bring it to a potluck, a baby shower, a weeknight dinner, or a holiday gathering — it will disappear fast.
The secret to getting it just right lies in a few key details: using well-drained shredded chicken (so the mixture doesn’t get watery), balancing the creaminess of the mayo with a bright squeeze of fresh lemon juice, and adding the crunchy topping right before baking so it stays perfectly crispy.
This is one of those rare recipes that is equal parts easy and impressive. Once you make it the first time, it will earn a permanent spot in your dinner rotation.
You might also enjoy: Classic Chicken Salad
Why You’ll Love This Hot Chicken Salad Recipe
This dish checks every box for a go-to family recipe.
It comes together in under an hour from start to finish, and most of that time is completely hands-off baking.
The combination of creamy mayo-based filling and a crunchy, salty topping gives you the best of both worlds in every single bite.
It’s endlessly flexible — you can swap the protein, change up the toppings, or add extra vegetables depending on what you have on hand.
It works for any occasion, from a laid-back weeknight dinner to an elegant baby shower spread.
It’s make-ahead friendly, which means you can prep it the day before and simply pop it in the oven when you’re ready to eat.
The leftovers reheat beautifully, making it a wonderful meal prep option for busy weeks.
Here’s a quick summary of why this recipe stands out:
- Ready in under 60 minutes with minimal prep work
- Uses affordable, easy-to-find ingredients
- Creamy, cheesy, and irresistibly crunchy in one dish
- A genuine crowd-pleaser for potlucks, gatherings, and family dinners
- Can be assembled up to 24 hours in advance and refrigerated before baking
- Freezer-friendly for long-term meal planning
Read Also: Healthy Chicken Salad Recipe
Ingredients
The ingredients list for this hot chicken salad is short, simple, and deeply satisfying. The magic is in how they work together. The cream of chicken soup adds body and a savory depth that plain mayo alone can’t achieve. The fresh lemon juice cuts through the richness and brightens everything up. And the water chestnuts add a subtle crunch that holds up even through baking, making every bite a little more interesting.
Here’s what you’ll need (serves 6-8):
- 4 cups (560g) cooked chicken, shredded or cubed (rotisserie chicken works great)
- 1 cup (225g) mayonnaise
- 1 can (10.5 oz / 298g) condensed cream of chicken soup, undiluted
- 2 cups (200g) celery, thinly sliced
- 1 can (8 oz / 227g) water chestnuts, drained and chopped
- 1 tablespoon fresh lemon juice
- 1 teaspoon onion powder
- 1/2 teaspoon garlic powder
- 1/2 teaspoon salt
- 1/4 teaspoon black pepper
- 1 cup (115g) sharp cheddar cheese, shredded (divided)
- 1/2 cup (55g) slivered almonds (divided)
- 2 cups (100g) kettle-cooked potato chips, lightly crushed, for topping
- Fresh chopped parsley or green onions, for garnish (optional)
For a chicken salad recipe that uses rotisserie chicken to save even more time, check out this guide to Chicken Salad with Rotisserie Chicken.
Kitchen Equipment Needed
You don’t need any special tools for this recipe. Everything comes together in a single mixing bowl and bakes in one dish, which means cleanup is minimal. The only thing worth investing in is a quality baking dish that distributes heat evenly — it makes a real difference in achieving that perfectly bubbly, golden top.
Here’s what you’ll need:
- 9×13-inch casserole baking dish (ceramic or glass preferred)
- Large mixing bowl
- Box grater or pre-shredded cheese (block cheese melts more smoothly)
- Cutting board and sharp knife
- Measuring cups and spoons
- Rubber spatula or large spoon for mixing
- Aluminum foil (optional, for covering if reheating)
- Cooking spray or butter for greasing the baking dish
This dish pairs wonderfully with a simple side, and a Chicken Broccoli Rice Casserole can round out your meal beautifully on nights you’re feeding a larger crowd.
Recommended Products for This Recipe
These are handpicked products based on quality and performance that will genuinely make a difference in how this recipe turns out.
1. Le Creuset Enameled Cast Iron Baking Dish
A heavy-duty baking dish like this one distributes heat more evenly than thin metal pans, which means your hot chicken salad bakes uniformly without any hot spots. The enameled surface prevents sticking and makes cleanup incredibly easy. It’s an investment piece that will serve you for decades.
2. Chosen Foods Avocado Oil Mayonnaise
Avocado oil mayo delivers the same creamy richness as traditional mayo with a cleaner ingredient list. It holds up beautifully during baking without separating, which keeps the texture of the casserole silky and smooth throughout. Readers who’ve used it in this recipe consistently say it’s their new go-to.
3. Blue Diamond Sliced Almonds
Sliced almonds from Blue Diamond are consistently thin and uniform, which means they toast evenly during baking and add a delicate crunch without overwhelming the other textures in the dish. A quality almond makes a noticeable difference here since it’s one of the key textural elements.
4. Kettle Brand Sea Salt Potato Chips
The chip topping is where this dish gets its signature crunch, and kettle-cooked chips hold up far better during baking than regular chips. They stay crisper longer in the oven and add a satisfying, salty bite that perfectly contrasts the creamy filling beneath.
5. OXO Good Grips 3-Piece Mixing Bowl Set
Having the right mixing bowl makes the prep stage far easier. These OXO bowls have non-slip bases and pour spouts, which means you can mix your filling without the bowl sliding around and transfer it cleanly to the baking dish without making a mess.
This recipe also works beautifully as an inspiration for exploring other comforting casseroles like this classic Chicken Casserole.
Step-by-Step Instructions
Step 1: Prepare Your Oven and Baking Dish
- Preheat your oven to 350°F (175°C). Give it at least 10 to 15 minutes to fully preheat before you bake.
- Lightly grease a 9×13-inch (23x33cm) baking dish with cooking spray or a thin layer of softened butter. Make sure to coat the sides and corners as well as the bottom so nothing sticks.
- Set the prepared dish aside while you mix the filling.
Step 2: Cook and Prep the Chicken
- If you’re using a rotisserie chicken, remove the skin and shred the meat using two forks or your hands. You want roughly 4 cups (560g) of shredded or cubed chicken.
- If cooking chicken from scratch, place boneless, skinless chicken breasts or thighs in a pot, cover with water or chicken broth, and bring to a boil. Reduce to a simmer and cook for 18 to 20 minutes, or until the internal temperature reaches 165°F (74°C). Remove from the pot, let cool slightly, and shred with two forks.
- Pat the chicken lightly with paper towels to remove excess moisture. This step is important — excess liquid can make the casserole watery instead of creamy.
Step 3: Slice and Prep the Vegetables
- Rinse the celery stalks and slice them thinly, about 1/4 inch (6mm) thick. You want the pieces small enough to blend into the filling but large enough to provide a noticeable crunch.
- Drain the canned water chestnuts through a colander and rinse them briefly under cold water. Chop them into rough pieces, about 1/4 inch (6mm) dice.
- Set both vegetables aside on the cutting board.
Step 4: Mix the Creamy Filling
- In a large mixing bowl, combine the mayonnaise and the undiluted condensed cream of chicken soup. Stir them together until fully blended and smooth. The condensed soup adds a concentrated savory depth that elevates the whole dish.
- Add the fresh lemon juice to the mayo-soup mixture and stir. The lemon juice is essential here — it cuts through the richness and keeps the casserole from tasting heavy.
- Add the onion powder, garlic powder, salt, and black pepper to the bowl and stir to combine.
Step 5: Add the Chicken, Vegetables, and Cheese
- Add the prepared shredded chicken to the mixing bowl and fold it into the creamy base until every piece of chicken is thoroughly coated.
- Add the sliced celery and chopped water chestnuts and fold them in. These add two distinct types of crunch to the finished dish.
- Reserve 2 tablespoons of the slivered almonds for topping. Add the remaining almonds to the bowl and stir to distribute evenly. The almonds add a nutty, toasted flavor once baked.
- Reserve 1/4 cup (30g) of the shredded cheddar cheese for topping. Add the remaining 3/4 cup (85g) to the bowl and fold in. Using block cheese that you shred yourself rather than pre-shredded cheese makes a big difference — fresh-shredded cheese melts smoother and tastes richer.
- Stir the entire mixture until everything is evenly incorporated.
Step 6: Transfer to the Baking Dish
- Pour and spread the chicken mixture evenly into the prepared 9×13-inch baking dish. Use a rubber spatula to spread it out to the edges and smooth the top.
- Sprinkle the reserved 1/4 cup (30g) of shredded cheddar cheese evenly over the top of the casserole.
- Scatter the reserved 2 tablespoons of slivered almonds over the cheese layer.
Step 7: Add the Crunchy Chip Topping
- Just before placing the dish in the oven, scatter the lightly crushed kettle-cooked potato chips evenly over the top. Adding the chips at this stage rather than mixing them in ensures they stay crispy during baking rather than turning soggy.
- Press them down very gently with your hand so they adhere slightly to the cheese beneath. Aim for an even, full layer of chips covering the entire surface.
Step 8: Bake the Casserole
- Place the baking dish uncovered on the center rack of your preheated 350°F (175°C) oven.
- Bake for 25 to 30 minutes, or until the filling is heated through, bubbly around the edges, and the cheese is fully melted. The chip topping should be golden and crisp.
- If you want an extra-crispy topping, turn the broiler on high for the last 1 to 2 minutes of baking, watching very closely to prevent burning.
- Remove from the oven and let the casserole rest for 5 minutes before serving. This brief rest allows the filling to set slightly, making it easier to scoop.
Step 9: Garnish and Serve
- Sprinkle freshly chopped parsley or sliced green onions over the top for a pop of color and freshness. This is optional but adds a lovely finishing touch.
- Serve warm directly from the baking dish using a large spoon or serving spatula.
For another indulgent and easy chicken bake, check out this Buffalo Chicken Salad recipe that gives this classic a spicy spin.
Tips for Success
These are the small details that make a noticeable difference between a good hot chicken salad and a truly outstanding one. Keeping these in mind will help you nail it every time.
Here are the most important tips:
- Use dry chicken. Pat your cooked chicken with paper towels before adding it to the bowl. Wet chicken releases liquid during baking, which can make the filling soupy.
- Shred your own cheese. Pre-shredded cheese contains anti-caking powder that prevents it from melting smoothly. Shredding from a block gives you a silkier, richer melt.
- Add chips right before baking. This is the number one key to keeping the topping crispy. Assembling it too far in advance will let the chips absorb moisture and go soft.
- Don’t skip the lemon juice. It’s just one tablespoon but it lifts the whole dish and prevents the mayo base from tasting flat or heavy.
- Use condensed soup straight from the can. Do not dilute it. Using it undiluted is what gives the filling its thick, luscious consistency.
- Room temperature chicken mixes more evenly. If your chicken was in the fridge, let it sit at room temperature for 15 minutes before mixing to ensure it blends smoothly with the other ingredients.
- Taste before baking. Season the filling after mixing and before spreading it into the dish. It’s your last chance to adjust salt and pepper.
Another favorite: Southern Chicken Salad
Serving Suggestions

Hot chicken salad is wonderfully versatile and pairs well with a wide range of sides. Because the casserole itself is rich and creamy, lighter or fresher sides work best to round out the meal.
A crisp, simple green salad dressed with lemon vinaigrette is always a great companion, as the brightness cuts through the richness of the casserole. Warm Dinner Rolls on the side are perfect for scooping up every last bit of the creamy filling from the baking dish.
Here are more serving ideas:
- Serve with a fresh Broccoli Salad for a classic Southern combination
- Spoon leftovers into slider buns or croissants the next day for an easy lunch
- Pair with a light Fruit Salad for a brunch spread or baby shower table
- Serve alongside Garlic Mashed Potatoes for a hearty comfort food dinner
- Scoop into warm pita pockets or flour tortillas for a handheld meal
- Pair with a simple Potato Salad for an easy summer cookout spread
Variations to Try
One of the best things about this recipe is how easy it is to customize. The base is forgiving and works well with all sorts of mix-ins and toppings, so feel free to experiment once you’ve made the classic version.
Here are some fun and delicious variations to try:
- French fried onion topping: Swap the potato chips for canned French fried onions for a slightly sweeter, more savory crunch. This is especially great for holiday versions.
- Spicy kick: Add 1/2 teaspoon of cayenne pepper and a tablespoon of hot sauce to the filling for a bolder, spicier flavor. This is wonderful if you love the idea of a Buffalo Chicken Salad vibe in a baked casserole.
- Pimento addition: Stir in one small jar (2 oz / 57g) of drained diced pimentos for a classic church-cookbook style version with a subtle sweet-peppery note.
- Mushroom variation: Add one cup of sliced, sauteed mushrooms to the filling for extra earthiness and meaty texture.
- Lighter version: Replace half the mayonnaise with plain Greek yogurt for a slightly tangier, lower-calorie filling that still stays perfectly creamy.
- Nutty swap: Replace slivered almonds with chopped pecans or cashews for a different but equally delicious nutty element.
- Ritz cracker topping: Crush a sleeve of buttery Ritz crackers and mix with 2 tablespoons of melted butter before scattering over the top instead of chips for a rich, buttery crust.
Read Also: Curry Chicken Salad Recipe
Storage and Reheating
This hot chicken salad stores and reheats beautifully, making it an ideal recipe for meal prep or bringing to someone who could use a home-cooked meal.
Here are all the storage and reheating details you need:
- Refrigerator: Store leftovers in an airtight container or cover the baking dish tightly with plastic wrap or foil. It will keep well in the fridge for up to 3 to 4 days.
- Freezer: Prepare the filling and spread into the baking dish, then cover tightly with a double layer of plastic wrap followed by aluminum foil. Freeze for up to 3 months. Do NOT add the chip topping before freezing. Add it fresh right before baking from frozen.
- Reheating from the fridge: Cover the dish with foil and warm in a 350°F (175°C) oven for 15 to 20 minutes, or until heated through. Add fresh chips on top for the last 5 minutes uncovered if you want to restore the crunch. You can also reheat individual portions in the microwave for 90 seconds to 2 minutes.
- Reheating from frozen: Thaw the casserole overnight in the refrigerator, then bake as directed, adding 5 to 10 minutes to the cook time. Add fresh chips on top before the final bake.
This dish also has a lot in common with the classic Chicken Casserole when it comes to storage and make-ahead tips.
Nutritional Facts
The following values are estimates based on 8 servings using the standard recipe. Actual values may vary depending on specific brands and portion sizes.
| Nutrient | Per Serving |
|---|---|
| Calories | ~480 kcal |
| Total Fat | 38g |
| Saturated Fat | 9g |
| Cholesterol | 85mg |
| Sodium | 720mg |
| Total Carbohydrates | 15g |
| Dietary Fiber | 2g |
| Sugars | 2g |
| Protein | 24g |
Note: Values are approximate and calculated for one portion out of 8. Using light mayonnaise or Greek yogurt in place of regular mayo will significantly reduce calories and fat per serving.
For a lighter chicken-based dish to balance out the week, this Asian Chicken Salad makes a wonderful contrast.
Health Benefits of Key Ingredients
This recipe is comfort food at heart, but several of its key ingredients actually bring some genuine nutritional value to the table.
Here’s a closer look at the health benefits of the star ingredients:
- Chicken: An excellent source of lean protein, which supports muscle maintenance, immune function, and satiety. A single serving provides a significant portion of your daily protein needs.
- Celery: Low in calories and high in fiber, celery supports digestive health and provides vitamins K and C, as well as important electrolytes. It also has a high water content that helps with hydration.
- Almonds: Packed with heart-healthy monounsaturated fats, vitamin E, magnesium, and fiber. Almonds have been linked to improved cholesterol levels and blood sugar regulation.
- Water chestnuts: A surprisingly nutritious ingredient — they’re low in calories, high in fiber and potassium, and contain antioxidants. They also maintain their crunch even after baking, which sets them apart from most vegetables.
- Lemon juice: Rich in vitamin C and natural antioxidants, fresh lemon juice supports immune health and also aids in the absorption of iron from the chicken and other ingredients.
Read Also: Chinese Chicken Salad Recipe
Frequently Asked Questions
1. Can I make hot chicken salad ahead of time?
Yes, absolutely. Assemble the filling and spread it into the baking dish, then cover tightly and refrigerate for up to 24 hours before baking. Add the potato chip or cracker topping right before putting it in the oven so it stays crispy. If baking cold from the refrigerator, add 5 to 10 minutes to the bake time.
2. What kind of chicken works best for this recipe?
Rotisserie chicken is the easiest and most flavorful option because the slow-roasted meat is already well-seasoned and tender. You can also use leftover baked or poached chicken, or cook boneless skinless chicken breasts or thighs from scratch. The key is to make sure the chicken is fully cooked, shredded or cubed, and patted dry before mixing to avoid a watery casserole.
3. Can I substitute the cream of chicken soup?
Yes. You can replace it with cream of mushroom soup for a slightly earthier flavor, or use a homemade white sauce (béchamel) as a from-scratch alternative. Some recipes skip the condensed soup entirely and use a combination of sour cream and extra mayonnaise instead. Each option changes the flavor slightly, but all work well.
4. Why did my hot chicken salad turn out watery?
This almost always comes down to excess moisture in the chicken. Pre-cooked chicken, especially poached chicken, tends to release liquid as it bakes. Always pat your chicken dry before adding it to the bowl. Using rotisserie chicken that’s been allowed to cool completely also helps. Additionally, avoid adding any extra liquid to the recipe beyond the lemon juice.
5. Can I use a different topping instead of potato chips?
Definitely. Crushed Ritz crackers mixed with melted butter are a popular and delicious alternative. French fried onions give a sweeter, crunchier topping that many people love. Panko breadcrumbs tossed with a little butter and garlic powder work well for a more refined look. Crushed buttery crackers are another great option. The only firm rule is to add the topping right before baking so it doesn’t soften from the moisture in the filling.
For more chicken salad inspiration, try this delicious Chicken Salad Recipe with Grapes for a sweet and savory twist.
Final Thoughts
Hot chicken salad is one of those timeless recipes that earns its place in any home cook’s rotation. It’s approachable enough for a busy Tuesday night and impressive enough to bring to any gathering.
The combination of creamy filling, tender chicken, satisfying crunch, and melted cheese is simply hard to beat.
If you’ve been looking for a recipe that feels both comforting and a little special, this is it. Try it once and you’ll understand why Southern families have been making it for decades.
Give it a try this week and make it your own with the toppings and mix-ins that suit your family best. If you make it, we’d love to hear how it turned out — drop a comment below or share a photo on social media!
Recommended:
- Mexican Chicken Salad Recipe
- Willow Tree Chicken Salad Recipe
- Chicken Salad Recipe with Canned Chicken
- Green Bean Casserole Recipe
- Tuna Noodle Casserole Recipe
- Squash Casserole Recipe
- Broccoli Casserole Recipe
- Creamy Coleslaw Recipe
- Easy Egg Salad Recipe
- Classic Tuna Salad Recipe


