Few things say summer quite like a perfectly cooked corn on the cob recipe that delivers sweet, juicy kernels with just the right bite.
This is the dish that shows up at every backyard cookout, holiday weekend spread, and family dinner from June through August — and for good reason.
The key to truly great boiled corn on the cob is simpler than most people realize: fresh corn, properly seasoned water, and the right timing.
Skip the lid, keep the water at a rolling boil, and you’ll have perfectly cooked ears that need nothing more than a swipe of butter and a pinch of salt.
But even that basic version can be elevated with a few smart techniques, like adding sugar to your boiling water to coax out the corn’s natural sweetness, or finishing with an herb-flecked compound butter that melts straight into every row of kernels.
This guide walks you through every step, from choosing the best ears at the market to the exact minute you should pull them out of the pot.
You might also enjoy: Mexican Street Corn if you want to take your corn game even further after you’ve nailed the classic boiled version.
Why You’ll Love This Corn On The Cob Recipe
Boiled corn on the cob is one of those recipes that’s genuinely hard to mess up when you know what you’re doing.
It uses just a handful of ingredients, comes together in under 15 minutes, and delivers results that taste unmistakably fresh and seasonal.
Here’s what makes this version a keeper:
- Incredibly fast. From shucking to plate, you’re looking at about 15 minutes total.
- No special equipment required. Just a large pot and some water.
- Crowd-pleaser every time. Kids and adults alike love it, which makes it perfect for feeding a group without complaint.
- Naturally sweet flavor. A small amount of sugar added to the boiling water amplifies the corn’s natural sweetness without making it taste artificial.
- Versatile base for toppings. Once you’ve mastered the boiled version, you can load it up with anything from classic butter and salt to bold Mexican-style toppings.
- Budget-friendly. Fresh corn is one of the most affordable vegetables in season, making this a smart choice for feeding a crowd.
- Pairs with everything. Grilled meats, simple salads, soups — corn on the cob works alongside almost any main dish.
You might also like this Corn Casserole for another crowd-pleasing corn side dish that works beautifully at potlucks and family gatherings.
Ingredients
Getting good corn on the cob starts before you even reach the stove. Fresh, in-season corn is the single biggest factor in how good this dish tastes. Here’s everything you’ll need:
- 4 ears of fresh corn, husks and silk removed
- 1 tablespoon granulated sugar (helps draw out the corn’s natural sweetness)
- 1 tablespoon kosher salt, plus more for serving
- Water, enough to fully submerge the ears (about 4–6 quarts / 3.8–5.7 liters)
- 2 tablespoons unsalted butter, cut into pats (for serving)
- Freshly ground black pepper, to taste (for serving)
Optional toppings:
- Flaky sea salt
- Smoked paprika or chili powder
- Fresh chopped parsley or chives
- Honey butter for a sweet and savory finish
Read Also: Corn Salsa Recipe
Kitchen Equipment Needed
You don’t need anything fancy to boil corn perfectly. Most of these items are already in a standard kitchen:
- Large stockpot or Dutch oven (at least 8-quart / 7.5-liter capacity to fit 4 ears comfortably)
- Tongs (for safely lowering corn into boiling water and removing it)
- Cutting board (for trimming the ends of corn if needed)
- Sharp knife (to trim and halve ears if serving smaller portions)
- Measuring spoons
- Colander or slotted spoon (for draining)
- Large stockpot with lid (a heavy-bottomed pot heats water more evenly)
- Kitchen tongs (long-handled tongs protect your hands from steam and boiling water)
Another favorite: Corn Chowder — a hearty and comforting way to use extra corn you might have on hand.
Recommended Products for This Recipe
These are products recommended based on quality and performance — each one makes cooking boiled corn on the cob easier, safer, or more enjoyable.
1. Large Stainless Steel Stockpot
A wide, deep stockpot is essential for fitting multiple ears of corn without crowding. Crowding the pot traps steam and slows the return to a boil, which extends cook time and can lead to uneven results. A quality stainless steel stockpot heats water quickly and holds a steady boil throughout cooking.
2. OXO Good Grips Locking Tongs
Boiling water and hot corn can cause real burns if you’re fumbling with inadequate tools. OXO tongs offer a firm, reliable grip that makes it easy to lower ears into boiling water and lift them out without slipping. The locking mechanism also makes storage simple.
3. Corn Holders / Corn Cob Skewers
These small but mighty tools make eating corn so much more comfortable, especially for kids. Instead of burning your fingers on a hot ear, corn holders give you a stable, cool grip from each end. They’re inexpensive, reusable, and make the eating experience noticeably better.
4. Flaky Sea Salt
Finishing with flaky sea salt instead of regular table salt is a simple upgrade that makes a real difference. The flakes dissolve slightly on contact with the hot butter and corn, delivering bursts of salinity rather than an even, flat saltiness. Maldon is the classic choice.
5. Compound Butter Molds
If you plan on making flavored butters to serve alongside your corn, silicone butter molds let you prep them ahead of time and serve them in attractive, portioned shapes. They’re especially useful when entertaining and add a polished, restaurant-quality touch to a simple dish.
This recipe also pairs beautifully with a warm bowl of Corn Soup if you’re building a full corn-forward menu for a summer dinner.
Step-by-Step Instructions
Step 1: Select and Prep Your Corn
- Look for ears with bright green, tightly wrapped husks and slightly damp, golden-brown silk at the top. The silk should not be completely dry or black.
- Gently peel back just the very tip of the husk to check that the kernels are plump and tightly packed, without any dark or moldy spots.
- Remove the husk by peeling it downward from the tip to the base in long, firm strokes. Peel off all layers until the ear is completely bare.
- Pull away as much silk as possible by hand, then run the ear under cool water while rubbing lightly to remove remaining strands.
- Snap or trim off the tough stem end at the base if it feels hard or dried out. This is optional but gives a cleaner presentation.
- If your pot is not large enough to fit full ears, break each ear in half by placing it over the edge of the counter and pressing down firmly.
Step 2: Fill and Season the Pot
- Fill your large stockpot with enough cold water to fully submerge all 4 ears of corn. This typically requires 4 to 6 quarts (3.8 to 5.7 liters) of water.
- Add 1 tablespoon of granulated sugar to the cold water. The sugar does not make the corn sweet on its own, but it does help the corn’s natural sugars shine through, especially in ears that were picked a day or two ago.
- Add 1 tablespoon of kosher salt. Salt in the cooking water seasons the corn from the outside in and enhances the overall flavor.
- Stir briefly to dissolve the sugar and salt into the water.
- Do not add butter or oil to the cooking water. Butter added to water does not absorb into the corn and can leave an unpleasant film.
Step 3: Bring the Water to a Full Rolling Boil
- Place the pot on your largest burner and set the heat to high.
- Cover the pot with a lid to speed up the boiling process.
- Allow the water to reach a full, aggressive rolling boil. This means large bubbles are breaking the surface continuously — not just a gentle simmer.
- This step typically takes 10 to 15 minutes depending on your stove and pot size. Do not add the corn until the water is fully boiling.
- Once boiling, remove the lid and keep it off for the remainder of cooking to prevent the pot from boiling over.
Step 4: Add the Corn
- Using long-handled tongs, carefully lower each ear of corn into the boiling water one at a time.
- Position the ears so they are fully submerged. If an ear floats above the waterline, gently press it down or rotate it halfway through cooking.
- If all 4 ears do not fit comfortably in a single layer, it is better to cook them in two batches than to crowd the pot. Crowding slows the return to a boil and results in uneven cooking.
- Once all ears are in the pot, wait for the water to return to a full boil before starting your timer.
Step 5: Cook the Corn
- Once the water returns to a full rolling boil with all the corn in the pot, start your timer for 3 to 5 minutes.
- For corn that is very fresh (picked same-day or the day before), 3 minutes is usually sufficient. The sugars have not yet converted to starch, so the corn is already naturally sweet and tender.
- For corn that has been sitting for a few days, 4 to 5 minutes gives the kernels time to become fully tender without turning mushy.
- Do not cook corn longer than 5 minutes if boiling at a full, aggressive boil. Overcooked corn becomes starchy, rubbery, and loses its bright yellow color.
- Keep the heat on high throughout cooking to maintain the boil.
Step 6: Check for Doneness
- Using tongs, lift one ear out of the water and rest it briefly on a plate or cutting board.
- Pierce a kernel near the middle of the ear with a sharp knife tip or fingernail. It should release a milky, slightly starchy liquid and feel tender but not mushy.
- Alternatively, press a kernel lightly — it should feel plump and give gently under pressure without collapsing completely.
- If the kernel feels hard or releases no liquid, return the ear to the boiling water for 1 more minute and check again.
- Properly cooked corn will have bright, slightly deepened yellow color compared to raw corn.
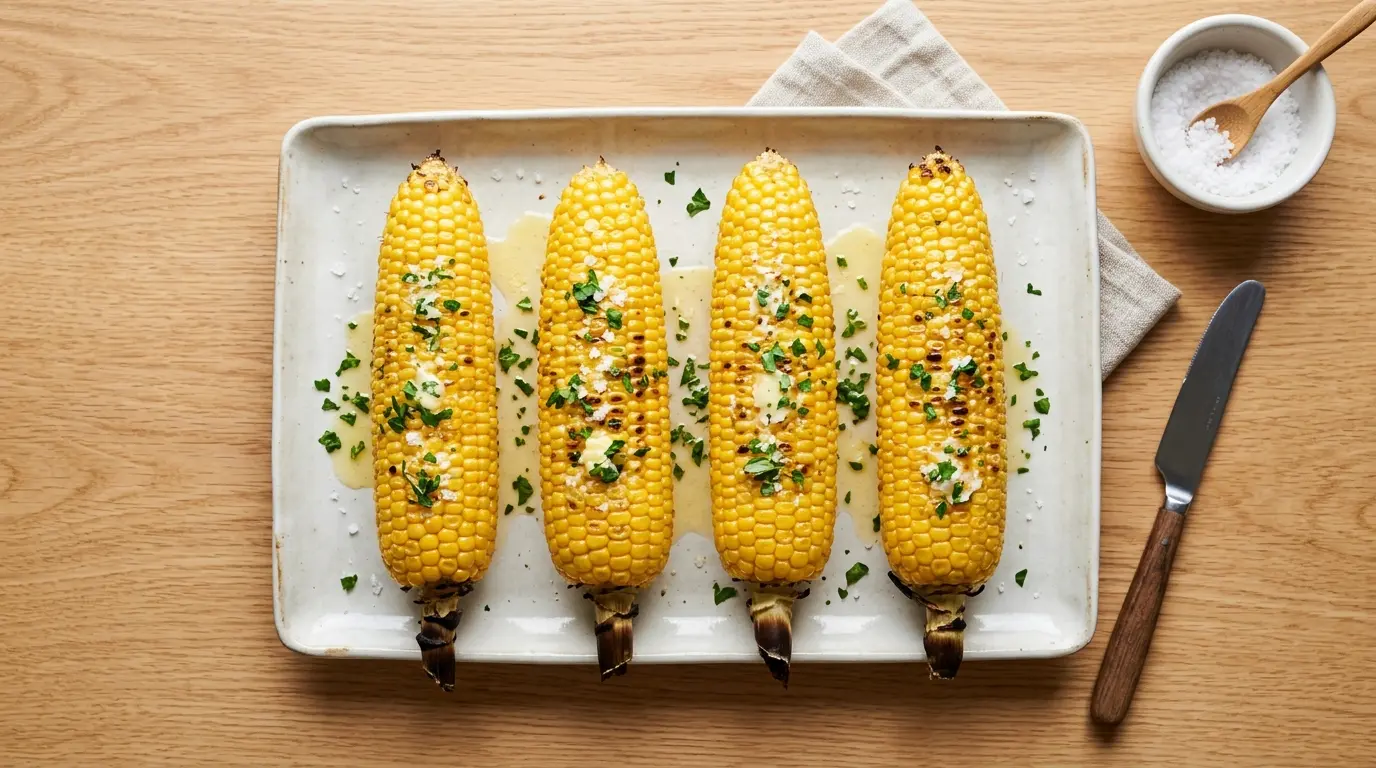
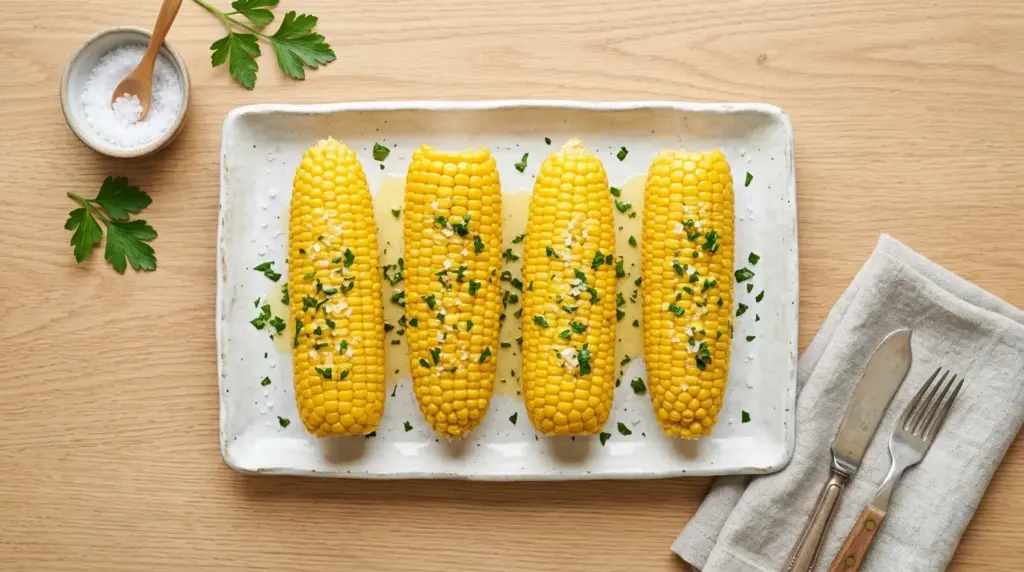
Step 7: Remove, Butter, and Serve
- Using tongs, remove each ear from the boiling water and place it on a serving platter or directly onto plates.
- Work quickly — corn cools fast and is best served immediately.
- Place 2 tablespoons of unsalted butter, cut into pats, on the platter or in a small dish for guests to roll their corn through.
- Alternatively, hold the ear with a cloth or insert corn holders, then rub a pat of butter directly up and down each ear so it melts evenly across all sides.
- Season generously with freshly ground black pepper and additional salt to taste.
- Serve immediately while the butter is still melting.
Read Also: Corn Pudding Recipe
Tips for Success
Getting boiled corn right every time comes down to a few key habits. Keep these in mind each time you make it:
- Buy the freshest corn you can find. Corn starts converting sugar to starch the moment it is picked. Farmers’ markets and farm stands almost always have fresher corn than grocery stores. Look for ears with moist silk, not dry or blackened.
- Do not add the corn to cold water. Adding corn to cold water and bringing it up to a boil together leads to overcooked, rubbery results. Always wait for a full rolling boil first.
- Do not overcook. The most common mistake with boiled corn is leaving it in the water too long. At a full boil, 3 to 5 minutes is all you need. More than that leads to starchy, mushy kernels.
- Keep cooked corn warm in the water. If your corn is ready but dinner isn’t, you can leave the ears in the hot (no longer boiling) water for up to 10 minutes without overcooking. Just turn off the heat and cover the pot.
- Season the water, not just the corn. Adding salt and sugar to the cooking water is what seasons the corn from the inside out. Relying only on surface-level seasoning at the end gives a flat, one-dimensional result.
- Use the freshest butter you have. Since butter is the primary topping, quality matters. European-style butter with a higher fat content melts more luxuriously and delivers a noticeably richer flavor.
This recipe is a natural match with a batch of Sweet Cornbread for a fully corn-forward summer spread.
Serving Suggestions
Boiled corn on the cob is one of the most versatile summer sides out there, and it belongs on the table next to a wide variety of dishes.
It pairs especially well with grilled and smoky mains, fresh salads, and hearty comfort sides that share the same casual, backyard-cookout energy.
Here are some of the best ways to serve it:
- Alongside Baked Beans for a classic cookout plate that needs no further introduction
- Next to a scoop of Potato Salad for a crowd-pleasing combination that travels well to picnics
- Paired with Creamy Coleslaw for a balance of cool, creamy texture against the warm, juicy corn
- With a side of Broccoli Salad to add color and crunch to a summer spread
- Served with Collard Greens for a Southern-style meal that feels deeply comforting
- Rolled in homemade BBQ Sauce before serving for a sticky, smoky twist on the classic
- Cut off the cob and tossed into a fresh summer grain bowl or pasta salad for a hearty, textural bite
You might also enjoy: Chicken Corn Chowder — a great way to use any leftover corn kernels cut from the cob.
Variations to Try
Once you’ve mastered the basic boiled corn on the cob recipe, there are plenty of delicious directions you can take it:
- Mexican Street Corn Style: After boiling, brush the ears with mayonnaise, roll in crumbled cotija cheese, squeeze over fresh lime juice, and dust with chili powder and smoked paprika. This preparation is inspired by Mexican Street Corn and is wildly popular for a reason.
- Herb Butter Corn: Mix softened unsalted butter with minced garlic, fresh chopped parsley, and a pinch of sea salt. Roll each hot ear in the herb butter immediately after boiling so it melts into every row of kernels.
- Parmesan and Garlic: Brush boiled corn with melted butter, then roll in finely grated Parmesan and a pinch of garlic powder. Finish with a crack of black pepper.
- Honey Butter and Sea Salt: Blend equal parts softened butter and honey, then spread it generously over hot boiled corn. Finish with a pinch of flaky sea salt for a sweet-savory contrast that works surprisingly well.
- Spicy Sriracha Lime: Mix softened butter with sriracha, fresh lime zest, and a squeeze of lime juice. Brush over hot corn for a fiery, tangy finish.
- Corn Succotash: After boiling, cut the kernels off the cob and toss them into a skillet with lima beans, cherry tomatoes, garlic, and fresh basil for a fresh, colorful side dish.
Read Also: Corn Souffle Recipe
Storage and Reheating
Boiled corn on the cob is at its absolute best served immediately, but leftovers store reasonably well when handled correctly:
- Refrigerating cooked corn: Allow boiled corn to cool to room temperature, then wrap each ear tightly in plastic wrap or place in an airtight container. Refrigerate for up to 3 days.
- Freezing cooked corn: Allow the ears to cool completely, then wrap each one individually in plastic wrap and place in a freezer-safe zip bag. Freeze for up to 3 months. Thaw overnight in the refrigerator before reheating.
- Reheating in boiling water: Bring a pot of water back to a boil and add the corn for 1 to 2 minutes until warmed through. This method best preserves the texture and moisture.
- Reheating in the microwave: Wrap a single ear in a damp paper towel and microwave on high for 1 to 2 minutes. Check and rotate halfway through if your microwave does not have a turntable.
- Reheating in the oven: Wrap each ear in aluminum foil with a small pat of butter inside and bake at 350°F (175°C) for 5 to 7 minutes. The butter steams the corn gently and adds extra flavor.
- Cutting kernels off the cob: If you plan to store for later use in other recipes, cut the kernels off the cob using a sharp knife and store in an airtight container in the refrigerator for up to 3 days.
This recipe pairs naturally with a batch of Skillet Cornbread — both come together quickly and complement each other at any summer table.
Nutritional Facts
The following is an approximate nutritional breakdown for one medium ear of boiled corn on the cob (about 90g / 3.2 oz of kernels), served plain without butter or added toppings:
| Nutrient | Amount Per Ear |
|---|---|
| Calories | 90 kcal |
| Total Fat | 1.4g |
| Saturated Fat | 0.2g |
| Cholesterol | 0mg |
| Sodium | 15mg (from natural sources) |
| Total Carbohydrates | 21g |
| Dietary Fiber | 2.4g |
| Total Sugars | 4.5g |
| Protein | 3.4g |
| Vitamin C | 7mg (8% DV) |
| Thiamin (B1) | 0.2mg (17% DV) |
| Folate | 42mcg (11% DV) |
| Magnesium | 37mg (9% DV) |
| Phosphorus | 89mg (7% DV) |
| Potassium | 270mg (6% DV) |
Nutritional values are estimates based on USDA data and will vary based on corn variety, size, and preparation method. Adding 1 tablespoon of butter adds approximately 100 calories and 11g of fat.
Another favorite: Corn Egg Drop Soup — a light and warming dish that uses simple corn to stunning effect.
Health Benefits of Key Ingredients
Corn on the cob is more nutritious than it often gets credit for, especially when eaten fresh and in season.
It provides a solid foundation of B vitamins, dietary fiber, and plant-based antioxidants that contribute to overall health in meaningful ways.
Here’s a closer look at what’s working for you in each ear:
- Dietary fiber: One ear of corn provides about 2.4g of dietary fiber, which supports digestive health, helps regulate blood sugar levels, and contributes to feelings of fullness after meals.
- Folate (Vitamin B9): Corn is a notable source of folate, which is essential for DNA synthesis, cell division, and is particularly important for pregnant women to support healthy fetal development.
- Thiamin (Vitamin B1): This B vitamin plays a key role in converting carbohydrates into usable energy and supports healthy nerve function throughout the body.
- Lutein and Zeaxanthin: These two carotenoid antioxidants found in yellow corn are strongly associated with eye health. Research links them to a reduced risk of age-related macular degeneration and cataracts.
- Antioxidants: Corn contains ferulic acid, a potent antioxidant that may help protect cells from oxidative damage and has been studied for its potential anti-inflammatory effects.
- Complex carbohydrates: The carbohydrates in corn are primarily complex, meaning they digest more slowly than simple sugars and provide sustained energy rather than a spike and crash.
- Low in fat: Plain boiled corn is naturally very low in fat, making it a smart side dish choice for people managing their fat intake without sacrificing satisfaction.
Read Also: Jiffy Cornbread Recipe With Creamed Corn
Frequently Asked Questions
1. How long do you boil corn on the cob?
Boil corn on the cob for 3 to 5 minutes in actively boiling, well-seasoned water.
Very fresh corn (same-day or next-day from the farm) only needs 3 minutes because the kernels are already tender and sweet. Corn that has been stored for a few days needs the full 4 to 5 minutes to reach optimal texture.
2. Should you salt the water when boiling corn?
Yes — adding salt to the boiling water is an important step that seasons the corn from the outside in.
Use about 1 tablespoon of kosher salt per 4 to 6 quarts (3.8 to 5.7 liters) of water. Unlike pasta, corn does not readily absorb water, so the salt primarily seasons the outermost kernels and enhances the overall flavor profile.
3. Can you cook corn on the cob in advance?
You can boil corn up to a few hours in advance and keep it warm by leaving it submerged in the hot water with the heat turned off.
For longer storage, refrigerate cooked ears wrapped in plastic wrap for up to 3 days and reheat them in boiling water for 1 to 2 minutes before serving.
4. How do you know when corn on the cob is done?
Properly cooked corn will be bright yellow, and the kernels will feel plump and tender when pressed.
The most reliable test is to pierce a kernel with a knife tip or your fingernail — it should release a milky liquid and give easily under gentle pressure without being mushy or hard.
5. Does adding sugar to the water actually help?
Yes, adding 1 tablespoon of sugar to the cooking water does make a noticeable difference, particularly with corn that is a few days old.
As corn sits after harvest, its natural sugars convert to starch, which reduces sweetness. Adding sugar to the water helps compensate for this conversion, resulting in a sweeter, more vibrant-tasting corn without any artificial sweetness.
This recipe can be paired with a chilled bowl of Corn Salsa as a fresh appetizer before the main meal.
Final Thoughts
Corn on the cob is one of those recipes that rewards attention to small details — fresh ears, seasoned water, the right timing, and a generous finish of good butter.
Once you follow these steps, you’ll notice an immediate difference in how the corn tastes compared to guessing your way through it.
Give this corn on the cob recipe a try at your next cookout, family dinner, or lazy summer evening, and see just how satisfying a simple, well-made dish can be.
If you make it, leave a comment below and let me know how it turned out — and feel free to share it with someone who could use a little help getting their corn just right!
Recommended:
- Mexican Street Corn Recipe
- Corn Pudding Recipe
- Corn Casserole Recipe
- Corn Chowder Recipe
- Corn Soup Recipe
- Corn Souffle Recipe
- Corn Tortilla Recipe
- Sweet Cornbread Recipe
- Skillet Cornbread Recipe
- Honey Butter Recipe


