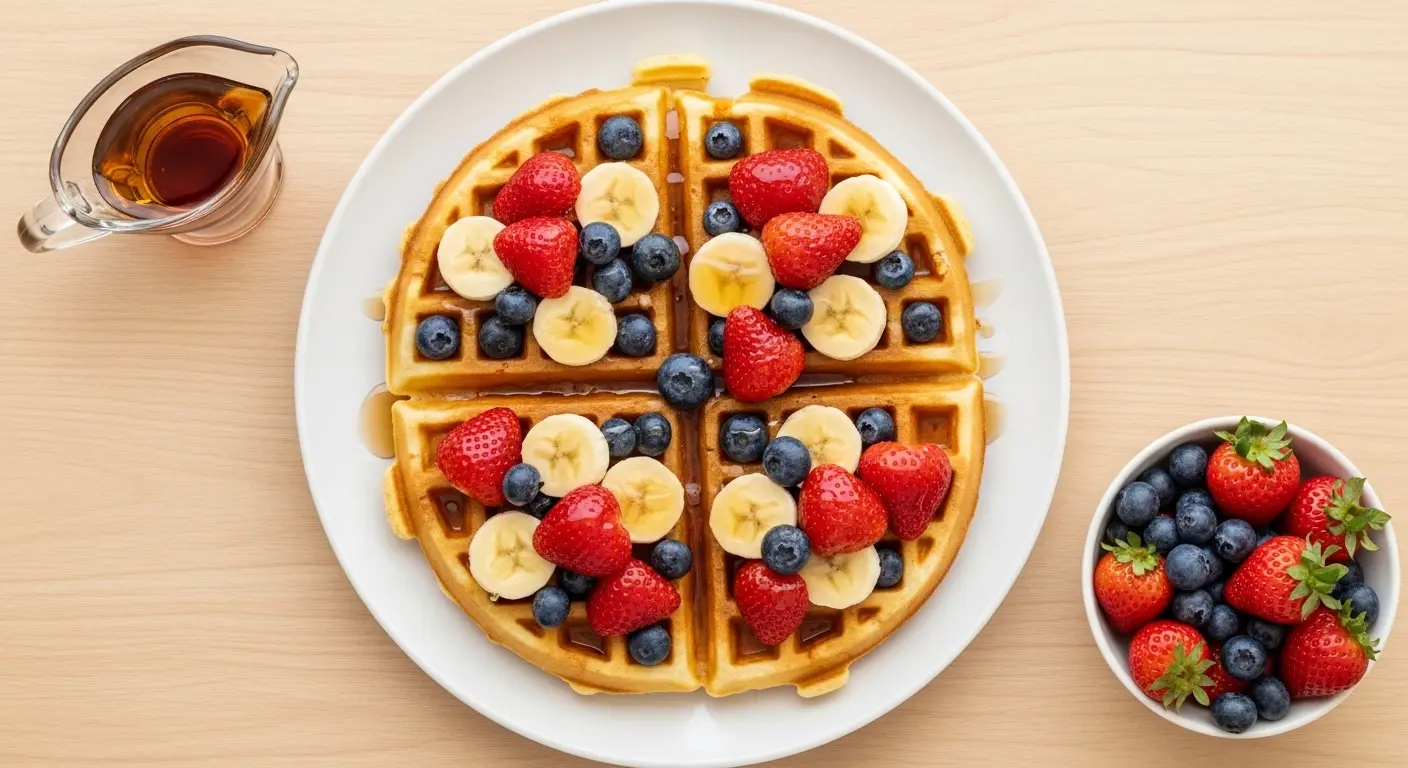
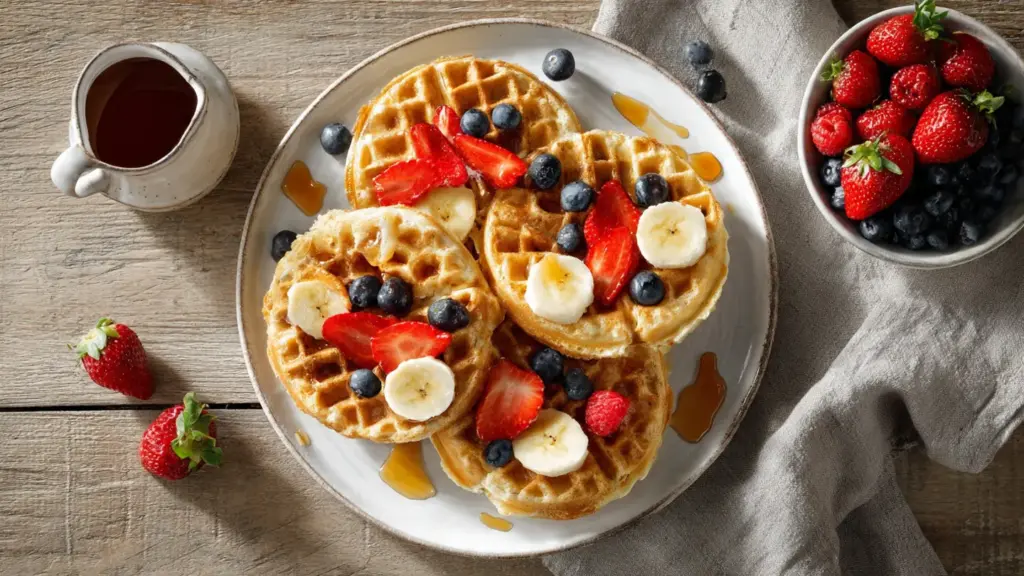
If you’ve been searching for the perfect vegan Belgian waffle recipe, your weekend brunch just got a major upgrade. These waffles are everything you’d want from a Belgian-style waffle: deeply golden on the outside, light and airy on the inside, with those signature deep pockets just waiting to be filled with your favorite toppings.
The secret to making them genuinely great without eggs or dairy comes down to a few clever swaps that actually work. Aquafaba (the liquid from a can of chickpeas) replaces eggs in a way that gives you lift and structure. Plant-based milk and vegan butter stand in seamlessly for their conventional counterparts. The result is a waffle that holds its crunch, doesn’t go limp, and tastes absolutely indulgent — no one at your table will believe it’s fully plant-based.
This recipe is beginner-friendly and comes together quickly, making it perfect for lazy weekend mornings or a special brunch spread. You might also love this Belgian Waffle Recipe if you’re looking for the classic version.
Why You’ll Love This Vegan Belgian Waffle Recipe
These waffles genuinely check every box for a standout breakfast treat.
They come together with pantry staples you likely already have on hand, making a special brunch completely stress-free. The batter takes just about 10 minutes to mix, and from there the waffle iron does all the work.
The texture is the real star here — the aquafaba creates a batter that’s light and aerated, producing waffles with a delicate crumb rather than the dense, gummy result you sometimes get with eggless baking. The exterior crisps up beautifully thanks to the fat content in the vegan butter and the high heat of the waffle iron.
They’re also incredibly versatile when it comes to toppings. Fresh fruit, coconut whipped cream, maple syrup, or even a savory avocado situation all work wonderfully.
- Truly crispy exterior — not soft or limp, even after sitting for a few minutes
- Light and fluffy interior — thanks to aquafaba and baking powder working together
- Deep waffle pockets — the Belgian-style design holds toppings perfectly
- Completely dairy-free and egg-free — without sacrificing flavor or texture
- Quick to make — the batter is ready in under 10 minutes
- Customizable — easily made gluten-free with a simple flour swap
You might also enjoy: Healthy Belgian Waffle Recipe
Ingredients
You only need a handful of simple ingredients to make this recipe work. The aquafaba is the most unusual item here — it’s simply the liquid from a standard can of chickpeas, so be sure to save it before draining the beans.
- 2 cups (240g) all-purpose flour
- 2 tablespoons (25g) granulated sugar
- 1 tablespoon (12g) baking powder
- ½ teaspoon (3g) salt
- 1 teaspoon (2g) ground cinnamon (optional, but recommended)
- 1¾ cups (415ml) unsweetened oat milk (or any plant-based milk)
- ⅓ cup (75g) vegan butter, melted and slightly cooled
- 3 tablespoons (45ml) aquafaba (liquid from a can of chickpeas)
- 1 teaspoon (5ml) pure vanilla extract
- 1 tablespoon (15ml) apple cider vinegar
- Non-stick cooking spray or additional vegan butter, for greasing the waffle iron
Read Also: Homemade Belgian Waffle Recipe
Kitchen Equipment Needed
You don’t need any specialized equipment beyond a waffle iron. If you have a Belgian-style iron (one with deeper grid plates), that’s ideal for achieving the signature deep pockets, but a standard waffle iron will work too.
- Belgian waffle iron (deep grid recommended)
- 2 large mixing bowls
- Whisk
- Hand mixer or stand mixer (for whipping aquafaba)
- Measuring cups and spoons
- Rubber spatula
- Ladle or batter dispenser
- Cooling rack
- Small bowl (for melting butter)
The same waffle iron technique used here also works beautifully in my Easy Waffle Recipe.
Recommended Products for This Recipe
These are products I recommend based on quality and overall performance for making the best vegan Belgian waffles.
1. Cuisinart Belgian Waffle Iron
A quality waffle iron makes all the difference between crispy, evenly cooked waffles and pale, unevenly done ones. A Belgian-style iron with deep grids ensures those signature pockets are deep enough to hold toppings without spilling. Look for one with adjustable temperature settings so you can dial in that perfect golden color.
2. Bob’s Red Mill Oat Flour
If you want to make these waffles gluten-free, a finely milled oat flour from a trusted brand like Bob’s Red Mill gives you a tender texture without any grit. It’s also a great way to add subtle nutty flavor to the batter. Make sure to use a certified gluten-free version if needed.
3. Miyoko’s Creamery Vegan Butter
Miyoko’s Creamery makes one of the best vegan butters on the market in terms of flavor and performance in baking. It melts beautifully, has a clean buttery taste, and contributes to the crispy exterior of these waffles without any off-flavors. It’s worth seeking out for recipes where butter flavor matters.
4. OXO Good Grips Batter Dispenser
A batter dispenser makes pouring the perfect amount of batter into your waffle iron easy and mess-free. It gives you consistent results waffle after waffle without overflow or underfilling, which is especially helpful when you’re making a large batch for a crowd.
5. Vitamix High-Speed Blender
A high-speed blender is great for quickly blending your batter if you want an ultra-smooth result, and it doubles as a tool for whipping up vegan toppings like cashew cream or blended fruit sauces. It’s a versatile investment for a plant-based kitchen.
This recipe also pairs well with our Authentic Belgian Waffle Recipe if you want to compare techniques.
Step-by-Step Instructions
1. Whip the Aquafaba
- Measure out 3 tablespoons (45ml) of aquafaba from a can of chickpeas into a clean, dry mixing bowl. Make sure there’s no grease or moisture in the bowl, as this can prevent the aquafaba from whipping properly.
- Using a hand mixer or stand mixer, beat the aquafaba on high speed for 3 to 4 minutes until it forms stiff, glossy peaks. It should look similar to softly whipped egg whites — pale, voluminous, and holding its shape when you lift the beaters.
- Set the whipped aquafaba aside. This step is what gives the waffles their light, airy texture, so don’t skip it.
2. Combine the Dry Ingredients
- In a large mixing bowl, add 2 cups (240g) of all-purpose flour, 2 tablespoons (25g) of granulated sugar, 1 tablespoon (12g) of baking powder, ½ teaspoon (3g) of salt, and 1 teaspoon (2g) of ground cinnamon if using.
- Whisk the dry ingredients together thoroughly until evenly combined. This step ensures the baking powder and salt are distributed evenly throughout the flour, so your waffles rise consistently.
3. Mix the Wet Ingredients
- In a separate medium bowl, combine 1¾ cups (415ml) of unsweetened oat milk with 1 tablespoon (15ml) of apple cider vinegar. Stir briefly and let it sit for about 2 minutes — this creates a vegan “buttermilk” that adds a subtle tang and helps the waffles become even fluffier.
- Add ⅓ cup (75g) of melted vegan butter (make sure it’s cooled to room temperature so it doesn’t cook the other ingredients) and 1 teaspoon (5ml) of vanilla extract to the oat milk mixture.
- Whisk the wet ingredients together until combined.
4. Combine Wet and Dry Ingredients
- Pour the wet ingredient mixture into the bowl of dry ingredients all at once.
- Stir gently with a rubber spatula or whisk just until combined. It’s okay if the batter looks a little lumpy — overmixing will develop the gluten and make your waffles tough and dense rather than light and tender. Stop mixing as soon as you no longer see large streaks of dry flour.
5. Fold in the Whipped Aquafaba
- Add the whipped aquafaba to the batter in two additions. For the first addition, stir it in gently but don’t worry too much about keeping air in it — this helps loosen the batter.
- For the second addition, use a large rubber spatula to fold the whipped aquafaba in with gentle, sweeping motions from the bottom of the bowl up and over. Fold just until the aquafaba is mostly incorporated — a few streaks are fine. The goal is to retain as many air bubbles as possible for a fluffy result.
6. Preheat and Grease the Waffle Iron
- Preheat your Belgian waffle iron according to the manufacturer’s instructions. Most irons take about 3 to 5 minutes to come to temperature.
- Once hot, generously grease the top and bottom plates with non-stick cooking spray or brush with a little melted vegan butter using a pastry brush. This is especially important for the first waffle, as the iron tends to be slightly less non-stick at the start.
- Set the heat to medium-high, or roughly between 3 and 4 on a dial that goes from 1 to 5. This temperature gives you enough heat to crisp the exterior without burning it before the interior cooks through.
7. Cook the Waffles
- Use a ladle or batter dispenser to pour enough batter to just fill the lower plate of your waffle iron — typically ¾ cup to 1 cup (180ml to 240ml) of batter per waffle, depending on the size of your iron. Don’t overfill, as the batter will spread when you close the lid.
- Close the waffle iron lid and cook for 5 to 6 minutes without opening it prematurely. Opening the lid too early can cause the waffle to tear in half. When steam stops visibly escaping from the sides of the iron, that’s a reliable sign the waffle is nearly done.
- Once the waffle is golden brown and releases easily from the plates without sticking, it’s ready. Use a silicone spatula or fork to gently lift it out.
- Transfer the cooked waffle to a wire cooling rack — not a plate — to keep it crispy on the bottom. Stacking waffles directly on a plate will steam them and make them go soft.
8. Repeat with Remaining Batter
- Re-grease the waffle iron between each waffle. Even if your iron has a good non-stick coating, a light spray between batches helps prevent sticking and ensures a consistent golden crust.
- Continue cooking the remaining batter in batches. This recipe makes approximately 4 large Belgian waffles, depending on the size of your iron.
- Keep finished waffles warm by placing them in a single layer on a baking sheet in a 200°F (93°C) oven while you finish the batch. This keeps them crispy without overcooking.
Read Also: Gluten Free Belgian Waffle Recipe
Tips for Success
A few small details make a big difference with this recipe. Paying attention to these points will help you get reliably great waffles every single time.
- Don’t skip whipping the aquafaba. This is what sets this recipe apart from denser vegan waffles. Whipped aquafaba adds real lift and a light, airy texture that you can’t achieve by simply adding the liquid straight to the batter.
- Let the batter rest for 5 minutes before cooking. This gives the baking powder time to activate and the flour time to fully hydrate, resulting in a better texture.
- Don’t overmix. Lumpy batter is fine. Overworked batter leads to tough waffles because too much gluten develops when flour is mixed aggressively.
- Always preheat the iron fully. Starting with a fully hot iron ensures an immediate sear that creates a crispy exterior. A lukewarm iron means the waffle steams rather than crisps.
- Use the cooling rack, not a plate. Cooling waffles on a rack instead of stacking them on a plate keeps the bottoms from steaming and going soggy.
- Measure the aquafaba carefully. Too much aquafaba can make the batter overly light and cause the waffle to not hold its structure properly.
You might also enjoy: Buttermilk Belgian Waffle Recipe
Serving Suggestions
These vegan Belgian waffles are absolutely delicious on their own with a drizzle of maple syrup, but they’re even better when you build a full spread around them.
Toppings and pairings transform a simple waffle into something that feels truly special and restaurant-worthy, and the deep pockets of Belgian-style waffles hold everything perfectly.
- Fresh berries and coconut whipped cream — a classic, beautiful combination that’s naturally vegan and works with any seasonal fruit
- Sliced bananas with peanut butter and a drizzle of maple syrup — incredibly satisfying and filling as a post-workout breakfast
- Strawberry Sauce — a warm, glossy sauce that soaks into the waffle pockets for the most indulgent result
- Savory toppings like sliced avocado, cherry tomatoes, and everything bagel seasoning — for a completely different and equally delicious savory brunch direction
- Caramel Sauce with crushed pecans — for a dessert-style waffle that feels totally decadent
- A simple Fruit Salad on the side rounds out a brunch spread beautifully
- Dairy-free vanilla ice cream — for a proper dessert waffle that rivals anything from a restaurant
Variations to Try
Once you’ve mastered the base recipe, it’s easy to customize these waffles with different flavors and add-ins. Each variation keeps the same core batter structure — just swap or add ingredients as noted.
- Blueberry waffles: Gently fold ½ cup (75g) of fresh or frozen blueberries into the finished batter just before cooking. Don’t thaw frozen berries first — they’ll bleed less and distribute more evenly if added straight from the freezer.
- Chocolate chip waffles: Fold in ½ cup (85g) of dairy-free chocolate chips into the batter. Use mini chips for a more even distribution throughout each waffle.
- Lemon poppy seed waffles: Add 1 tablespoon (8g) of poppy seeds, 2 teaspoons (4g) of lemon zest, and 1 tablespoon (15ml) of fresh lemon juice to the wet ingredients for a bright, citrusy flavor.
- Pumpkin spice waffles: Replace ¼ cup (60ml) of the plant-based milk with canned pumpkin puree and add 1½ teaspoons (3g) of pumpkin pie spice in place of the cinnamon.
- Gluten-free version: Substitute the all-purpose flour with a 1:1 gluten-free baking flour blend. The texture will be slightly denser, but still delicious.
- Banana waffles: Mash one ripe banana and add it to the wet ingredients, reducing the plant milk by ¼ cup (60ml) to account for the added moisture.
Also check out: Easy Belgian Waffle Recipe
Storage and Reheating
These waffles store well, making them a great option for meal prepping a week’s worth of quick breakfasts. The key to reheating them is high, dry heat — this brings the crispiness right back.
- Refrigerator: Store cooled waffles in an airtight container or zip-top bag for up to 4 days. Place a sheet of parchment paper between each waffle to prevent them from sticking together.
- Freezer: Arrange cooled waffles in a single layer on a baking sheet and freeze until solid, about 2 hours. Transfer to a freezer bag and store for up to 3 months. Label with the date so you know what’s in there.
- Reheat in a toaster: The toaster is the best method for single waffles — it crisps the exterior back up perfectly in just 2 to 3 minutes. Use the medium setting and check after the first round.
- Reheat in the oven: Place frozen or refrigerated waffles on a baking sheet in a single layer and bake at 350°F (175°C) for 8 to 10 minutes until heated through and crispy. This is the best method for reheating multiple waffles at once.
- Avoid the microwave: The microwave will steam the waffles and make them soft and rubbery — not what you want after going through the effort of making crispy Belgian-style waffles.
This recipe also pairs wonderfully with Easy Overnight Oats for a full week of prepped breakfasts.
Nutritional Facts
The following nutritional information is an estimate per waffle (recipe makes 4 large Belgian waffles) and will vary depending on your specific ingredients and toppings.
| Nutrient | Per Waffle |
|---|---|
| Calories | ~320 kcal |
| Total Fat | 12g |
| Saturated Fat | 3g |
| Cholesterol | 0mg |
| Sodium | 380mg |
| Total Carbohydrates | 47g |
| Dietary Fiber | 1.5g |
| Total Sugars | 7g |
| Protein | 6g |
Note: These values are calculated without toppings. Adding maple syrup, fruit, or nut butter will change the nutritional profile.
You might also enjoy: Easy Acai Bowl Recipe
Health Benefits of Key Ingredients
Making these waffles vegan doesn’t just make them kinder to animals — several of the key ingredients bring real nutritional value to your plate.
The combination of plant-based ingredients gives you a breakfast that’s lower in saturated fat and cholesterol compared to traditional waffles, while still delivering satisfying flavor and energy.
- Oat milk is a good source of beta-glucan, a soluble fiber that supports heart health and helps keep blood sugar levels stable after meals. It’s also often fortified with calcium and vitamin D.
- Aquafaba is surprisingly nutritious — the liquid from chickpeas contains small amounts of protein and saponins, and using it in place of eggs eliminates cholesterol entirely from the recipe.
- Vegan butter (coconut oil-based) provides medium-chain triglycerides (MCTs), which are metabolized differently from long-chain fats and can provide quick energy. Brands like Miyoko’s also tend to be lower in hydrogenated oils than older margarine-style products.
- All-purpose flour provides a base of complex carbohydrates for sustained energy. Swapping half for whole wheat flour adds more fiber and magnesium.
- Apple cider vinegar acts as a mild probiotic and helps create the “buttermilk” reaction in the batter, while also potentially supporting digestion and gut health.
- Cinnamon contains antioxidants and has been shown in studies to help moderate blood sugar response when consumed with carbohydrate-heavy foods — a useful quality for a waffle breakfast.
Read Also: Vegan Pho Recipe
Frequently Asked Questions
1. Can I make these waffles gluten-free?
Yes, absolutely. The easiest approach is to substitute the all-purpose flour with an equal amount of a 1:1 gluten-free baking flour blend, such as Bob’s Red Mill Gluten Free 1-to-1 Baking Flour. These blends are formulated to mimic the behavior of all-purpose flour and work well in this recipe without requiring any other adjustments. The texture may be very slightly denser, but you’ll still get a delicious, crispy waffle.
2. What can I use instead of aquafaba?
If you don’t have aquafaba, you can use 3 tablespoons (45ml) of unsweetened applesauce or a flax egg (1 tablespoon of ground flaxseed mixed with 3 tablespoons of water, left to gel for 5 minutes) as a substitute. Keep in mind that neither of these alternatives can be whipped, so your waffles won’t be quite as fluffy — but they’ll still taste great and hold together well.
3. Can I make the batter the night before?
You can mix the dry and wet ingredients separately the night before and store each in covered bowls in the refrigerator. However, it’s best to whip the aquafaba and fold everything together just before cooking. Pre-mixed batter that includes whipped aquafaba tends to lose its airiness overnight, resulting in denser waffles in the morning. Prepping the components separately takes just a couple of minutes to combine fresh.
4. Why are my waffles not crispy?
The most common reasons for soft, non-crispy vegan waffles are an iron that wasn’t fully preheated, too little fat in the batter, or opening the iron too early during cooking. Make sure your waffle iron is fully hot before adding batter. Don’t reduce the amount of vegan butter in the recipe — it’s essential for crispiness. And resist the urge to peek at the waffle before the steam has mostly stopped escaping from the sides of the iron.
5. What plant milk works best in this recipe?
Oat milk is the top choice for this recipe because its mild sweetness and natural starchiness create a batter that mimics the richness of dairy milk most closely. Soy milk is a close second and gives a similar result. Almond milk works but tends to be thinner, which can result in a slightly less rich waffle. Canned full-fat coconut milk produces a richer, slightly denser waffle with a subtle coconut flavor — delicious if that’s what you’re going for.
The same techniques in this FAQ apply to the Buttermilk Pancake Recipe — great for comparing plant milk options across breakfast recipes.
Final Thoughts
This vegan Belgian waffle recipe is proof that plant-based breakfast can be every bit as satisfying, indulgent, and crowd-pleasing as the traditional version.
The combination of whipped aquafaba, vegan butter, and a “buttermilk” made from oat milk and apple cider vinegar produces waffles with genuine crunch and a pillowy interior — the kind of texture that makes you look forward to getting out of bed on a weekend morning.
Give this recipe a try next time you’re in the mood for a special breakfast, and don’t be shy about experimenting with the variations. Once you see how easy these come together, they might just become your new Sunday staple.
If you make these, leave a comment below and let me know how they turned out — and which toppings you went with! Feel free to share a photo too.
Recommended:
- Belgian Waffle Recipe
- Easy Belgian Waffle Recipe
- Homemade Belgian Waffle Recipe
- Pumpkin Pancake Recipe
- Cracker Barrel Pancake Recipe
- Easy French Toast Recipe
- Basic Crepe Recipe
- Breakfast Potatoes Recipe
- Baked Oatmeal Recipe
- Scrambled Eggs Recipe


