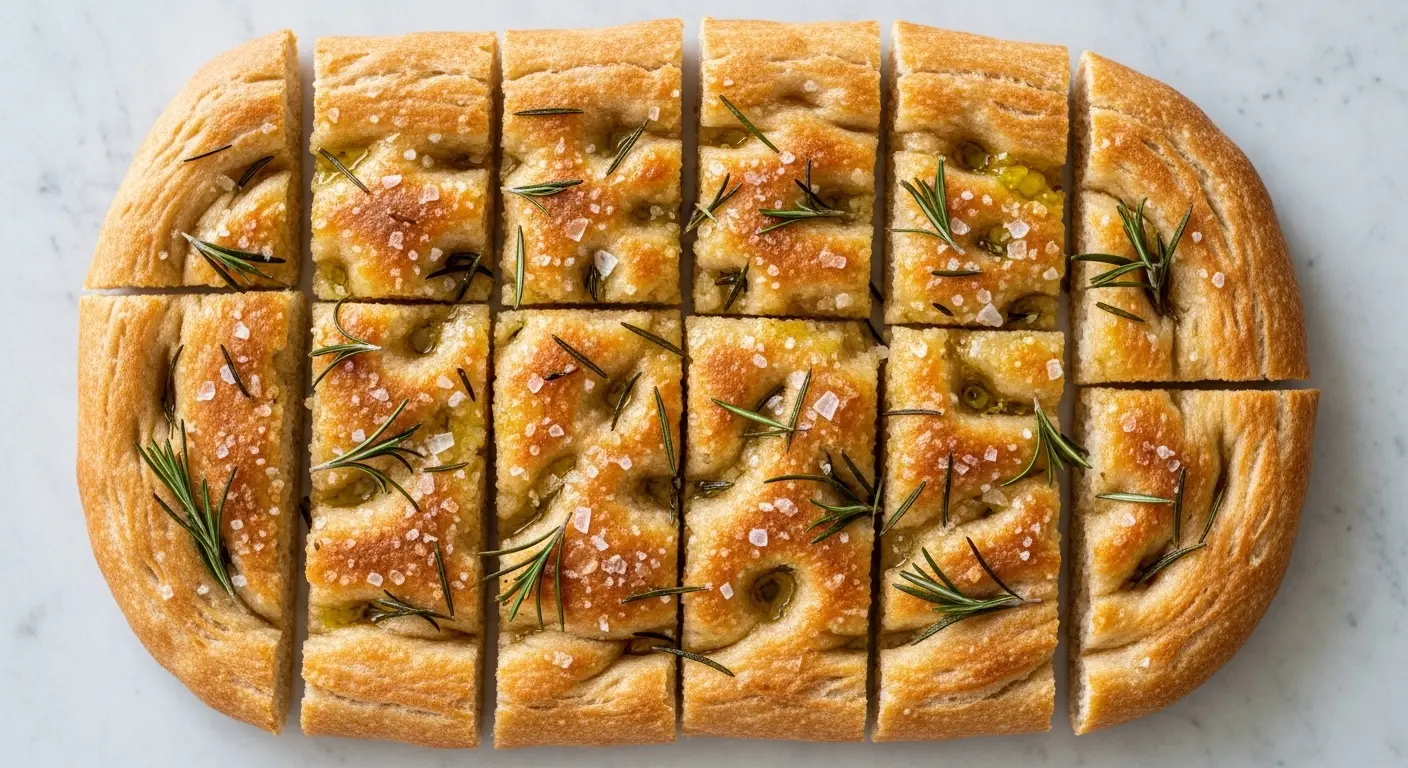
If you’ve been wanting to try your hand at a sourdough focaccia recipe, you are in exactly the right place. This bread is everything a homemade loaf should be: golden and crispy on the outside, pillowy and airy on the inside, and absolutely drenched in good olive oil with just the right amount of sea salt on top.
Focaccia made with sourdough starter has a depth of flavor you simply can’t get from commercial yeast alone. The long fermentation process gives the bread a subtle tang, a more complex crumb, and a texture that holds up beautifully whether you’re tearing off a chunk to dip in soup or layering it up for sandwiches.
This recipe is approachable even if you’ve never worked with sourdough before. As long as you have an active, bubbly starter ready to go, the rest is straightforward. The dough is forgiving, the process is mostly hands-off, and the result is a show-stopper that looks like it came from a proper Italian bakery.
You’ll be doing a lot of waiting (fermentation can’t be rushed), but the active hands-on time is minimal. A few folds, a dimple session, and a generous pour of olive oil are really all you need.
Sourdough Sandwich Bread is another great way to put your active starter to work if you’re building up your sourdough repertoire.
Why You’ll Love This Sourdough Focaccia Recipe
This is the kind of bread that makes people stop mid-bite and ask, “Did you actually make this?”
It delivers everything you want: a shatteringly crisp bottom crust from the olive oil in the pan, an open and airy interior full of big, irregular bubbles, and a flavor that’s savory, tangy, and deeply satisfying.
Because it uses sourdough starter instead of commercial yeast, you’re getting a bread with real fermentation going on. That means better flavor, better digestibility, and a longer shelf life compared to regular focaccia.
The dough itself is a high-hydration, no-knead style, so there’s zero intimidating kneading involved. You just mix, fold, and wait.
It’s endlessly versatile. You can top it with rosemary and sea salt for the classic version, load it with olives and sun-dried tomatoes, or pile on caramelized onions and fresh herbs.
It scales beautifully for a crowd and bakes up just as well in a 9×13-inch pan as in a larger sheet pan. Whether you’re feeding a family dinner or a casual gathering, this focaccia delivers every single time.
- Bold, complex flavor from sourdough fermentation
- Crispy bottom crust and fluffy, open interior
- No kneading required
- Highly customizable with toppings
- Made with simple, pantry-friendly ingredients
- Impressive enough for guests, easy enough for weeknights
You might also enjoy: Same Day Sourdough Bread
Ingredients
You need only a handful of ingredients for this recipe, but quality matters here. A great olive oil and good sea salt make a noticeable difference in the final loaf. Make sure your sourdough starter is active and bubbly before you begin, meaning it should have been fed within the last 4 to 8 hours and should be showing visible signs of activity.
- 100g (3.5 oz / about ½ cup) active sourdough starter (100% hydration, fed and bubbly)
- 375g (13.2 oz / 1½ cups + 2 tbsp) lukewarm water (75-80°F / 24-27°C)
- 500g (17.6 oz / 4 cups) bread flour (or all-purpose flour)
- 10g (2 tsp) fine sea salt
- 75ml (5 tbsp) extra virgin olive oil, divided
- 1 tsp honey or sugar (optional, to support fermentation)
- Flaky sea salt, for topping (such as Maldon sea salt flakes)
- 2-3 sprigs of fresh rosemary (or 1 tsp dried rosemary)
- Optional toppings: sliced olives, cherry tomatoes, caramelized onions, fresh garlic slices
Read Also: Sourdough Starter Recipe
Kitchen Equipment Needed
You don’t need any fancy equipment to make this focaccia. The most important item is a good-quality baking pan that will conduct heat evenly and give you that gorgeous crispy bottom. A standard 9×13-inch (23x33cm) metal baking pan works perfectly, though a larger rimmed sheet pan will give you a thinner, crispier result.
- Large mixing bowl
- Digital kitchen scale (highly recommended for accuracy)
- 9×13-inch metal baking pan or a rimmed half-sheet baking pan
- Bench scraper or spatula
- Plastic wrap or shower cap bowl cover
- Instant-read thermometer (to check water temperature)
- Measuring spoons
- Wire cooling rack
This pairs beautifully with a batch of Classic Bruschetta as a starter spread at your next dinner party.
Recommended Products for This Recipe
These are products I genuinely recommend based on quality and performance for making the best possible sourdough focaccia.
1. Extra Virgin Olive Oil (High-Quality)
The flavor of focaccia depends heavily on the olive oil you use since the dough is essentially saturated in it. A good quality extra virgin olive oil with a fruity, peppery flavor profile will elevate every bite. Don’t skimp here.
2. Lodge Seasoned Cast Iron Half Sheet Pan
A well-seasoned cast iron pan conducts heat more aggressively than a standard aluminum pan, which means a crispier, more deeply golden bottom crust. It’s an investment piece that will serve you for decades.
3. Maldon Sea Salt Flakes
Maldon flakes have a distinctive crunch and mild, clean salinity that works perfectly as a finishing salt on focaccia. The large flat crystals don’t dissolve into the dough the way fine salt does, giving you that classic salty crunch in every bite.
4. Danish Dough Whisk
A Danish dough whisk incorporates high-hydration dough far more easily than a regular spoon, preventing overmixing while making sure everything comes together evenly. It’s a small tool that makes a real difference with wet focaccia doughs.
5. OXO Bench Scraper
A bench scraper is your best friend when working with sticky, wet focaccia dough. It helps with folding, scraping the bowl, and portioning dough cleanly without deflating it.
Read Also: Easy Sourdough Bread Recipe
Step-by-Step Instructions
1. Feed Your Sourdough Starter
- Take your sourdough starter out of the refrigerator the night before or early morning.
- Feed it with equal parts flour and water by weight (for example, 50g starter + 50g flour + 50g water).
- Let it sit at room temperature (ideally 70-75°F / 21-24°C) until it is visibly bubbly, has doubled in size, and passes the float test (drop a small spoonful into water; if it floats, it’s ready).
- This typically takes 4-8 hours depending on the temperature of your kitchen and the strength of your starter.
2. Mix the Dough
- In a large mixing bowl, combine the lukewarm water (375g / 1½ cups + 2 tbsp) and the active sourdough starter (100g / ½ cup).
- Stir gently with a spatula or Danish dough whisk until the starter is mostly dissolved into the water. The mixture may look slightly cloudy and bubbly, which is exactly right.
- If using honey, add it now and stir to combine.
- Add the bread flour (500g / 4 cups) and the fine sea salt (10g / 2 tsp) to the bowl.
- Mix everything together until no dry flour remains and a shaggy, rough dough forms. It will look rough and sticky, and that is completely normal for a high-hydration dough.
- Drizzle 1 tablespoon (15ml) of olive oil over the top of the dough and let it rest, uncovered, for 30 minutes. This rest period is called the autolyse, and it allows the flour to fully hydrate and the gluten to begin developing on its own.
3. Perform the Stretch and Fold
- After the 30-minute rest, wet your hand with water to prevent sticking.
- Reach under one side of the dough, stretch it upward as far as it will go without tearing, then fold it over the top of the dough to the opposite side.
- Rotate the bowl 90 degrees and repeat this stretch-and-fold motion on the new side.
- Continue rotating and folding until you’ve gone all the way around the bowl (4 folds = 1 set).
- Cover the bowl with plastic wrap or a damp kitchen towel and let it rest for 30 minutes.
- Repeat this stretch-and-fold process for a total of 4 sets over 2 hours (one set every 30 minutes). With each set, the dough will become noticeably smoother, more elastic, and easier to handle.
- After the final fold, the dough should feel strong, cohesive, and much smoother than when you started.
4. Bulk Ferment the Dough
- After completing all 4 sets of stretch and folds, leave the dough covered in the bowl at room temperature to continue fermenting.
- You are looking for the dough to increase in volume by 50-75%, feel airy and slightly jiggly when you shake the bowl, and show bubbles on the surface and sides of the dough.
- This bulk fermentation typically takes 4-6 hours at a room temperature of 70-75°F (21-24°C). In a cooler kitchen, it may take longer; in a warmer kitchen, check it earlier.
- Alternatively, after the final fold, you can cover the bowl tightly with plastic wrap and transfer it to the refrigerator to ferment overnight (8-16 hours). Cold fermentation develops even more flavor and makes the dough easier to handle the next day.
5. Prepare the Pan
- When your dough has completed its bulk ferment, generously coat the bottom and sides of your 9×13-inch (23x33cm) baking pan with 3-4 tablespoons (45-60ml) of olive oil. The pan should look almost obscenely oily, and that is exactly what you want. The oil is what creates the signature crispy bottom crust and rich flavor.
- If using a half-sheet pan for a thinner focaccia, coat it equally generously.
6. Transfer the Dough to the Pan
- Gently scrape the fermented dough out of the mixing bowl and into the oiled pan. Use a bench scraper or oiled spatula to avoid deflating the dough.
- Drizzle another tablespoon of olive oil over the top of the dough.
- Using your fingertips, gently stretch the dough toward the corners and edges of the pan. If the dough springs back and resists, stop stretching and let it rest for 10-15 minutes before trying again. Do not force it. Resting allows the gluten to relax and the dough will be much more cooperative.
- Once the dough is roughly filling the pan, cover loosely with plastic wrap and let it proof at room temperature for 2-4 hours (or 1-2 hours if you did a cold overnight ferment), until it is puffed, bubbly, and jiggly.
7. Dimple the Dough and Add Toppings
- Preheat your oven to 450°F (230°C) with a rack in the center position. Allow the oven to preheat fully for at least 30 minutes so it’s thoroughly hot.
- Oil your fingers generously with olive oil and press them firmly and confidently into the dough, creating deep dimples all over the surface. Press all the way down to the pan without puncturing through. The dimples are what give focaccia its characteristic appearance and help hold the olive oil on top.
- Drizzle the remaining 1-2 tablespoons of olive oil over the surface of the dough so it pools into the dimples.
- Scatter the fresh rosemary sprigs or leaves evenly over the surface.
- Finish with a generous sprinkle of flaky sea salt over the entire top.
- Add any additional optional toppings now (olives, cherry tomatoes, caramelized onions, etc.), pressing them gently into the dimples.
8. Bake the Focaccia
- Place the pan in the fully preheated oven.
- Bake for 20-25 minutes, until the top is a deep golden brown and the edges are visibly crispy.
- The internal temperature of the bread should reach at least 200°F (93°C) when tested with an instant-read thermometer.
- When the focaccia is done, remove it from the oven and immediately run a spatula around the edges.
- Lift the bread out of the pan within 2-3 minutes of baking to prevent the bottom from steaming and softening. Transfer it to a wire cooling rack.
- Let it cool for at least 15-20 minutes before slicing to allow the crumb to set properly.
The same careful process that goes into this focaccia also makes an incredible Sweet Sourdough Bread if you want to try another variation with your starter.
Tips for Success
Getting your sourdough focaccia right comes down to a few key habits: using a genuinely active starter, being generous with the olive oil, and not rushing the fermentation. These tips will help you avoid the most common pitfalls and nail it on your first try.
- Use an active, peak starter. Your starter should be fed, doubled, bubbly, and at or just past its peak rise. A weak or recently fed (but not yet active) starter will result in a dense, flat loaf that doesn’t ferment properly.
- Don’t skimp on the olive oil. The pan should be coated so heavily it almost seems wasteful. This oil is what gives you the crispy, golden bottom crust. Under-oiling leads to sticking and a pale, soft bottom.
- Use bread flour for better structure. Bread flour has a higher protein content than all-purpose flour, which creates more gluten and supports the airy, open crumb that makes focaccia so special. All-purpose will work in a pinch but the texture will be slightly less chewy.
- Don’t rush the fermentation. The long, slow fermentation is where all the flavor and texture development happens. Cutting corners here will give you a bland, dense result. Watch the dough, not the clock.
- Let the dough relax before stretching. If the dough is pulling back aggressively when you try to stretch it into the pan, stop and give it 10-15 minutes to rest. Forcing it risks degassing the dough and tearing the gluten.
- Dimple with confidence. Press firmly all the way to the bottom of the pan. Shallow, timid dimples will puff back up in the oven. Deep dimples hold the olive oil and toppings beautifully and add to the visual appeal.
- Preheat your oven fully. At least 30 minutes at 450°F (230°C) is important. A hot oven creates the rapid oven spring that gives focaccia its lift and ensures you get a properly crispy crust.
Read Also: Easy Garlic Bread Recipe
Serving Suggestions
Sourdough focaccia is incredibly versatile. It’s equally at home as a dinner table bread, a base for appetizers, or the star of a casual lunch spread. Here are some of the best ways to serve it:
- Tear it into chunks and serve alongside a bowl of Tomato Sauce or creamy soup for dipping.
- Slice it horizontally and use it as the bread for a pressed sandwich or Italian-style sub loaded with cured meats, fresh mozzarella, and roasted vegetables.
- Arrange it on a charcuterie board alongside olives, cheeses, and cured meats for an effortless entertaining spread.
- Top warm slices with Easy Hummus, roasted red peppers, and a drizzle of olive oil for a quick and impressive appetizer.
- Serve alongside a bowl of Easy Tomato Soup for the ultimate comfort food pairing.
- Cut into small squares and top each piece with a smear of ricotta and a drizzle of honey for a sweet-savory bite that works as a snack or light dessert.
Variations to Try
One of the best things about this recipe is how easily it can be customized. The base dough is essentially a blank canvas, and the toppings are where you get to have fun. Here are some of the most delicious variations to explore once you’ve mastered the classic version:
- Olive and Herb Focaccia: Press a generous handful of Castelvetrano olives into the dimples along with fresh thyme and oregano. The buttery, mild flavor of these olives pairs beautifully with the tangy sourdough.
- Caramelized Onion and Gruyere: Spread a thick layer of deeply caramelized onions across the dough before baking, then scatter shredded Gruyere over the top. The sweetness of the onions plays off the tang of the sourdough perfectly.
- Cherry Tomato and Basil: Halve a pint of cherry tomatoes and press them cut-side down into the dimples before baking. Scatter fresh basil over the top immediately after the bread comes out of the oven.
- Garlic and Parmesan: Thinly slice 4-5 garlic cloves and press them into the dough. Finish with finely grated Parmesan and an extra drizzle of olive oil for a deeply savory result.
- Sun-Dried Tomato and Feta: Mix chopped sun-dried tomatoes in oil into the toppings along with crumbled feta cheese for a Mediterranean-inspired variation.
- Potato and Rosemary: This classic Italian combination involves thinly sliced raw potatoes laid over the dough before baking. The potatoes roast directly on the focaccia, becoming tender and slightly crispy on the edges.
- Focaccia di Recco Style: Flatten the dough very thin, add a layer of fresh stracchino or cream cheese in the center, top with a second thin sheet of dough, seal the edges, and bake. It’s a totally different style of focaccia but extraordinarily delicious.
You might also enjoy: Cheesy Garlic Bread Recipe
Storage and Reheating
Sourdough focaccia keeps better than most bread thanks to its olive oil content, which helps retain moisture and slow staling. Proper storage will keep it tasting great for several days.
- Room temperature: Wrap the cooled focaccia tightly in plastic wrap or store in an airtight container at room temperature. It will stay fresh for up to 2-3 days.
- Refrigerator: For longer storage, refrigerate the wrapped focaccia for up to 5 days. Note that refrigeration can slightly alter the texture, making it a bit firmer.
- Freezer: Focaccia freezes very well. Slice it into portions, wrap each piece tightly in plastic wrap and then in foil, and freeze for up to 2 months. Thaw at room temperature or reheat from frozen.
- Reheating: To restore the crispy crust, reheat slices on a baking sheet in a 375°F (190°C) oven for 8-10 minutes. Alternatively, place slices directly on a dry skillet over medium heat for 2-3 minutes per side. Avoid the microwave if possible, as it makes the crust soft.
- Refreshing day-old focaccia: Drizzle a little olive oil over the top before reheating to help revive the flavor and restore some moisture to the crumb.
Read Also: Homemade Bagel Recipe
Nutritional Facts
The following values are approximate, based on 12 servings from one 9×13-inch pan of sourdough focaccia.
| Nutrient | Per Serving (1 slice) |
|---|---|
| Calories | ~280 kcal |
| Total Fat | 12g |
| Saturated Fat | 1.7g |
| Carbohydrates | 37g |
| Dietary Fiber | 1.5g |
| Sugars | 0.5g |
| Protein | 6g |
| Sodium | 410mg |
Note: Nutritional values are estimates and will vary based on exact ingredient amounts, flour type, and specific toppings used.
Another favorite for bread lovers: Dinner Rolls Recipe
Health Benefits of Key Ingredients
While focaccia is certainly an indulgent bread, several of its core ingredients bring real nutritional benefits to the table. Here’s what’s working in your favor with every slice:
The sourdough fermentation process is one of the most significant benefits. The long fermentation by wild yeast and lactic acid bacteria partially breaks down phytic acid (an antinutrient found in wheat), which can make the minerals in the bread more bioavailable. Fermentation also partially pre-digests gluten proteins, which some people find makes sourdough easier to tolerate than regular bread.
- Extra virgin olive oil is rich in oleic acid, a heart-healthy monounsaturated fat, and contains polyphenols with anti-inflammatory properties. Using quality EVOO is one of the cornerstones of the Mediterranean diet, widely associated with cardiovascular health.
- Bread flour provides complex carbohydrates for sustained energy, along with B vitamins and iron. When made with sourdough fermentation, the glycemic impact may be lower than conventionally yeasted bread.
- Rosemary is more than just flavor. It contains rosmarinic acid and other antioxidants, and has been studied for potential anti-inflammatory and cognitive benefits.
- Sea salt in moderate amounts is a source of trace minerals like magnesium, potassium, and calcium, which are stripped from refined table salt during processing.
- Wild yeast fermentation produces beneficial organic acids that contribute to the preservation of the bread and may support a healthier gut environment.
Read Also: Basil Pesto Recipe
Frequently Asked Questions
1. Can I make sourdough focaccia without a starter?
You can make a very similar focaccia using commercial instant yeast instead of a sourdough starter, but the flavor will be noticeably different. Sourdough focaccia has a mild tanginess, more complex flavor, and a slightly chewier crumb that you simply can’t replicate with commercial yeast. If you don’t have a starter yet, the Sourdough Starter Recipe is a great place to begin. It typically takes about 5-7 days to develop a starter from scratch before it’s ready to bake with.
2. How do I know when my sourdough starter is ready to use?
Your starter is ready when it has visibly doubled in size after its most recent feeding, is full of bubbles throughout, smells pleasantly tangy and yeasty (not harsh or alcoholic), and passes the float test. Drop a small spoonful into a glass of water. If it floats, your starter is active and ready to leaven bread. If it sinks, it needs more time or another feeding.
3. Why is my focaccia dense and flat instead of airy?
Dense, flat focaccia almost always comes down to one of three issues: an underactive starter, insufficient fermentation time, or dough that was handled too roughly. Make sure your starter is at its peak of activity before mixing. Give the dough enough time to ferment and puff properly during the bulk ferment. And handle the dough gently, especially when transferring it to the pan, to preserve the gas bubbles that create an airy crumb.
4. Can I do a cold overnight ferment to make this recipe more convenient?
Absolutely, and many bakers prefer this method because it develops even more flavor. After you complete all 4 sets of stretch and folds, cover the bowl tightly and place it in the refrigerator. Let it ferment slowly overnight for 8 to 16 hours. The next day, take the dough out, let it come back to room temperature for about 30-60 minutes, then proceed with transferring it to the oiled pan and proofing before baking. The result is an even more flavorful focaccia with a slightly more open crumb.
5. What type of olive oil is best for sourdough focaccia?
Extra virgin olive oil is the gold standard for focaccia. It has the richest flavor, the highest polyphenol content, and the most complex aromatic profile of any olive oil. Avoid light or “pure” olive oil for this recipe since those products have most of the flavor refined out of them. You want the olive oil to be a flavor contributor, not just a cooking medium. A good quality Italian, Greek, or Spanish EVOO with a fruity, slightly peppery character works beautifully in this recipe.
Read Also: Easy Pesto Recipe
Final Thoughts
Making sourdough focaccia at home is one of those baking projects that rewards patience with an absolutely outstanding result. The long fermentation, the generous olive oil, the confident dimpling session, and then the hot oven doing its thing for those 20-25 minutes create something that genuinely feels special.
It’s bread that makes people happy. It’s hard to pull off a freshly baked, golden, olive-oil-soaked sourdough focaccia and not get enthusiastic reactions.
Once you make it once, you’ll understand why so many home bakers consider this a staple in their rotation. The process becomes intuitive quickly, and the variations are nearly endless.
Give this recipe a try and let me know how it goes in the comments below! I’d love to hear which toppings you went with and how your starter performed.
Recommended:
- Sweet Sourdough Bread Recipe
- Classic Bruschetta
- Chicken Bruschetta Recipe
- Garlic Naan Bread Recipe
- Easy Naan Bread Recipe
- Classic Hummus
- Avocado Toast Recipe
- Homemade Biscuit Recipe
- Buttermilk Biscuit Recipe
- Croissant Recipe


