Making homemade ravioli recipe from scratch is one of those kitchen projects that feels incredibly rewarding. Sure, it takes time and a bit of patience, but once you taste those tender pasta pillows filled with creamy cheese, you’ll understand why generations of Italian cooks have been crafting this dish for centuries.
The beauty of ravioli lies in its simplicity. With just flour, eggs, and olive oil, you create delicate pasta dough that cradles a rich ricotta filling.
The process breaks down into four manageable steps: making the dough, preparing the filling, rolling out the pasta sheets, and assembling the ravioli. None of these steps are complicated, but they do reward careful attention and a gentle touch.
I find the rhythm of making ravioli almost meditative. There’s something deeply satisfying about working with your hands, shaping each pasta pocket, and watching them transform from raw ingredients into something beautiful. This isn’t a Tuesday night dinner recipe, but rather a weekend project that turns into a delicious memory.
The best part? Once you master the basic technique, you can experiment with endless filling variations. But today, we’re sticking with the classic ricotta and Parmesan combination that makes this dish so beloved.
Why You’ll Love This Homemade Ravioli Recipe
This homemade alfredo sauce recipe pairs beautifully with fresh ravioli for an elegant dinner.
This recipe uses all-purpose flour, which makes the pasta slightly softer and more tender. It’s also more forgiving than specialty flours, so you don’t need to worry about tracking down 00 or semolina flour at specialty stores.
The ricotta filling is wonderfully simple. Just five ingredients create a creamy, delicate filling that doesn’t overpower the pasta. Many store-bought ravioli are overstuffed and doughy, but homemade versions let you control exactly how much filling goes into each piece.
Here’s what makes this recipe special:
- Restaurant-quality results at home – Fresh pasta has a texture that dried pasta simply can’t match
- Freezer-friendly – Make a double batch and freeze half for easy weeknight dinners
- Customizable fillings – Once you master the technique, the possibilities are endless
- Therapeutic process – The repetitive motions of rolling and filling are surprisingly relaxing
- Impressive presentation – Homemade ravioli always impresses dinner guests
- Budget-friendly – Basic ingredients create an elegant dish without breaking the bank
Ingredients
You might also enjoy: Lasagna Recipe with Ricotta
This recipe uses simple, accessible ingredients you probably already have in your pantry. The key is using fresh, quality ingredients, especially for the ricotta cheese and eggs.
For the Pasta Dough:
- 2½ cups (312g) all-purpose flour, plus extra for dusting
- 4 large eggs, at room temperature
- 1 tablespoon extra-virgin olive oil
- ½ teaspoon salt
- 1-2 tablespoons water, if needed
For the Ricotta Filling:
- 15 oz (425g) whole milk ricotta cheese, drained overnight
- ½ cup (50g) freshly grated Parmesan cheese
- 1 large egg yolk
- 2 tablespoons fresh basil, finely chopped
- ¼ teaspoon salt
- ⅛ teaspoon black pepper
- Pinch of nutmeg (optional)
For Assembly:
- 1 egg, beaten (for egg wash)
- Semolina flour or all-purpose flour, for dusting
Kitchen Equipment Needed
Read Also: Baked Ziti Recipe
Having the right tools makes the ravioli-making process much smoother. While you can make ravioli with minimal equipment, a few key tools will save you time and frustration.
Essential equipment you’ll need:
- Pasta machine (hand-crank or stand mixer attachment) or rolling pin
- Fluted pastry wheel or ravioli cutter
- Large mixing bowl
- Fork or whisk
- Bench scraper
- Baking sheets
- Parchment paper
- Large pot for boiling
- Slotted spoon or spider strainer
- Clean kitchen towels
Recommended Products for This Recipe
I’ve tested countless tools for making ravioli, and these products consistently deliver the best results. They’re not essential, but they make the process smoother and more enjoyable.
1. Marcato Atlas Pasta Machine
This hand-crank pasta roller is the gold standard for home pasta makers. It rolls dough to consistent thickness settings, which is crucial for ravioli that cooks evenly. The clamp holds securely to your countertop, and the machine itself is built to last for decades.
2. KitchenAid Pasta Roller Attachment
If you already own a KitchenAid stand mixer, this attachment is a game-changer. It rolls pasta sheets quickly and evenly while keeping your hands free to guide the dough. The adjustable thickness settings go from thick fettuccine to paper-thin sheets perfect for ravioli.
3. Fluted Pastry Wheel Ravioli Cutter
The decorative zigzag edge isn’t just pretty – it actually helps seal the ravioli better than a straight edge. This particular cutter has a comfortable grip and creates those classic baby-tooth edges that make ravioli look professional.
4. Bellemain Fine Mesh Strainer
Store-bought ricotta contains excess moisture that will make your filling watery and cause it to leak during cooking. This fine mesh strainer drains ricotta perfectly overnight, removing up to 3 ounces of liquid. It’s also useful for draining homemade ricotta or straining sauces.
Step-by-Step Instructions
For a lighter option, try: Healthy Chicken Salad Recipe
The process of making ravioli is methodical and straightforward. Take your time with each step, and remember that even imperfect ravioli tastes delicious. The key is not to rush – ravioli making rewards patience.
1. Drain the Ricotta (The Night Before)
- Line a fine-mesh strainer with cheesecloth or a clean kitchen towel and place it over a bowl
- Add the ricotta to the strainer and refrigerate overnight (or at least 8 hours)
- You should see about 3 ounces of liquid in the bowl by morning – this step is crucial and non-negotiable
- Skipping this step will result in watery filling that leaks out during cooking
2. Make the Pasta Dough
- On a clean work surface, mound the flour and create a well in the center about 4-5 inches wide
- Make sure the well is deep enough that the eggs won’t overflow when you add them
- Crack the eggs into the well and add the olive oil and salt
- Using a fork, gently beat the eggs without breaking through the flour walls
- Gradually incorporate flour from the inner walls of the well, working in a circular motion
- As the mixture thickens, use your hands to bring the dough together
- If the dough feels too dry and won’t come together, add water one teaspoon at a time
- Once a shaggy dough forms, knead it on a lightly floured surface for 8-10 minutes
- The dough should feel smooth and slightly tacky, like Play-Doh, when ready
- Wrap the dough tightly in plastic wrap and let it rest at room temperature for 30 minutes (this allows the gluten to relax)
3. Prepare the Ricotta Filling
- Remove the drained ricotta from the refrigerator and transfer it to a large mixing bowl
- Add the grated Parmesan cheese, egg yolk, chopped fresh basil, salt, pepper, and nutmeg (if using)
- Using a fork or spatula, mix the ingredients together until smooth and well combined
- The mixture should be thick and creamy, not runny or loose
- Taste the filling and adjust seasoning if needed – it should be flavorful since it will be enclosed in pasta
- Cover the bowl and refrigerate until ready to use
4. Roll Out the Pasta Dough
- Divide the rested dough into 4 equal pieces
- Keep the pieces you’re not working with covered with plastic wrap to prevent drying
- Flatten one piece of dough into a rectangular shape about ½ inch thick
- Set your pasta machine to the widest setting (usually 0 or 1) and run the dough through
- Fold the dough in thirds like a letter, then run it through the widest setting again
- Repeat this folding and rolling process 2-3 times – this creates smooth, strong pasta
- Without folding, run the dough through progressively narrower settings, one at a time
- For ravioli, stop at setting 6 on a Marcato roller or setting 7 on a KitchenAid attachment
- The dough should be thin enough to see the shadow of your hand through it, but not transparent
- Lay the rolled sheet on a lightly floured surface and cover with a damp towel while you roll the remaining pieces
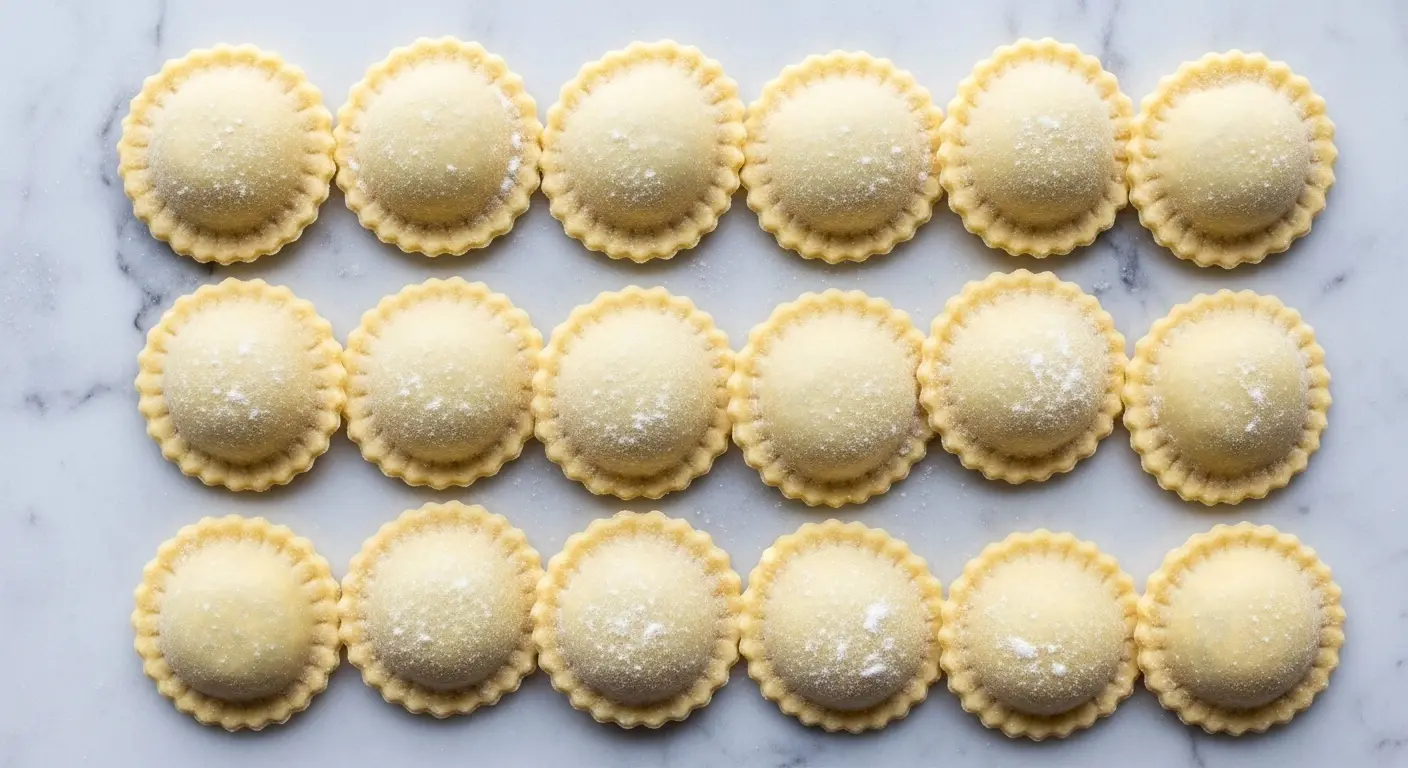
5. Cut and Fill the Ravioli
- Work with one pasta sheet at a time, keeping others covered
- Fold the pasta sheet in half lengthwise to create a center line, then unfold it
- Place heaping tablespoons of filling along one half of the sheet, about 1½ inches apart
- Leave at least 1 inch of space from the edges and between each mound of filling
- Brush the exposed pasta around each mound with the beaten egg wash using a pastry brush
- The egg wash acts as glue to seal the ravioli
- Carefully fold the pasta sheet over the filling, keeping it lifted with one hand while pressing out air pockets with the other
- Starting from the fold, gently press around each mound of filling to seal, working out any trapped air
- Trapped air will cause the ravioli to burst during cooking
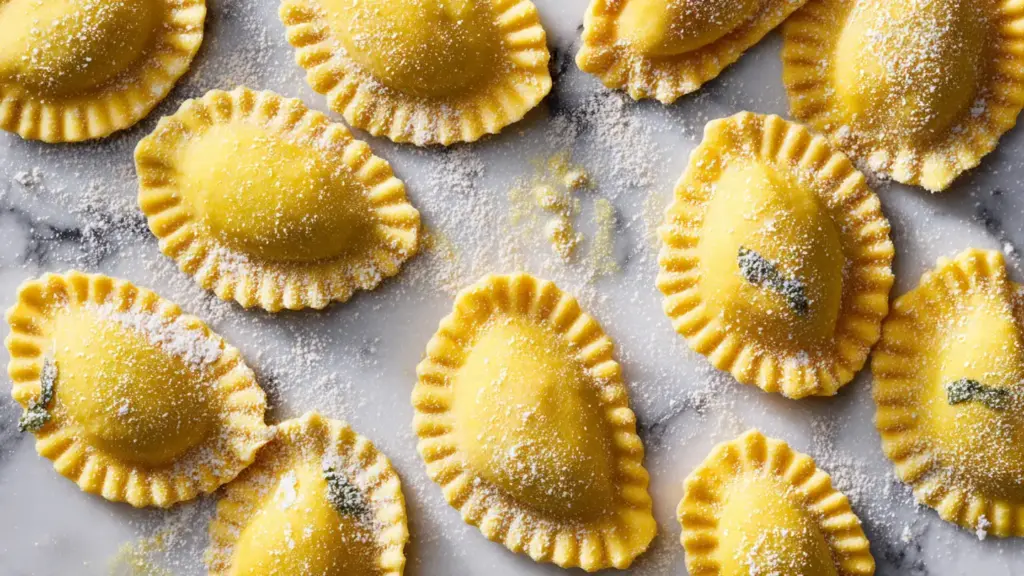
- Using a fluted pastry wheel or sharp knife, cut between the mounds to create individual ravioli
- Leave about ¼ inch of sealed border around each piece
- Press the edges again with your fingers or the tines of a fork to ensure a tight seal
- Transfer finished ravioli to a parchment-lined baking sheet dusted with semolina flour
- Make sure the ravioli don’t touch each other or they’ll stick together
6. Cook the Ravioli
- Bring a large pot of salted water to a gentle boil (use about 1 tablespoon salt per quart of water)
- Working in batches of 8-10 ravioli, carefully lower them into the boiling water
- Don’t overcrowd the pot or the ravioli will stick together
- The ravioli will sink to the bottom, then float to the surface after about 2-3 minutes
- Once floating, cook for an additional 2-3 minutes until the pasta is tender and the filling is heated through
- Fresh ravioli cooks much faster than dried pasta – overcooked ravioli becomes mushy
- Use a slotted spoon or spider strainer to gently remove the ravioli from the water
- Transfer to a serving dish or individual plates
- Repeat with remaining ravioli, allowing the water to return to a boil between batches
7. Sauce and Serve
- Toss the cooked ravioli gently with your chosen sauce while still hot
- A simple sauce works best so it doesn’t overpower the delicate filling
- Drizzle with extra virgin olive oil or melted butter and sprinkle with fresh Parmesan cheese
- Garnish with fresh basil leaves or a crack of black pepper
- Serve immediately while the ravioli are hot and the cheese filling is creamy
Tips for Success
Another favorite: Classic Chicken Parmesan Recipe
These tips come from years of trial and error making ravioli. Follow them, and you’ll avoid the most common pitfalls that trip up first-time ravioli makers.
Key tips for perfect ravioli:
- Don’t skip draining the ricotta – This single step prevents 90% of filling problems. Excess moisture will make the filling watery and cause it to leak during cooking
- Keep your work surface lightly floured – Too much flour makes the dough tough, but too little causes sticking. Brush off excess flour between rolling passes
- Work quickly once the dough is rolled – Pasta dough dries out fast. Cover rolled sheets with a damp towel and only uncover the section you’re actively working with
- Don’t overfill the ravioli – A heaping tablespoon is plenty. Too much filling causes ravioli to burst during cooking and makes sealing difficult
- Press out all the air – Air pockets expand during cooking and cause ravioli to explode. Take time to press gently around each mound of filling
- Use egg wash generously – The egg wash is what seals the ravioli. Make sure every edge is brushed before folding
- Test seal strength – Before cutting, press the sealed edges again. They should feel firmly stuck together
- Don’t let ravioli touch – Place them on a well-floured surface with space between each one. They’ll stick together quickly
- Maintain a gentle boil – A rolling boil can break delicate ravioli. Keep it at a gentle simmer
- Salt your pasta water – Properly salted water (it should taste like the sea) seasons the pasta as it cooks
Serving Suggestions
This pairs beautifully with tomato sauce for a classic Italian meal.
Homemade ravioli deserves simple, elegant accompaniments that let the fresh pasta shine. The goal is to complement, not overwhelm, the delicate cheese filling.
Sauce Options:
- Brown Butter and Sage – Melt butter until it turns golden and nutty, then add fresh sage leaves. This classic sauce takes 5 minutes and tastes incredible
- Simple Marinara – A light tomato sauce with garlic and basil lets the ravioli be the star
- Alfredo Sauce – Creamy and indulgent, perfect for a special occasion dinner
- Garlic and Oil – Extra virgin olive oil, minced garlic, red pepper flakes, and fresh parsley for a lighter option
- Lemon Butter Sauce – Butter, lemon juice, white wine, and capers create a bright, tangy sauce
Side Dishes:
- Simple arugula salad with lemon vinaigrette
- Garlic bread or crusty Italian bread
- Roasted asparagus with Parmesan
- Caesar salad
- Sautéed spinach with garlic
Garnishes:
- Freshly grated Parmesan or Pecorino Romano cheese
- Torn fresh basil leaves
- Microgreens or baby arugula
- Toasted pine nuts
- Extra virgin olive oil drizzle
- Cracked black pepper
Variations to Try
Read Also: Olive Garden Alfredo Sauce Recipe
Once you’ve mastered the basic technique, the world of ravioli fillings opens up. These variations all use the same pasta dough recipe, so you’re just swapping out the filling.
Try these filling variations:
- Spinach and Ricotta – Sauté 10 oz fresh spinach until wilted, squeeze out excess moisture, chop finely, and mix with the ricotta filling base
- Mushroom Ravioli – Sauté 1 lb mixed mushrooms with shallots and thyme until golden, cool, then pulse in a food processor with ricotta and Parmesan
- Butternut Squash – Roast butternut squash until tender, mash, and mix with ricotta, Parmesan, nutmeg, and brown butter
- Four Cheese – Combine ricotta, mozzarella, fontina, and Parmesan for an ultra-creamy filling
- Meat Ravioli – Mix cooked ground beef or Italian sausage with ricotta, Parmesan, and Italian herbs
- Lobster Ravioli – Fold cooked lobster meat into ricotta with lemon zest, tarragon, and a touch of mascarpone
- Pumpkin and Amaretti – Mix pumpkin puree with crushed amaretti cookies, Parmesan, and nutmeg for a sweet-savory filling
- Pesto Ravioli – Swirl homemade or store-bought pesto through the ricotta filling
- Goat Cheese and Herb – Replace ricotta with creamy goat cheese and add fresh herbs like chives, dill, and parsley
Storage and Reheating
You might also enjoy: Easy Lasagna Recipe
Homemade ravioli stores beautifully, which means you can make a big batch and enjoy it for weeks. Proper storage prevents the ravioli from sticking together or drying out.
Short-Term Storage (3-4 hours):
- Arrange uncooked ravioli in a single layer on a parchment-lined baking sheet
- Make sure they’re not touching each other
- Dust lightly with semolina flour
- Cover loosely with a clean kitchen towel (not plastic wrap, which traps moisture)
- Keep at room temperature until ready to cook
Refrigerator Storage (Up to 1 day):
- Place baking sheet with ravioli in the refrigerator uncovered for 1 hour to dry slightly
- Once the surface feels dry, transfer to an airtight container with parchment paper between layers
- Use within 24 hours for best quality
Freezer Storage (Up to 3 months):
- Arrange ravioli in a single layer on a parchment-lined baking sheet
- Freeze until solid, about 1-2 hours
- Transfer frozen ravioli to freezer bags or airtight containers
- Label with the date and filling type
- Cook from frozen – do not thaw first, just add 1-2 extra minutes to the cooking time
Reheating Cooked Ravioli:
- Leftover cooked ravioli can be refrigerated in an airtight container for up to 3 days
- Reheat gently in simmering sauce on the stovetop
- Alternatively, microwave with a splash of water or sauce for 1-2 minutes
- You can also reheat in a skillet with butter or olive oil until warmed through
Nutritional Facts
Per serving (approximately 8-10 ravioli):
- Calories: 385
- Total Fat: 12g
- Saturated Fat: 5g
- Cholesterol: 165mg
- Sodium: 420mg
- Total Carbohydrates: 50g
- Dietary Fiber: 2g
- Sugars: 2g
- Protein: 18g
- Calcium: 220mg
- Iron: 3mg
Note: Nutritional values are approximate and will vary based on serving size, specific ingredients used, and sauce additions. These values are for the ravioli alone without sauce.
Health Benefits of Key Ingredients
Each component in this recipe brings nutritional value beyond just great taste. Understanding these benefits helps you appreciate what you’re putting on your table.
Ricotta Cheese:
Ricotta provides high-quality protein and calcium essential for bone health. It’s also lower in fat and calories than many other cheeses while delivering vitamins A and B12. The whey proteins in ricotta support muscle repair and satiety.
Eggs:
The eggs in both the dough and filling offer complete protein with all essential amino acids. They’re rich in choline for brain health, lutein for eye health, and vitamin D for immune function. Eggs also contain healthy fats that help your body absorb fat-soluble vitamins.
Parmesan Cheese:
This aged cheese is nutrient-dense and packed with calcium and phosphorus for strong bones and teeth. It’s naturally low in lactose and provides umami flavor, which means you can use less of it while still getting big flavor impact.
Basil:
Fresh basil contains antioxidants, including flavonoids and volatile oils that have anti-inflammatory properties. It’s also a good source of vitamin K, which supports bone health and proper blood clotting.
Olive Oil:
Extra virgin olive oil provides heart-healthy monounsaturated fats and antioxidants like oleocanthal, which has anti-inflammatory effects similar to ibuprofen. It helps your body absorb fat-soluble vitamins from other ingredients.
Frequently Asked Questions
1. Can I make ravioli dough without a pasta machine?
Yes, you can absolutely make ravioli using just a rolling pin. Roll the dough as thin as possible on a floured surface, rotating and flipping it frequently to maintain an even thickness. It takes more elbow grease and patience, but the results are just as delicious. The key is getting the dough thin enough that you can see the shadow of your hand through it.
2. Why does my ravioli burst open during cooking?
Bursting usually happens for one of three reasons. First, trapped air pockets expand during cooking and cause the ravioli to explode. Second, overfilling makes it impossible to seal the edges properly. Third, the ricotta wasn’t drained well enough, so excess moisture creates steam that forces the ravioli open.
3. Can I use a different flour for the pasta dough?
All-purpose flour works perfectly and creates tender, forgiving pasta. You can substitute 00 flour for a silkier texture or use half all-purpose and half semolina for a chewier bite. Avoid using only semolina flour, as it makes the dough too stiff for delicate ravioli.
4. How do I know when fresh ravioli is done cooking?
Fresh ravioli cooks in 4-6 minutes total. They’ll sink to the bottom initially, then float to the surface after 2-3 minutes. Once they’re floating, cook for another 2-3 minutes until the pasta feels tender when you bite into it, and you’ll know they’re done.
5. Can I make the dough and filling ahead of time?
Yes, you can make the pasta dough up to 24 hours in advance. Wrap it tightly in plastic wrap and refrigerate. Bring it back to room temperature before rolling. The ricotta filling can be made 1-2 days ahead and kept covered in the refrigerator.
Final Thoughts
Making homemade ravioli recipe from scratch might seem intimidating at first, but it’s honestly one of the most rewarding cooking projects you can tackle. The process is meditative, the results are spectacular, and the smiles around your dinner table make every minute worthwhile.
Start with a lazy weekend afternoon when you have no other commitments. Pour yourself a glass of wine, put on some music, and embrace the process. Your first batch might not be perfect, and that’s completely okay. Even slightly imperfect ravioli tastes infinitely better than anything from a box.
I’d love to hear how your ravioli turns out! Drop a comment below with your experience, any questions, or your favorite filling combinations. And if you enjoyed this recipe, please share it with someone who’d appreciate learning this beautiful skill.
Recommended:
- San Giorgio Lasagna Recipe
- Baked Mac and Cheese Recipe
- Creamy Mac and Cheese Recipe
- Chicken Alfredo Recipe with Jar Sauce
- Baked Chicken with Alfredo Sauce Recipe
- Vodka Sauce Recipe
- Easy Pesto Recipe
- Classic Tiramisu Recipe
- Easy Tiramisu Recipe
- Classic Bruschetta Recipe


