If you’ve been craving a restaurant-worthy dinner that doesn’t feel heavy or indulgent, this healthy chicken piccata recipe is exactly what you need on your table tonight.
Classic chicken piccata is already a relatively simple Italian-American dish, but the traditional version often calls for a generous amount of butter and white wine. This lighter take keeps all the bold, tangy flavor you love — the briny capers, the zippy lemon, the silky pan sauce — while cutting back on saturated fat and calories without sacrificing a single bite of satisfaction.
The secret to making piccata taste rich and luxurious without loading it down? A good-quality chicken broth as the base of the sauce, just a touch of olive oil for sautéing, and fresh lemon juice added at the very end so it stays bright and vibrant.
This dish comes together in about 30 minutes, uses one pan, and produces results that genuinely impress. Even on a busy weeknight, you can pull this off.
For another bright and zesty chicken dinner, you might also love this Lemon Chicken Recipe.
Why You’ll Love This Healthy Chicken Piccata Recipe
This recipe has everything going for it, starting with how fast it is to make.
From prep to plate, you’re looking at around 30 minutes total, which makes it an ideal weeknight dinner even when you’re running on empty.
The flavors are genuinely bold and satisfying, not bland or diet-food-ish in any way.
Lemon, capers, garlic, and a splash of chicken broth come together into a pan sauce that tastes like it came from a proper Italian restaurant.
It’s also incredibly versatile.
Serve it over pasta, cauliflower rice, or steamed greens, and it fits seamlessly into a wide range of eating styles including low-calorie, gluten-free (with a simple swap), and dairy-free.
One pan means minimal cleanup, which is always a win.
- Ready in about 30 minutes from start to finish
- Uses simple, wholesome ingredients you likely already have
- Lower in calories and saturated fat than the classic version
- Naturally gluten-free with a one-ingredient flour swap
- The pan sauce is bright, tangy, and absolutely packed with flavor
- Pairs beautifully with a wide variety of sides
- Great for meal prep since it reheats well the next day
Read Also: The Best Easy Chicken Piccata Recipe
Ingredients
This recipe keeps things clean and simple. Every ingredient plays a specific role in building flavor, and nothing here is fussy or hard to find.
- 4 boneless, skinless chicken breasts (about 6 oz / 170g each)
- ½ cup (60g) all-purpose flour (or almond flour for gluten-free)
- ½ teaspoon salt
- ¼ teaspoon black pepper
- ½ teaspoon garlic powder
- 2 tablespoons olive oil, divided
- 3 garlic cloves, minced
- ¾ cup (180ml) low-sodium chicken broth
- ⅓ cup (80ml) fresh lemon juice (about 2 lemons)
- 3 tablespoons capers, drained
- 1 tablespoon unsalted butter (optional, for a touch of richness)
- 2 tablespoons fresh flat-leaf parsley, chopped
- Lemon slices, for garnish
You might also enjoy this Creamy Chicken Piccata Recipe if you prefer a richer, creamier sauce with more indulgence.
Kitchen Equipment Needed
You don’t need any special equipment for this recipe, but having the right tools makes the process much smoother and more enjoyable.
- Large skillet or sauté pan (at least 12 inches / 30cm)
- Meat mallet or rolling pin for pounding chicken
- Shallow dish or plate for dredging
- Tongs for flipping chicken
- Sharp chef’s knife for slicing and mincing
- Cutting board
- Measuring cups and measuring spoons
- Citrus juicer or reamer
- Microplane or fine grater (optional, for lemon zest)
- Wooden spoon or silicone spatula for the sauce
Read Also: Gluten Free Chicken Piccata Recipe
Recommended Products for This Recipe
These are products I genuinely recommend based on quality and performance, and each one makes a real difference in how this dish turns out.
1. Stainless Steel Skillet (12-Inch)
A wide, heavy-bottomed stainless steel skillet is the best pan for chicken piccata. It gives you an even, golden sear on the chicken and allows the pan drippings to develop properly, which is the foundation of a great pan sauce.
2. Capers in Brine
High-quality capers in brine (not salt-packed) are essential here. They add a punchy, briny flavor that defines the sauce. Look for small nonpareil capers, which have the most concentrated flavor.
3. Fresh-Pressed Lemon Juicer
Fresh lemon juice is non-negotiable in this recipe, and a good citrus press makes the job fast and clean. Bottled lemon juice simply doesn’t deliver the same brightness and freshness.
4. Meat Mallet
Pounding the chicken breasts to an even thickness is one of the most important steps for tender, evenly cooked piccata. A solid meat mallet with a flat side makes the job easy and precise.
5. Low-Sodium Chicken Broth
Since this is a healthy version of the recipe, using a good-quality low-sodium chicken broth lets you control the salt level while still getting rich, savory depth in the sauce.
Another favorite for an Italian-inspired weeknight dinner: Chicken Marsala Recipe
Step-by-Step Instructions
Step 1: Prep and Pound the Chicken
- Place each chicken breast on a sturdy cutting board and cover with a sheet of plastic wrap or place inside a zip-lock bag.
- Using a meat mallet or the flat bottom of a heavy skillet, pound each breast to an even thickness of about ½ inch (1.25cm). This ensures even cooking and prevents the thicker parts from staying raw while the thinner parts overcook.
- If any chicken breasts are very large (more than 8 oz / 225g), slice them in half horizontally to create thinner cutlets before pounding.
- Pat the chicken completely dry with paper towels. This step is important because moisture on the surface of the chicken creates steam instead of a golden crust.
Step 2: Season and Dredge the Chicken
- In a shallow dish or plate, combine the flour, salt, black pepper, and garlic powder. Stir together with a fork until evenly mixed.
- Season each chicken breast lightly with a pinch of salt and pepper directly on the meat before dredging.
- Press each chicken breast into the flour mixture, coating both sides evenly. Shake off any excess flour by holding the chicken over the dish and tapping it gently. You want a thin, even coating, not a thick crust.
- Set the dredged chicken aside on a clean plate while you heat the pan.
Step 3: Sear the Chicken
- Heat a large skillet over medium-high heat. Add 1½ tablespoons of the olive oil and allow it to heat until shimmering but not smoking, about 1 to 2 minutes.
- Add the chicken breasts in a single layer, making sure not to crowd the pan. If your skillet is smaller, work in two batches. Crowding causes the chicken to steam rather than sear.
- Cook without moving for 3 to 4 minutes, until the bottom is deep golden brown and the chicken releases easily from the pan.
- Flip and cook the second side for another 3 to 4 minutes, until cooked through. The internal temperature should reach 165°F (74°C) when tested with an instant-read thermometer.
- Transfer the cooked chicken to a clean plate and loosely tent with foil to keep warm. Do not discard the browned bits left in the pan as these are going into the sauce.
Step 4: Build the Pan Sauce
- Reduce the heat to medium. Add the remaining ½ tablespoon of olive oil to the same skillet.
- Add the minced garlic and cook, stirring constantly, for about 30 seconds until fragrant. Be careful not to let it burn, as burnt garlic will make the sauce bitter.
- Pour in the chicken broth, scraping up all the browned bits from the bottom of the pan with a wooden spoon or silicone spatula. These bits are packed with flavor and will dissolve into the sauce.
- Add the fresh lemon juice and the drained capers to the pan. Stir to combine.
- Bring the liquid to a gentle simmer and cook for 3 to 4 minutes, stirring occasionally, until the sauce has reduced slightly and thickened just a touch.
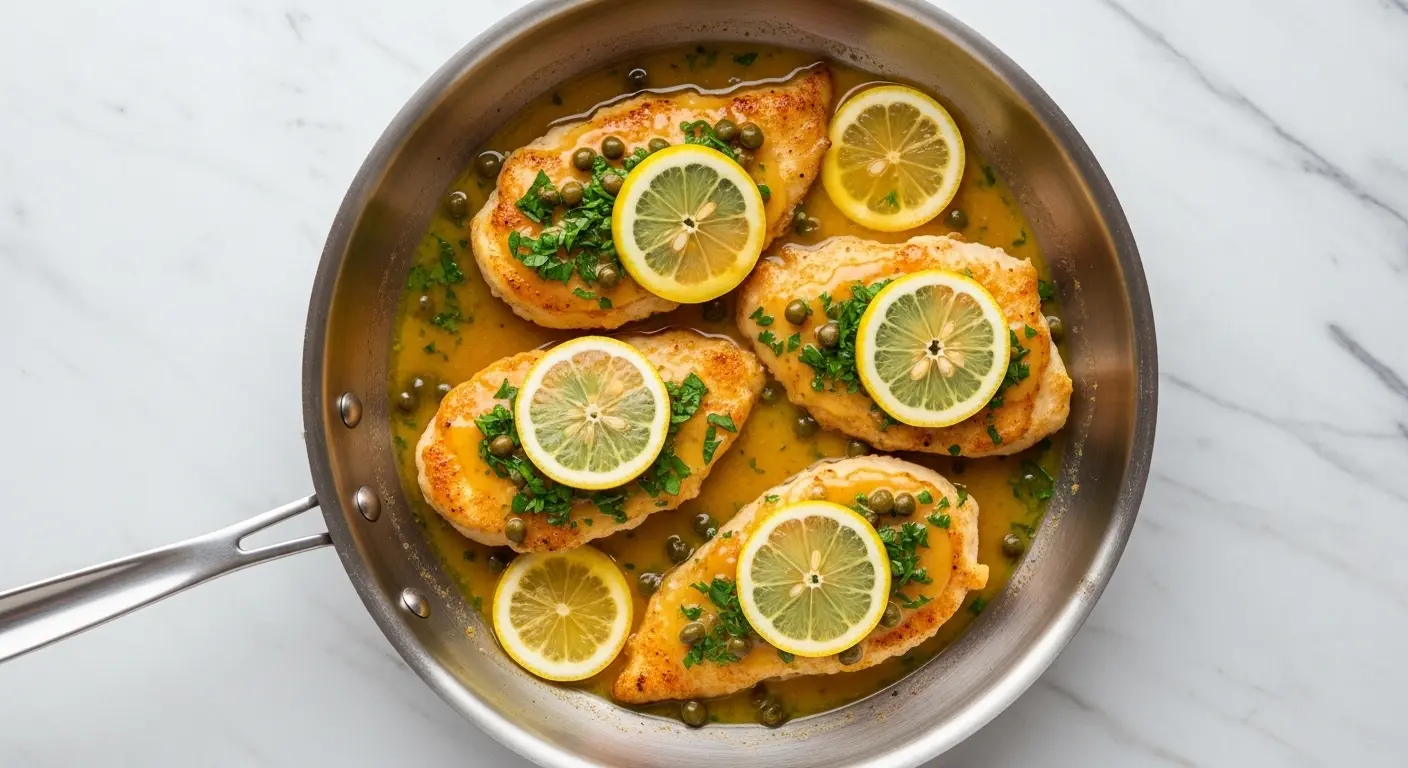
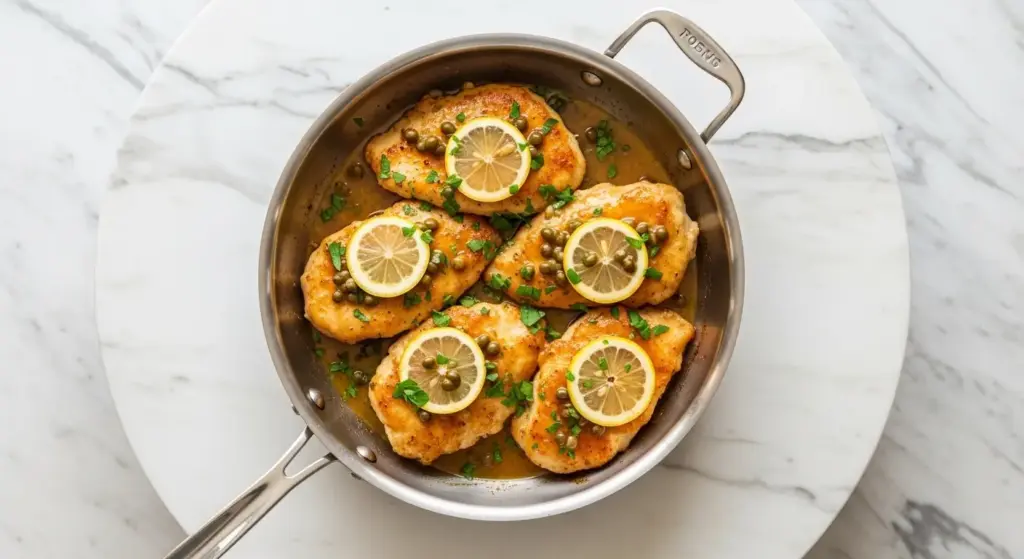
Step 5: Finish and Serve
- If using the optional tablespoon of butter, remove the pan from the heat and swirl the butter into the sauce until melted and incorporated. This step adds a slight silkiness to the sauce without dramatically increasing the calorie count.
- Taste the sauce and adjust seasoning with salt and pepper as needed. If you want more lemon brightness, squeeze in a small additional amount of fresh lemon juice at this stage.
- Return the chicken to the skillet and spoon the sauce over each piece. Allow the chicken to warm in the sauce for about 1 minute over low heat.
- Scatter the fresh parsley over the top and add lemon slices for garnish.
- Serve immediately for best results.
This technique for building a flavorful pan sauce works beautifully in a Chicken Skillet Recipe as well.
Tips for Success
Getting chicken piccata right every time comes down to a few key techniques that are easy to master once you know them.
- Pound the chicken thin and even. This is the single most important step. Thin, even cutlets cook quickly and stay juicy. Thick, uneven pieces cook inconsistently and dry out in spots.
- Dry the chicken before dredging. Patting the chicken dry with paper towels ensures the flour coating sticks properly and you get a real golden sear instead of a steamed surface.
- Don’t skip the dredging. The thin flour coating does two jobs: it helps the chicken develop a beautiful golden crust, and it slightly thickens the sauce as the chicken simmers in it.
- Use fresh lemon juice, not bottled. The difference in flavor is dramatic. Bottled lemon juice is flatter and less vibrant. Fresh is always worth the extra minute of squeezing.
- Add lemon juice off the heat or at the end. Heat breaks down the volatile compounds that give lemon its brightness. Adding it toward the end keeps the sauce tasting alive and zesty.
- Don’t crowd the pan. Cook chicken in batches if needed. A crowded pan lowers the temperature and causes steaming instead of searing.
- Use low-sodium broth. This gives you control over the salt level in the final dish, especially since capers already add a salty, briny punch.
You might also enjoy: Authentic Italian Chicken Piccata Recipe
Serving Suggestions
This healthy chicken piccata is delicious on its own, but it really shines when paired with the right sides. The bright, tangy sauce is a natural complement to simple, starchy, or leafy accompaniments that soak it up beautifully.
Think angel hair pasta tossed with just a drizzle of olive oil, or a bowl of creamy cauliflower rice if you’re keeping things lower-carb. Roasted vegetables are another excellent match, especially Roasted Broccoli, which picks up the lemon notes in the sauce with every bite.
- Angel hair pasta or whole wheat linguine
- Cauliflower rice for a low-carb option
- Steamed white or brown rice
- Roasted broccoli or asparagus
- Garlic Mashed Potatoes
- A simple green salad with lemon vinaigrette
- Creamy Mashed Potatoes
- Crusty bread or garlic bread to soak up the sauce
Variations to Try
Once you’ve mastered the base recipe, there are plenty of easy ways to switch things up and keep things interesting throughout the week.
- Use chicken thighs instead of breasts. Boneless, skinless chicken thighs have more flavor and stay juicier. Pound them slightly thinner and cook 1 to 2 minutes longer per side.
- Make it gluten-free. Swap the all-purpose flour for almond flour or a gluten-free 1:1 baking flour. The coating works the same way and still gives you a golden crust.
- Add artichoke hearts. A handful of canned or jarred artichoke hearts added to the sauce during the last 2 minutes creates a heartier, more filling dish.
- Make it dairy-free. Simply skip the optional butter finish. The sauce is still incredibly flavorful without it.
- Add white wine for depth. If you don’t mind the extra calories, a splash of dry white wine (about ¼ cup / 60ml) added before the broth creates a more complex, layered sauce.
- Try it with turkey cutlets. Thin turkey breast cutlets work beautifully with this same method and sauce. The flavor is slightly milder but just as satisfying.
- Make it spicy. Add a pinch of red pepper flakes to the garlic before adding the broth for a gentle kick of heat.
For a CPK-inspired version with a slightly different approach, check out the Copycat CPK Chicken Piccata Recipe.
Storage and Reheating
This recipe stores and reheats really well, making it a great option for meal prepping or enjoying leftovers the next day.
- Refrigerator: Store leftover chicken and sauce together in an airtight container in the refrigerator for up to 3 days. The sauce will thicken slightly as it sits, which is perfectly normal.
- Freezer: You can freeze cooked chicken piccata for up to 2 months. Store in a freezer-safe container with some sauce over the chicken to prevent drying out. Thaw overnight in the refrigerator before reheating.
- Reheating on the stovetop: Place the chicken and sauce in a skillet over medium-low heat. Add a splash of chicken broth or water to loosen the sauce and heat gently for 5 to 7 minutes, flipping the chicken once.
- Reheating in the microwave: Place in a microwave-safe dish, cover loosely, and heat on medium power in 60-second intervals until warmed through.
- Avoid high heat when reheating. High heat dries out the chicken quickly. Low and slow is the better approach for keeping it tender and juicy.
Read Also: Chicken Piccata Recipe with Pasta
Nutritional Facts
The following nutritional values are approximate per serving, based on 4 servings and using the optional butter. Values will vary based on exact ingredient amounts and specific brands used.
| Nutrient | Per Serving |
|---|---|
| Calories | ~310 kcal |
| Protein | 38g |
| Total Fat | 11g |
| Saturated Fat | 2.5g |
| Carbohydrates | 12g |
| Fiber | 0.5g |
| Sugar | 1g |
| Sodium | 490mg |
| Cholesterol | 95mg |
Compared to a traditional restaurant-style chicken piccata, which can run upward of 500 to 600 calories per serving, this version saves you a significant amount of fat and calories while delivering the same satisfying flavors.
For another lean and flavorful chicken option, try the Healthy Chicken Salad Recipe.
Health Benefits of Key Ingredients
This healthy chicken piccata recipe isn’t just light on calories. The core ingredients actually offer meaningful nutritional value that supports a balanced, wholesome diet.
Chicken breast is one of the best sources of lean protein available, providing all the essential amino acids needed for muscle repair, satiety, and overall energy.
Lemon juice is rich in vitamin C and natural antioxidants. It supports immune function, skin health, and helps the body absorb non-heme iron from plant-based foods eaten alongside it.
- Chicken breast: High in lean protein, low in saturated fat, and an excellent source of B vitamins, especially niacin (B3) which supports energy metabolism
- Lemon juice: Rich in vitamin C and citric acid, supports immune health and aids in iron absorption
- Capers: Surprisingly high in antioxidants, particularly quercetin and rutin, which have anti-inflammatory properties
- Garlic: Contains allicin, a compound associated with heart health benefits, anti-inflammatory effects, and immune support
- Olive oil: A healthy monounsaturated fat source associated with reduced cardiovascular risk and improved cholesterol levels
- Fresh parsley: A nutrient-dense herb containing vitamin K, vitamin C, and folate, with anti-inflammatory properties
You might also enjoy: Chicken Bruschetta Recipe
Frequently Asked Questions
1. Can I make healthy chicken piccata without flour?
Yes, you can skip the flour dredging entirely for a lower-carb, grain-free version. The chicken won’t develop as golden or crispy a crust, but it will still cook beautifully and the sauce will still be delicious. Alternatively, you can use arrowroot powder or a light dusting of cornstarch for similar results with fewer carbohydrates.
2. What can I use instead of capers?
If you don’t have capers on hand or don’t enjoy their flavor, finely chopped green olives are the closest substitute. They offer the same briny, savory punch. Chopped cornichons (small French pickles) also work in a pinch, though the flavor is slightly different.
3. Can I use chicken thighs instead of chicken breasts?
Absolutely. Boneless, skinless chicken thighs are actually a great choice for this recipe because they stay juicier and have more flavor. Pound them to an even thickness of about ½ inch before dredging, and add 1 to 2 extra minutes of cooking time per side since thighs are slightly denser than breasts.
4. How do I know when the chicken is fully cooked?
The most reliable method is using an instant-read meat thermometer inserted into the thickest part of the chicken. It should read 165°F (74°C). If you don’t have a thermometer, slice the thickest part of one piece and check that there is no pink remaining and the juices run clear.
5. Is this recipe good for meal prep?
Yes, this is an excellent meal prep dish. Cook a full batch on Sunday and divide into containers with your preferred sides. The chicken stays moist and the sauce keeps well for up to 3 days in the refrigerator. Add a squeeze of fresh lemon juice when reheating to brighten the flavors back up.
For a Cheesecake Factory-inspired take, check out the Copycat Cheesecake Factory Chicken Piccata Recipe.
Final Thoughts
This healthy chicken piccata recipe proves that eating well doesn’t mean giving up the flavors you love.
With a few smart swaps and a little technique, you get a dish that’s bright, satisfying, and genuinely restaurant-worthy, all in under 30 minutes.
The lemony caper sauce is bold enough to make the whole meal feel special, and the lean chicken keeps things light without leaving you hungry an hour later.
If you give this recipe a try, I’d love to hear how it turned out! Drop a comment below, share a photo on social media, or tag the blog. Your feedback always means so much, and it helps others discover recipes they’ll love too.
Recommended:
- Copycat Geoffrey Zakarian Chicken Piccata Recipe
- Copycat Giada Chicken Piccata Recipe
- Copycat Ina Garten Chicken Piccata Recipe
- White Wine Chicken Piccata Recipe
- Chicken Cacciatore Recipe
- Classic Chicken Parmesan Recipe
- Chicken Tortilla Soup Recipe
- Lemon Chicken Orzo Soup Recipe
- Chicken and Broccoli Recipe
- Chipotle Chicken Recipe


