If you’ve been searching for the ultimate coconut cake with cream of coconut recipe, your search ends right here.
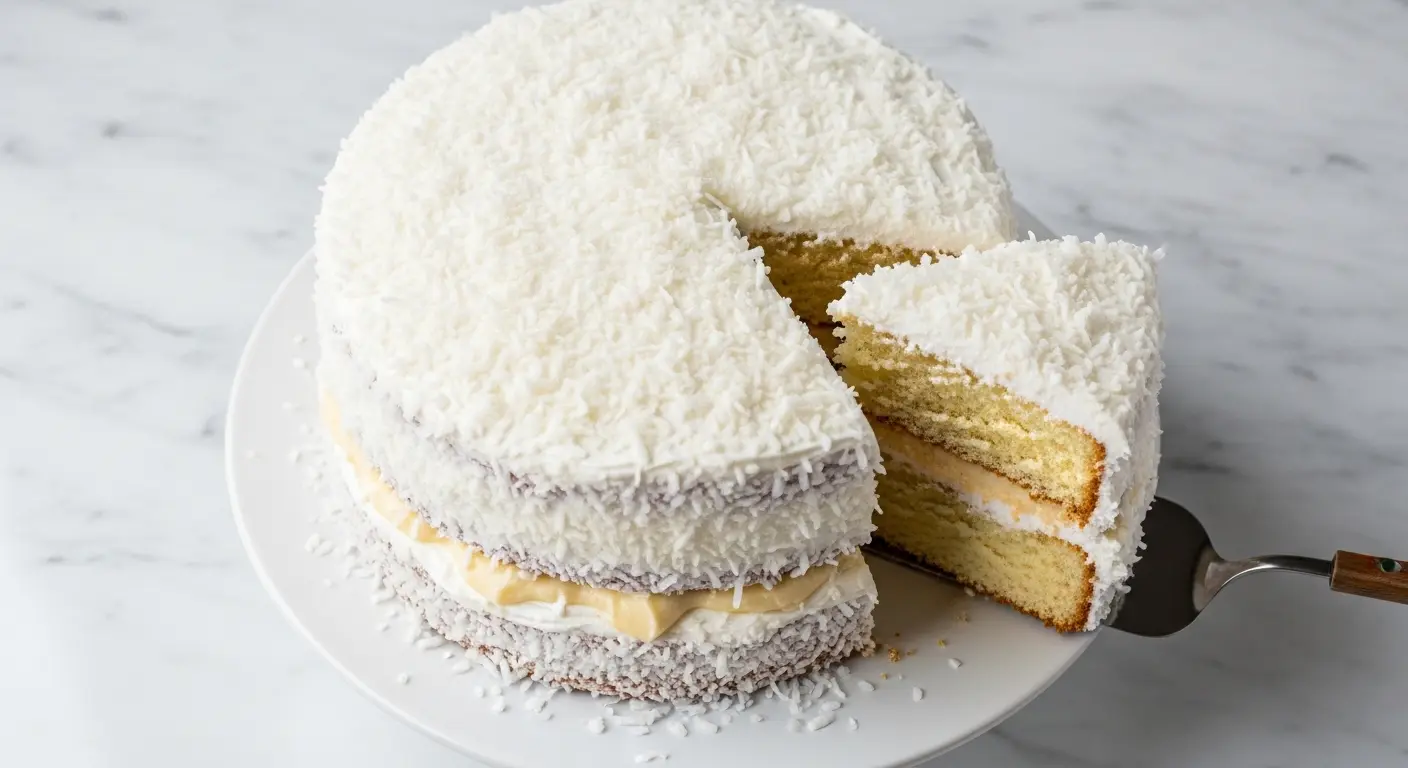
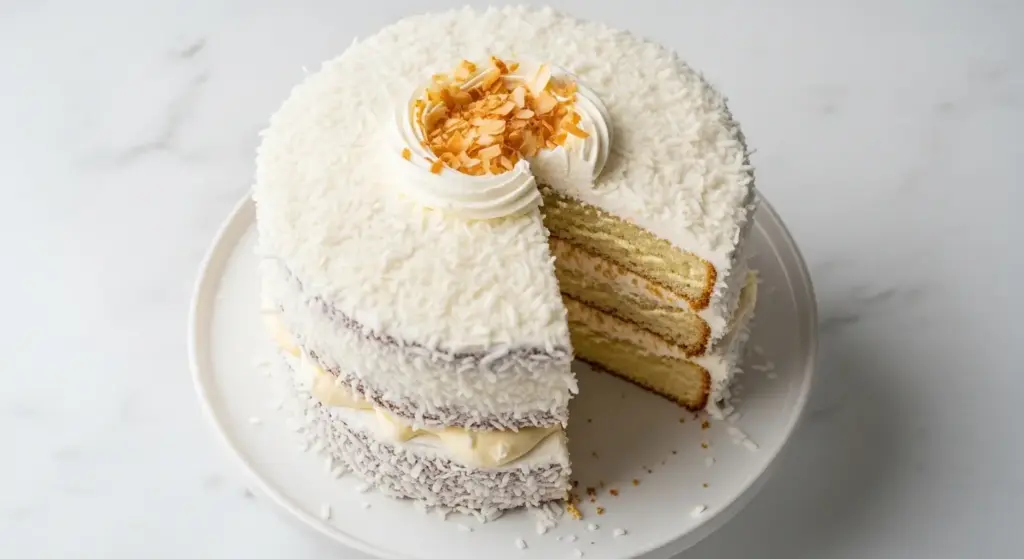
This cake is the kind of dessert that stops people mid-conversation at a party. It’s incredibly moist, deeply coconutty, and layered with a fluffy cream of coconut-soaked interior and a cloud-like whipped cream frosting that makes every single bite feel like a little tropical vacation.
What makes this version so special is the cream of coconut. Unlike coconut milk, cream of coconut is thick, sweet, and intensely flavored. Think Coco Lopez, the stuff you’d use in a piña colada. When you poke holes in a freshly baked cake and pour that luscious liquid over the top, it seeps into every crumb and transforms the cake from good to absolutely extraordinary.
This recipe uses a combination of a homemade butter-based cake batter and a generous drench of cream of coconut for maximum flavor and moisture. The result is a tender, pillowy cake with a pronounced coconut taste in every layer. It’s topped with sweetened whipped cream and a generous shower of shredded coconut for a beautiful, festive finish.
You’ll also notice we’re using sweetened shredded coconut in the batter itself, which adds a lovely chew and extra coconut character throughout the cake. This isn’t a subtle coconut cake. It’s a full-on coconut celebration.
Why You’ll Love This Coconut Cake with Cream of Coconut Recipe
This cake checks every box you could possibly want in a show-stopping dessert.
It’s absolutely packed with coconut flavor, which comes from three sources: shredded coconut in the batter, cream of coconut soaked into the layers, and coconut folded right into the frosting. Every forkful delivers that distinct, tropical sweetness you’re looking for.
It’s also incredibly easy to make despite looking impressive. The batter comes together quickly with pantry staples, and the soak-and-frost method means there’s no complicated decorating skills required. If you can mix a bowl and spread frosting, you can make this cake.
The texture is honestly unbeatable. The cream of coconut soak creates an almost pudding-like quality in the center of the cake, while the edges stay tender and soft.
It holds up beautifully over several days, which makes it perfect for making ahead of time for birthdays, holidays, potlucks, or any gathering where you want to wow people without stressing yourself out the day of.
- Triple coconut flavor from shredded coconut, cream of coconut, and coconut frosting
- Ultra-moist, almost pudding-like texture thanks to the cream of coconut soak
- Simple enough for beginner bakers with stunning, bakery-worthy results
- Feeds a crowd and gets better as it sits in the refrigerator
- Naturally festive and beautiful with its snowy white coconut coating
- Perfect make-ahead dessert for parties, holidays, and celebrations
If you love coconut-based desserts, you’ll also want to check out this Coconut Pie with Cream of Coconut for another incredibly easy and deeply satisfying treat.
Ingredients
Everything you need for this cake is straightforward to find, with cream of coconut being the one specialty ingredient that makes all the difference. Make sure you’re using cream of coconut (like Coco Lopez or Coco Real) and not coconut cream, which is unsweetened and a completely different product.
- 2 1/2 cups (315g) all-purpose flour
- 2 teaspoons baking powder
- 1/2 teaspoon baking soda
- 1/2 teaspoon salt
- 1 cup (225g) unsalted butter, softened to room temperature
- 1 3/4 cups (350g) granulated sugar
- 4 large eggs, at room temperature
- 1 teaspoon pure vanilla extract
- 1 teaspoon coconut extract
- 1 cup (240ml) full-fat sour cream, at room temperature
- 1/2 cup (120ml) whole milk, at room temperature
- 1 cup (80g) sweetened shredded coconut (for the batter)
For the Cream of Coconut Soak:
- 1 can (15 oz / 425ml) cream of coconut (such as Coco Lopez or Coco Real)
For the Whipped Cream Frosting:
- 3 cups (720ml) heavy whipping cream, very cold
- 1/2 cup (60g) powdered sugar
- 1 teaspoon pure vanilla extract
For Finishing:
- 2 to 3 cups (160 to 240g) sweetened shredded coconut, for coating
You might also love this Tres Leches Cake, another beautifully soaked, moist cake that follows a similar soak-and-frost philosophy.
Kitchen Equipment Needed
Having the right equipment on hand will make the process smooth and enjoyable. None of these items are exotic, but a few make a real difference in getting the best possible results.
- Two 9-inch (23cm) round cake pans
- Stand mixer or electric hand mixer
- Large mixing bowl
- Medium mixing bowl
- Whisk
- Rubber spatula
- Wooden skewer or cake tester
- Offset spatula or regular butter knife for frosting
- Wire cooling rack
- Small saucepan or microwave-safe bowl (for warming cream of coconut if needed)
- Parchment paper
- Cake turntable (optional but helpful for frosting)
- Measuring cups and spoons
Read Also: Classic Vanilla Cake Recipe
Recommended Products for This Recipe
These are products that genuinely elevate this cake, chosen for quality, performance, and the difference they make in the final result.
1. Coco Lopez Cream of Coconut
Coco Lopez is the gold-standard brand for cream of coconut, widely used by professional bakers and bartenders alike. Its thick, ultra-sweet coconut flavor is exactly what you need to create that legendary soaked texture in this cake. Using a quality cream of coconut is the single most important ingredient decision in this entire recipe.
2. Nordic Ware Naturals 9-Inch Round Cake Pans
These pans heat evenly, release cleanly, and have a thick aluminum construction that prevents hot spots and uneven baking. Consistent, even heat distribution means your cake layers come out flat and perfectly risen every time, which makes assembling and frosting so much easier.
3. Rodelle Pure Coconut Extract
Pure coconut extract (as opposed to artificial) adds a beautifully authentic coconut aroma and flavor to the batter without any chemical aftertaste. A good coconut extract paired with the cream of coconut soak creates an incredibly layered coconut profile throughout the cake.
4. KitchenAid Classic Stand Mixer
Creaming butter and sugar properly is one of the most important steps in this recipe. A stand mixer makes it effortless, ensuring you get the light, fluffy texture that creates a tender crumb. It also whips the heavy cream frosting to perfect stiff peaks without overworking it.
5. Ateco Offset Spatula
An offset spatula makes frosting a layered cake smooth and manageable, even for beginners. The angled blade gives you control and distance from the surface, making it easy to apply frosting evenly and create that gorgeous coconut-coated finish without messing up the layers.
You might also enjoy: Classic Pineapple Upside Down Cake
Step-by-Step Instructions
1. Prepare Your Pans and Oven
- Preheat your oven to 350°F (175°C). It’s important to let the oven fully preheat before the batter goes in, so give it at least 20 minutes.
- Grease two 9-inch (23cm) round cake pans generously with softened butter or non-stick baking spray, making sure to coat the sides and the bottom thoroughly.
- Cut two circles of parchment paper to fit the bottom of each pan. Press them in firmly so they lie flat. Grease the parchment as well for extra insurance against sticking.
- Lightly dust the greased pans with flour, then tap out any excess. This triple-layer protection (grease, parchment, flour) guarantees your cake layers will release cleanly every time.
2. Mix the Dry Ingredients
- In a medium mixing bowl, add 2 1/2 cups (315g) of all-purpose flour, 2 teaspoons of baking powder, 1/2 teaspoon of baking soda, and 1/2 teaspoon of salt.
- Whisk the dry ingredients together thoroughly for about 30 seconds until everything is evenly combined. Whisking rather than stirring distributes the leavening agents more uniformly, which gives you a more even rise.
- Set the dry ingredient bowl aside while you prepare the wet ingredients.
3. Cream the Butter and Sugar
- In the bowl of a stand mixer fitted with the paddle attachment (or in a large bowl using a hand mixer), add 1 cup (225g) of room-temperature unsalted butter and 1 3/4 cups (350g) of granulated sugar.
- Beat on medium-high speed for 4 to 5 full minutes. The mixture should become noticeably lighter in color, almost ivory, and very fluffy. Don’t rush this step. Proper creaming incorporates air into the batter, which is what gives the cake its tender, light crumb.
- Stop the mixer and scrape down the sides and bottom of the bowl with a rubber spatula to make sure no butter or sugar is hiding around the edges.
4. Add the Eggs and Extracts
- With the mixer on medium-low speed, add the 4 large eggs one at a time, waiting until each egg is fully incorporated before adding the next. This slow addition prevents the batter from curdling.
- Add 1 teaspoon of pure vanilla extract and 1 teaspoon of coconut extract after the last egg is incorporated.
- Beat for another 30 seconds until the mixture is smooth and uniform.
- Stop the mixer and scrape down the bowl once more.
5. Combine Sour Cream and Milk
- In a small bowl or measuring cup, whisk together 1 cup (240ml) of room-temperature full-fat sour cream and 1/2 cup (120ml) of room-temperature whole milk until smooth.
- Using room-temperature dairy is important here. Cold sour cream or cold milk can cause the batter to seize or look curdled, which affects the final texture of the cake.
6. Add the Dry Ingredients and Sour Cream Mixture Alternately
- With the mixer on its lowest speed, add about one-third of the dry ingredient mixture to the butter mixture. Mix just until the flour disappears into the batter.
- Add half of the sour cream-milk mixture and mix on low until just combined.
- Add another third of the dry ingredients, mix briefly, then add the remaining sour cream-milk mixture, and finally the last third of the dry ingredients.
- Mix on low speed only until just combined after the final addition. Overmixing at this stage develops gluten and makes the cake tough. A few small streaks of flour are fine; they’ll incorporate during folding.
7. Fold in the Shredded Coconut
- Using a rubber spatula, fold 1 cup (80g) of sweetened shredded coconut into the batter by hand. Use gentle, sweeping motions from the bottom of the bowl upward.
- Fold only until the coconut is evenly distributed and no flour streaks remain. Do not stir vigorously.
8. Divide the Batter and Bake
- Divide the batter evenly between the two prepared cake pans. Use a kitchen scale if you have one for perfectly even layers. Without a scale, use a large spoon to alternate scoops between the pans and eyeball the levels.
- Smooth the tops of the batter gently with an offset spatula or the back of a spoon.
- Place both pans on the center rack of the preheated oven, leaving a couple of inches between them for air circulation.
- Bake at 350°F (175°C) for 28 to 34 minutes. Start checking at 28 minutes. The cakes are done when the tops are golden, the edges are pulling slightly away from the pan, and a toothpick or cake tester inserted into the center comes out with just a few moist crumbs (not wet batter).
9. Soak the Warm Cakes with Cream of Coconut
- Remove the cakes from the oven and let them cool in the pans on a wire rack for exactly 10 minutes. You want them still quite warm for this step.
- While the cakes cool briefly, open the can of cream of coconut and stir it well if it has separated. If it’s very thick, warm it slightly in a saucepan over low heat or in a microwave for 20 to 30 seconds until pourable.
- Use a wooden skewer or the handle of a thin spoon to poke holes all over the surface of each cake layer. Make holes about every 1/2 inch (1.25cm), going nearly all the way through but not completely through to the bottom.
- Slowly pour roughly half of the cream of coconut over each cake layer, allowing it to pool in the holes and absorb into the cake. Don’t rush this step. Pour it slowly so the cake can absorb it rather than pooling on the surface.
- Allow the cakes to cool completely in the pans, which takes about 1 hour. During this time they’ll continue to absorb the cream of coconut.
10. Remove the Cakes from the Pans
- Once completely cool, run a thin knife or offset spatula carefully around the inner edge of each pan to loosen the sides.
- Place a wire rack or a flat plate over the top of the pan, then flip it over so the cake releases onto the rack or plate.
- Peel off the parchment paper gently.
- If stacking the layers immediately, let the cakes rest for another 15 to 20 minutes until fully at room temperature. For best results, wrap each layer in plastic wrap and refrigerate them for at least 1 hour, or overnight. Cold layers are much firmer and easier to frost without sliding.
11. Make the Whipped Cream Frosting
- Pour 3 cups (720ml) of very cold heavy whipping cream into a clean, chilled mixing bowl. Cold cream whips faster and holds its shape better. If your kitchen is warm, refrigerate the bowl and whisk attachment for 15 minutes before starting.
- Add 1/2 cup (60g) of powdered sugar and 1 teaspoon of pure vanilla extract to the cream.
- Beat on medium speed until soft peaks form, then increase to medium-high and continue beating until stiff peaks form. Stiff peaks mean the cream holds its shape firmly when you lift the whisk. Stop as soon as stiff peaks form to avoid over-whipping, which will make the cream grainy or buttery.
12. Assemble and Frost the Cake
- Place one cake layer on your serving plate or cake stand, flat side up.
- Spread a generous layer of whipped cream frosting over the top surface of the first layer, using about one-quarter of the total frosting. Spread it evenly all the way to the edges.
- Carefully place the second cake layer on top, flat side down (this gives you a flat, even top). Press gently to set it in place.
- Apply the remaining whipped cream frosting to the top and sides of the cake using an offset spatula. Work in long, even strokes to cover the entire surface. It doesn’t need to be perfectly smooth. A slightly rustic finish looks beautiful under the coconut coating.
13. Coat the Cake in Shredded Coconut
- Working over a baking sheet or a large piece of parchment to catch the coconut that falls, take handfuls of 2 to 3 cups (160 to 240g) of sweetened shredded coconut and press it firmly onto the sides and top of the frosted cake.
- Press the coconut gently so it adheres to the whipped cream frosting all the way around.
- Fill in any bare spots and press additional coconut as needed until the entire cake is coated.
- Refrigerate the finished cake for at least 2 hours before slicing for the cleanest cuts and best texture.
Read Also: Rum Cake Recipe with Cake Mix
Tips for Success
A few simple adjustments make the difference between a good cake and a truly exceptional one. These tips come directly from making this recipe multiple times and learning what really moves the needle.
- Use room-temperature ingredients for the batter. Cold butter, eggs, milk, or sour cream can cause the batter to look curdled or mix unevenly, which affects the final crumb. Take everything out of the fridge 45 to 60 minutes before you start baking.
- Don’t skip the cream of coconut soak on warm cakes. The warm cake is porous and absorbs the liquid far more effectively than a cool one. If you wait too long, the liquid will just sit on top rather than soaking in.
- Refrigerate your cake layers before frosting. Even 1 hour in the fridge firms up the layers and the soaked interior, making the cake much more stable and easier to assemble cleanly.
- Use very cold heavy cream for the frosting. If your cream isn’t cold enough, it won’t whip properly and may not hold stiff peaks. Chill your bowl and beaters if needed.
- Coat the cake in coconut right after frosting. The whipped cream is stickiest and most adhesive immediately after spreading. Don’t wait to add the coconut or it won’t stick as well.
This technique pairs beautifully with the same patient, layer-building approach used in Carrot Cake with Cream Cheese Frosting.
Serving Suggestions
This coconut cake is rich, festive, and generous in flavor, which means it pairs best with lighter accompaniments that let the coconut character really shine.
A slice served with a bowl of fresh tropical fruit like mango, pineapple, and papaya is an absolutely gorgeous pairing. The brightness of fresh fruit cuts through the richness of the cake beautifully.
For drinks, this cake goes wonderfully with a hot cup of black coffee or a strong cup of tea, both of which contrast the sweetness nicely. If you’re serving it at a party, a chilled coconut water or even a Classic Piña Colada alongside it turns dessert into a full tropical moment.
- Fresh tropical fruit salad with mango, kiwi, and pineapple
- A pot of hot black coffee or jasmine tea
- A scoop of vanilla bean ice cream alongside a warm slice
- Whipped cream and toasted coconut flakes as a garnish for individual slices
- Coconut water or a refreshing pineapple punch for a tropical party spread
Variations to Try
Once you’ve made the classic version, there are some wonderful ways to change things up and keep this cake feeling fresh no matter how many times you make it.
The base recipe is incredibly versatile and adapts well to different flavors, formats, and presentations. These variations maintain the same cream of coconut soak method but spin the flavor profile in exciting new directions.
- Lime Coconut Cake: Add the zest of 2 limes and 1 tablespoon of fresh lime juice to the batter. Add lime zest to the frosting as well. The citrus cuts through the sweetness and makes the whole cake taste more vibrant and tropical.
- Toasted Coconut Variation: Toast the 2 to 3 cups of coconut for the exterior coating in a 325°F (165°C) oven for 5 to 8 minutes until golden brown. Toasted coconut adds a nuttier, more complex flavor to the finished cake.
- Chocolate Coconut Cake: Use the same cream of coconut soak but layer the whipped cream frosting with chocolate ganache between the layers for a stunning flavor combination.
- Pineapple Coconut Cake: Add 1/2 cup (120ml) of crushed pineapple (well-drained) to the batter for a piña colada-inspired twist that pairs perfectly with the cream of coconut soak.
- Coconut Cupcakes: Divide the same batter into 24 lined cupcake wells and bake at 350°F (175°C) for 18 to 22 minutes. Poke holes in the warm cupcakes, drizzle cream of coconut over each one, and frost once cool.
You might also love: Easy Chocolate Cake
Storage and Reheating
Proper storage keeps this cake tasting fresh and moist for several days, and the good news is that it actually improves the longer it sits as the cream of coconut continues to meld into the crumb.
Because of the whipped cream frosting, this cake must be stored in the refrigerator. Keep it well-covered to prevent the coconut exterior and frosting from picking up fridge odors.
- Refrigerator: Store the finished cake covered loosely with plastic wrap or in a large cake carrier for up to 4 days. The cake is actually best on day 2 and day 3 as the soak has had more time to settle.
- Freezing unfrosted layers: You can freeze the soaked and cooled cake layers individually. Wrap each one tightly in two layers of plastic wrap, then in aluminum foil, and freeze for up to 2 months. Thaw overnight in the refrigerator before frosting.
- Freezing frosted slices: Individual slices can be frozen on a parchment-lined baking sheet until firm, then wrapped tightly and stored in a freezer-safe container for up to 1 month.
- Reheating: This cake is best served cold or at room temperature. If you’d like it slightly warmer, a 10-second burst in the microwave softens the crumb nicely without melting the frosting too much.
Read Also: Moist Chocolate Cake Recipe
Nutritional Facts
The following values are estimates per serving, based on 12 servings from a standard two-layer 9-inch cake. Actual values will vary depending on specific brands used.
| Nutrient | Per Serving (1 slice) |
|---|---|
| Calories | Approx. 610 kcal |
| Total Fat | 36g |
| Saturated Fat | 24g |
| Cholesterol | 140mg |
| Sodium | 220mg |
| Total Carbohydrates | 68g |
| Dietary Fiber | 2g |
| Sugars | 50g |
| Protein | 6g |
This cake is a treat, and like all celebratory desserts it’s meant to be savored on special occasions rather than as an everyday food. The cream of coconut and heavy cream contribute significantly to the fat and sugar content, but they also deliver that extraordinary texture and flavor that makes this cake worth every bite.
Another favorite: Boston Cream Pie
Health Benefits of Key Ingredients
While this is certainly an indulgent dessert, a few of its key ingredients do carry some genuine nutritional and functional benefits worth knowing about.
Coconut contains medium-chain triglycerides (MCTs), a type of fat that is metabolized differently than long-chain fats and may provide a quick source of energy. While the amounts in this cake are not medicinal doses, coconut does bring more than just flavor to the table.
Eggs are one of the most nutritionally complete foods available, providing high-quality complete protein, choline for brain health, and fat-soluble vitamins including A, D, and E. They also play a critical structural role in the cake, providing lift, richness, and binding.
- Coconut (shredded and cream of coconut): Contains MCTs, manganese, and copper; provides intense tropical flavor and moisture
- Eggs: High-quality complete protein, choline, vitamins A, D, and E; essential for structure and richness
- Butter: Source of fat-soluble vitamins A, E, and K2; contributes to the tender, rich crumb
- Sour cream: Provides probiotics, calcium, and phosphorus; adds tangy richness and moisture to the batter
- Heavy cream (frosting): Source of fat-soluble vitamins; creates the stable, luscious whipped topping
This cake is a wonderful treat for coconut lovers, and knowing that coconut itself brings some real nutritional merit makes it even more enjoyable to share.
You might also enjoy: Best Carrot Cake Recipe
Frequently Asked Questions
1. What is cream of coconut and where can I find it?
Cream of coconut is a sweetened, thick coconut product made from coconut flesh and sugar. It’s typically found in the cocktail mixers aisle at most grocery stores, often near the piña colada mixes and tropical drink ingredients. Popular brands include Coco Lopez and Coco Real.
It is not the same as coconut cream, which is unsweetened, or coconut milk, which is thinner. Using cream of coconut in this recipe is essential because the sweetness is built in and the thick texture is what gives the cake that signature moistness.
2. Can I use coconut milk instead of cream of coconut for the soak?
Coconut milk can be used in a pinch, but the results will be noticeably different. Cream of coconut is much thicker and much sweeter, which gives the soaked cake layers their signature dense, pudding-like moisture.
If you use unsweetened coconut milk, the soak will still add coconut flavor and moisture, but you’ll want to stir in 1/2 cup (100g) of sugar and reduce it slightly in a saucepan to concentrate the flavor before pouring it over the cake.
3. Can I make this cake ahead of time?
Yes, and in fact this cake genuinely improves after a day in the refrigerator. The cream of coconut soak continues to absorb and meld into the crumb overnight, creating an even more moist and flavorful result on day two.
You can bake and soak the layers up to 2 days in advance, wrapping them tightly in plastic wrap and refrigerating them. Frost and coat the cake with coconut the day before or the day of serving for the freshest frosting texture.
4. My cream of coconut is very thick and solid in the can. What should I do?
Cream of coconut often separates and solidifies, especially in cooler temperatures. This is completely normal and doesn’t affect quality.
Simply stir it vigorously in the can, or transfer it to a small saucepan and warm it over low heat, stirring constantly until it becomes smooth and pourable. Alternatively, microwave it in a bowl in 20-second intervals, stirring between each, until it’s uniformly liquid.
5. Can I make this into a sheet cake or a bundt cake instead of layers?
Absolutely. For a sheet cake, pour all the batter into a greased and parchment-lined 9×13 inch (23x33cm) baking pan and bake at 350°F (175°C) for 30 to 38 minutes. Poke holes and soak with cream of coconut while warm, then frost once cool.
For a bundt cake, pour the batter into a well-greased and floured bundt pan and bake at 350°F (175°C) for 45 to 55 minutes. Once cool, drizzle the cream of coconut over the top and allow it to seep down into the cake before finishing with a simple powdered sugar glaze or the whipped cream frosting.
Read Also: Checkerboard Cake Recipe
Final Thoughts
This coconut cake with cream of coconut recipe is the kind of dessert that earns a permanent spot in your baking rotation. It’s approachable enough for a weeknight baking project and beautiful enough to be the centerpiece at a birthday party, Easter brunch, or summer celebration.
The cream of coconut soak is what truly sets this cake apart from any other coconut cake you’ve tried before. Once you taste how it transforms the texture into something almost impossibly moist and flavorful, you’ll understand why this method has such a devoted following.
Give this recipe a try, and I truly hope it brings as much joy to your table as it does to mine. If you make it, I’d love to hear how it turned out. Leave a comment below with your experience, any tweaks you made, or share a photo. Your feedback makes this little corner of the internet so much better!
Recommended:
- Coconut Pie with Cream of Coconut
- Tres Leches Cake
- Easy Carrot Cake with Cake Mix
- Pudding Cake with Cake Mix
- Easy Vanilla Cake
- Pumpkin Roll
- Easy Pina Colada
- Cannoli Poke Cake
- Fruit Tart
- Eggnog Cake


