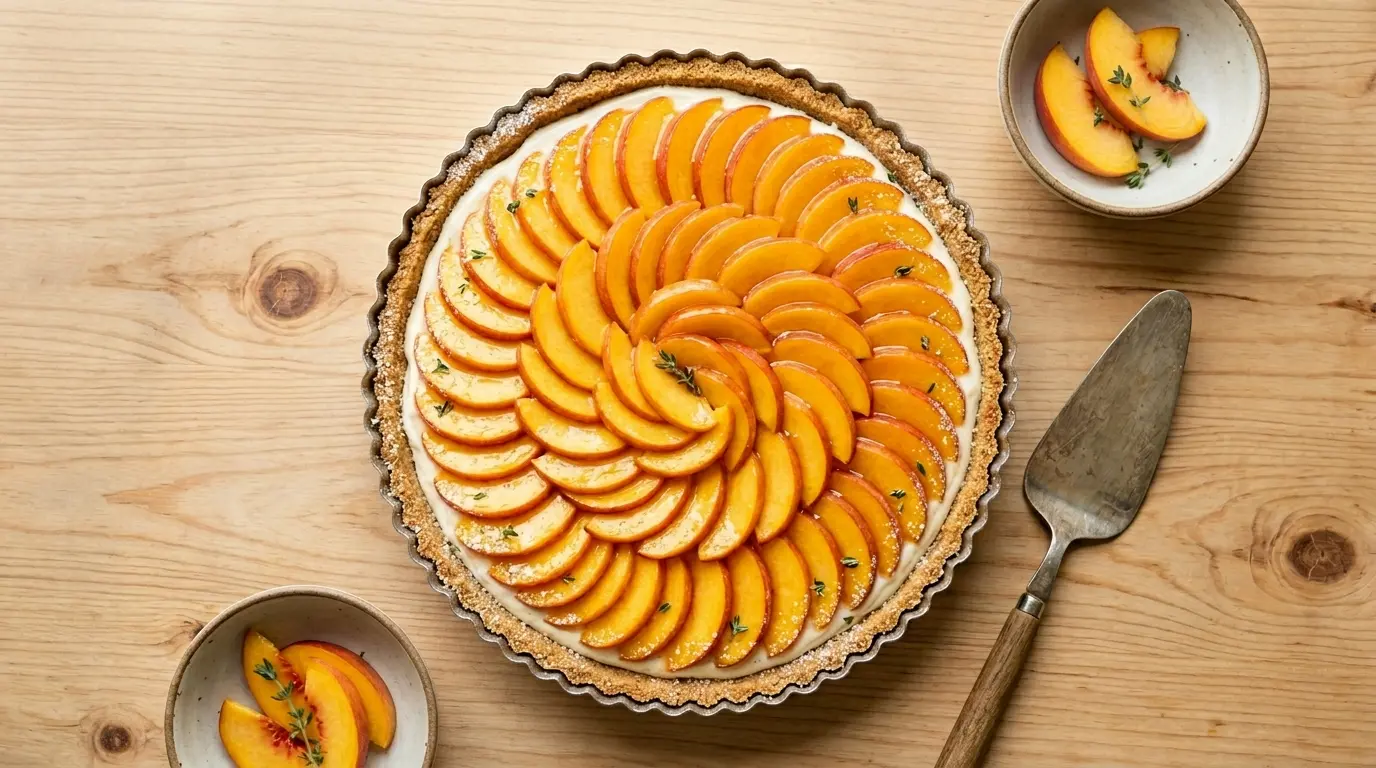
Summer desserts have a way of calling you toward the kitchen, but that doesn’t mean you have to turn on the oven. This no-bake peach tart recipe is proof that some of the most stunning desserts require zero heat and very little effort.
It starts with a buttery graham cracker crust, pressed right into the pan and chilled until firm. Then comes a silky cream cheese and whipped cream filling that sets beautifully in the fridge. The whole thing gets crowned with luscious fresh peach slices and a shimmering apricot glaze, making it look like it came straight from a patisserie window.
The flavor is bright and fresh, with a gentle tang from the cream cheese that balances the natural sweetness of ripe summer peaches. You get crunch, creaminess, and fruit in every single bite.
Best of all, you only need about 30 minutes of active prep time. The rest is just waiting for it to chill, and that wait is very much worth it.
If you love peach desserts, you’ll also want to check out this gorgeous Peach Tart with Puff Pastry for another stunning centerpiece dessert.

Why You’ll Love This No-Bake Peach Tart Recipe
This is one of those recipes that works for almost every occasion, from a casual summer cookout to a dinner party where you want to impress without the stress.
No oven means no overheated kitchen, no watching the clock, and no guessing if something is done. That’s a win when temperatures outside are already climbing.
The graham cracker base comes together in minutes and sets up perfectly crisp after chilling. It holds the filling without crumbling apart when you slice it, which makes serving tidy and easy.
The cream cheese filling is rich and creamy but not heavy. Folding in freshly whipped cream gives it an airy, mousse-like texture that melts in your mouth.
Fresh peaches are the star here. When they’re in season, their perfume and natural sweetness need almost nothing added to shine.
The apricot glaze does double duty: it makes the tart look polished and professional, and it adds a subtle fruity depth that enhances every bite.
- No oven required, making it perfect for hot summer days
- Ready to serve after a few hours of chilling
- Stunning presentation with very little effort
- Made with fresh seasonal peaches at their peak flavor
- A crowd-pleasing dessert that travels well
- Easily adaptable for gluten-free or lighter versions
You might also enjoy: Strawberry Peach Tart
Ingredients
This tart uses simple, widely available ingredients that come together into something that feels genuinely special. Use the ripest, most fragrant peaches you can find as they are the heart of the whole dessert. The brown sugar in the crust adds a hint of molasses depth that plain white sugar just cannot replicate.
For the Graham Cracker Crust:
- 2 cups (200g) graham cracker crumbs (about 14-16 full crackers, finely crushed)
- 3 tablespoons (38g) packed light brown sugar
- 1/4 teaspoon fine salt
- 6 tablespoons (85g) unsalted butter, melted
For the Cream Cheese Filling:
- 8 oz (226g) full-fat cream cheese, softened to room temperature
- 1/2 cup (60g) powdered sugar (confectioners’ sugar), sifted
- 1 teaspoon pure vanilla extract
- 1 tablespoon fresh lemon juice
- 1 cup (240ml) heavy whipping cream, cold
For the Peach Topping:
- 4-5 large ripe fresh peaches (about 1.5 lbs / 680g total)
- 1/3 cup (100g) apricot preserves or apricot jam
- 1 tablespoon water
- Optional: fresh mint leaves for garnish
Read Also: Peach Tart Recipe
Kitchen Equipment Needed
Having the right tools makes the whole process smoother and ensures you get clean, professional-looking slices every time. A removable-bottom tart pan is non-negotiable here as it is the key to lifting the tart out cleanly without it collapsing.
- 9-inch or 10-inch tart pan with removable bottom
- Stand mixer or hand electric mixer
- Large mixing bowls (at least 2)
- Food processor or zip-lock bag and rolling pin for crushing crackers
- Rubber spatula
- Pastry brush for the apricot glaze
- Sharp chef’s knife and cutting board for slicing peaches
- Small saucepan or microwave-safe bowl for warming the glaze
- Rimmed baking sheet (to place under the tart pan for easy transport)
- Plastic wrap or tart pan lid for chilling
This pairs wonderfully with our Peach Galette Recipe if you want to make a full stone fruit dessert spread.
Recommended Products for This Recipe
These are products I genuinely recommend based on quality and how much they improve the final result. Each one addresses a common pain point in no-bake tart making.
1. Emile Henry 9-Inch Tart Dish
A high-quality ceramic tart dish delivers even chilling across the crust, meaning your base sets uniformly firm from edge to center. The beautiful fluted edges mean your tart looks elegant straight from the pan, no fussing needed. It is a piece that goes from the fridge to the table without a second thought.
2. KitchenAid 5-Speed Hand Mixer
Beating cold heavy cream to stiff peaks and then whipping cream cheese to a fluffy, lump-free consistency is so much easier with a reliable hand mixer. The KitchenAid model gives you precise speed control so you don’t overmix the cream. It is compact, easy to clean, and handles both tasks perfectly.
3. Bonne Maman Apricot Preserves
The glaze is what takes this tart from homemade to patisserie-level, and the quality of the preserves matters more than you might think. Bonne Maman uses a high fruit-to-sugar ratio, giving you a glaze with real apricot flavor rather than just sweetness. The result is a glossy finish that tastes as good as it looks.
4. OXO Good Grips Pastry Brush
Applying the warm apricot glaze evenly over delicate peach slices without disturbing their arrangement calls for a soft, flexible brush. The OXO silicone bristles hold just the right amount of glaze and release it smoothly, giving you that mirror-like shine. It is also dishwasher-safe, which is always a plus.
5. Microplane Premium Zester
A touch of fresh lemon zest stirred into the cream cheese filling makes a noticeable difference in brightness and balance. A quality Microplane zester removes only the flavorful outer zest, with no bitter white pith. It takes seconds and the flavor payoff is significant.
The classic Peach Pie Recipe is another wonderful way to put seasonal peaches to use if you want a traditional baked option.

Step-by-Step Instructions
1. Prepare Your Tart Pan
- Place your 9-inch or 10-inch tart pan with a removable bottom on a rimmed baking sheet. This makes it easy to move in and out of the refrigerator without the bottom of the pan dropping out accidentally.
- Lightly spray the inside of the tart pan with non-stick cooking spray, then wipe away any excess with a paper towel. This step is optional but does help the crust release more cleanly later.
2. Make the Graham Cracker Crust
- Add your graham crackers to a food processor and pulse until you have fine, even crumbs with no large chunks remaining. Alternatively, place the crackers in a sealed zip-lock bag and use a rolling pin to crush them thoroughly. You need 2 cups (200g) of fine crumbs.
- Transfer the crumbs to a medium mixing bowl. Add the 3 tablespoons (38g) of packed light brown sugar and 1/4 teaspoon of fine salt, then stir well to combine.
- Pour in the 6 tablespoons (85g) of melted unsalted butter. Stir everything together until every crumb is evenly moistened and the mixture looks like wet sand. When you press a small pinch of it between your fingers, it should hold together.
- Tip the crumb mixture into your prepared tart pan. Use the flat base of a measuring cup or a dry measuring cup to press the crumbs firmly and evenly across the bottom. Then use your fingers to press the mixture up the fluted sides of the pan, making the sides about the same thickness as the base, roughly 1/4 inch (0.6cm) thick.
- Place the pan (still on the baking sheet) in the refrigerator and chill for at least 30 minutes. This allows the butter to firm up and the crust to set properly.
3. Whip the Heavy Cream
- Pour 1 cup (240ml) of cold heavy whipping cream into a clean, chilled mixing bowl. Using your hand mixer or stand mixer fitted with the whisk attachment, beat the cream on medium-high speed until stiff peaks form. This means the cream holds its shape when you lift the beater and the peaks don’t droop or curl.
- Be careful not to overbeat the cream. Stop as soon as you have stiff peaks. Set the whipped cream aside in the refrigerator while you prepare the cream cheese base.
4. Make the Cream Cheese Filling
- In a separate large mixing bowl, beat the 8 oz (226g) of room-temperature cream cheese on medium speed until completely smooth and fluffy, about 2 minutes. Scrape down the sides of the bowl frequently to make sure no lumps remain.
- Add the 1/2 cup (60g) of sifted powdered sugar, 1 teaspoon of pure vanilla extract, and 1 tablespoon of fresh lemon juice. Beat again on medium speed until everything is fully incorporated and the mixture is light and creamy, about 1 more minute.
- Remove the bowl of whipped cream from the refrigerator. Using a rubber spatula, gently fold the whipped cream into the cream cheese mixture in two or three additions. Use slow, sweeping fold motions from the bottom of the bowl up and over the top. Do not stir vigorously, as this will deflate the whipped cream. Continue until no white streaks remain and the filling is evenly fluffy.
5. Fill the Chilled Crust
- Remove the chilled crust from the refrigerator. Spoon the cream cheese filling into the crust and spread it into an even, smooth layer using your rubber spatula. Pay attention to the edges, making sure the filling reaches all the way to the sides of the crust.
- Place the filled tart back in the refrigerator and chill for at least 2 hours, or up to overnight. The longer it chills, the firmer and more stable the filling will be, giving you cleaner slices.
6. Prepare the Fresh Peaches
- Just before you are ready to top the tart and serve, wash and dry your peaches. You do not need to peel them if the skin is thin and the peaches are very ripe. For the cleanest look and texture, however, you can peel them by scoring an X in the bottom of each peach, blanching in boiling water for 30 seconds, then transferring to ice water. The skin will slip off easily.
- Cut each peach in half and remove the pit. Place the cut side down on the cutting board and slice each half into thin, even slices, about 1/4 inch (0.6cm) thick. Try to keep the slices uniform so the arrangement looks neat.
7. Arrange the Peach Slices
- Remove the chilled, filled tart from the refrigerator. Starting from the outside edge, fan out overlapping peach slices in a circular pattern, working your way inward toward the center. Each ring of peach slices should slightly overlap the previous one.
- For the very center, arrange a small cluster of slices fanned out in a rosette shape. Take your time with this step as it is what makes the tart look really beautiful.
8. Make and Apply the Apricot Glaze
- In a small saucepan over low heat (or in a microwave-safe bowl in the microwave in 20-second bursts), warm the 1/3 cup (100g) of apricot preserves together with 1 tablespoon of water. Stir until the preserves are fully melted and liquid. If there are any large pieces of fruit, press them through a fine mesh strainer for a completely smooth glaze.
- Using your pastry brush, gently brush the warm glaze all over the surface of the peach slices. Use light, dabbing strokes rather than dragging to avoid disturbing your arrangement. The glaze gives the tart a beautiful, professional shine and also adds subtle apricot flavor.
- Return the glazed tart to the refrigerator for 15-20 minutes to allow the glaze to set before serving. Garnish with fresh mint leaves if desired.
9. Remove from the Pan and Serve
- When ready to serve, place the tart pan on top of a sturdy can or jar that is slightly smaller than the opening in the bottom of the pan. Gently press down on the outer ring of the pan. It should drop away cleanly, leaving the tart sitting on the removable base.
- Slide a thin offset spatula or wide knife between the crust and the metal base if you want to transfer the tart to a serving plate. Alternatively, serve it directly on the metal base for simplicity.
- Slice the tart with a sharp knife, wiping the blade clean between cuts for neat pieces.
For more inspiration on peach-forward baking, the Blueberry Peach Galette is a beautiful no-fuss option worth bookmarking.
Tips for Success
A few targeted tips will save you from the most common problems and help you nail this tart on the very first try. The biggest secret is patience: don’t rush the chilling times and your tart will hold together beautifully.
- Use room-temperature cream cheese. Cold cream cheese will not beat smooth and will leave lumps in your filling. Take it out of the fridge at least 1 hour before you start.
- Chill your mixing bowl and beaters before whipping the cream. Cold equipment helps the cream whip faster and hold its peaks better. Place them in the freezer for 15 minutes first.
- Don’t skip the crust chilling time. Rushing this step results in a crumbly, unstable base that crumbles when you slice. Give it a full 30 minutes minimum.
- Only top with peaches just before serving (or no more than 2 hours ahead). Fresh peaches release juice over time, which can make the filling soggy and the glaze dissolve.
- Press the crust firmly. A loose crust is the top reason tarts crumble when sliced. Press hard with the back of a measuring cup to compact it well.
- Use the ripest peaches you can find. Under-ripe peaches are hard, lack flavor, and don’t slice cleanly. They should give slightly to gentle pressure and smell sweet and floral.
- Warm the glaze just before applying. If it cools and thickens before you brush it on, it will drag the peaches out of place instead of coating them smoothly.
- Let the finished tart chill after glazing. Even 15 minutes allows the glaze to firm up and the whole dessert to hold its shape when sliced.
Read Also: Mini Peach Tart Recipe
Serving Suggestions
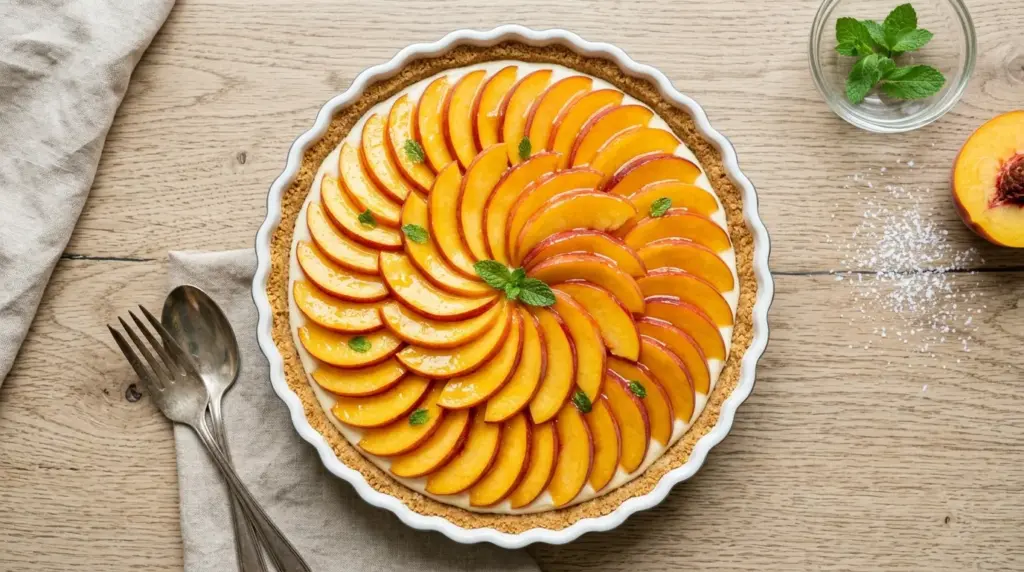
This tart is beautiful on its own, but the right accompaniments take it from a great dessert to a truly memorable one. A simple scoop of vanilla ice cream alongside a slice lets guests enjoy the warm-cold contrast even without any actual baking involved.
Lightly sweetened whipped cream is always the classic choice, since it echoes the filling inside the tart without overpowering the peach topping.
A spoonful of crème fraîche adds a tangy, sophisticated note that works especially well for dinner parties.
A drizzle of local honey over each slice right before serving adds extra sweetness and a beautiful glossy finish.
Fresh mint or lemon verbena leaves make a natural, aromatic garnish that enhances the fresh fruit flavors without competing with them.
- A scoop of quality vanilla ice cream alongside each slice
- Lightly sweetened whipped cream piped or dolloped generously
- Crème fraîche and a little extra lemon zest
- A drizzle of good honey over the finished slices
- A glass of sparkling prosecco or peach bellini alongside
- Fresh mint leaves and a light dusting of powdered sugar
For a full summer spread, serve this alongside a bowl of Fruit Salad loaded with seasonal berries and citrus.
Variations to Try
Once you have the base recipe down, it is fun to play with both the crust and the filling to create new flavor combinations. The cream cheese filling is especially forgiving and takes well to extra flavors, citrus zests, or spices.
- Vanilla Almond Crust: Swap half the graham crackers for almond flour and add 1/4 teaspoon almond extract to the crust mixture for a nutty, fragrant base.
- Mascarpone Filling: Replace half the cream cheese with mascarpone for an even richer, silkier filling with a more pronounced dairy flavor.
- Honey Vanilla Filling: Swap the powdered sugar for 3 tablespoons of good honey and add extra vanilla for a more natural, floral sweetness.
- Peach and Raspberry Tart: Add a layer of fresh raspberries between the filling and the peach slices for a sweet-tart contrast and a beautiful color combination.
- Ginger Spiced Crust: Add 1 teaspoon of ground ginger and 1/4 teaspoon of cinnamon to the graham cracker crumb mixture for a warm, spiced base that pairs beautifully with the peaches.
- Nectarine Version: Swap peaches for ripe nectarines, which have a slightly more tart, firmer flesh and do not require peeling at all.
- Individual Mini Tarts: Divide the crust and filling between 6 individual 4-inch tart pans for elegant single-serving desserts that are easy to plate.
Another great summer variation worth exploring is this Blackberry Peach Galette, which combines two beautiful stone fruits in a freeform pastry.
Storage and Reheating
This tart is best enjoyed the day it is assembled, particularly once the peaches are on top. That said, the components can be prepped ahead of time to make day-of assembly quick and easy.
- Storing the assembled tart: Keep any leftover tart covered with plastic wrap or a domed cake cover in the refrigerator for up to 2 days. Be aware that the peaches will continue to release juice over time, so the filling may soften slightly near the fruit.
- Making ahead: You can prepare the crust and fill it with the cream cheese filling up to 2 days ahead. Cover tightly and refrigerate. Add the peach topping and glaze only on the day of serving.
- Freezing: The filled crust (without peaches) can be tightly wrapped and frozen for up to 1 month. Thaw overnight in the refrigerator, then top with fresh peaches and glaze just before serving.
- Reheating: This is a chilled, no-bake dessert and should not be reheated. Serve directly from the refrigerator, or let it sit at room temperature for 10 minutes before slicing if you prefer a slightly softer filling.
- Transport tips: Keep the tart on the removable base (in the pan ring if possible) and transport it on a flat surface inside a lidded cake carrier. Only add the mint garnish when you arrive at your destination.
Read Also: Peach Crumble Bars Recipe
Nutritional Facts
The values below are approximate and based on the tart being sliced into 8 equal servings. Exact values will vary depending on the size of your peaches, the specific brand of cream cheese and graham crackers you use, and how thick you slice each piece.
| Nutrient | Per Serving (1/8 tart) |
|---|---|
| Calories | ~340 kcal |
| Total Fat | 21g |
| Saturated Fat | 12g |
| Cholesterol | 65mg |
| Sodium | 185mg |
| Total Carbohydrates | 35g |
| Dietary Fiber | 1g |
| Total Sugars | 22g |
| Protein | 4g |
| Vitamin C | 6mg |
| Calcium | 60mg |
These figures include the full graham cracker crust, cream cheese filling, peaches, and glaze. For lighter versions, see the Variations section for substitutions that reduce calories and fat without sacrificing much flavor.
For another lighter fruit-forward dessert, the Peach Crisp Recipe is a wonderful warm option with a naturally lower fat base.
Health Benefits of Key Ingredients
This dessert is a treat, but several of its core ingredients bring genuine nutritional value along with great flavor.
Fresh peaches are genuinely good for you, not just delicious. They are a rich source of vitamin C, which supports immune function and skin health, and they provide beta-carotene, potassium, and dietary fiber.
Peaches also contain antioxidants called polyphenols that have been linked to reduced inflammation. Eating them raw, as in this tart, preserves those heat-sensitive nutrients fully.
Cream cheese contributes calcium and some protein. It is calorie-dense, but in the amounts used per serving here it fits comfortably into a balanced diet as an occasional treat.
Graham crackers, while processed, do provide a small amount of whole grain and fiber depending on the brand. Choosing a whole grain variety bumps up that contribution noticeably.
- Peaches: High in vitamin C, potassium, beta-carotene, and polyphenol antioxidants
- Cream cheese: A source of calcium, phosphorus, and protein
- Heavy cream: Provides fat-soluble vitamins A, D, E, and K
- Lemon juice: Rich in vitamin C and helps preserve the color of sliced peaches
- Apricot preserves: Contain some fiber, potassium, and beta-carotene from the fruit
- Graham crackers: Provide a small amount of whole grain and satisfying crunch with fewer calories than a traditional pastry crust
For more ways to enjoy the nutritional goodness of peaches, the Blueberry Peach Crisp pairs two antioxidant-rich fruits in one dish.
Frequently Asked Questions
1. Can I use canned or frozen peaches instead of fresh?
Yes, you can. If using canned peaches, drain them very thoroughly and pat them dry with paper towels before arranging them on the tart, since excess liquid will make the filling soggy.
If using frozen peaches, thaw them completely, drain off all the liquid, and pat dry. Fresh peaches will always give you the best flavor and texture, but both substitutes work well when fresh peaches are not available.
2. How far in advance can I make this tart?
You can make the graham cracker crust and fill it with the cream cheese mixture up to 2 days ahead of time. Keep it covered and refrigerated until you are ready to serve.
Add the peach topping and apricot glaze no more than 2 hours before serving for the freshest look and texture.
3. My filling came out lumpy. What went wrong?
Lumpy filling almost always happens because the cream cheese was too cold when you started beating it. Cold cream cheese does not blend smoothly and leaves chunks even with extended mixing.
Make sure your cream cheese is genuinely at room temperature (left out for at least 1 full hour) before you begin. Beat it alone for at least 2 minutes before adding the other ingredients.
4. Can I make this tart without a tart pan with a removable bottom?
Yes, you can use a standard 9-inch pie plate. You will not be able to remove the crust from the pan cleanly, so plan to serve slices directly from the pie plate.
A springform pan (the kind used for cheesecakes) also works well as an alternative since the sides release easily.
5. Why does my crust crumble when I slice the tart?
The most common cause is not pressing the crust firmly enough into the pan. Use the flat base of a dry measuring cup to compact the crumbs with real force before chilling.
The second most common cause is insufficient chilling time. The crust needs at least 30 full minutes in the refrigerator before you add the filling, and the filled tart needs at least 2 hours to firm up before you add the peaches and serve.
Read Also: Peach Cobbler Recipe
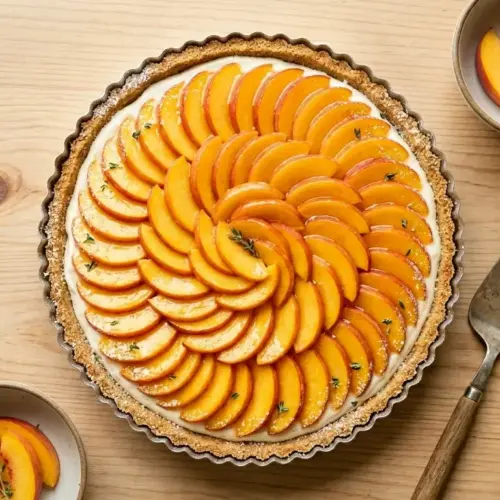
No-Bake Peach Tart

Equipment
- 9-inch or 10-inch tart pan with removable bottom - essential for clean release
- Stand mixer or hand electric mixer
- Large mixing bowls - at least 2
- Food processor - or zip-lock bag and rolling pin for crushing crackers
- Rubber spatula
- Pastry brush - for the apricot glaze
- Sharp chef's knife - for slicing peaches
- Cutting board
- Small saucepan - or microwave-safe bowl for warming the glaze
- Rimmed Baking Sheet - to place under the tart pan for easy transport
- Plastic wrap or tart pan lid - for chilling
Ingredients
- 2 cups graham cracker crumbs - 200g, about 14-16 full crackers, finely crushed
- 3 tablespoons packed light brown sugar - 38g
- 1/4 teaspoon fine salt
- 6 tablespoons unsalted butter - 85g, melted
For the Cream Cheese Filling
- 8 oz full-fat cream cheese - 226g, softened to room temperature
- 1/2 cup powdered sugar - 60g, sifted (confectioners’ sugar)
- 1 teaspoon pure vanilla extract
- 1 tablespoon fresh lemon juice
- 1 cup heavy whipping cream - 240ml, cold
For the Peach Topping
- 4-5 large ripe fresh peaches - about 1.5 lbs / 680g total
- 1/3 cup apricot preserves - 100g (or apricot jam)
- 1 tablespoon water
- fresh mint leaves - optional, for garnish
Serving Suggestions (Optional)
- vanilla ice cream - for serving
- lightly sweetened whipped cream - for serving
- crème fraîche - and extra lemon zest, for serving
- good honey - for drizzling over finished slices
Instructions
- Place your tart pan on a rimmed baking sheet. Lightly spray the inside with non-stick cooking spray and wipe away any excess.
- Pulse graham crackers in a food processor until you have fine, even crumbs (2 cups / 200g). Alternatively, crush them in a sealed zip-lock bag with a rolling pin.
- In a bowl, combine the crumbs with brown sugar and salt. Pour in melted butter and stir until the mixture holds together when pressed.
- Press the crumb mixture firmly into the bottom and up the sides of the tart pan. Chill in the refrigerator for at least 30 minutes to set.
- Beat cold heavy cream with a mixer on medium-high until stiff peaks form. Set aside in the refrigerator.
- In a separate bowl, beat room-temperature cream cheese until smooth and fluffy. Add powdered sugar, vanilla, and lemon juice, and beat until creamy.
- Gently fold the whipped cream into the cream cheese mixture in two or three additions using a rubber spatula until no streaks remain.
- Spoon the filling into the chilled crust and smooth it into an even layer. Chill for at least 2 hours, or up to overnight.
- Wash and dry the peaches. Slice them into thin, even slices about 1/4 inch (0.6cm) thick. You can peel them if desired.
- Remove the chilled tart from the fridge. Arrange overlapping peach slices in a circular pattern starting from the outside edge, working toward the center.
- Warm apricot preserves with water in a small saucepan or microwave until melted and smooth. Strain if you prefer a completely smooth glaze.
- Brush the warm glaze gently over the peach slices using light, dabbing strokes. Chill for 15-20 minutes to set the glaze.
- To serve, place the tart pan on a can slightly smaller than the bottom opening. Press down on the outer ring to release. Transfer to a serving plate if desired.
Notes
- Room temperature cream cheese: Make sure your cream cheese is fully softened (left out for at least 1 hour) to avoid a lumpy filling.
- Chill your equipment: Place your mixing bowl and beaters in the freezer for 15 minutes before whipping the cream for best results.
- Don’t rush the crust: Chill the crust for a full 30 minutes minimum to ensure it holds together when sliced.
- Top just before serving: Add the fresh peaches and glaze no more than 2 hours before serving to prevent soggy filling and dissolving glaze.
- Press firmly: Use the flat base of a measuring cup to compact the crust well – this is key to neat slices.
- Choose ripe peaches: Use the ripest, most fragrant peaches you can find. They should give slightly to gentle pressure and smell sweet.
- Warm glaze: Apply the glaze while it’s still warm. If it cools and thickens, it will drag the peaches out of place.
- Make ahead: You can prepare the crust and filling up to 2 days ahead. Add the peach topping and glaze on the day of serving.
- Peeling peaches: For the cleanest look, score an X in the bottom of each peach, blanch in boiling water for 30 seconds, then transfer to ice water – the skin will slip off easily.
- Freezing: The filled crust (without peaches) can be tightly wrapped and frozen for up to 1 month. Thaw overnight in the refrigerator before topping.
Final Thoughts
This no-bake peach tart recipe is one of those summer staples that never gets old. It is easy enough for a weeknight treat but impressive enough for a dinner party centerpiece.
Every time you make it you will find a new little tweak, a different peach variety to try, a new spice in the crust, or a swirl of honey through the filling. That is the beauty of a simple, well-built recipe.
I hope you give it a go this peach season. When you do, drop a comment below and let me know how it turned out! Did you try any of the variations? Share a photo and tell me all about it.
Recommended:
- Peach Tarte Tatin
- Peach Galette with Puff Pastry
- Peach Pie with Frozen Peaches
- Peach Pie with Canned Peaches
- Peach Pie Filling Recipe
- Peach Crumble Pie Recipe
- Peach Crumble Recipe
- Peach Crisp with Frozen Peaches
- Blueberry Peach Crumble Recipe
- Peach Cobbler with Canned Peaches